Simple Wood Joints: Master Basic Techniques for DIY Projects
Woodworking can be both fun and rewarding. Simple wood joints are a great place to start.
In this blog post, we will explore the basics of simple wood joints. These joints are essential for any woodworking project. Understanding them can help you build strong, durable pieces. Whether you are a beginner or have some experience, knowing these joints can improve your skills.
This guide will break down each joint, making it easy to follow. By the end, you will feel more confident in your woodworking abilities. So, grab your tools and let’s dive into the world of simple wood joints!
Introduction To Simple Wood Joints
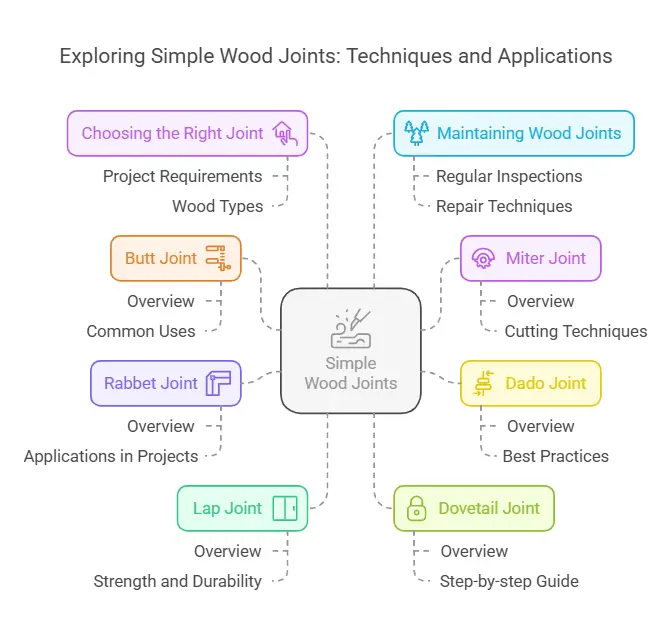
Simple wood joints are basic connections between pieces of wood. They are essential for building sturdy wooden structures. These joints include butt joints, miter joints, and dovetail joints.
Woodworking can be both fun and rewarding. Simple wood joints are the building blocks of many DIY projects. They help connect pieces of wood together. Understanding these joints is key to creating strong and lasting items.
Importance In DIY Projects
Simple wood joints are crucial in DIY projects. They ensure the pieces fit together securely. Good joints mean your project will last longer. They can also improve the overall look of your work. Even basic joints can make a big difference.
Basic Tools Needed
You don’t need many tools to start. A saw is essential for cutting wood. A hammer will help you drive nails. You also need a chisel for carving out joints. A measuring tape ensures your pieces are the right size. Lastly, a clamp holds the wood steady while you work. These tools are easy to find and use.
Woodworking can be enjoyable with the right knowledge and tools. Simple wood joints are a great starting point. They make your projects stronger and more durable. Start small, and soon you’ll see great results.
Butt Joint
When it comes to woodworking, simplicity often gets the job done effectively. One of the most basic yet essential wood joints is the Butt Joint. This joint is easy to make and perfect for beginners. Let’s dive into its details and why it might be your go-to choice for many projects.
Overview
The Butt Joint is the simplest of all wood joints. It involves joining two pieces of wood by merely butting them together, usually at a right angle. Imagine placing one book on top of another and you get the idea. No fancy cuts or angles—just straightforward, head-to-head contact.
This joint is a staple in many woodworking projects because of its simplicity. Even if you are just starting out with woodworking, you will find that creating a butt joint is a breeze. It doesn’t require any special tools, making it accessible for anyone with basic woodworking equipment.
Common Uses
Now, you might be wondering, “Where can I use a Butt Joint?” Well, here are some common applications:
- Simple Frames: Perfect for making basic picture frames or window frames.
- Boxes and Crates: Ideal for constructing straightforward storage boxes or crates.
- Furniture: Commonly used in assembling parts of furniture like tables and chairs, especially when additional reinforcements are applied.
- Shelving: Great for creating shelves, where simplicity and quick assembly are key.
One key point to remember, though, is that while the butt joint is easy to make, it’s not the strongest on its own. For enhanced strength, you might want to use additional fasteners like nails, screws, or even glue. Sometimes, woodworkers use reinforcements like dowels or biscuits to give the joint extra durability. Think of it as giving your joint a little boost—like adding a few extra muscles to an arm.
So, if you are embarking on a woodworking adventure and need a quick, easy, and effective way to join pieces of wood, the butt joint is your friend. It’s simple, versatile, and with a few enhancements, can be quite robust. Why complicate things when simplicity works just fine?
Have you tried making a butt joint yet? If not, grab your tools and give it a go. You might find it’s just what you need for your next project!
Miter Joint
When diving into the world of woodworking, understanding different types of joints is crucial. One of the most common and aesthetically pleasing joints is the Miter Joint. This joint is not only simple but also highly effective in various projects. Let’s explore its intricacies under the following sections.
Overview
The miter joint is formed by cutting two pieces of wood at a 45-degree angle and joining them to form a 90-degree corner. This joint is commonly used in picture frames, boxes, and other projects where a neat, clean look is desired. It’s known for its elegant appearance as the end grain of the wood is hidden, giving a seamless look.
Cutting Techniques
Creating a precise miter joint can be a bit challenging without the right techniques and tools. Here are some methods to achieve a perfect cut:
- Miter Saw: A miter saw is one of the most accurate tools for making miter cuts. It allows you to set the exact angle and make a clean cut.
- Hand Saw and Miter Box: For those who prefer hand tools, a miter box and a fine-toothed hand saw can be used. This method requires a steady hand and some patience.
- Table Saw: A table saw with a miter gauge can also make precise miter cuts. It’s essential to ensure the saw blade is at the correct angle.
When cutting your pieces, remember to:
- Measure twice, cut once. Precision is key.
- Use a sharp blade to avoid tear-out.
- Test fit your pieces before gluing to ensure a snug fit.
In my early woodworking days, I struggled with miter joints. My cuts were often slightly off, leaving gaps. It was frustrating! But with practice and the right tools, my joints are now tight and professional-looking. Don’t get disheartened if your first few attempts aren’t perfect. Remember, practice makes perfect.
So, ready to try out a miter joint in your next project? Whether it’s a picture frame for your favorite photo or a custom-made box, mastering this joint will surely elevate your woodworking skills.

Dado Joint
The dado joint is a classic choice for woodworkers. Simple yet strong, it’s a must-know for any DIY enthusiast. Perfect for making shelves or cabinets, the dado joint offers a snug fit that can hold quite a bit of weight. Let’s dive deeper into what makes the dado joint so special.
Overview
A dado joint is a slot cut into a piece of wood where another piece fits snugly. Think of it as a groove carved into the surface, designed to house another board. It’s typically cut across the grain, creating a perfect resting place for the intersecting wood. The result? A seamless, sturdy connection.
Best Practices
Getting the dado joint right requires some practice and attention to detail. Here are some best practices to keep in mind:
- Measure Twice, Cut Once: Accuracy is key. Double-check your measurements to ensure a perfect fit.
- Use a Dado Blade: A dado blade makes cutting these joints easier and more precise. It’s a worthy investment.
- Test Fit: Before final assembly, test the fit. Make any necessary adjustments to avoid gaps or loose joints.
If you follow these tips, you’ll find the dado joint to be a reliable and versatile option in your woodworking projects. Remember, practice makes perfect. So, don’t be afraid to make a few mistakes and learn from them. After all, every master was once a beginner!
Rabbet Joint
The rabbet joint is a simple yet effective wood joint. It involves cutting a groove along the edge or end of one piece of wood. This groove fits into a corresponding part of another piece. The result is a clean and strong connection. The rabbet joint is common in woodworking for its simplicity and strength.
Overview
The rabbet joint is one of the basic wood joints. It is also known as a rebate joint in some regions. The joint consists of a rectangular recess cut into the edge or end of a piece of wood. This recess receives another piece, forming a strong bond. The joint can be cut using hand tools or power tools. A chisel or a table saw are often used to create it.
There are different types of rabbet joints. A single rabbet joint has one groove cut along the edge. A double rabbet joint has grooves cut on both pieces of wood. Both types offer a neat and durable fit. The joint is ideal for projects requiring neat edges and solid corners.
Applications In Projects
The rabbet joint is versatile and useful in many woodworking projects. It is commonly used in cabinet making. The joint provides a clean look and strong edges. Bookshelves and drawers often feature rabbet joints. The joint helps these items handle weight and daily use.
Picture frames also benefit from rabbet joints. The joint allows for a sturdy and precise fit. It helps in creating professional-looking frames. Boxes and chests often use rabbet joints for their corners. The joint adds strength and stability to these items.
In woodworking, the rabbet joint is a go-to choice. Its simplicity and effectiveness make it popular. Whether building furniture or small crafts, the rabbet joint is a reliable option.
Lap Joint
The lap joint is a basic yet strong wood joint. It is commonly used in woodworking for its simplicity and effectiveness. This joint involves overlapping two pieces of wood and securing them together. Its ease of construction makes it a favorite among both beginners and professionals.
Overview
The lap joint consists of two wood pieces that overlap each other. They are usually the same thickness. You cut away half the thickness of each piece at the joint. This allows the two pieces to fit together flush. The cut sections form a strong bond when glued or nailed.
Lap joints are versatile. They can be used in frames, boxes, and furniture. The joint is easy to make with hand tools or power tools. It does not require complex measurements or cuts.
Strength And Durability
Lap joints are known for their strength. The overlapping wood pieces distribute the load evenly. This makes the joint strong and reliable. The large surface area for glue adds to its holding power.
The durability of a lap joint is impressive. It can withstand heavy use and stress. The joint’s simplicity ensures fewer points of failure. It is less likely to weaken over time.
Properly made lap joints can last for many years. They are a great choice for both small and large projects. Their strength and durability make them a popular option in woodworking.
Dovetail Joint
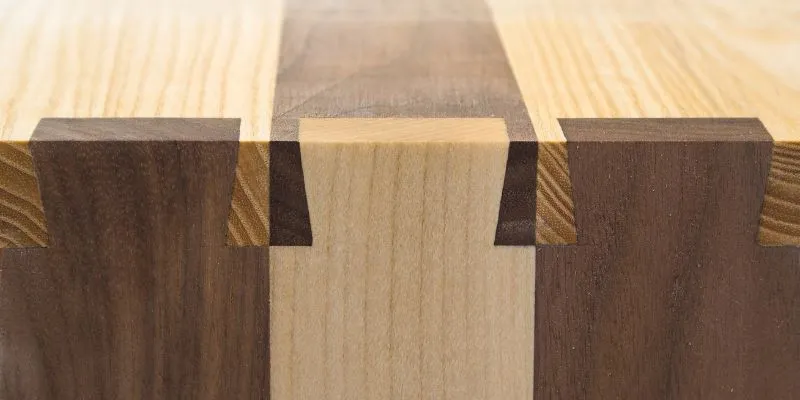
The dovetail joint is a hallmark of fine woodworking, admired for its strength and beauty. It is a popular choice for connecting pieces at right angles, such as in drawers and boxes. This joint not only holds strong but also adds an aesthetic appeal that woodworking enthusiasts cherish. Let’s delve into the intricate world of dovetail joints.
Overview
The dovetail joint is characterized by its interlocking ‘tails’ and ‘pins’. These pieces fit together like a puzzle, creating a strong bond without the need for nails or screws. The joint’s design allows it to resist pulling apart, making it perfect for items that face frequent stress.
- Strength: The interlocking nature of the joint provides superior tensile strength.
- Aesthetics: The visible pattern of dovetails can be a beautiful feature in woodworking.
- Durability: Ideal for items that require long-lasting joints, such as furniture.
Despite its complexity, creating a dovetail joint can be a rewarding experience. With some patience and practice, anyone can master this technique.
Step-by-step Guide
Ready to give it a go? Here’s a simple guide to help you create a dovetail joint.
- Prepare Your Wood: Start with two pieces of wood. One will be for the ‘tails’ and the other for the ‘pins’.
- Mark the Tails: Use a dovetail marker or a homemade template to mark the tails on one piece of wood.
- Cut the Tails: Carefully cut along the marked lines using a saw. Clean up the cuts with a chisel.
- Transfer the Tails: Place the tails against the second piece of wood and trace their shape. This will be where the pins go.
- Cut the Pins: Cut along the traced lines on the second piece of wood. Use a chisel to clean up and ensure a snug fit.
- Fit Together: Gently tap the tails into the pins. They should fit tightly together, creating a strong joint.
Creating a dovetail joint can seem daunting at first, but with these steps, you’ll be well on your way to crafting joints like a pro.
Let me share a quick story. When I first attempted a dovetail joint, my cuts were far from perfect. But after a few tries, I began to see improvement. The key is to take your time and learn from each attempt. Remember, even the best woodworkers started as beginners!
So, grab your tools and give the dovetail joint a try. It’s a skill that will not only improve your woodworking but also give you a sense of accomplishment with each joint you create.
Tips For Choosing The Right Joint
Choosing the right wood joint can determine the strength and durability of your project. Understanding the specific needs of your project and the types of wood you’re using can guide you in selecting the best joint. Here are some tips to help you make the right choice.
Project Requirements
Consider the function of your project. Will it bear weight? For furniture, strong joints like dovetail or mortise and tenon are ideal. For decorative pieces, simpler joints might suffice. Think about the level of skill required. Some joints are easier for beginners. Complex joints need more practice and precision.
Wood Types
Different woods have different properties. Hardwood and softwood behave differently when joined. Softwoods like pine are easier to work with. Hardwoods like oak provide more strength. Match the joint type to the wood’s characteristics. For softwoods, simpler joints work well. For hardwoods, stronger joints ensure durability.
Maintaining Your Wood Joints
Simple wood joints are the backbone of many woodworking projects. Whether you’re crafting a table, building a bookshelf, or constructing a birdhouse, the joints hold everything together. But, like everything else, wood joints need a bit of love and care to keep them in good shape. Let’s dive into some easy ways to maintain your wood joints, ensuring they last for years to come.
Regular Inspections
Just like you’d take your car for a regular check-up, your wood joints need the same attention. Regular inspections are key to spotting potential problems before they become big issues.
- Look for Cracks: Small cracks can grow if not addressed. Check your joints for any signs of splitting.
- Check for Looseness: Wiggle the joints gently to see if they feel loose. Tight joints are crucial for a sturdy structure.
- Inspect for Moisture: Wood and water don’t mix well. Look for any signs of moisture damage, like discoloration or swelling.
By making these inspections a habit, you can catch problems early and save yourself from bigger repairs down the line.
Repair Techniques
Even with the best care, joints can sometimes need repairs. Don’t worry; most fixes are straightforward and can be done with basic tools. Here are some common repair techniques:
- Glue and Clamp: For loose joints, a bit of wood glue and a clamp can work wonders. Apply the glue, clamp the joint tightly, and let it dry.
- Wood Filler: For small cracks or gaps, wood filler is your friend. Apply it to the affected area, let it dry, and sand it smooth.
- Reinforcement: Sometimes, adding a small nail or screw can provide extra strength to a joint. Be sure to countersink any screws to avoid damaging the wood surface.
Think of these techniques as your toolkit for keeping your wood projects in top shape. And remember, a little maintenance goes a long way.
So, what’s the takeaway? Regular inspections and simple repairs can keep your wood joints strong and reliable. With these tips in your back pocket, you’ll be better prepared to handle any issues that come your way. Happy woodworking!
Frequently Asked Questions
What Is The Simplest Wood Joint?
The simplest wood joint is the butt joint. It involves joining two pieces of wood by simply butting them together. This joint is easy to create and commonly used for basic woodworking projects. It is ideal for beginners due to its simplicity and minimal tools required.
What Is The Easiest Way To Join Two Pieces Of Wood Together?
Use wood glue and clamps to easily join two pieces of wood. Apply glue, align pieces, and clamp until dry.
What Is The Simplest Form Of A Wood Joint?
The simplest form of a wood joint is the butt joint. It connects two pieces by simply butting them together.
What Is The Easiest Joint In Carpentry?
The butt joint is the easiest in carpentry. It involves joining two pieces of wood by simply butting them together.
Conclusion
Simple wood joints offer a great start for beginner woodworkers. They require minimal tools and skills. These joints create strong connections for many projects. Practice helps improve your technique over time. Keep experimenting with different joints. Your skills will naturally grow.
Always prioritize safety while working. Enjoy the process of learning. Happy woodworking!