How to Perfectly Finish Sheetrock Joints: Expert Tips & Techniques
To finish sheetrock joints, apply joint compound, embed tape, feather out edges, sand, repeat for smooth finish. Sheetrock installation requires attention to detail and proper finishing techniques to achieve a flawless end result.
By following these steps and paying careful attention to detail, you can ensure a professional-looking finish that enhances the overall appearance of your project. Whether you are a seasoned contractor or a DIY enthusiast, mastering the art of finishing sheetrock joints is essential for creating a polished and well-executed space.
Let’s explore the process of finishing sheetrock joints in more detail to help you achieve professional results in your next project.
Choosing The Right Materials
Selecting The Right Joint Compound
Look for lightweight all-purpose joint compound.
- Ensure it has good workability.
- Opt for quick-drying options for faster results.
Choosing The Proper Joint Tape
Use fiberglass mesh tape for strength and durability.
- Self-adhesive tape is easy to apply.
- Consider paper tape for inside corners.
When finishing sheetrock joints, materials play a vital role in achieving a smooth and professional result.
Preparing The Sheetrock Surface
When finishing sheetrock joints, proper preparation of the sheetrock surface is crucial for achieving a smooth and flawless finish. This involves removing any loose debris and applying a PVA primer to ensure good adhesion of the joint compound.
Removing Loose Debris
- Use a drywall knife to scrape off any loose debris or paper edges on the sheetrock surface.
- Clean the area with a dry cloth to remove dust and ensure a clean surface for the next steps.
Applying A Pva Primer
- Apply a PVA primer using a roller or brush to seal the sheetrock surface and improve the adhesion of the joint compound.
- Allow the primer to dry completely before proceeding with the joint compound application.
Taping And Mudding Techniques
Taping and mudding is a crucial step in achieving a smooth and professional finish for sheetrock joints. By applying the right techniques and using the proper tools, you can ensure a seamless transition between the sheetrock panels. Let’s have a detailed look at the best practices for taping and mudding to achieve a flawless result.
Applying The First Coat Of Joint Compound
Before applying the joint compound, ensure that the joint between the sheetrock panels is clean and free from any dust or debris. Use a taping knife to apply a thin layer of the joint compound over the joint. Make sure to spread the compound evenly to cover the entire joint.
After applying the compound, use the taping knife to remove any excess and create a smooth surface. Allow the first coat to dry completely before proceeding to the next step. This is essential for achieving a professional finish.
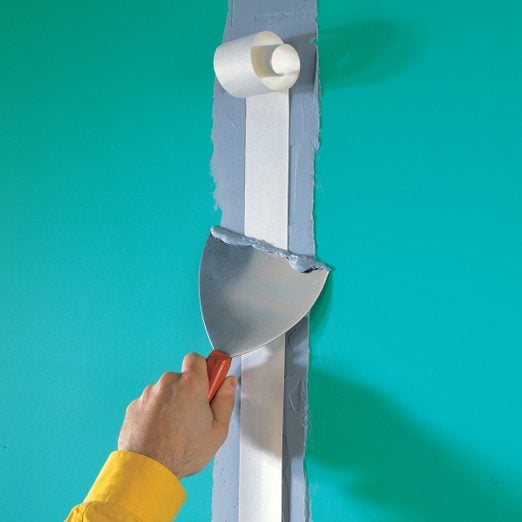
Embedding The Joint Tape
Start by embedding the joint tape into the freshly applied first coat of joint compound. Press the tape firmly into the compound using a taping knife, ensuring it is centered over the joint. Avoid creating any bubbles or wrinkles in the tape, as it can affect the final finish.
Next, apply another thin coat of joint compound over the embedded tape, making sure to completely cover it. Smooth out the edges with the taping knife to blend it seamlessly with the surrounding surface. Allow the second coat to dry before applying subsequent coats for a perfect finish.
Credit: www.familyhandyman.com
Feathering And Sanding
When it comes to finishing sheetrock joints, feathering and sanding are two essential steps that ensure a smooth and professional-looking outcome. Feathering out the joint compound involves blending the compound with the surrounding surface to create a seamless finish, while sanding further refines and smoothens the surface. In this article, we will guide you through these crucial steps to help you achieve a flawless finish on your sheetrock joints.
Feathering Out The Joint Compound
Feathering out the joint compound is the process of gradually tapering the edges of the compound to merge it seamlessly with the surrounding surface. This technique helps to minimize the visibility of the joint by eliminating any noticeable raised or depressed areas.
To feather out the joint compound:
- Apply a thin layer of joint compound to the joint using a taping knife, making sure it extends slightly beyond the joint.
- Hold the knife at a slight angle and use long, smooth strokes to feather out the edges of the compound towards the surrounding area.
- Continue feathering out the compound with subsequent coats, allowing each layer to dry and sanding lightly in between. Repeat this process until the joint appears seamless.
By feathering out the joint compound, you create a gradual transition from the joint to the rest of the surface, giving your sheetrock a professional and seamless appearance.
Sanding To A Smooth Finish
Sanding is the final step in finishing sheetrock joints, and it helps to achieve a smooth and even surface. It removes any imperfections and roughness left by the joint compound, ensuring that the finished wall or ceiling looks flawless.
To sand your sheetrock joints effectively:
- Use a fine-grit sandpaper or sanding sponge to gently sand the joint compound in a circular motion.
- Start with light pressure and gradually increase it, focusing on smoothing out any ridges, bumps, or uneven areas.
- Wipe away the dust periodically to assess your progress. If necessary, apply another thin layer of joint compound to fill in any remaining imperfections and repeat the sanding process.
- Once you are satisfied with the smoothness of the surface, wipe away any dust with a damp cloth to prepare the sheetrock for priming and painting.
Remember, sanding requires patience and attention to detail. Take your time and be thorough to achieve the best results.
Final Touches And Tips
The final touches and tips are crucial to achieving a flawless finish on your sheetrock joints. These finishing touches will ensure that your walls are smooth and ready for painting or wallpapering. In this section, we will cover two important aspects of finishing sheetrock joints:
Applying A Thin Final Coat
Once you have completed the main joint taping and sanding, it’s time to apply a thin final coat to achieve a seamless finish. This final coat is essential for hiding any remaining imperfections and creating a smooth surface. Follow these steps to apply a thin final coat:
- Make sure the joint compound is well mixed and has a smooth consistency. You can thin it down slightly with water if necessary.
- Using a clean taping knife, apply a thin layer of joint compound over the entire joint, extending it a few inches beyond the edges of the joint tape.
- Smooth out the compound using long, even strokes, feathering the edges to blend it with the surrounding surface. Avoid excessive pressure, as it can remove too much compound.
- Allow the compound to dry completely according to the manufacturer’s instructions, typically 24 hours.
- Once dry, lightly sand the surface with fine-grit sandpaper to remove any imperfections or ridges. Remember to remove the dust with a damp cloth before proceeding.
Inspecting For Imperfections
Before you finish your sheetrock project, it’s important to inspect the walls thoroughly for any imperfections. This step ensures that your walls will have a professional, flawless appearance. Follow these tips when inspecting for imperfections:
- Inspect the entire surface in good lighting conditions. Natural light is best for identifying any flaws.
- Run your hand over the walls, feeling for any bumps, ridges, or unevenness. This tactile inspection can reveal imperfections that may not be visible to the naked eye.
- Use a bright flashlight held at a low angle to shine light across the surface. This technique will reveal any shadowing caused by uneven joint compound application.
- If you spot any imperfections, mark them with a pencil or painter’s tape for easy identification during the touch-up process.
- Fix any imperfections by applying a small amount of joint compound using a putty knife. Feather out the edges and allow it to dry before sanding and re-inspecting.
By following these final touches and tips, you will be able to achieve a professional-looking finish on your sheetrock joints. Remember to take your time and be meticulous during the final stages to ensure a flawless result.
Frequently Asked Questions On How To Finish Sheetrock Joints
How Do You Finish Sheetrock Joints?
To finish Sheetrock joints, start by applying joint compound using a taping knife. Cover the joint with tape, pressing it into the compound. Smooth out any excess compound, and let it dry. Sand the joint lightly, and apply another coat of compound if necessary.
Finally, sand again for a smooth finish.
What Tools Are Needed For Finishing Sheetrock Joints?
To finish Sheetrock joints, you will need a taping knife, joint compound, fiberglass tape, sandpaper, and a sanding block. Additionally, a mud pan or hawk, a utility knife, and a sponge for cleanup are also helpful. These tools will ensure a professional-looking finish.
How Long Does It Take For Sheetrock Joint Compound To Dry?
The drying time for Sheetrock joint compound depends on various factors such as temperature and humidity. Typically, it takes about 24 hours for the compound to dry completely. However, it is recommended to wait for at least 48 hours to ensure a thorough drying process before sanding or applying additional coats.
Can You Paint Over Unfinished Sheetrock Joints?
It is not recommended to paint over unfinished Sheetrock joints. The unfinished joints will be visible and can affect the overall appearance of the painted surface. It is important to properly finish the joints by applying joint compound, sanding, and smoothing them before applying any paint.
Conclusion
To sum up, finishing sheetrock joints is a crucial part of the construction process. Employing the right techniques and materials can make a significant difference in the final appearance of your walls and ceilings. By following the tips outlined in this guide, you can achieve professional-looking results and ensure the structural integrity of your sheetrock.
Mastering this skill can elevate the overall quality of your projects and leave a lasting impression on clients and guests.