How to Safely Remove Tack Strips from Hardwood Floors
To remove tack strips from hardwood floors, use a pry bar and hammer to carefully pry them up. Be cautious not to damage the flooring during the process.
When renovating a room with hardwood floors, one task often overlooked is removing the tack strips that held down the carpet. These strips can be a nuisance and require careful removal to avoid any damage to the hardwood underneath. By following a few simple steps, you can effectively remove tack strips from hardwood floors without causing any harm.
This guide will provide you with the necessary information and steps to complete this task safely and efficiently. Let’s dive into the process of removing tack strips from hardwood floors to prepare for your flooring renovation project.
Credit: www.youtube.com
Preparing For Removal
Removing tack strips from hardwood floors involves careful preparation to avoid damaging the flooring. Here are the steps you need to take before starting the removal process.
Gather Necessary Tools
- Hammer
- Pry bar
- Gloves
- Goggles
Protect Yourself And The Floor
- Wear safety gloves and goggles to protect yourself from any potential injuries.
- Cover the hardwood floor with a protective layer such as cardboard or a drop cloth to prevent scratches or dents.
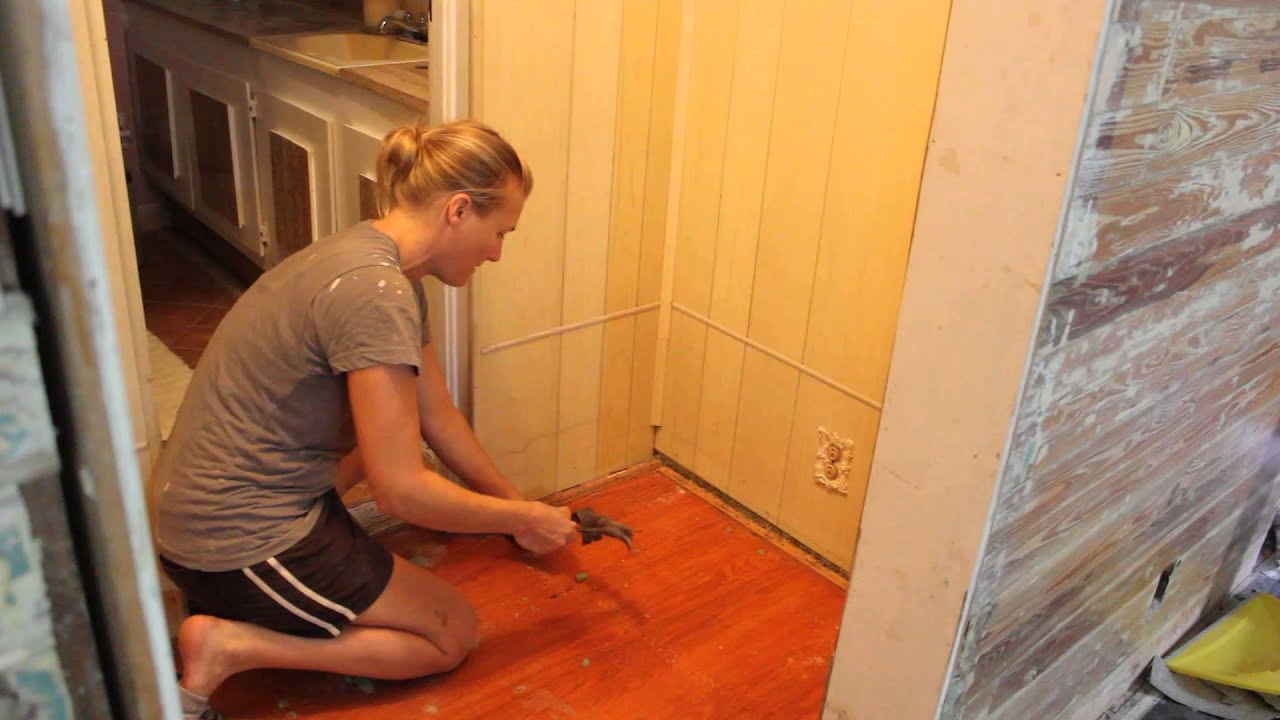
Removing The Tack Strips
Here are the steps to remove tack strips from hardwood floors:
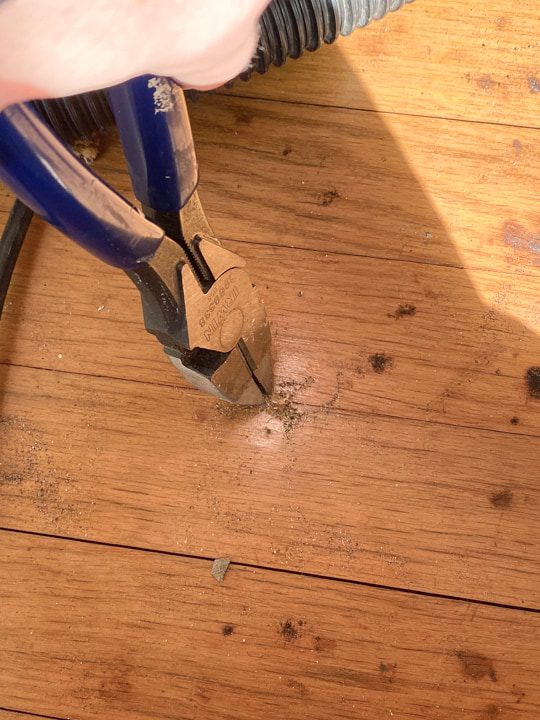
Loosen The Tack Strips:
- Use a pry bar to gently pry up the tack strips.
- Work slowly to avoid damaging the hardwood floor.
Lift And Remove The Tack Strips:
- Once loosened, lift the tack strips with pliers.
- Ensure each tack strip is fully removed.
Cleaning Up
After removing the tack strips from the hardwood floors, it’s essential to properly clean up and dispose of the materials. This step ensures a tidy and safe environment while preparing the floors for the next phase of restoration.
Inspect The Floor For Damage
Before beginning the cleanup process, carefully inspect the hardwood floors for any potential damage caused by the tack strips. Look for scratches, dents, or any remaining adhesive residue. Addressing these issues promptly can prevent further complications during the restoration process.
Dispose Of The Tack Strips Properly
Proper disposal of the tack strips is crucial to maintain a clean and organized workspace. Utilize a sturdy container or trash bag to gather the removed strips, ensuring that all sharp nails are securely contained to prevent injuries. Additionally, consider checking local regulations to ensure compliance with any specific disposal guidelines in your area.
Addressing Residue
To address residue from tack strips on hardwood floors, begin by lifting the strips with a pry bar. Use a heat gun to soften any stubborn adhesive, making it easier to remove. Afterward, scrape off any remaining residue with a putty knife and finish by sanding the area smooth.
Removing tack strips from hardwood floors can be a challenging task, but the job isn’t complete until you address the adhesive residue left behind. If not properly addressed, this residue can make it difficult for you to refinish your floors. In this section, we will discuss the steps you can take to effectively remove adhesive residue and prepare your hardwood floors for sanding and refinishing.
Removing Adhesive Residue
To successfully remove adhesive residue from your hardwood floors, follow these steps:
-
- Step 1: Scrape Off Excess Residue
Use a plastic scraper or putty knife to gently scrape off any loose or excess adhesive residue. Be careful not to scratch the surface of the floor. Collect the scraped residue in a dustpan and discard it properly.
-
- Step 2: Apply Adhesive Remover
Apply a liberal amount of adhesive remover directly onto the residue. Ensure that the remover is specifically designed for hardwood floors to avoid damage. Allow the remover to sit on the residue for the specified amount of time mentioned on the product label.
-
- Step 3: Gently Scrub the Residue
Use a soft-bristled brush or a scrubbing pad to gently scrub the residue in a circular motion. This will help loosen the adhesive and facilitate its removal. Be cautious to avoid scrubbing too vigorously to prevent any damage to the wood.
-
- Step 4: Wipe off Residue
Use a clean cloth or sponge dampened with warm, soapy water to wipe away the loosened residue. Rinse the cloth or sponge frequently to prevent the spread of residue onto the rest of the floor.
-
- Step 5: Repeat if Necessary
If there are still traces of adhesive residue left on the floor, repeat steps 2 to 4 until the residue is completely removed. Patience and persistence are key to achieving a clean and residue-free surface.
Sanding And Refinishing The Floor
Once the adhesive residue has been successfully removed, it’s time to prep your hardwood floors for sanding and refinishing. Follow these steps to ensure a smooth and beautiful finish:
-
- Step 1: Sand the Floor
Use a drum sander or a floor buffer with a sanding attachment to sand the entire floor surface. Start with a coarse-grit sandpaper and gradually move to finer-grit sandpapers for a smoother finish. Sand in the direction of the wood grain to achieve the best results.
-
- Step 2: Remove Dust
After sanding, thoroughly clean the floor to remove any dust or debris. Use a vacuum with a floor brush attachment and then wipe the surface with a damp cloth or mop.
-
- Step 3: Apply Wood Finish
Apply a wood finish of your choice to protect and enhance the natural beauty of your hardwood floors. Follow the manufacturer’s instructions for proper application techniques and drying times.
-
- Step 4: Allow to Cure
After applying the wood finish, allow it to cure completely before placing furniture or rugs back on the floor. This will ensure a durable and long-lasting finish.
With these steps, you can effectively address adhesive residue and prepare your hardwood floors for sanding and refinishing. Take your time, follow the instructions carefully, and soon you’ll have beautifully restored hardwood floors that bring new life to your space.
Final Steps
Discover the final steps to effectively removing tack strips from hardwood floors. Start by gently prying the strips using a putty knife, then carefully extract any remaining nails to ensure a seamless finish on your floors.
Removing tack strips from hardwood floors can be a challenging task, but with the right approach, it can be accomplished successfully. Once you have cleared the room and completed the initial steps, it’s time to move on to the final steps. These steps include inspecting the cleaned area and considering professional help if needed.
Inspect The Cleaned Area
After removing the tack strips and adhesive from your hardwood floors, it’s important to inspect the cleaned area to ensure that it is free from any remaining residue or damage. Take a close look at the floor surface and pay attention to any signs of adhesive, scratches, or dents. By thoroughly inspecting the cleaned area, you can be confident that your hardwood floors are ready for the next steps in the restoration process.
Consider Professional Help If Needed
If you encounter stubborn residue or extensive damage during the tack strip removal process, it may be wise to consider seeking professional assistance. Professional flooring experts have the experience, tools, and knowledge to handle challenging situations, ensuring that your hardwood floors are restored to their former glory. They can provide you with valuable advice and recommend suitable solutions that will save you time and effort.
Removing tack strips from hardwood floors requires careful attention to detail and patience. By inspecting the cleaned area and seeking professional help if needed, you can ensure that your hardwood floors are properly prepared for the next steps in the restoration process.
Credit: www.reddit.com
Frequently Asked Questions For How To Remove Tack Strips From Hardwood Floors
How Do You Remove Tack Strips From Hardwood Floors?
To remove tack strips from hardwood floors, carefully pry them up using a flathead screwdriver or pry bar. Lift and discard the strips, then patch any nail holes left behind. Sand and refinish the area as needed.
What Tool Is Used To Remove Tack Strips?
A pry bar is commonly used for removing tack strips. It’s a versatile tool that can easily lift and remove the strips from different surfaces. Using a pry bar ensures a quick and efficient removal process for tack strips.
Should You Remove Carpet Tack Strips?
Yes, you should remove carpet tack strips when replacing carpet to ensure proper installation and prevent damage. Removing the strips allows for a clean and smooth surface before installing new carpet.
How Do You Remove Tack From Wood?
To remove tack from wood, follow these steps:
1. Apply heat using a hairdryer to soften the tack.
2. Gently scrape the tack off with a putty knife or credit card.
3. If residue remains, rub it with a cloth soaked in rubbing alcohol or vinegar.
4. Wipe the area with a damp cloth to remove any remaining residue.
5. Polish or reapply finish if necessary.
Conclusion
Removing tack strips from hardwood floors can be a challenging task, but with the right tools and techniques, it can be done effectively. By following the steps outlined in this guide, you can protect your floors and ensure a smooth and successful removal process.
Remember to prioritize safety and take your time to achieve the best results.