How to Stain Cherry Wood: 7-Step Guide + Blotch Prevention
Cherry wood stains best with a gel stain applied over a shellac wash coat — skip the wash coat and cherry’s uneven grain absorbs stain in patches, leaving blotchy dark and light spots. Sand to 220 grit, apply a 1:4 shellac-to-denatured-alcohol wash coat, let it dry 1 hour, then sand lightly with 320-grit before applying stain. This guide covers the full 7-step process, the best stain colors for cherry, drying times, and how to minimize cherry’s natural red tones.
⚡ Quick Answer
Sand cherry to 220 grit, apply a shellac wash coat (1 part dewaxed shellac + 4 parts denatured alcohol), let dry 1 hr, sand 320-grit, then apply a gel stain. Gel stains prevent blotching on cherry. Allow 8–12 hrs dry time for oil-based stain before applying a topcoat.
How to Stain Cherry Wood: 7 Steps
- Sand to 220 grit: Start with 80–120 grit to remove surface defects, then progress to 150, and finish at 220 grit. Stop at 220 — sanding higher closes the pores and reduces stain absorption. Sand in the direction of the wood grain to avoid cross-grain scratches.
- Stain immediately after sanding: Cherry oxidizes quickly — the longer you wait after sanding, the more the surface darkens and hardens, making stain absorption uneven. Stain the same day you finish sanding.
- Apply a shellac wash coat: Mix 1 part dewaxed shellac with 4 parts denatured alcohol. Apply a single thin coat with a brush. Let it dry for 1 hour. This seals the most absorbent areas so stain penetrates evenly across the whole surface.
- Sand lightly with 320-grit: After the wash coat dries, sand very lightly with 320-grit sandpaper to remove any raised grain. Vacuum dust and wipe with a tack cloth before staining.
- Apply gel stain: Gel stains sit on the wood surface rather than penetrating deeply — this makes them ideal for blotch-prone species like cherry. Apply with a brush or cloth, working in small sections. Wipe off all excess within 5 minutes of application.
- Let stain dry completely: Oil-based stain: 8–12 hours. Water-based stain: 2–4 hours. Apply a second coat if you want a deeper color — always let the first coat dry fully before recoating.
- Apply a protective topcoat: Wait for full cure before applying polyurethane, lacquer, or oil finish: oil-based stain needs 48–72 hours; water-based stain needs 24–48 hours. Natural oil finishes like tung oil work well for cherry and are easy to repair.
Understanding Cherry Wood Staining
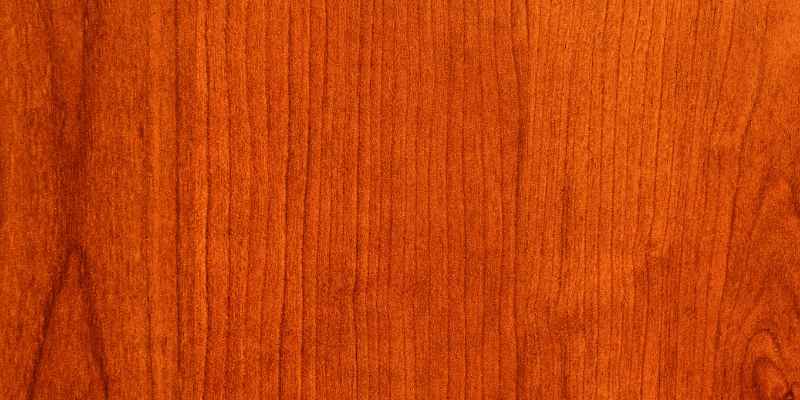
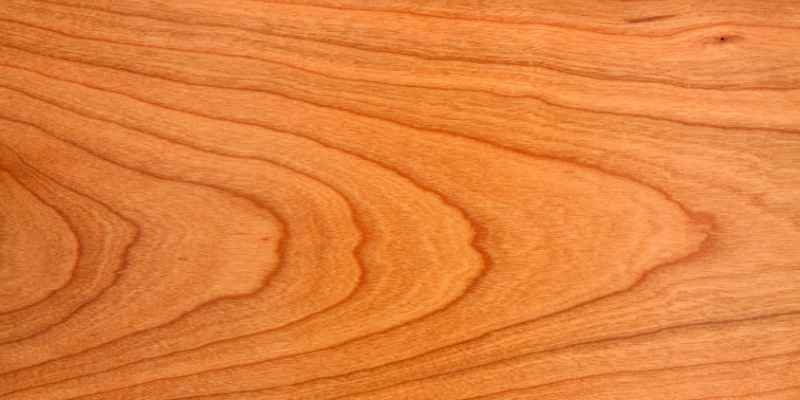
Cherry wood is prized for its warm reddish-brown tones and fine, straight grain. It is dense, durable, and one of the most desirable North American hardwoods for furniture and cabinetry. Unlike oak or pine, cherry has a tight, relatively closed grain — which means stain absorbs unevenly without proper preparation. The wood also darkens naturally with UV exposure over time, which affects how stain colors appear long-term.
Cherry’s blotch-prone nature is not a defect — it is a characteristic of the wood’s natural density variation. Areas where early wood (soft growth rings) and late wood (hard growth rings) meet absorb stain at very different rates. A wash coat or pre-stain conditioner equalizes this absorption before stain is applied.
Choosing The Right Stain
Gel stains are the most forgiving choice for cherry. They sit on the surface rather than penetrating deeply, which produces more even color on tight-grained, blotch-prone wood. Penetrating oil-based stains can be used successfully if a proper wash coat is applied first.
Considerations For Selecting The Stain
- Wood grain: Cherry’s fine, straight grain takes stain evenly when properly prepped. Gel stains enhance the grain with minimal risk of blotching.
- Existing color: Cherry already has warm reddish tones. Stains in warm brown, walnut, or amber ranges complement the natural hue. Cooler stains (gray, ebony) require more coats to override cherry’s natural warmth.
- Long-term darkening: Cherry darkens significantly with UV exposure over 6–12 months. Choose a stain shade lighter than your target — the wood will meet you there.
- Sample testing: Always test stain on scrap cherry from the same board before applying to your project. Cherry from different trees can absorb stain differently.
Best Stain Options For Cherry Wood
| Stain | Type | Color result on cherry | Best for |
|---|---|---|---|
| Minwax Cherry (235) | Oil-based penetrating | Warm medium brown with reddish undertones | Enhancing natural color |
| Minwax Dark Walnut | Oil-based penetrating | Rich dark brown, reduces redness | Darker, traditional look |
| Minwax Jacobean | Oil-based penetrating | Very dark espresso brown | Maximum color depth |
| General Finishes Cabernet | Water-based | Deep warm burgundy-brown | Exact cherry match, low odor |
| Varathane Black Cherry | Oil-based | Dark reddish-black | Dramatic, high-contrast finish |
| Minwax Gel Stain (any dark color) | Gel (oil-based) | Even, consistent coverage | Blotch prevention on raw cherry |
Recommended Product
Minwax Gel Stain — Oil Based
Gel stain is the best choice for cherry wood — it sits on the surface instead of penetrating unevenly, giving consistent color even without a wash coat. Ideal for furniture, cabinets, and trim.
Check Price on Amazon →Preparation And Sanding
Proper preparation is the single most important factor in staining cherry wood successfully. Cherry’s tight grain punishes skipped steps — blotching and uneven absorption are always preparation failures, not stain failures.
Importance Of Proper Preparation
Cherry must be sanded and conditioned before any stain is applied. Skipping the wash coat or pre-stain conditioner is the most common cause of blotchy cherry staining. The wash coat seals the most porous areas of the grain, so the stain applies at a consistent depth across the entire surface.
Sanding Techniques For Cherry Wood
- Start with 80–120 grit sandpaper: Remove surface defects, mill marks, and any previous finish.
- Progress to 150 grit: Smooth the surface and begin closing visible scratch marks from coarser grit.
- Finish at 220 grit: Final smoothing. Stop here — sanding to 320 or higher before staining burnishes the grain closed and reduces stain absorption unevenly.
- Sand in the direction of the wood grain: Cross-grain scratches are highlighted by stain and become visible in the final finish.
- Remove all dust: Vacuum the surface, then wipe with a tack cloth. Any dust particle trapped under the stain creates a visible bump in the finish.
Blotch-free Staining Techniques
Achieving a blotch-free finish on cherry requires controlling how deeply stain penetrates into the wood. There are two proven methods: the shellac wash coat and the pre-stain wood conditioner. For best results, use both methods combined with a gel stain.
Understanding Wood Conditioning
A pre-stain wood conditioner (such as Minwax Pre-Stain) is a thinned penetrating oil that partially seals the most absorbent areas of the grain before stain is applied. Apply liberally with a brush, let sit 10–15 minutes, then wipe off any excess. Apply stain within 2 hours — if you wait longer, the conditioner hardens and reduces its effectiveness.
Application Of Wash Coats
A shellac wash coat gives more reliable blotch prevention than commercial pre-stain conditioner on cherry. Mix 1 part dewaxed shellac flakes with 4 parts denatured alcohol. Apply one thin, even coat with a brush. Let dry for 1 hour. Sand lightly with 320-grit to knock down any raised grain. The wash coat seals the most absorbent early-wood areas, forcing stain to penetrate at a uniform depth across the whole surface.
- Mix: 1 part dewaxed shellac + 4 parts denatured alcohol
- Apply one thin coat — avoid puddling
- Dry time: 1 hour at room temperature
- Sand lightly with 320-grit to smooth raised grain
- Remove dust with tack cloth before staining
Applying The Finish
Best Practices For Applying Finish
- Ensure the surface is clean and dust-free before applying any finish.
- Work in a well-ventilated area — oil-based finishes produce fumes that need airflow to dissipate safely.
- Test on scrap first — apply a small patch on scrap cherry from the same board to verify color before committing to the full piece.
- Use a quality brush or lint-free cloth appropriate for the finish type.
- Apply in thin, even coats following the wood grain direction.
- Never over-apply: excess finish on cherry creates a tacky surface that does not cure evenly.
- Allow full dry between coats: oil-based 8–12 hrs; water-based 2–4 hrs.
- Sand lightly with 320-grit between coats to improve adhesion and surface smoothness.
- Cure before topcoat: oil-based stain needs 48–72 hrs; water-based 24–48 hrs before polyurethane or lacquer.
Recommended Finishing Products
| Product | Description |
|---|---|
| Tung Oil | Natural oil finish that enhances cherry’s warm grain — easy to apply and repair. |
| Linseed Oil | Traditional oil finish with a warm amber tone; boiled linseed oil dries faster. |
| OSMO Polyx-Oil | Oil and wax combination product; excellent durability, water resistance, and repairability. |
| Shellac | Classic fast-drying finish for cherry; easy to apply, easy to repair, compatible with all topcoats. |
Dealing With Color Variations
Color variation in stained cherry comes from the wood’s natural density differences — early wood absorbs more stain than late wood, creating light and dark patches. Use these techniques to even out the color across the whole piece. For a full deep-dive, see our guide on how to neutralize red tones in wood.
Techniques For Evening Out Color
- Sprayed dye: An aniline dye (water or alcohol-based) applied before stain gives the most uniform base color across early and late wood. The dye penetrates deeply and evenly, and the gel stain on top adds depth without blotching.
- Sprayed toners: A diluted stain sprayed in light, even passes can even out light and dark areas after the primary stain coat has dried.
- Wash coats of finish: Applied before staining, wash coats limit absorption in the most porous areas, producing more uniform color.
Minimizing Red Tones In Cherry Wood
- Use a pre-stain conditioner to seal off the most absorbent grain — this reduces the intensity of the red tones visible in unstained areas.
- Choose a cool-toned stain: Minwax Dark Walnut or Jacobean both shift cherry toward a neutral brown and suppress the redness. A 50% mix of walnut stain with natural stain gives a warm medium brown without prominent red.
- Use natural oil finishes like tung oil or linseed oil — they add depth without amplifying cherry’s natural red undertones the way solvent-based finishes can.
Expert Tips And Tricks
Insider Recommendations And Insights
- Choose gel stain over penetrating stain for the most forgiving, blotch-free result on raw cherry.
- Prep the surface: Sand to 220 grit and apply a shellac wash coat before any stain.
- Test samples: Always test stain on scrap cherry from the same board — cherry from different trees absorbs stain differently.
- Apply evenly and wipe excess within 5 minutes of application to prevent build-up and lap marks.
- Account for natural darkening: Cherry wood darkens significantly over 6–12 months with UV exposure. Stain one or two shades lighter than your target — the wood will age into the right color.
Common Mistakes To Avoid
- Skipping the wash coat: Applying stain directly to raw cherry without a wash coat or conditioner is the most common cause of blotchy results.
- Sanding too high: Sanding cherry past 220 grit before staining burnishes the grain and creates hard spots that reject stain.
- Overlapping wet stain strokes: Overlap marks become visible as dark streaks once the stain dries. Work in small sections and maintain a wet edge.
- Applying topcoat too soon: Oil-based stain on cherry needs 48–72 hours of cure time before polyurethane. Applying topcoat too early traps solvent and creates a permanently tacky surface.
- Not sealing the stain: A protective topcoat is required to lock in the color and protect the cherry surface from moisture, UV, and wear.
Frequently Asked Questions On How To Stain Cherry Wood
What Stain Is Best For Cherry Wood?
Gel stain is the best stain type for cherry wood because it sits on the surface rather than penetrating unevenly, preventing blotching. For specific colors: Minwax Cherry (235) enhances the natural warm tones; General Finishes Cabernet gives a deep warm brown; Minwax Dark Walnut suppresses redness. Always apply a shellac wash coat before staining to ensure even color absorption across the grain.
Can I Stain Cherry Wood A Different Color?
Yes — cherry wood can be stained darker, lighter, or even toward cool gray-brown tones. Because cherry is blotch-prone, achieving a consistent shade in a different color requires a shellac wash coat or pre-stain conditioner first. Furniture makers often use a sprayed aniline dye to lay down even base color, then apply a gel stain on top for depth and protection.
What Is The Best Way To Finish Cherry Wood?
For a natural look, use tung oil or linseed oil — both are easy to apply, easy to repair, and enhance cherry’s warm grain without a heavy plastic feel. For more durability, apply shellac as a sealer coat, then topcoat with polyurethane. OSMO Polyx-Oil is an oil-and-wax combination that provides excellent water resistance and is easy to spot-repair on cherry wood furniture.
How Do You Make Cherry Wood Less Red?
To reduce cherry’s natural redness, use a cool-toned stain like Minwax Dark Walnut or Jacobean — both shift the color toward neutral brown. A pre-stain conditioner applied before staining seals the most absorbent grain areas, which reduces the intensity of red undertones. Alternatively, mix walnut stain 50/50 with natural (clear) stain to warm the color without a strong red cast.
Will Cherry Wood Darken On Its Own?
Yes — cherry darkens significantly with UV light exposure over time, typically deepening from a light pinkish-tan to a rich reddish-brown within 6–12 months. This natural patina is one of cherry’s most prized qualities. When choosing a stain, select a shade 1–2 tones lighter than your target — the wood will age to meet it. Use UV-blocking topcoats if you want to slow the darkening process.
How Do You Prevent Blotching When Staining Cherry Wood?
Apply a shellac wash coat (1 part dewaxed shellac + 4 parts denatured alcohol) before staining, let it dry 1 hour, then sand lightly with 320-grit. This seals the most absorbent areas of cherry’s grain. Using a gel stain instead of a penetrating stain further reduces blotching because gel stain sits on the surface and absorbs at a uniform rate across the grain.