What Way to Lay Laminate Flooring: Expert Tips for a Perfect Installation
To lay laminate flooring, start in a corner and work towards the room’s main entrance. Align planks perpendicular to the longest wall.
Laminate flooring is a popular choice for homeowners looking to update their floors. It is durable, affordable, and easy to install. By following a few simple steps, you can lay laminate flooring like a pro. In this guide, we will cover the basics of how to lay laminate flooring in your home, including the tools you will need, the preparation steps, and the installation process.
Whether you are a seasoned DIYer or a first-time floor installer, this guide will help you achieve beautiful and long-lasting laminate flooring in your space. Let’s dive in and start transforming your floors today!
Selecting The Right Laminate Flooring
Laminate flooring is a versatile and budget-friendly option for transforming your space. With various styles, colors, and finishes available, selecting the right laminate flooring is crucial for achieving the desired aesthetic and functionality in your home.
Consideration Of Room And Traffic
Before choosing laminate flooring, evaluate the room’s purpose and foot traffic it receives. Opt for high-traffic laminate in areas like living rooms and hallways for durability.
Choosing The Perfect Color And Finish
When selecting color and finish, consider the desired ambiance and lighting of the room. Lighter hues can make a space appear larger, while darker tones add warmth. Choose a matte finish for a more natural look and high-gloss finish for a modern touch.
Preparing The Subfloor
Before laying laminate flooring, it is crucial to properly prepare the subfloor to ensure a durable and long-lasting installation. Follow these steps to get your subfloor ready:
Inspecting And Repairing Subfloor
- Check for any dips, bumps, or damage in the subfloor.
- Fix any uneven areas by sanding or using a self-leveling compound.
- Ensure the subfloor is clean, smooth, and free of debris.
Underlayment Installation
- Place a moisture barrier, such as a plastic sheet, over the subfloor.
- Install underlayment padding to provide cushioning and noise reduction.
- Seal seams of the underlayment to prevent moisture from seeping through.
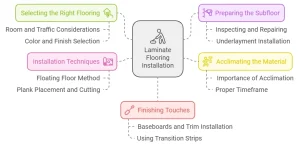
Acclimating The Flooring Material
Acclimating the flooring material is a crucial step in the laminate flooring installation process. This ensures that the material adjusts to the temperature and humidity of its new environment, minimizing the risk of warping, cupping, or other issues that could arise from the sudden exposure to different conditions.
Understanding The Importance
Acclimating the laminate flooring material allows it to settle and expand or contract, ultimately reducing the likelihood of future problems. This step helps maintain the integrity of the flooring, ensuring a longer lifespan and better performance once installed.
Proper Timeframe For Acclimation
The recommended time for acclimating laminate flooring is usually around 48 hours. However, it’s important to check the manufacturer’s guidelines as the timeframe may vary based on the specific product. This step cannot be rushed and should be carefully followed to ensure the best results.
Installation Techniques
When it comes to laying laminate flooring, following the right installation techniques is crucial for a smooth and durable finish. In this section, we will discuss the two main techniques for installing laminate flooring: Floating Floor Installation and Placement and Cutting of Planks.
Floating Floor Installation
One popular technique for installing laminate flooring is the floating floor installation. This method involves placing the laminate planks directly on top of the existing floor, without the need for nails or glue. The planks are connected to each other using a tongue-and-groove system that ensures a tight and secure fit. This creates a floating floor that is not attached to the subfloor.
The key advantage of this installation technique is its ease and simplicity. Since the planks are not permanently attached, they can be easily replaced or removed if needed. This also makes it a great option for DIY enthusiasts who want to save on installation costs.
Placement And Cutting Of Planks
Proper placement and cutting of laminate planks is essential for a professional-looking installation. Before laying the planks, it’s important to measure the room and determine the best starting point. Ideally, you should start in a corner and work your way towards the door.
- Make sure to leave a small expansion gap around the perimeter of the room to allow for natural movements of the flooring.
- Cut the planks using a saw or laminate cutter as needed to fit around corners, doorways, and other obstacles. Remember to measure twice and cut once to avoid wastage.
- Ensure that the end joints of the planks are staggered and not aligned, as this will create a more stable and aesthetically pleasing installation.
By following these placement and cutting techniques, you can achieve a seamless look and minimize the chances of gaps or uneven spaces between the planks.
Finishing Touches
Once you have installed your laminate flooring, it’s time to add those final details that will truly bring your project together. The finishing touches will not only enhance the appearance of your flooring but also give it a polished and professional look. In this section, we will explore two essential steps in completing your laminate floor installation: installing baseboards and trim, and using transition strips.
Installing Baseboards And Trim
Baseboards and trim are the unsung heroes of any flooring project. They not only provide a clean and polished look but also protect the edges of your laminate flooring from damage. Here’s how you can complete this step:
- Measure your walls and cut the baseboards to the appropriate length.
- Use a miter saw to create 45-degree angles at the corners for a seamless finish.
- Apply adhesive or use finishing nails to secure the baseboards to the wall, ensuring they are flush against the flooring.
- Fill any nail holes or gaps with wood filler and sand it down for a smooth surface.
- Apply a coat of paint or stain to match your desired aesthetic.
Using Transition Strips
Transition strips are essential for creating a seamless transition between laminate flooring and other types of flooring or different rooms. Here’s a step-by-step guide on using transition strips:
- Measure the length needed for the transition strip and cut it accordingly.
- Place the transition strip in the doorway or where the laminate flooring meets another type of flooring.
- Align the strip with the edge of the laminate flooring and attach it using the provided nails or adhesive.
- Ensure the transition strip is level and provides a smooth transition, making sure there are no gaps.
- Repeat this process for each doorway or area where a transition strip is required.
By following these steps and paying attention to the finishing touches, you can turn your laminate flooring installation into a professional-looking masterpiece. Whether it’s the baseboards and trim or the transition strips, these final details will elevate the overall appearance and functionality of your laminate flooring, leaving you with a beautiful and long-lasting result.
Frequently Asked Questions For What Way To Lay Laminate Flooring
Which Direction Do You Lay Laminate Flooring?
Laminate flooring should be laid parallel to the longest wall in the room for better aesthetics and stability.
Is There A Wrong Way To Lay Laminate Flooring?
Yes, there is a wrong way to lay laminate flooring. Incorrect installation can lead to issues like buckling or uneven surfaces. It’s crucial to follow manufacturer guidelines for proper installation.
Which Way Do You Lay Laminate Flooring To Make Room Look Bigger?
To make a room look bigger, lay laminate flooring lengthwise along the longest wall. This creates the illusion of a larger space.
Does The Tongue Or Groove Go Against The Wall?
The tongue should go against the wall when installing wood flooring to ensure a secure fit.
Conclusion
To sum up, laying laminate flooring is a straightforward process that can enhance the aesthetic and functionality of any space. By following proper installation techniques and choosing the right materials, you can achieve a durable and visually appealing floor. Don’t hesitate to experiment with different patterns and styles to achieve your desired look.
Happy flooring!