DIY How to Stain Wood: Step-by-Step for a Pro Finish
To stain wood, start by sanding the surface and wiping it clean. Then, apply the stain evenly with a cloth or brush, following the direction of the grain.
DIY wood staining allows you to customize the color and finish of your project, creating a unique and personalized look for your furniture or home decor. Whether you’re refinishing an old piece or starting from scratch, mastering the art of staining wood will give you the freedom to create beautiful and durable pieces that showcase your style and creativity.
This guide will take you through the step-by-step process of staining wood, providing tips and techniques to achieve professional-looking results and preserving the natural beauty of the wood. Let’s dive into the world of DIY wood staining and unleash your creativity with this transformative technique.
Choosing The Right Stain
Choosing the right wood stain is crucial for achieving the desired finish on your DIY project. With a myriad of options available, it can be overwhelming to know where to begin. Let’s break down the key factors to consider when choosing the right stain for your wood project.
Understanding Different Types Of Wood Stain
Wood stains come in three primary types: water-based, oil-based, and gel. Each type has its own application method and unique properties that affect the final result. For instance, water-based stains are eco-friendly and quick-drying, while oil-based stains offer deeper penetration and richer color payoff. Gel stains, on the other hand, provide a thicker consistency, making them ideal for vertical surfaces and achieving a more consistent finish.
Considering The Color And Transparency
When selecting a wood stain, consider the color and transparency that will best complement your project. Lighter stains allow more of the wood’s natural grain to show through, while darker stains provide a more uniform color. Additionally, transparent stains offer a subtle tint while showcasing the wood’s natural beauty, while opaque stains completely conceal the wood grain with bold color.
Preparing The Wood Surface
Before staining wood, preparing the wood surface is crucial for achieving a smooth and professional finish.
Sanding And Smoothing The Wood
Begin by sanding the wood using progressively finer grit sandpaper to remove any imperfections.
Smooth the surface by sanding in the direction of the wood grain for a polished result.
Cleaning And Removing Dust
- Clean the wood surface with a damp cloth to remove any dirt, dust, or debris.
- Remove all dust using a tack cloth or vacuum to ensure a clean base for the stain to adhere to.
Applying The Stain
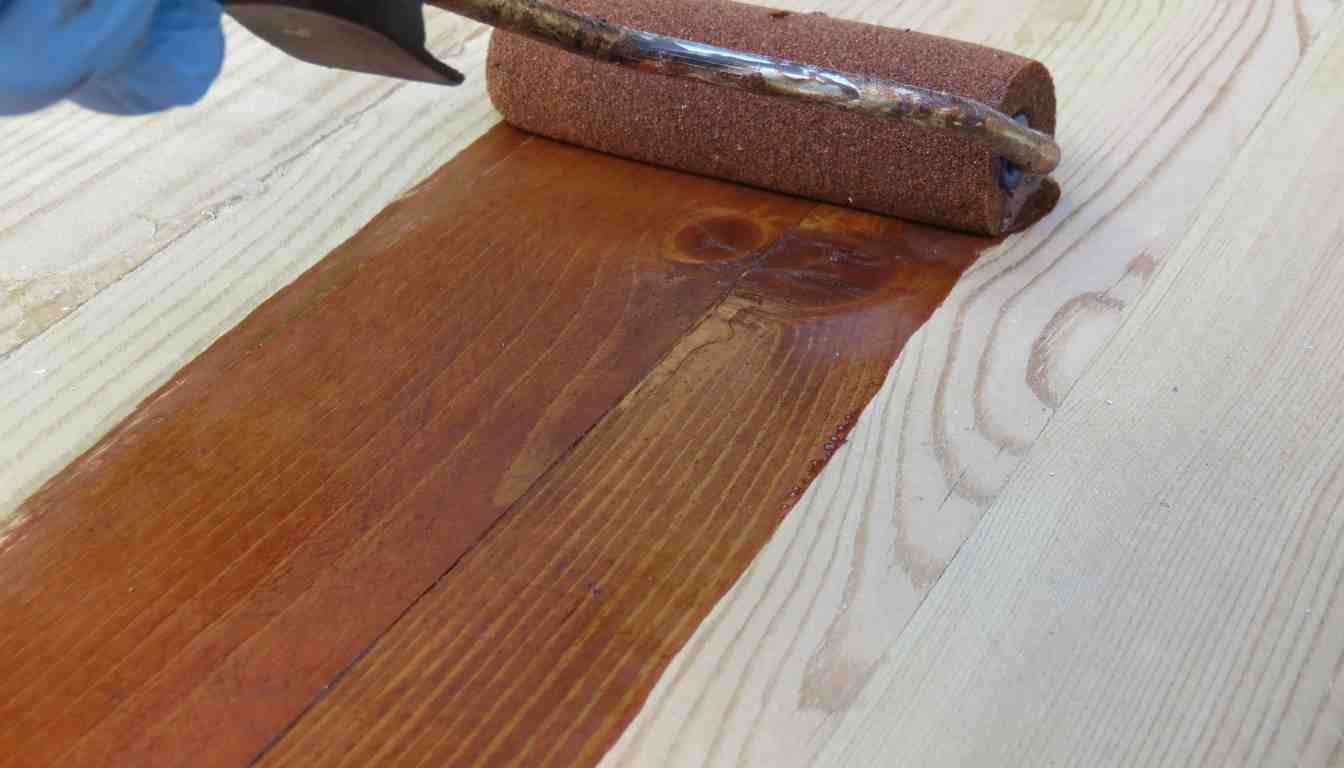
Now that you have prepared the wood surface and chosen the perfect stain color, it’s time to apply the stain. This step is crucial in achieving the desired look and preserving the natural beauty of the wood. In this section, we will discuss the different methods you can use to apply the stain and how to achieve the desired intensity by applying multiple coats.
Using A Brush, Cloth, Or Sprayer
When it comes to applying the stain, you have three main options – using a brush, a cloth, or a sprayer. Each method has its advantages and it ultimately depends on your preference and the size of the project. Let’s take a closer look at each option:
- Using a Brush: This is the most common method and it offers precise control over the application. A bristle brush works well for larger surfaces, while a foam brush is ideal for smaller areas and intricate details. Dip the brush lightly into the stain, making sure to remove any excess before applying it in smooth, even strokes along the grain of the wood.
- Using a Cloth: If you prefer a more subtle and even application, using a cloth is a great option. Cut a clean, lint-free cloth into small pieces and fold them into squares. Dip a cloth piece into the stain and wring out any excess. Gently wipe the stain onto the wood, applying in the direction of the grain. This method allows you to control the intensity of the stain by adjusting the pressure and the number of coats applied.
- Using a Sprayer: When working on larger surfaces or intricate designs, a sprayer can save you a lot of time and effort. Make sure to choose the appropriate sprayer for your stain, whether it is an airless sprayer or a compressed air sprayer. Apply the stain evenly, holding the sprayer about 8-12 inches from the wood surface. Keep the sprayer moving to avoid pooling and streaking.
Applying Multiple Coats For Desired Intensity
Depending on the desired color intensity and the type of wood you’re working with, you may need to apply multiple coats of stain. Applying multiple coats allows you to build up the color gradually and achieve your desired look. Here’s how to do it:
- Light Coat: Start by applying a light coat of stain. This will allow the wood to absorb the stain and create a base for subsequent coats. Use the same method (brush, cloth, or sprayer) that you used for the initial application.
- Drying Time: Allow the first coat to dry completely before applying another coat. Refer to the manufacturer’s instructions for the recommended drying time. Ensure proper ventilation during the drying process to prevent fumes from accumulating.
- Sand Between Coats: To achieve a smooth finish, gently sand the wood between coats. Use a fine-grit sandpaper (220-grit or higher) to remove any raised grain or imperfections. Wipe away the sanding residue with a tack cloth before proceeding with the next coat.
- Repeat Process: Apply additional coats, following the same process as the initial coat. Depending on the desired intensity, you may need to apply several coats until you achieve the desired color depth and richness.
Remember, take your time during the staining process and pay attention to the details. Proper application and patience will ensure a beautiful, professional-looking finish that enhances the natural beauty of the wood. Happy staining!
Enhancing With Techniques
When it comes to staining wood, the possibilities are endless. With a little bit of creativity and know-how, you can take your DIY project to the next level by enhancing it with different staining techniques. In this post, we will explore two techniques that will add a unique touch to your stained wood: creating a distressed look and blending colors for custom effects.
Creating A Distressed Look
If you want to give your stained wood a vintage or weathered appearance, creating a distressed look is the way to go. This technique involves intentionally aging the wood and adding character by giving it an aged or worn-out appearance. Here’s how you can achieve this:
- Prepare the surface by sanding it lightly to remove any rough spots or imperfections.
- Apply a base coat of the desired stain color and let it dry completely.
- Using sandpaper, gently sand the surface of the wood in areas where wear would naturally occur, such as edges, corners, and handles.
- Once you have achieved the desired distressed look, apply a second coat of stain to enhance the aged effect.
- Finish off by sealing the wood with a protective topcoat to preserve the distressed look.
Blending Colors For Custom Effects
If you’re looking to add a pop of color or create a custom effect, blending colors is an excellent technique to experiment with. By combining different stains, you can achieve unique finishes that suit your style and preferences. Here’s a simple guide to help you get started:
- Choose two or more stain colors that complement each other and your project.
- Apply the first stain color to the wood, following the manufacturer’s instructions.
- Allow the first coat to dry completely before lightly sanding the surface with fine-grit sandpaper.
- Apply the second stain color, focusing on areas where you want to create depth or highlight certain features.
- Blend the colors together using a clean cloth or brush, working in circular motions for a seamless transition.
- Continue layering and blending the colors until you achieve the desired effect.
- Finish off with a protective topcoat to seal the colors and enhance their vibrancy.
Now that you know how to enhance your stained wood with techniques such as creating a distressed look and blending colors, it’s time to unleash your creativity and take your DIY projects to new heights. With these techniques, you can transform ordinary wood into extraordinary pieces that reflect your unique style and personality.
Protecting The Stained Wood
Learn how to protect stained wood with this easy DIY guide. Discover the steps to properly stain your wood and keep it looking beautiful for years to come.
In order to maintain the beauty of your stained wood project, it’s crucial to protect it with a clear coat or sealant.
Applying A Clear Coat Or Sealant
Applying a clear coat or sealant is a simple yet essential step in wood staining. It provides a protective layer that shields the wood from damage.
- Choose a high-quality clear coat or sealant suitable for your project.
- Follow manufacturer instructions for application and drying times.
Maintaining The Finish Over Time
To maintain the finish on your stained wood over time, regular care and attention are required.
- Wipe down the surface with a damp cloth to remove dust and dirt.
- Avoid using harsh chemicals or abrasive materials that can damage the finish.
Inspect the wood periodically for any signs of wear and reapply the clear coat or sealant as needed.
Troubleshooting And Tips
When it comes to stained wood projects, it’s essential to be prepared for potential challenges and have the right strategies in place to troubleshoot and achieve the best results. Here we offer some invaluable tips to help you effectively deal with common staining issues and maintain consistent, professional-looking results.
Dealing With Uneven Staining
If you’ve encountered uneven staining on your wood project, don’t worry – it’s a common problem that can be resolved with the right techniques. Here are some effective solutions for dealing with uneven staining:
- Sand the Surface: If you notice areas with darker or lighter stain, lightly sand the surface to remove excess stain and even out the color.
- Apply Additional Coats: Consider applying an additional coat of stain to even out the color and achieve the desired depth of color.
- Use Pre-Stain Conditioner: Pre-stain conditioners can help minimize blotchiness and promote a more even stain absorption, especially on softwoods like pine or birch.
Tips For Achieving Consistent Results
Consistency is key when it comes to achieving a professional finish on your stained wood projects. Here are some helpful tips to ensure consistent and beautifully stained results:
- Proper Surface Preparation: Ensure the wood surface is properly sanded and free of any dust or debris before applying the stain to promote even absorption and a smooth finish.
- Stir the Stain Thoroughly: Thoroughly stir the stain before application to evenly distribute the color pigments and achieve consistent results.
- Test Stain on Scrap Wood: To ensure the desired color and consistency, always test the stain on a scrap piece of the same wood to avoid any surprises on the final piece.
- Apply Evenly: Use a brush, cloth, or sprayer to apply the stain evenly, working in the direction of the wood grain to avoid streaks or blotches.
Inspiring Staining Ideas
Staining wood can bring out the natural beauty of the grain, transforming your existing furniture into breathtaking pieces that reflect your personal style. To help spark your creativity, here are some inspiring staining ideas that can revamp your home decor and breathe new life into yourhttps://woodworkingadvisor.com/how-to-get-rid-of-old-furniture old furniture.
Staining A Vintage Chair
Revive your beloved vintage chair by giving it a fresh new look with a rich and lustrous stain. Consider opting for a darker shade such as mahogany or ebony for an elegant and timeless appeal, or go bold with a vibrant color that complements your interior design scheme. Staining a vintage chair is an engaging and rewarding DIY project that can add character and charm to any room.
Revamping An Old Coffee Table
Transforming an old, worn-out coffee table into a stunning centerpiece for your living space is as simple as applying a new stain. From classic oak to trendy gray wash, the possibilities are endless. Experiment with different staining techniques such as layering multiple colors or creating a distressed finish to achieve a custom look that captures attention and adds a touch of sophistication to your home.
Conclusion And Final Touches
Finally, after putting in the time and effort to stain wood furniture, it’s time to add the final touches to your project. By focusing on Admiring Your Transformed Furniture, you can fully appreciate the beauty of your work.
Admiring Your Transformed Furniture
Stand back and admire the rich color and smooth finish you achieved through staining. Run your fingers over the wood to feel the velvety texture and appreciate the grain patterns brought out by the stain.
Sharing Your Staining Success
- Show off your stained furniture to friends and family
- Post pictures on social media to inspire others
By sharing your staining success, you can spread the joy of DIY projects and encourage others to try their hand at staining wood too.
Frequently Asked Questions On Diy How To Stain Wood
What Tools Do I Need For Wood Staining?
To stain wood effectively, you will need essential tools such as brushes, sandpaper, wood stain, protective gear, and a clean cloth for wiping off excess stain. These tools ensure a smooth staining process and a professional finish on your wood project.
How Do I Prepare Wood For Staining?
Preparing wood for staining is crucial for a flawless finish. Begin by sanding the wood surface to remove any imperfections and create a smooth base. Clean the wood thoroughly to eliminate dust and debris. Apply a pre-stain conditioner to help the wood absorb the stain evenly.
What Is The Best Way To Apply Wood Stain?
For optimal results, apply wood stain using a brush or cloth in the direction of the wood grain. Allow the stain to penetrate for the recommended time before wiping off excess with a clean cloth. Ensure even coverage and consistency to achieve the desired color and finish on your wood project.
Conclusion
Enhance your woodworking skills with these DIY wood staining techniques. Get creative with colors and finishes to match your style. Follow the steps and enjoy the satisfaction of transforming plain wood into beautiful pieces for your home. Start staining today and let your creativity shine!