
How to Cut Trim at a 45-Degree Angle Without a Miter Saw
To cut trim at a 45-degree angle without a miter saw, you can use a circular saw with a guide or a miter box and a handsaw. These alternative methods allow you to achieve accurate and clean cuts while maintaining the desired angle.
By following the steps below, you can successfully cut trim at a 45-degree angle without the need for a miter saw. When it comes to trimming projects, achieving precise angles is crucial for seamless installations. However, you may not always have access to a miter saw.
Fortunately, there are alternative methods that can help you cut trim at a 45-degree angle accurately. By utilizing a circular saw with a guide or a miter box and a handsaw, you can still achieve clean and precise cuts without the need for specialized equipment. We will explore these alternative methods in detail, providing step-by-step instructions to help you successfully cut trim at a 45-degree angle without a miter saw.
Using A Miter Box
A miter box is a simple tool for cutting trim at a 45° angle without a miter saw. Secure the trim in the miter box, aligning the cutting slot at the 45° angle. Then, carefully saw through the trim using a hand saw for a precise cut.
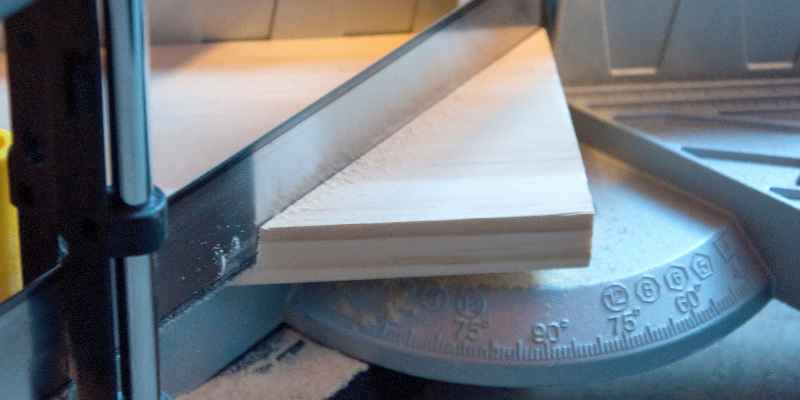
Using A Circular Saw With A Guide
When a miter saw isn’t available, a circular saw with a guide can be used for cutting trim at a 45° angle. Secure the trim and the guide, ensuring it’s set at the correct angle. Slowly and steadily, use the circular saw to make the cut, ensuring precision.
Using A Table Saw With A Miter Jig
Pairing a table saw with a miter jig allows for accurate 45° angle cuts on trim. Attach the miter jig to the table saw and set it to the desired angle. Carefully guide the trim through the saw, using the miter jig as a guide for precision cuts.
Tips For Accurate Measurements
Learn how to cut trim at a 45-degree angle even without a miter saw by following these handy tips for accurate measurements. With a few simple techniques, you can achieve precise cuts and create professional-looking results for your projects.
Accurate measurements are essential when cutting trim at a 45-degree angle without a miter saw. Even small discrepancies can significantly affect the final result, leaving you with gaps or uneven edges. To ensure precision, consider the following tips:
Using A Framing Square
One of the most reliable tools for measuring and marking a 45-degree angle is a framing square. This triangular-shaped tool is versatile and can assist in various carpentry tasks. To use a framing square:
- Place the base of the framing square against the edge of the trim.
- Align the long side of the square along the length of the trim piece.
- Find the 45-degree angle on the framing square and mark it on the trim.
- Ensure that the square stays securely in place while marking to prevent any shifting that could affect the accuracy of the cut.
Using a framing square provides a reliable guide for creating precise 45-degree angles, eliminating the need for a miter saw.
Double-checking The Angle
Double-checking the angle is crucial before making any cuts to prevent potential mistakes. Ensure that the framing square is aligned correctly by following these steps:
- Place the framing square back on the previously marked line.
- Check that the square is flush against the trim’s edge and that the line aligns with the designated 45-degree angle.
- If the angles do not match or the square is not aligned properly, reposition and remark the line to guarantee accuracy.
Marking The Cut Line
Once the angle is double-checked, it’s time to mark the cut line for a precise and clean outcome. To mark the cut line:
- Extend the marked line across the full width of the trim.
- Use a straightedge or ruler to ensure a straight and even line.
- Make the line bold and visible to prevent confusion during the cutting process.
By following these tips, you can confidently cut trim at a 45-degree angle without a miter saw, achieving professional-looking results with precision and accuracy.
Essential Tools For Clean Cuts
The key to achieving clean cuts when cutting trim at a 45-degree angle without a miter saw lies in having the right tools to assist you. By using the essential tools mentioned below, you can ensure precise and professional-looking cuts that will enhance the overall appearance of your woodworking project.
Sharp Saw Blade
A sharp saw blade is crucial for achieving clean and accurate cuts when working with trim. Make sure your saw blade is sharp and well-maintained before starting your project. A dull blade can result in jagged cuts and splintered edges, compromising the quality of your work. If needed, sharpen your blade or consider investing in a new one for the best results.
Clamps For Stability
When cutting trim at a 45-degree angle, it is essential to ensure stability to achieve precise cuts. Using clamps to secure the trim firmly in place can help prevent it from moving or shifting during the cutting process. This will help you maintain control and accuracy, resulting in clean and seamless cuts. Position the clamps strategically along the length of the trim to provide optimal stability.
Sandpaper Or File For Finishing
After cutting your trim at a 45-degree angle, it is essential to smooth out any rough edges or imperfections. Sandpaper or a file can be used to carefully and gently smooth the cut surface, ensuring a professional and polished finish. Pay attention to detail while sanding to achieve a seamless transition between the angled cut and the rest of the trim. This finishing step adds a touch of refinement and enhances the overall aesthetic of your project.

Practice And Preparation
Cutting trim at a 45-degree angle without a miter saw requires precise practice and thorough preparation. From choosing the right type of trim to setting up a safe workspace, each step plays a crucial role in achieving clean, accurate cuts. Let’s explore the essential practices and preparations for achieving precise 45-degree angle cuts on trim without a miter saw.
Choosing The Right Type Of Trim
Before beginning any cutting, it’s crucial to select the appropriate type of trim for the project. Ensure the trim is straight and free from knots or imperfections that could hinder clean cuts. Additionally, consider the size and profile of the trim, as this will impact the type of saw and cutting technique required.
Practice Cuts On Scrap Pieces
Practicing on scrap pieces of trim is a vital step in mastering the art of cutting at a 45-degree angle without a miter saw. Use the same type of trim that will be used in the actual project, and conduct several practice cuts to perfect the technique. This allows for adjustments and fine-tuning before making cuts on the actual trim pieces.
Setting Up A Safe Workspace
Prior to cutting trim, establish a safe and organized workspace. Clear the area of any obstructions, ensure proper lighting, and use clamps or supports to secure the trim in place during cutting. Adhering to safety protocols and maintaining a clutter-free environment is essential for precise and secure cutting.
Conclusion
Mastering the art of cutting trim at a 45-degree angle without a miter saw adds versatility to your DIY projects. With the techniques outlined in this guide, you can achieve clean and precise cuts using simple tools. Embrace the challenge and hone your skills for a seamless finish in your woodworking endeavors.