How to Finish Butcher Block Like a Pro
Finishing butcher block can feel like a big task for many DIYers, especially when you want that smooth, beautiful surface that lasts. Getting it right the first time avoids headaches and costly mistakes down the road. If you’re wondering how to finish butcher block like a pro, you’re in the right spot.
We’ll break down everything you need to know into simple steps that anyone can follow. Get ready to transform your kitchen or workspace!
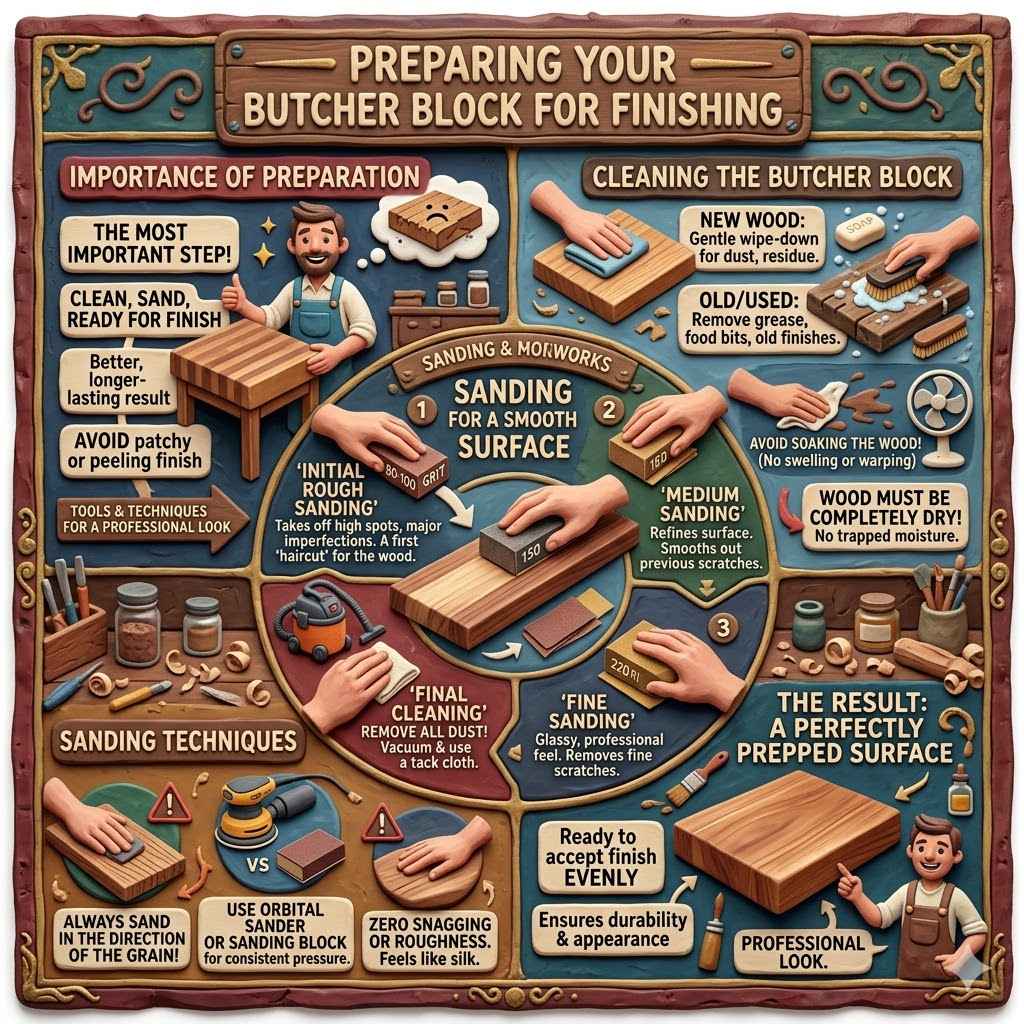
Preparing Your Butcher Block For Finishing
Before you even think about applying a finish, preparing your butcher block surface is the most important step. This involves cleaning, sanding, and ensuring the wood is ready to accept the finish evenly. A well-prepared surface means a much better and longer-lasting result.
Skipping this part can lead to a finish that looks patchy or peels off prematurely. We’ll cover the exact tools and techniques to get your wood perfectly prepped, ensuring a professional look.
Cleaning the Butcher Block
Start by giving your butcher block a thorough cleaning. If it’s new, it might have dust or factory residues. If it’s old or has been used, you’ll want to remove any grease, food bits, or old finishes.
For new wood, a gentle wipe-down with a damp cloth is usually enough. If there are stubborn marks, you might need a mild soap and water solution, but make sure to dry it completely immediately after. Avoid soaking the wood, as too much moisture can cause it to swell or warp, which is a problem you don’t want before finishing.
It’s essential that the wood is completely dry before you move on to sanding. Moisture can get trapped under the finish and cause issues later. Think of it like painting a wall—you wouldn’t paint over dirt or dampness.
For butcher block, this principle is even more critical because it’s a surface that will see a lot of use and potential moisture exposure.
Sanding for a Smooth Surface
Sanding is key to achieving that smooth, professional finish. You’ll start with a coarser grit sandpaper and gradually move to finer grits. This process removes any imperfections, rough spots, or old finishes and prepares the wood for the sealant or oil.
The goal is to create a surface that feels like silk to the touch. Imagine running your hand over it – you want zero snagging or roughness.
Typically, you’ll start with 80 or 100-grit sandpaper to remove any major unevenness. Then, you’ll move to 150-grit, followed by 220-grit. Some pros even go up to 320-grit for an ultra-smooth feel, especially if they plan to use a penetrating oil finish.
Always sand in the direction of the wood grain. This prevents creating visible scratches that can show through your finish. Use a sanding block or an orbital sander for larger areas to ensure consistent pressure and avoid dips or high spots.
- Initial Rough Sanding: Use 80 or 100-grit sandpaper. This step takes off the high spots and any significant imperfections. It’s like giving the wood a first haircut, shaping it down. Make sure to cover the entire surface evenly.
- Medium Sanding: Switch to 150-grit sandpaper. This refines the surface after the coarser grit. It starts to smooth out the scratches left by the 80 or 100-grit paper. You’ll begin to feel a noticeable difference in smoothness.
- Fine Sanding: Finish with 220-grit sandpaper. This is where the magic really happens for smoothness. It removes the finer scratches from the previous step and prepares the wood for finishing. The surface should feel almost glassy at this point.
After each sanding stage, it’s vital to remove all dust. You can use a shop vacuum with a brush attachment or a tack cloth. Dust left behind will get trapped in your finish, creating a gritty texture.
A final wipe with a tack cloth ensures all fine particles are gone, leaving a perfectly clean surface. This attention to detail makes a huge difference in the final appearance and durability of your butcher block.
Choosing the Right Butcher Block Finish
Selecting the perfect finish for your butcher block is crucial. It impacts not only how it looks but also how it performs, especially in a kitchen environment. Different finishes offer varying levels of protection, maintenance requirements, and aesthetics.
Understanding these differences will help you pick the best option for your needs and lifestyle. We’ll explore the most popular choices and what makes them suitable for butcher block.
Food-Safe Mineral Oil
Mineral oil is a popular choice, especially for cutting boards and butcher blocks that will see direct food contact. It’s food-safe, easy to apply, and simple to reapply as needed. This is a penetrating finish, meaning it soaks into the wood rather than forming a hard surface layer.
This keeps the wood moisturized and helps prevent it from drying out and cracking.
When using mineral oil, you’ll need to apply it regularly, especially in the first few weeks. The wood will absorb the oil, and it will appear dry. Reapplying will keep it looking its best and protected.
It’s a very natural look and feel that many people prefer for their kitchen surfaces. It doesn’t offer the same level of water resistance as some other finishes, but it’s incredibly easy to touch up and maintain.
How to Apply Mineral Oil
Applying mineral oil is straightforward. Ensure your butcher block is clean and dry. Pour a generous amount of food-grade mineral oil directly onto the surface.
Use a clean cloth or paper towel to spread the oil evenly across the entire surface, making sure to cover all edges and end grain. Let the oil soak in for at least 30 minutes, or ideally, overnight for a deeper penetration. Wipe away any excess oil that hasn’t been absorbed.
You will likely need to apply multiple coats, especially the first time. Repeat this process until the wood stops absorbing the oil, looking rich and saturated.
For ongoing maintenance, reapply mineral oil whenever the wood starts to look dry or dull. This could be weekly at first, then perhaps monthly or even less often as the wood becomes well-seasoned. This regular application is what keeps the wood from drying out and prevents stains from setting in too deeply.
Beeswax and Oil Blends
Many people like to use a blend of mineral oil and beeswax. This creates a slightly more protective finish than oil alone. The beeswax adds a bit of water resistance and a smoother, softer feel to the surface.
It’s still food-safe and easy to reapply.
These blends are often sold pre-mixed, or you can make your own by melting beeswax and mixing it with mineral oil. The ratio can vary, but a common starting point is about 1 part beeswax to 4 parts mineral oil. It’s a great option for those who want a bit more protection without going to a more permanent sealant.
Tung Oil and Linseed Oil
Pure tung oil and polymerized linseed oil are also common choices. These are drying oils that cure to form a protective film on the surface of the wood. They offer better water and stain resistance than mineral oil alone.
However, they require more careful application and curing time. Pure tung oil is considered food-safe once fully cured, while linseed oil can sometimes have issues with rancidity if not fully polymerized or if it’s the raw version.
When using tung or linseed oil, follow the manufacturer’s instructions closely. These finishes typically involve applying thin coats, letting them cure, and then applying more coats. This process can take several days or even weeks to complete.
The resulting finish is more durable and offers better protection against spills and daily wear and tear. It also provides a beautiful, natural sheen.
It’s important to note the difference between pure tung oil and “tung oil finish.” Many products labeled “tung oil finish” contain varnishes or other chemicals that are not food-safe. Always check the label to ensure you are using 100% pure tung oil if food safety is a concern. Polymerized linseed oil has undergone a process to make it dry faster and harder than raw linseed oil.
Polyurethane and Varnish
For maximum durability and water resistance, polyurethane or other clear varnishes are an option. These create a tough, waterproof barrier on the surface of the wood. This is a good choice for high-traffic areas or if you want a very low-maintenance surface that can withstand spills and frequent cleaning without worry.
However, the downside is that polyurethane and varnishes are not food-safe once applied. If you plan to use your butcher block for direct food preparation, these finishes are not recommended. They also create a surface that can chip or scratch over time, and repairing them can be more involved than reapplying oil.
If you choose this route, consider using it for decorative or utility surfaces rather than primary food prep areas.
Polyurethane comes in water-based and oil-based varieties. Water-based poly dries clear and has low odor, while oil-based poly offers a warmer, amber tone and is generally more durable. For butcher block, an oil-based poly might be preferred for its hardness and slight ambering effect that can look nice on wood.
How to Apply Your Chosen Finish Like a Pro
Applying the finish correctly is where the “like a pro” part really comes in. Even the best finish will look poor if applied sloppily. This section will guide you through the application process for different finish types, ensuring a smooth, even, and beautiful result.
We’ll focus on techniques that create a durable and attractive surface.
Applying Penetrating Finishes (Oils and Waxes)
If you’ve chosen mineral oil, beeswax blend, or tung oil, the application is generally quite forgiving but requires patience and multiple coats. The key is to let the oil penetrate deeply into the wood. For mineral oil, it’s as simple as applying, letting it soak, and wiping off the excess.
For tung oil or linseed oil, you’ll be applying thin coats. Use a lint-free cloth or a good quality brush. Apply a thin layer and spread it evenly.
Allow it to penetrate for the recommended time (check product instructions), then wipe off any excess that hasn’t soaked in. This prevents a sticky or gummy residue from forming on the surface. You’ll need to repeat this process multiple times.
The number of coats depends on the wood’s porosity and the specific product, but usually, 3-5 coats are recommended for good protection.
- Thin Coats are Key: Apply the oil or wax blend in thin, even layers. It’s better to apply several thin coats than one thick, gloopy coat. This ensures even absorption and prevents pooling.
- Work with the Grain: Always apply the finish in the same direction as the wood grain. This helps the finish soak in evenly and avoids creating swirl marks or uneven patches.
- Allow Ample Penetration Time: Don’t rush the process. Let the oil soak into the wood for at least 30 minutes to an hour, or even overnight for the first few coats. This allows the wood to drink up the protective oils.
- Wipe Off Excess Thoroughly: After the penetration time, meticulously wipe off all excess oil with a clean, dry cloth. Any oil left on the surface will become sticky and difficult to remove once it starts to cure.
A common mistake is not allowing enough drying or curing time between coats. For tung or linseed oil, this can be anywhere from 12 to 24 hours, or even longer depending on humidity and temperature. Rushing this step can lead to a finish that remains tacky or doesn’t harden properly.
Good ventilation also helps speed up the curing process.
Applying Film Finishes (Polyurethane, Varnish)
If you opt for polyurethane or varnish, the application process is different. You’re creating a protective film on top of the wood. This requires careful application to avoid drips, brush marks, and uneven coverage.
You’ll need a good quality brush or a foam applicator for smooth application.
Apply thin, even coats, working from one end of the butcher block to the other. Overlap each stroke slightly to ensure full coverage. After each coat, it’s recommended to lightly sand with a very fine grit sandpaper (like 320 or 400-grit) once the coat is dry.
This is called “de-nibbing” and it smooths out any imperfections and helps the next coat adhere better. Be sure to wipe away all dust after sanding with a tack cloth.
Typically, 3-4 coats of polyurethane or varnish are sufficient for a durable finish. Allow adequate drying time between coats, which can vary depending on the product and environmental conditions. Check the product instructions for specific drying times.
It’s important to seal all sides of the butcher block, including the bottom and edges. If you only seal the top, moisture can get into the unfinished sides, causing the wood to cup or warp. This is a critical step for maintaining the stability of the butcher block.
Ensure you are working in a well-ventilated area, especially with oil-based finishes, and consider wearing a respirator mask.
Dealing with End Grain
End grain is the most porous part of the wood and will absorb finish much faster than face grain. This can lead to an uneven finish if not handled properly. When applying oil, apply extra to the end grain and let it soak for longer.
For film finishes, you might need to apply extra coats to the end grain and be extra careful to avoid drips.
For oil finishes, you can often get away with just applying more oil to the end grain. It will absorb it readily. For polyurethane, you might apply a bit more to the end grain and ensure smooth strokes.
Some people even use a paste wax on the end grain after applying an oil finish to help seal it further and give it a nice sheen.
Real-Life Example: Sarah’s Kitchen Island Butcher Block
Sarah had a beautiful new butcher block top for her kitchen island. She wanted it to look amazing and be durable enough for everyday use, including chopping veggies and placing hot pans. After researching, she decided to go with a food-safe pure tung oil finish.
She started by sanding her new butcher block from 80 grit all the way up to 220 grit. Then, she wiped it down with a tack cloth. For the first coat of tung oil, she applied it generously and let it soak for an hour.
She wiped off the excess and let it cure for 24 hours. She repeated this process four more times, with 24-hour curing periods in between. The result was a stunning, warm, and durable finish that looked incredibly professional.
Now, her island is the centerpiece of her kitchen, easy to clean and a joy to work on.
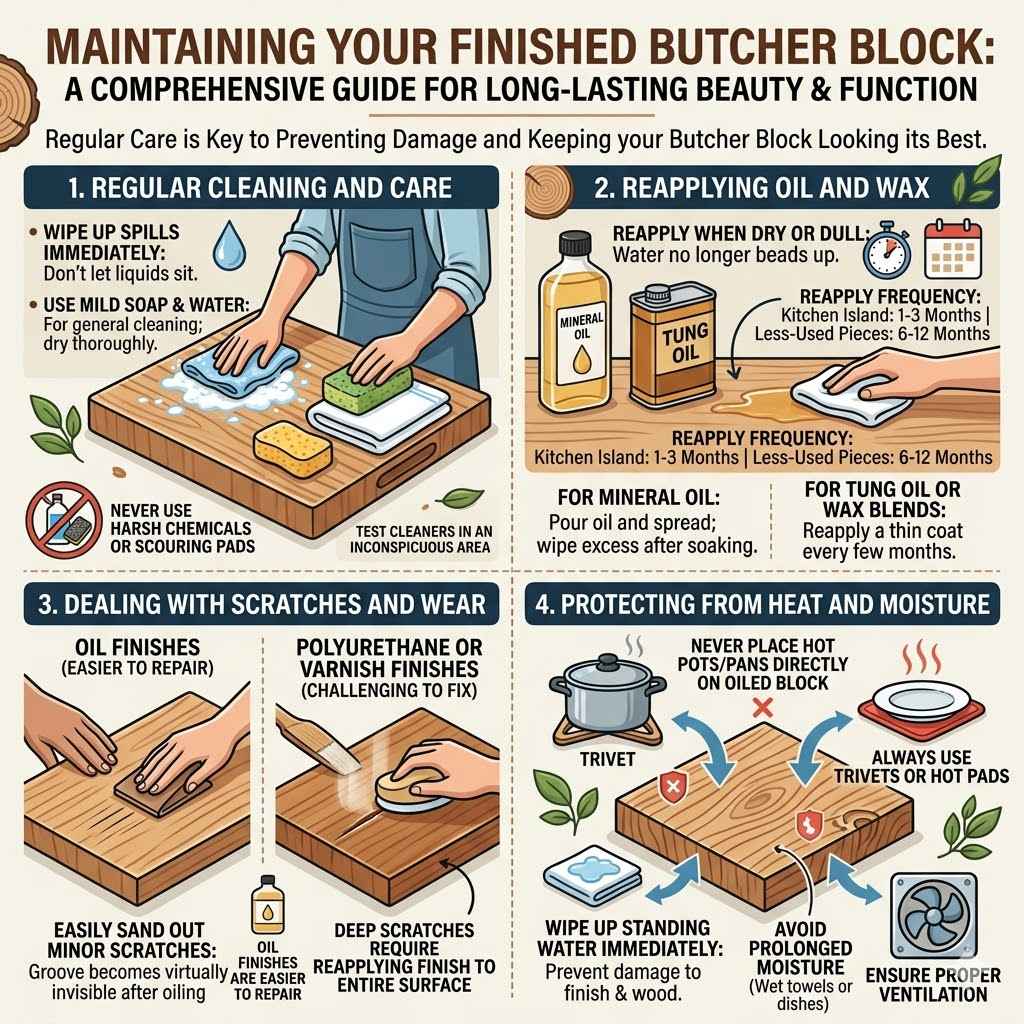
Maintaining Your Finished Butcher Block
Once your butcher block is finished, proper maintenance will ensure it stays beautiful and functional for years to come. The type of maintenance depends heavily on the finish you chose. Regular care is key to preventing damage and keeping your butcher block looking its best.
We’ll cover what to do after the initial finishing is complete.
Regular Cleaning and Care
For wood finished with oil or wax, cleaning is simple. Wipe up spills immediately with a damp cloth. Avoid letting liquids sit on the surface.
For general cleaning, use a mild soap and water solution, then dry thoroughly. Never use harsh chemicals, abrasive cleaners, or scouring pads, as these can damage the finish and the wood itself.
If you notice water spots or dull areas, it’s time for a refresh of your oil or wax. For polyurethane or varnish finishes, a damp cloth is usually sufficient for daily cleaning. Tougher stains might require a specialized wood cleaner, but always test it in an inconspicuous area first.
Reapplying Oil and Wax
Penetrating finishes like mineral oil and tung oil will need to be reapplied periodically. You’ll know it’s time when the wood starts to look dry, dull, or water no longer beads up on the surface. For mineral oil, simply pour more oil onto the surface and spread it around.
Let it soak in, then wipe off the excess.
For tung oil or wax blends, you might want to reapply a thin coat every few months, or as needed. This replenishes the protective oils and keeps the wood from drying out. It’s a simple process that significantly extends the life and appearance of your butcher block.
Just ensure the surface is clean before reapplying.
A good rule of thumb for oil finishes is to reapply whenever the surface starts to look dry or water doesn’t bead up. For a kitchen island, this might be every 1-3 months depending on use. For a less-used piece, it might be every 6-12 months.
Don’t be afraid to reapply; it’s a sign of good care!
Dealing with Scratches and Wear
Scratches are inevitable on a butcher block, especially if it’s used for food prep. For oil-finished butcher blocks, minor scratches can often be sanded out and the area re-oiled. You can carefully sand the scratched area with fine-grit sandpaper (220 or higher) in the direction of the grain, then apply a fresh coat of oil to the spot.
For polyurethane or varnish finishes, scratches are more challenging to fix. Deep scratches might require sanding down the entire surface and reapplying the finish. Minor surface scratches might be buffed out or covered with a furniture polish, but it’s not always a perfect fix.
This is a key reason why oil finishes are popular for active butcher blocks – they are much easier to repair and maintain.
One practical scenario: A user accidentally cut too deep while chopping vegetables, leaving a noticeable groove. With an oiled finish, they simply took a small piece of 220-grit sandpaper, lightly sanded the groove and surrounding area in the direction of the grain, then applied a fresh coat of mineral oil. The area blended seamlessly, and the damage was virtually invisible after the oil soaked in.
This ease of repair is a major benefit of oil finishes.
Protecting Your Butcher Block from Heat and Moisture
While finishes offer protection, it’s still important to be mindful of extreme heat and prolonged moisture. Never place hot pots or pans directly onto an oiled butcher block. Always use trivets or hot pads.
Excessive moisture, like leaving wet towels or dishes on the surface for extended periods, can damage the finish and the wood itself.
For film finishes like polyurethane, they offer better heat resistance but can still be damaged by extremely hot items. Wipe up any standing water immediately. If you use your butcher block for wet tasks, ensure it’s thoroughly dried afterward.
Proper ventilation around the butcher block can also help prevent moisture buildup.
Frequently Asked Questions
Question: Is butcher block hard to finish for beginners?
Answer: Not at all! While it might seem intimidating, finishing butcher block is quite manageable for beginners, especially with simple oil finishes. The key is preparation and patience.
We’ve broken down the steps to make it easy.
Question: Can I use any oil on my butcher block?
Answer: It’s best to use food-grade mineral oil for easy maintenance or pure tung oil for better durability. Avoid cooking oils like olive or vegetable oil, as they can go rancid and leave a sticky residue.
Question: How often should I reapply oil to my butcher block?
Answer: You’ll need to reapply oil whenever the wood starts to look dry or water no longer beads up on the surface. This could be monthly for heavily used surfaces or less often for others.
Question: Will I see scratches on my oiled butcher block?
Answer: Minor scratches are common. The beauty of oil finishes is that you can often sand out minor scratches and reapply oil to make them disappear. It’s easy to repair.
Question: Can butcher block be used as a cutting surface without a finish?
Answer: Yes, some people prefer to use butcher block unfinished or just oiled for direct cutting. However, a finish provides better protection against stains and moisture, making it easier to keep clean and looking good.
Summary
Finishing your butcher block like a pro is achievable. Start with thorough preparation, sanding from coarse to fine grits. Choose your finish wisely, considering oil for food safety and ease of maintenance, or film finishes for maximum durability.
Apply finishes in thin, even coats, allowing adequate drying time. Regular cleaning and reapplication of oil will keep your butcher block looking great and performing well. With these steps, you can create a beautiful and functional surface.