How to Make a Square Hole in Wood: Quick & Easy Guide
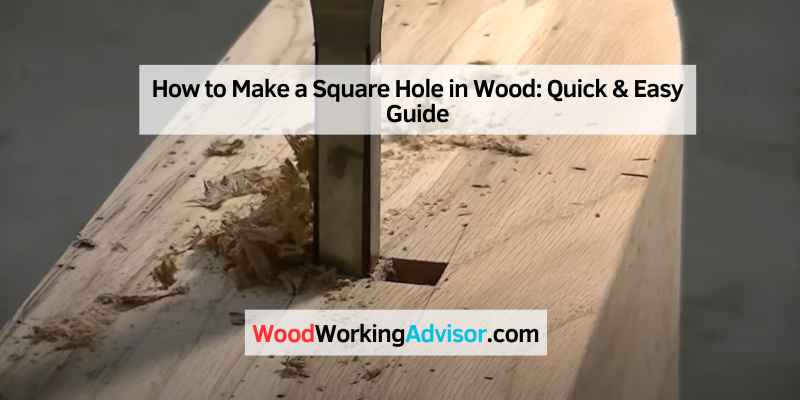
To make a square hole in wood, use a square hole drill bit to create the desired shape efficiently. This specialized tool ensures precise and clean cuts, resulting in a perfect square hole.
Achieving a square hole in wood can be a straightforward process with the right tools and techniques. Whether you are working on a woodworking project or need to install a square peg in a wooden surface, knowing how to create a square hole is a valuable skill.
By following the correct steps and using the appropriate tools, you can easily accomplish this task with precision and accuracy. Let’s explore the process of making a square hole in wood and the necessary tools required for the job.
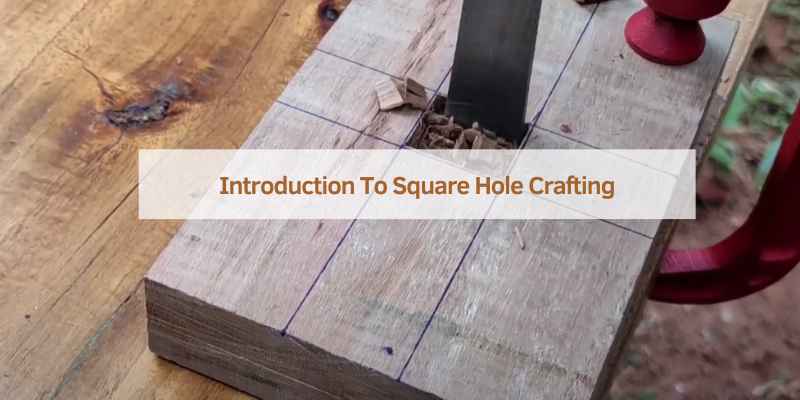
Introduction To Square Hole Crafting
Square hole crafting is a unique woodworking technique that adds a touch of elegance and sophistication to your projects. Whether you’re a seasoned woodworker or a hobbyist looking to expand your skills, creating square holes in wood can open up a world of creative possibilities. In this guide, we’ll explore the appeal of square holes, common applications, and the step-by-step process of crafting them.
The Appeal Of Square Holes
Square holes are visually striking and offer a modern, geometric aesthetic that sets them apart from traditional round holes. The clean lines and sharp angles of square holes add a contemporary flair to woodworking projects, making them a popular choice for furniture makers, cabinet builders, and artisans seeking a sleek and modern design.
Common Applications
Square holes are commonly used in joinery techniques such as mortise and tenon joints, where the precision of a square hole ensures a snug and secure fit. Additionally, square holes are ideal for creating unique accents in woodworking projects, from decorative inlays to functional features like adjustable shelving systems.
Essential Tools And Materials
When it comes to making a square hole in wood, having the right tools and materials is essential for achieving precise and professional results. Whether you are a seasoned woodworker or a DIY enthusiast, selecting the appropriate wood and using the correct tools is crucial for the success of your project. In this section, we will explore the essential tools and materials required for making a square hole in wood.
Selecting The Right Wood
Before starting the process of making a square hole in wood, it is important to choose the right type of wood. Hardwoods such as oak, maple, or cherry are ideal for this purpose due to their strength and durability. These woods are less likely to splinter or crack when creating a square hole, ensuring a clean and precise outcome.
Key Tools For Square Hole Making
Several tools are necessary for making a square hole in wood. The primary tool required for this task is a square hole chisel. This chisel is specifically designed to create clean and accurate square holes in wood, making it an indispensable tool for this woodworking technique.
Safety First: Preparing To Work
To ensure safety when making a square hole in wood, it’s important to prepare properly. Start by selecting the right tools and materials for the task. Measure and mark the wood accurately before using a chisel or drill to create the hole.
Always wear safety goggles and gloves to protect yourself during the process.
Protective Gear
Before starting, put on safety goggles and work gloves.
Workspace Setup
Clear clutter, ensure good lighting, and have a stable workbench.
Protect yourself before making square holes in wood.
Always wear protective gear like goggles and gloves.
Set up your workspace with good lighting and a stable bench.
Measuring And Marking Your Wood
To make a square hole in wood, begin by measuring and marking the wood accurately. Use a square tool to ensure precise right angles for your markings. This will help you create a neat and professional-looking square hole in your wood project.
Precision In Planning
Before making a square hole in wood, precision in planning is necessary. You need to have a clear idea of the size and depth of the hole you want to make. You can use a ruler or a measuring tape to take accurate measurements. It’s important to double-check your measurements to avoid errors.
Marking Techniques
Once you have measured your wood, the next step is to mark it. There are different marking techniques you can use depending on the type of tool you will be using to make the square hole. Here are some marking techniques to consider:
- Chalk line: A chalk line is a tool used to create a straight line on a piece of wood. You can use it to mark the outline of your square hole.
- Pencil: A pencil is a versatile tool that can be used to mark the wood. You can use it to mark the edges of your square hole.
- Combination square: A combination square is a tool that can be used to mark angles and lines. You can use it to mark the corners of your square hole.
Measuring and marking your wood is the first step in making a square hole. By taking accurate measurements and using the right marking techniques, you can ensure that your square hole is precise and meets your requirements.
The Drilling Method
The drilling method is an effective way to create a square hole in wood. By using a drill bit with a square shape, you can achieve precise and clean results. With careful planning and the right technique, you can easily accomplish this woodworking task.
Starting With A Pilot Hole
Begin by drilling a small hole to guide the larger bit.
Expanding To The Desired Size
Gradually increase the bit size until the hole reaches the correct dimensions.
Chisel And Hammer Technique
To make a square hole in wood, use the chisel and hammer technique. Mark the area, then carefully chisel along the lines to create the hole. Use the hammer to gently tap the chisel and gradually deepen the cut until the desired depth is achieved.
If you want to make a square hole in wood, the chisel and hammer technique is a simple and effective method. This technique involves carving out the corners of the hole first, and then smoothing the sides to create a clean finish. Here’s how to do it:
Carving Out Corners
1. Measure and mark the size of the square hole on the wood.
2. Use a drill to make a hole in each corner of the marked square.
3. Insert the chisel into one of the holes and tap it gently with a hammer to start carving out the corner.
4. Use the chisel to carve out the remaining three corners of the square.
Smoothing The Sides
1. Use the chisel to remove any rough edges or bumps from the carved corners.
2. Start at one corner and use the chisel to shave off thin layers of wood, working your way around the square.
3. Continue shaving off thin layers until the sides of the hole are smooth and even.
4. Test the size of the hole with the object you plan to fit inside it. Make any necessary adjustments to the size or shape of the hole.
Summary
The chisel and hammer technique is a simple and effective way to make a square hole in wood. By carving out the corners first and then smoothing the sides, you can create a clean and precise finish. With a little practice, you’ll be able to make square holes in wood with ease.
Router And Template Approach
In woodworking, creating a square hole in wood may seem like a challenging task. However, with the right approach and tools, such as a router and a template, you can achieve precise and clean square holes effortlessly. The router and template approach provides a methodical way to ensure accuracy and consistency in creating square holes. Let’s take a closer look at the steps involved in this approach.
Creating A Template
Before you can start routing the square hole, it’s essential to create a template that will guide the router along the desired shape. The template acts as a template guide bushing, ensuring that the router follows the correct path and maintains the square shape throughout the process. Here’s how you can create a template:
- Start by selecting a piece of wood that is similar in thickness to the workpiece you’ll be cutting the square hole in.
- Measure and mark the dimensions of the square hole on the template wood piece.
- Using a saw or chisel, carefully cut out the marked area, ensuring that the corners are perfectly square.
- Sand the edges of the template to smooth out any roughness or imperfections.
Routing The Square Hole
Once you have the template ready, it’s time to start routing the square hole in the actual workpiece. Follow these steps to ensure a clean and precise square hole:
- Secure the workpiece firmly in place using clamps or a vise to prevent any movement during routing.
- Attach the template to the workpiece using double-sided tape or clamps, making sure it is aligned with the desired location of the square hole.
- Insert a straight bit into the router and adjust the cutting depth according to the thickness of the workpiece.
- Turn on the router and carefully plunge it into the wood, following the edges of the template.
- Maintain a steady pace and apply even pressure to guide the router along the template, ensuring that the corners of the square hole are properly cut.
- Repeat the routing process if needed, gradually increasing the depth of cut until the desired depth is achieved.
By using the router and template approach, you can create precise square holes in wood with ease. Remember to always prioritize safety by wearing appropriate protective gear and following the manufacturer’s instructions for your specific router model. Happy woodworking!
Sanding And Finishing Touches
After successfully drilling a square hole in wood, the next step is to ensure a smooth finish. Sanding plays a crucial role in achieving a polished and professional look. Additionally, considering the various finishing options available allows you to personalize your project to suit your style and preferences.
Sanding For Smoothness
To achieve a smooth surface, start by using coarse-grit sandpaper, such as 80-grit or 100-grit, to remove any rough edges or uneven surfaces. This initial sanding helps to level the wood and prepares it for a finer finish.
As you progress, switch to finer-grit sandpaper, such as 120-grit or 150-grit, to further smoothen the surface. Sand the entire area evenly, applying consistent pressure. Be sure to sand along the grain of the wood to prevent any scratches or damage.
After sanding with the finer-grit sandpaper, you can proceed to use an even finer-grit sandpaper, such as 220-grit or 320-grit, for a final pass. This step helps to remove any remaining imperfections and leaves the wood surface exceptionally smooth.
Remember to wipe away any dust or debris from the sanding process with a clean cloth or brush before moving on to the finishing touches.
Finishing Options
Once the wood is sanded to perfection, it’s time to consider the finishing options. The choice of finish can greatly enhance the appearance and durability of your project.
Here are some popular finishing options to consider:
- Stain: Applying a wood stain can enhance the natural color and grain of the wood. Choose a stain that complements your project and follow the manufacturer’s instructions for application.
- Paint: Painting the wood offers endless possibilities for creativity. Select a high-quality wood paint and apply it evenly for a smooth and vibrant finish.
- Varnish: Applying varnish provides a protective layer that enhances the wood’s beauty. Choose between matte, satin, or glossy varnish depending on your desired look.
- Lacquer: Similar to varnish, lacquer offers a protective coating with a glossy finish. It is a popular choice for furniture and other decorative wooden items.
- Oil or Wax: Applying oil or wax can bring out the natural beauty of the wood while providing protection. Be sure to choose an oil or wax suitable for your specific type of wood.
Before applying any finish, ensure the wood is clean and free of dust. Follow the manufacturer’s instructions regarding application techniques, drying times, and any additional steps required for a successful finish.
By sanding your wood project to perfection and selecting the right finishing option, you can transform a simple square hole into a beautifully crafted piece that showcases your woodworking skills and personal style.
Troubleshooting Common Issues
To create a square hole in wood, start by marking the corners precisely. Then, use a drill to make holes at each corner to define the shape. Finally, use a chisel to remove the wood between the holes and refine the edges for a perfect square hole.
Making a square hole in wood can be a challenging task, especially if you are not familiar with the process. While following the steps to create the hole, there are some common issues that you may encounter. This section will help you troubleshoot these issues and provide solutions to fix them.
Dealing with Splintering
Splintering is a common issue that can occur while making a square hole in wood. It happens when the drill bit or chisel tears off some of the wood, causing rough and uneven edges. Here are some steps to deal with splintering:
– Use a sharp drill bit or chisel to cut the wood cleanly. Dull tools can cause more splintering.
– Place a piece of masking tape over the area where you will be drilling or chiseling. This can help prevent splintering.
– Drill or chisel slowly, applying even pressure. Do not rush the process.
– Sand the edges of the hole with a fine-grit sandpaper to smooth out any splinters.
Fixing Uneven Edges
Uneven edges can be another common issue when making a square hole in wood. This can happen when the drill bit or chisel does not cut the wood evenly. Here are some steps to fix uneven edges:
– Use a sharp chisel or sandpaper to smooth out any rough edges.
– Measure the sides of the hole to ensure they are equal. If they are not, use a chisel or sandpaper to adjust the sides until they are even.
– Use a square or level to check the corners of the hole. If they are not square, use a chisel to adjust them until they are.
Conclusion:
By following these tips, you can troubleshoot common issues that may arise while making a square hole in wood. Remember to take your time, use sharp tools, and check your work frequently to ensure a clean and precise hole.
Advanced Tips For Perfect Squares
Mastering Technique
Perfect your hand-eye coordination for precise square hole cutting.
Tool Maintenance For Precision
Regularly sharpen tools to ensure clean cuts in the wood.
Creative Projects Using Square Holes
Craft unique projects by mastering the art of creating square holes in wood. Elevate your woodworking skills with innovative designs. Let your creativity shine through precision and technique in crafting square holes for your next project.
If you’re a woodworking enthusiast, you know that square holes are not only practical but also have a unique aesthetic appeal. Whether you’re looking to spruce up your home decor or create functional woodworking projects, square holes can add an extra dimension of creativity to your projects. In this post, we’ll explore various creative projects using square holes, including home decor ideas and functional woodworking projects.
Home Decor Ideas
Square holes can add a touch of elegance to any home decor project. Here are some creative ideas to get you started:
- Create a unique picture frame by drilling square holes in a piece of wood and inserting small pieces of colored glass behind it.
- Add a modern touch to your bookshelf by drilling square holes in the shelves and inserting LED lights behind them.
- Make a stylish room divider by drilling square holes in a series of wooden panels and connecting them with metal rods.
Functional Woodworking Projects
Square holes can also add functionality to your woodworking projects. Here are some practical ideas:
| Project | Description |
|---|---|
| Tool Organizer | Create a custom tool organizer by drilling square holes in a wooden board and fitting your tools into the holes. |
| Speaker Enclosure | Build a speaker enclosure by drilling square holes in a wooden box to allow sound to escape. |
| Desk Organizer | Make a stylish desk organizer by drilling square holes in a wooden block and inserting small containers to hold your pens and pencils. |
In conclusion, square holes can add a unique touch to your woodworking projects. Whether you’re looking to spruce up your home decor or create functional woodworking projects, there are endless possibilities with square holes. So, get creative and start drilling!
Conclusion: Mastering Square Holes In Wood
Mastering the art of making square holes in wood requires precision and the right tools. By using a mortising chisel or a square hole drill bit, you can achieve clean and accurate results. Remember to measure carefully and proceed with patience to create perfect square holes in your woodworking projects.
Recap Of Techniques
Drilling pilot holes is essential for square hole accuracy.
Chiseling the corners helps to define the square shape.
Use a chisel and mallet to gradually deepen the hole.
Inspiration For Future Projects
Create unique wooden puzzles with intricate square holes.
Experiment with different wood types for diverse textures.
Challenge yourself with larger square holes for advanced projects.

Frequently Asked Questions
How Do You Make A Square Hole In Wood?
To make a square hole in wood, you can use a chisel and hammer to carefully remove the wood in small increments. Start by outlining the shape of the hole and then gradually chisel away the excess wood. Remember to work slowly and steadily to avoid damaging the wood.
What Tools Are Needed To Make A Square Hole In Wood?
To make a square hole in wood, you will need a few tools. These include a marking tool, such as a pencil or a knife, a chisel, a hammer, and a square or ruler to ensure accuracy. Additionally, a drill can be used to create pilot holes before chiseling out the square shape.
Can I Use A Drill To Make A Square Hole In Wood?
While a drill can be used to create pilot holes, it is not typically used to make a square hole directly in wood. Square holes are usually made by manually chiseling away the wood in a controlled manner. Using a drill alone would not achieve the desired square shape, as it primarily creates round holes.
Conclusion
Making a square hole in wood requires precision and the right tools. By following the steps outlined in this guide, you can achieve professional results. Remember to measure accurately, use sharp chisels, and work patiently. Embracing these techniques will help you create clean and precise square holes for your woodworking projects.