How to Seal Butcher Block Countertops Properly
So, you’ve got beautiful butcher block countertops, but keeping them looking great can feel like a puzzle. Many folks wonder how to seal butcher block countertops properly, especially when they’re new to kitchen projects. It’s a common concern because water and food stains can really damage that lovely wood if it’s not protected.
Don’t worry, though! This guide breaks down exactly how to seal butcher block countertops properly in simple steps. We’ll walk through everything you need to know so your countertops stay protected and beautiful for years to come.
Choosing the Right Sealant for Butcher Block
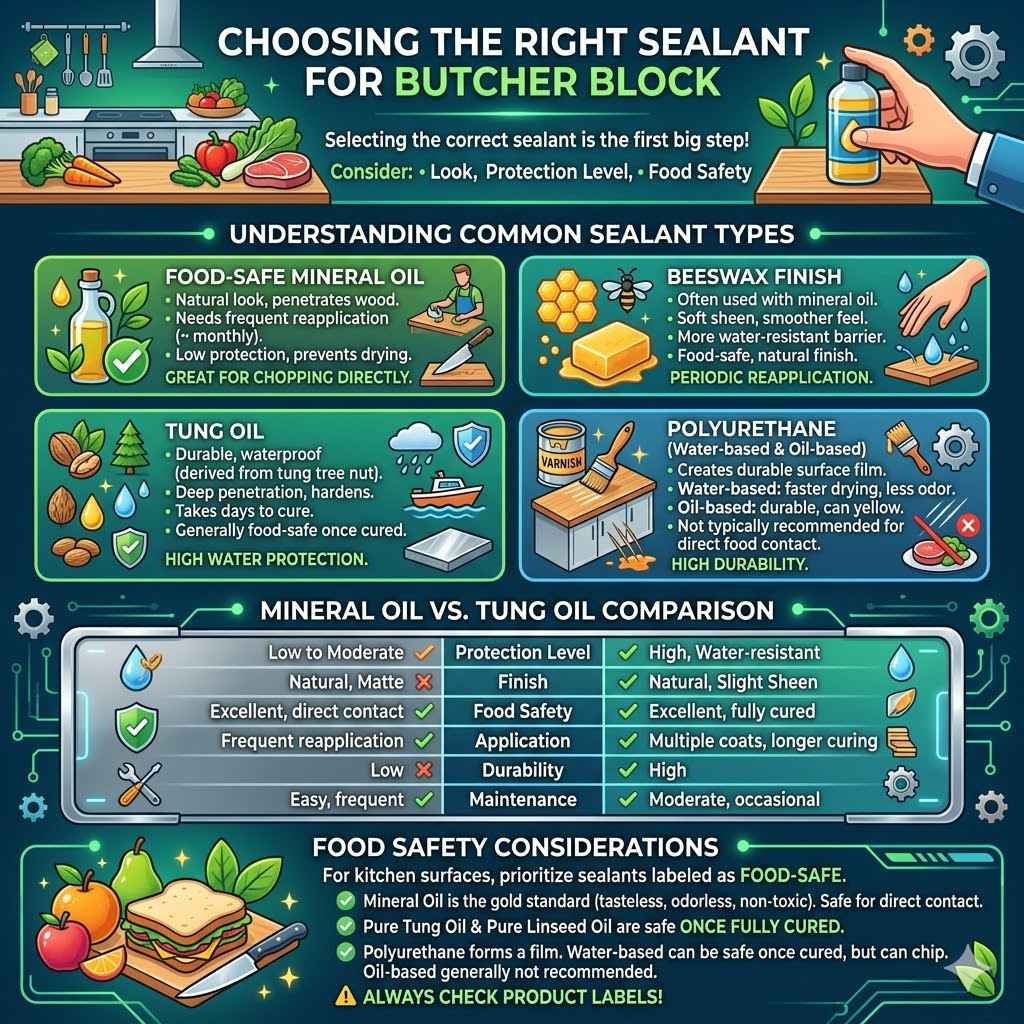
Selecting the correct sealant is the first big step in knowing how to seal butcher block countertops properly. Different sealants offer different looks and levels of protection. Some are food-safe, which is super important for a kitchen surface. Others offer a more matte finish, while some create a glossy sheen. Understanding the types available helps you pick what’s best for your kitchen’s style and how you use your countertops.
Understanding Different Sealant Types
There are several common types of sealants used for butcher block. Each has its own pros and cons. Let’s explore them to help you make an informed choice for your project.
Food-Safe Mineral Oil: This is a very popular choice because it’s completely safe for food preparation. It penetrates the wood, offering a natural look and feel. It needs regular reapplication, usually every month or so, to keep the wood protected. It doesn’t offer a hard protective layer but keeps the wood from drying out and cracking. This is a great option if you plan to chop directly on your countertops.
Beeswax Finish: Beeswax is often used in conjunction with mineral oil. It creates a slightly more water-resistant barrier than oil alone. It gives a soft sheen and a smooth feel. Like mineral oil, it needs periodic reapplication. It’s also considered food-safe and is a good choice for a natural, low-maintenance finish that still offers some protection.
Tung Oil: This is a durable, waterproof finish derived from the tung tree nut. It penetrates the wood deeply and hardens, creating a very tough, water-resistant layer. It’s often used in marine applications because of its excellent water protection. Tung oil can take a few days to cure fully between coats. It’s generally considered food-safe once fully cured.
Linseed Oil: Similar to tung oil, linseed oil is a natural drying oil. It penetrates wood and hardens to create a protective finish. However, it is slower to dry than tung oil and can be more prone to attracting mildew in humid environments if not properly maintained. It’s also generally considered food-safe after curing.
Polyurethane (Water-Based or Oil-Based): Polyurethane creates a very durable, protective film on the surface of the wood. Water-based polyurethanes dry faster and have less odor than oil-based ones. Oil-based polyurethanes offer excellent durability but can yellow over time. These are not typically recommended for direct food contact surfaces because they create a surface layer rather than penetrating the wood.
Mineral Oil vs. Tung Oil Comparison
| Feature | Mineral Oil | Tung Oil |
|---|---|---|
| Protection Level | Low to moderate; prevents drying | High; very water-resistant |
| Finish | Natural, matte | Natural with slight sheen; buildable |
| Food Safety | Excellent; safe for direct contact | Excellent; safe once fully cured |
| Application | Needs frequent reapplication | Multiple coats; longer curing time |
| Durability | Low | High |
| Maintenance | Easy; frequent re-oiling | Moderate; occasional reapplication |
When deciding, think about how you’ll use your counters. If you chop directly on them, mineral oil or a beeswax blend is best. If you want maximum protection from spills and stains and don’t mind using a cutting board, tung oil or polyurethane might be better.
Food Safety Considerations
For any kitchen surface where food will be prepared, food safety is paramount. When you’re learning how to seal butcher block countertops properly, always prioritize sealants that are labeled as food-safe.
Food-grade mineral oil is the gold standard for this. It’s tasteless, odorless, and non-toxic, making it perfectly safe for direct contact with food. It’s the go-to for many chefs and home cooks.
Pure tung oil and pure linseed oil are also safe once they are fully cured. It’s important to ensure you’re using 100% pure versions, not “tung oil finishes” or “boiled linseed oil” which can contain additives.
Water-based polyurethane can be safe once fully cured, but it creates a film that can chip or scratch, potentially exposing the wood. Oil-based polyurethane is generally not recommended for direct food contact.
Always check the product label to confirm it’s suitable for food preparation surfaces. If you’re unsure, it’s safer to stick with proven food-safe options like mineral oil.
Preparing Your Butcher Block for Sealing
Proper preparation is key to a long-lasting and beautiful finish. This stage is crucial for knowing how to seal butcher block countertops properly. If your countertops are new, they usually come pre-sanded and ready for sealing. If they’ve been used, or if you’ve just installed them yourself, you’ll need to ensure they’re clean and smooth.
Sanding the Surface
If your butcher block has any rough spots, old finishes, or imperfections, you’ll need to sand it. Start with a coarser grit sandpaper and move to finer grits.
Start with 80-grit sandpaper. This grit is good for removing any major imperfections, old finishes, or glue residue. Sand with the grain of the wood. Make sure to sand the entire surface evenly.
Move to 120-grit sandpaper. This step refines the surface further, removing the deeper scratches left by the 80-grit paper. Again, sand with the direction of the wood grain.
Finish with 180 or 220-grit sandpaper. This provides a super smooth surface. The finer the grit, the smoother the wood will feel and the better your sealant will adhere. This is the final sanding step before cleaning.
After sanding, you must thoroughly clean the surface. Use a vacuum cleaner with a brush attachment to pick up all the dust. Then, wipe the surface down with a tack cloth. A tack cloth is sticky and designed to grab fine dust particles that vacuuming might miss.
Cleaning and Drying
After sanding, it’s vital to remove all dust. Even tiny particles can ruin the smooth finish of your sealant.
Vacuum thoroughly. Use a brush attachment on your vacuum cleaner to get into all the nooks and crannies.
Wipe with a tack cloth. This sticky cloth will pick up any remaining fine dust. Work in one direction.
Allow to dry completely. If you used any cleaning solution (like a damp cloth with a bit of mild soap, though dry methods are preferred), let the wood dry fully before applying any sealant. Moisture trapped in the wood can cause sealing problems later.
If your butcher block is brand new and has a factory finish, you might only need to do a light cleaning to remove any shipping dust. Always check the manufacturer’s recommendations.
The Sealing Process Step-by-Step
Now that your butcher block is prepped, it’s time for the main event: applying the sealant. This is where you put into practice how to seal butcher block countertops properly. Consistency and patience are key during this process for the best results.
Applying the First Coat
The first coat is critical for establishing a good base.
Gather your supplies. You’ll need your chosen sealant, clean lint-free cloths or applicators, and possibly gloves.
Apply generously. If using oil, pour a generous amount onto the wood. Use a clean, lint-free cloth or applicator pad to spread it evenly over the entire surface. Make sure to cover all edges and sides, too.
Let it soak in. Allow the oil to penetrate the wood for at least 20-30 minutes. You’ll see the wood absorb the oil.
Wipe off excess. After the soak time, use a clean, dry cloth to wipe away any oil that hasn’t been absorbed. You don’t want any of the sealant to remain on the surface, as it can become sticky or gummy.
This process ensures the wood is deeply nourished and protected from within. For oils and waxes, this is the core of the application.
Adding Subsequent Coats
Depending on the sealant you chose and how absorbent your wood is, you’ll likely need multiple coats. This is where patience really pays off.
Allow drying time. If you are using a drying oil like tung oil or linseed oil, you’ll need to let each coat dry completely before applying the next. This can take anywhere from 8 to 24 hours per coat. Follow the product’s instructions carefully.
Apply thin, even coats. For most sealants, especially drying oils and polyurethanes, applying thin, even coats is better than one thick one. This ensures proper curing and a smooth finish.
Lightly sand between coats (for drying oils and polyurethanes). Once a coat is dry, you can often lightly sand the surface with a very fine-grit sandpaper (like 320 or 400 grit) and then wipe with a tack cloth. This helps to create an even smoother finish by removing any raised grain.
Repeat until satisfied. Continue applying coats until you achieve the desired level of protection and sheen. For oils, this might mean applying 3-5 coats. For polyurethanes, it could be 2-4 coats.
This layering builds up protection. It’s how you truly learn how to seal butcher block countertops properly for lasting results.
Example Scenario: Sealing with Mineral Oil and Beeswax
Let’s say you’re using mineral oil and beeswax.
1. Apply a generous coat of food-grade mineral oil to the clean, dry butcher block.
2. Let it soak for 30 minutes.
3. Wipe off all excess oil with a clean, lint-free cloth.
4. Let the wood rest for at least 4-6 hours, or overnight, to allow maximum absorption.
5. Rub a thin layer of food-grade beeswax over the entire surface.
6. Buff the beeswax with a clean, soft cloth until it has a smooth sheen.
7. Repeat this process every 3-4 weeks, or whenever the wood starts to look dry.
This method is simple, safe, and keeps your counters looking great with regular upkeep.
Curing Time
After your final coat, the sealant needs time to cure fully. This is when it hardens and reaches its maximum durability and water resistance.
Read product instructions. Curing times vary greatly depending on the type of sealant used. Some oils might take several days, while polyurethanes can take up to a month to fully cure.
Avoid heavy use. During the curing period, try to avoid placing heavy items on the countertops or exposing them to excessive moisture. Treat them gently.
Allow for ventilation. Good airflow can help speed up the curing process, especially for oil-based finishes.
Proper curing ensures your hard work pays off and your countertops are truly protected.
Maintaining Your Sealed Butcher Block
Once you’ve mastered how to seal butcher block countertops properly, the job isn’t quite done. Regular maintenance will keep them looking their best and extend their lifespan significantly. It’s all about simple, consistent care.
Daily Cleaning and Care
Everyday cleaning is straightforward and helps prevent stains from setting in.
Wipe spills immediately. This is the most important rule for any wood countertop. Don’t let liquids sit on the surface.
Use mild soap and water. For general cleaning, a soft cloth or sponge with a little mild dish soap and warm water is usually sufficient.
Dry thoroughly. After cleaning, always wipe the countertops dry with a clean, soft cloth. This prevents water spots and moisture damage.
Avoid harsh chemicals. Stay away from abrasive cleaners, bleach, or ammonia-based products, as these can damage the sealant and the wood.
Simple habits make a big difference in keeping your butcher block beautiful.
Regular Reapplication and Deep Cleaning
Over time, the protective layer will wear down, especially in high-use areas.
Reapply sealant as needed. For oil or wax finishes, reapply every 1-3 months, or whenever the wood starts to look dry or water doesn’t bead up on the surface. For polyurethane, you might not need to reapply for years, but you may need to touch up worn areas.
Deep cleaning occasionally. If you notice buildup or dullness, you can do a more thorough cleaning. For oiled finishes, this might involve a light sanding with very fine grit paper and reapplying oil. For polyurethanes, you might use a specialized wood cleaner.
A little attention regularly goes a long way. It ensures your countertops remain protected and attractive.
Sample Scenario: Reviving a Dry Spot
Imagine a spot on your butcher block near the sink looks dull and water soaks in quickly.
1. Wipe the area clean and dry it completely.
2. Apply a small amount of your chosen sealant (e.g., mineral oil) directly to the dry spot.
3. Gently rub it in with a lint-free cloth.
4. Let it soak for about 15 minutes.
5. Wipe off any excess.
6. Repeat if the spot still looks dry.
This quick fix can help maintain the uniform look and protection of your entire countertop.
Troubleshooting Common Issues
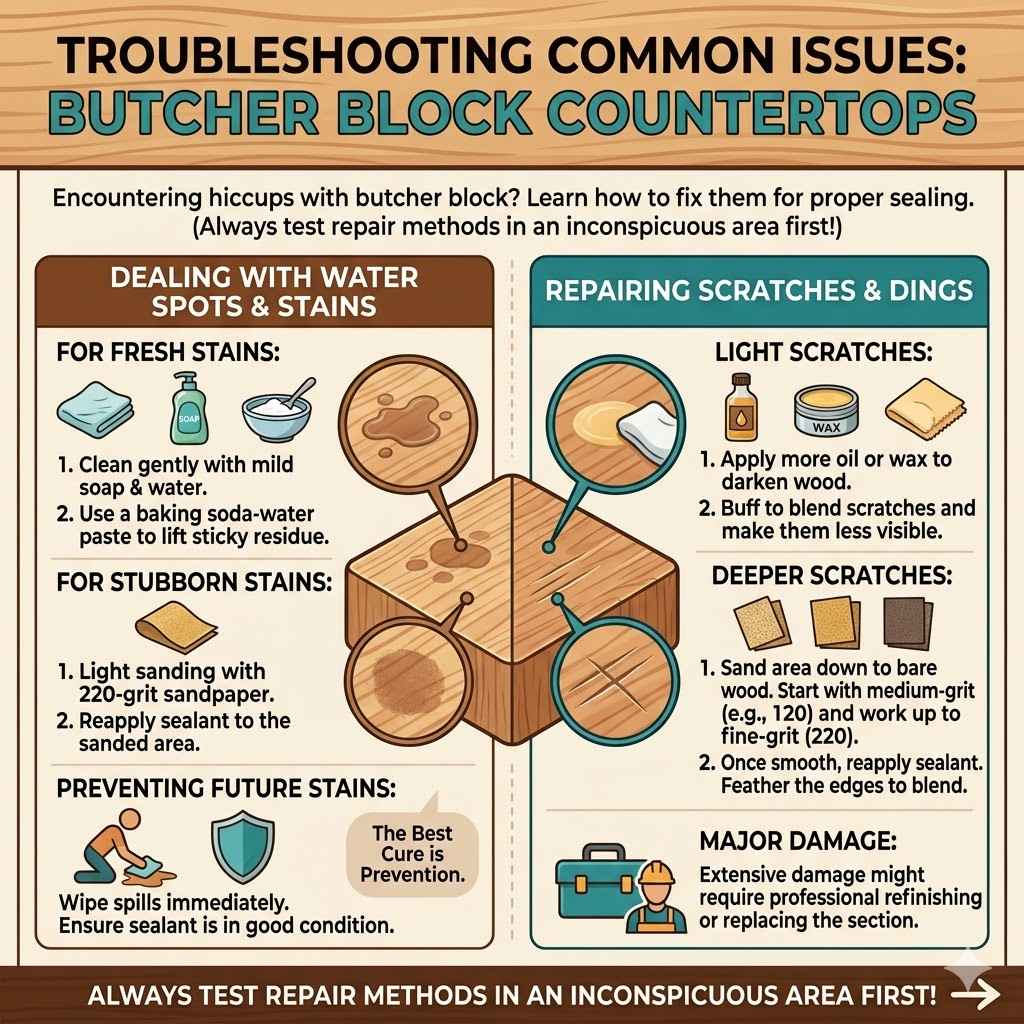
Even with careful application, you might encounter a few hiccups. Knowing how to fix them is part of understanding how to seal butcher block countertops properly.
Dealing with Water Spots and Stains
Water spots and stains are common foes.
For fresh stains: Try cleaning gently with a mild soap and water solution. If it’s a sticky residue, a paste of baking soda and water can sometimes help lift it.
For stubborn stains: Light sanding might be necessary. For minor discoloration, sanding with 220-grit sandpaper can often remove the stain. You’ll then need to reapply sealant to the sanded area.
Preventing future stains: The best cure is prevention. Wipe spills immediately and ensure your sealant is in good condition.
Repairing Scratches and Dings
Scratches and minor dings are part of having a functional wooden surface.
Light scratches: Often, applying more oil or wax can help blend minor scratches by darkening the wood and making them less visible. Buffing can also help.
Deeper scratches: For more significant damage, you’ll need to sand the area down to the bare wood. Start with a medium-grit sandpaper (like 120) and work your way up to a fine grit (220). Once smooth, reapply your chosen sealant, feathering the edges to blend it with the surrounding sealed surface.
Major damage: Extensive damage might require professional refinishing or replacing the affected section.
Always test repair methods in an inconspicuous area first if possible.
Frequently Asked Questions
Question: How often should I re-seal my butcher block countertops?
Answer: For oil and wax finishes, re-sealing is typically needed every 1 to 3 months, or whenever the wood starts to look dry or doesn’t repel water well. Polyurethane finishes last much longer, often years, before needing reapplication.
Question: Can I cut directly on my sealed butcher block countertops?
Answer: You can cut directly on butcher block countertops sealed with food-grade mineral oil or a pure tung oil finish. If you used polyurethane or other non-food-safe sealants, it’s best to use a cutting board.
Question: What’s the difference between an oil finish and a polyurethane finish for butcher block?
Answer: Oil finishes penetrate the wood, offering a natural look and feel, and are easily repairable. Polyurethane creates a surface film that provides a hard, protective layer but can be harder to repair and may not be suitable for direct food contact.
Question: My butcher block looks dull. What should I do?
Answer: If your butcher block looks dull, it likely needs more sealant. For oil finishes, apply another coat of oil. For polyurethane, you might need to clean it with a wood cleaner or apply a refreshing coat.
Question: Is it okay to use vinegar to clean my butcher block?
Answer: While vinegar is a natural cleaner, its acidity can potentially dull or damage some wood finishes over time, especially oil-based ones. It’s safer to stick with mild soap and water or specialized wood cleaners.
Conclusion
Knowing how to seal butcher block countertops properly ensures they stay beautiful and functional. It involves choosing the right sealant, preparing the surface well, applying coats patiently, and maintaining it regularly. With these steps, your butcher block will be protected from spills and wear for many years. Enjoy your stunning and well-protected kitchen counters.