Revive Your Wooden Surfaces: Can Rustoleum Be Used on Wood?
Yes, Rustoleum can be used on wood as it provides a durable finish and protection against various elements. Rustoleum offers a range of products specifically designed for wood surfaces, allowing users to achieve a quality finish and long-lasting results on their wood projects without the need for priming or sanding.
Whether you are refinishing furniture, cabinets, or outdoor wood structures, Rustoleum provides a convenient and effective solution for enhancing and preserving the beauty of wood. With its easy application and superior adhesion, Rustoleum ensures a smooth and professional-looking finish on any wood surface.
Advantages Of Using Rustoleum On Wood
When it comes to protecting and enhancing the beauty of wood surfaces, Rustoleum is a top choice for many DIY enthusiasts. With its exceptional features, using Rustoleum on wood offers several advantages that make it a go-to solution for anyone looking to revamp their wooden furniture, fixtures, or outdoor structures. In this article, we will explore the advantages of using Rustoleum on wood and why it is a popular option among homeowners and professionals alike.
Durable And Protective Coating
Rustoleum provides a durable and protective coating that shields wood from moisture, sunlight, and general wear and tear. Its advanced formula acts as a barrier, preventing the penetration of water and humidity which can lead to rotting and warping. With Rustoleum’s protective layer, your wood surfaces are less prone to damage, ensuring their longevity for years to come. Whether it’s a wooden deck, outdoor furniture, or interior pieces, Rustoleum’s durable coating is designed to withstand various environmental conditions, making it an ideal choice for both indoor and outdoor projects.
Easy Application And Quick Drying
One of the major advantages of using Rustoleum on wood is its ease of application. With its user-friendly formula, Rustoleum can be easily applied with a brush, roller, or sprayer, making it suitable for beginners and experienced DIYers alike. Its smooth consistency allows for effortless spreading, ensuring a seamless finish without brush strokes or clumps. Additionally, Rustoleum is known for its quick drying time, allowing you to complete your wood projects in no time. Say goodbye to waiting for hours for the paint to dry – Rustoleum ensures a fast and efficient application process.
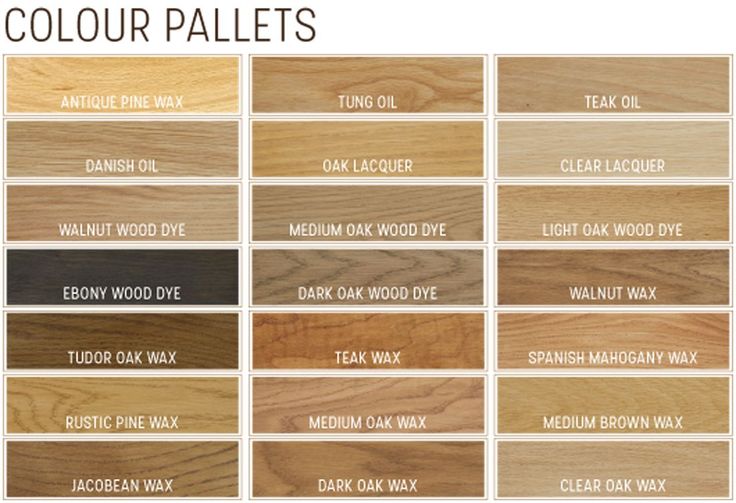
Wide Range Of Colors And Finishes
Rustoleum offers a wide range of colors and finishes, allowing you to customize and personalize your wood projects according to your style and preferences. Whether you’re going for a natural wood grain look, a vibrant pop of color, or a sleek modern finish, Rustoleum has you covered. From classic wood stains to bold and trendy hues, you can find the perfect shade to match your design aesthetic. Moreover, Rustoleum offers different finishes such as matte, satin, and gloss, giving you further options to achieve the desired look for your wood surfaces.
With its durable and protective coating, easy application, quick drying time, and extensive color and finish options, Rustoleum emerges as a versatile and reliable solution for enhancing and preserving wood surfaces. So why not give Rustoleum a try and transform your wooden projects into beautiful, long-lasting works of art?
Preparing Wood Surfaces For Rustoleum
Before applying Rustoleum to any wooden surface, it is important to properly prepare the wood to ensure the best adhesion and long-lasting results. By following a few simple steps, you can create a smooth and clean surface that is ready to be coated with Rustoleum paint.
Cleaning The Surface
To achieve a flawless finish, start by thoroughly cleaning the wood surface. This step is crucial as it removes dirt, dust, and any existing finishes that might affect the adhesion of the Rustoleum paint. Here’s how you can clean the surface:
- Remove loose debris and dirt by using a soft brush or vacuum cleaner.
- Wipe down the surface with a damp cloth or sponge to remove any remaining dirt.
- For stubborn residues or grease spots, use a mild detergent mixed with water to clean the area. Rinse off the soap residue with clean water afterwards.
By taking the time to properly clean the wood, you will ensure that the Rustoleum paint adheres evenly and creates a professional-looking finish.
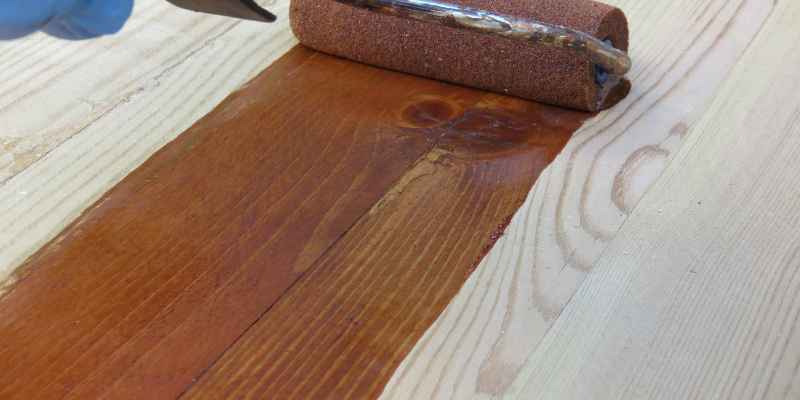
Sanding And Smoothing
After cleaning the wood, the next step is to sand and smooth the surface. This will not only remove imperfections but also help the Rustoleum paint adhere better. Follow these steps to achieve a smooth surface:
- Start by using a medium-grit sandpaper (around 120-150 grit) to sand the entire surface. Sanding in the direction of the wood grain will yield the best results.
- Once the surface is even, switch to a finer-grit sandpaper (around 220-320 grit) to further smooth the wood.
- Remove any sanding dust by wiping the surface with a tack cloth or a lightly damp cloth.
Sanding the wood not only improves the adhesion of the paint but also creates a smooth surface for a professional finish. Ensure you wear protective gear such as a dust mask and goggles during the sanding process.
Repairing Any Damage
Prior to applying Rustoleum paint, it is crucial to repair any damage the wood might have. This includes filling in cracks, holes, or any other imperfections. Follow these steps to repair the wood:
- For small cracks or holes, use a wood filler product and apply it according to the manufacturer’s instructions. Allow the filler to dry completely.
- Once dry, sand the patched area gently to ensure it is smooth and blends seamlessly with the surrounding wood.
Repairing any damage before applying Rustoleum not only ensures a better end result but also helps protect the wood surface from further deterioration.
Applying Rustoleum On Wood
Applying Rustoleum on wood is a great way to protect and enhance its appearance. Rustoleum can indeed be used on wood surfaces, providing a durable and long-lasting finish. Whether you’re refinishing furniture or working on a DIY project, Rustoleum is a reliable choice for achieving a professional-looking result.
Choosing The Right Brush Or Roller
When it comes to applying Rustoleum paint on wood, choosing the right brush or roller is crucial. Using the correct tool will ensure that the paint goes on smoothly and evenly, giving you a professional-looking finish. For smaller areas or intricate designs, opt for a high-quality paintbrush with synthetic bristles. These brushes offer excellent control and precision.
If you’re working on larger surfaces, such as a wooden table or a set of chairs, using a roller can save you time and effort. Look for a roller with a medium nap for the best results. This type of roller holds a good amount of paint and can cover large areas quickly.
Applying A Primer
Before applying Rustoleum paint on wood, it’s important to prepare the surface properly. This includes applying a primer. Primer helps the paint adhere better to the wood, creating a more durable and long-lasting finish.
Start by sanding the wood to create a smooth surface. Use a fine-grit sandpaper and sand in the direction of the wood grain. Once sanded, remove any dust or debris with a tack cloth or a clean, lint-free cloth.
Next, apply a coat of primer. Choose a primer that is suitable for both wood and the type of paint you’ll be using. Apply the primer using a brush or roller, making sure to cover the entire surface evenly. Allow the primer to dry completely according to the manufacturer’s instructions before moving on to the next step.
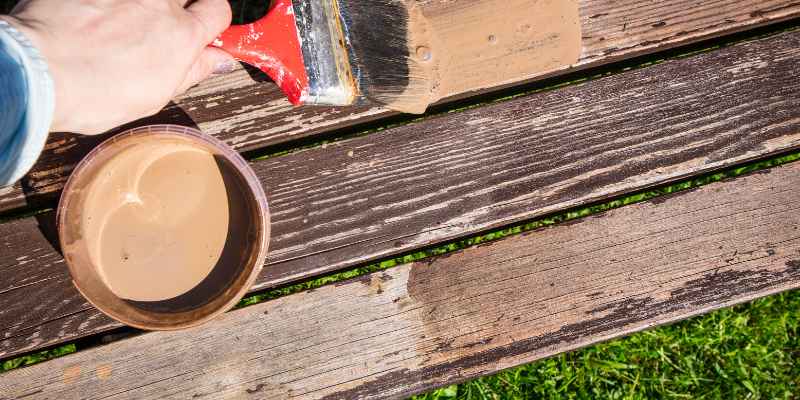
Applying The Rustoleum Paint
Now that the primer is dry, it’s time to apply the Rustoleum paint on wood. Rustoleum offers a wide range of paints specifically designed for wood surfaces, so make sure to choose the one that suits your project.
If using a brush, dip it into the paint, then remove any excess by tapping it against the side of the container. Apply the paint using smooth, even strokes, following the direction of the wood grain. For a more professional finish, apply multiple thin coats, allowing each coat to dry before applying the next one.
If you prefer to use a roller, pour the paint into a roller tray, then roll the roller in the paint until it is evenly coated. Start at one corner of the wood surface and apply the paint using vertical strokes. Work in small sections to ensure even coverage.
Once you’ve applied the desired number of coats, let the paint dry completely before using or touching the wood. This will help prevent any smudging or smearing of the paint.
Maintaining And Caring For Rustoleum-coated Wood
Once you have applied Rustoleum to your wood surfaces, it’s important to know how to properly maintain and care for them. With the right steps, you can ensure that your Rustoleum-coated wood retains its beauty and protection for years to come.
Cleaning And Regular Maintenance
To keep your Rustoleum-coated wood looking its best, regular cleaning and maintenance are key. Here’s how you can do it:
- Cleaning: Start by removing any loose dirt or debris with a soft-bristle brush or a gentle stream of water. Avoid using abrasive cleaners or harsh chemicals that can damage the coating.
- Washing: Use a mild soap or detergent solution and a soft cloth or sponge to gently scrub the surface of the wood. Rinse thoroughly with clean water to remove any soap residue.
- Drying: Allow the wood to air-dry completely before applying any additional treatments or coatings. This helps to prevent moisture buildup and potential damage.
Protection From UV Rays And Moisture
Rustoleum coatings provide excellent protection against both UV rays and moisture. However, it is important to take additional steps to enhance this protection:
- Sunscreen: To protect your Rustoleum-coated wood from sun damage, apply a clear, protective sealant or topcoat with UV inhibitors. Make sure to choose a product specifically designed for wood surfaces.
- Weatherproofing: If your wood is exposed to high levels of moisture or extreme weather conditions, consider using a waterproofing agent. Apply it according to the manufacturer’s instructions, ensuring complete coverage.
- Coverage: Whenever possible, keep your Rustoleum-coated wood protected from direct sunlight and excessive moisture. This can be achieved by using furniture covers, awnings, or locating them in shaded areas.
Repairing Any Chipped Or Damaged Coating
Over time, your Rustoleum-coated wood may develop chips or other damages. Here’s how you can repair them:
- Inspection: Regularly inspect your wood surfaces for any signs of chipped or damaged coating. Addressing these issues promptly will prevent further damage.
- Preparation: Clean the damaged area thoroughly to remove any dirt or debris. This ensures that the repair material adheres properly.
- Repair: Apply a touch-up coat of Rustoleum to the damaged area, following the manufacturer’s instructions. Use a brush or roller to achieve a smooth and even finish.
- Blending: Blend the touch-up coat with the surrounding area to achieve a seamless appearance. Feather the edges with light, overlapping strokes for a natural finish.
Conclusion
Rustoleum is a versatile solution when it comes to wood projects. Its ability to protect and enhance wooden surfaces makes it an ideal choice for DIY enthusiasts and professionals alike. With its durable finish and wide range of colors, Rustoleum allows you to transform ordinary wood into stunning pieces that stand the test of time.
Whether you’re refinishing furniture or adding a protective coat to wooden structures, Rustoleum proves to be a reliable and effective option. Embrace the possibilities and let Rustoleum bring out the beauty of wood in your next project.