How to Use 2 Minute Remover Advanced on Wood: Step-by-Step Guide
To use 2 Minute Remover Advanced on wood, shake the container, pour it into a metal or glass tray, and brush on the thickest coat you can without it running. Cover the wet stripper with plastic sheeting so the solvent can’t flash off, wait at least 2 minutes for paint or varnish and up to 5 minutes for epoxy or polyurethane, then scrape the softened finish away with a plastic putty knife.
Sunnyside Corporation, which has made stripping products since 1893, sells this remover in two forms: a thinner Liquid for flat horizontal surfaces and a thicker Gel that clings to vertical faces – drawer fronts, table legs, stair balusters – without dripping onto the floor. Both are methylene-chloride-free, which is the real reason woodworkers reach for this brand over older strippers: it works almost as fast without the fume risk that got the harsher chemistry pulled from retail shelves. It is, however, still a flammable solvent, and the can’s own warning label is blunt about that – so the steps below cover the actual technique, not just the marketing copy.
How To Use 2 Minute Remover Advanced On Wood
Fast-Acting Gel Pick
 |
Sunnyside 2 Minute Remover Advanced Gel – $9.95 The gel version this guide is built around – thick enough to cling to vertical surfaces instead of running off, which matters on assembled furniture.
|
When it comes to removing paint and varnish from wood, there are a lot of products on shelves that all promise fast results. 2 Minute Remover Advanced earns the name honestly on the finishes it’s rated for, but “2 minutes” is a minimum, not a fixed clock – here’s the actual sequence that gets clean results without gouging the wood underneath.
1. Gear Up Before You Open The Can
Nitrile gloves, not latex – solvents break latex down fast enough that you’ll feel the product on your skin within minutes. Add chemical splash goggles (not open safety glasses) and a respirator rated for organic vapors, not a paper dust mask. The label carries a poison and extremely-flammable warning and says the vapor can cause blindness in high enough concentration, so this step isn’t optional.
2. Pour Into A Separate Container
Pour the amount you need into a disposable metal or glass tray rather than dipping the brush straight into the can. Dipping contaminates the whole container with dissolved finish and shortens how far the rest of it goes.
3. Apply The Heaviest Coat That Will Hold
Brush it on in one direction with a natural-bristle or chip brush, working it into carvings and corners instead of back-brushing repeatedly, which just pulls the stripper back off the surface. A quart covers roughly 100 square feet of flat surface at full strength – figure on closer to a third of that on heavily carved or moulded pieces, since more product soaks into the detail.
4. Seal It Under Plastic
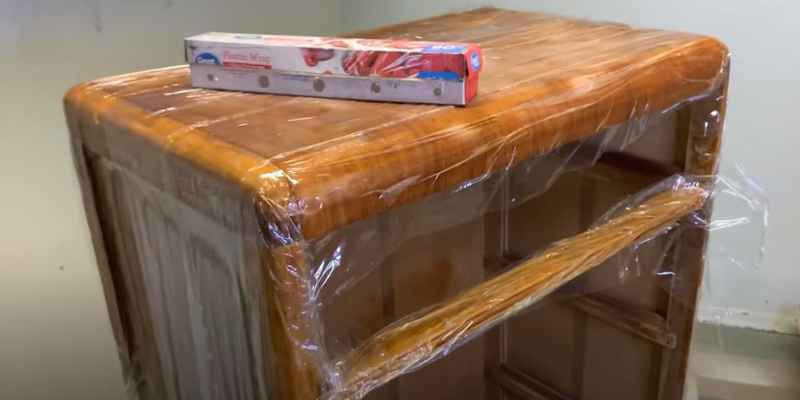
Lay plastic sheeting or a garbage bag directly against the wet stripper. This is what actually gives you the working time printed on the can – left open to air, the solvent evaporates in a couple of minutes and the finish never fully softens.
5. Time It To The Finish, Not The Name On The Can
Sunnyside’s own working-time chart splits finishes into two speeds. Latex and acrylic paint, oil-based paint, shellac, and alkyd/spar varnish start lifting in about 2 minutes. Enamel-alkyd paint, epoxy, marine finish, polyurethane, and most factory floor finishes need closer to 5 minutes before they’ll scrape clean. A piece with several stacked coats of history on it often needs a second full application left under plastic overnight rather than one quick pass.
6. Scrape With Plastic, Not Metal
Use a plastic putty knife or scraper on the softened finish. A metal scraper can dig into wood that’s already been softened by the solvent, especially on a softwood like pine. Anything that doesn’t lift cleanly gets a second coat and another few minutes under plastic instead of more pressure on the blade.
7. Neutralize Before You Sand Or Refinish
Wipe the stripped surface down with mineral spirits before sanding or applying a new finish – leftover solvent residue sitting in the grain will fight with new stain or topcoat later, causing spotty absorption. Let the wood dry fully, usually a few hours in a ventilated space, before moving on.
Liquid Vs. Gel: Which One To Buy
Both versions share the same chemistry and working times – the difference is viscosity, and it decides which one is actually usable for your project.
The Liquid formula is thin enough to soak fast into open horizontal grain, which makes it the better choice for large flat panels: tabletops, doors laid flat on sawhorses, flooring sections pulled up and worked on a bench. It will run off anything angled, though, so it’s the wrong pick for an assembled piece of furniture still standing on its legs.
The Gel is thick enough to grip drawer fronts, chair legs, spindles, and stair balusters without sliding down onto the floor – it’s the version actually labeled “clings to vertical surfaces.” For most furniture refinishing, where you’re stripping a piece that’s still assembled rather than a single flat board, gel is the more practical buy and the one this guide is built around.
Safety Precautions When Using A Chemical Stripper

The can’s own hazard warnings are worth reading before you open it, not after: it’s labeled extremely flammable liquid and vapor, capable of causing a flash fire, and the vapor is called out as harmful with the potential to cause blindness if the product is swallowed. That’s not scare language added by a retailer – it’s the manufacturer’s required label copy.
- Ventilate for real. Open garage door or windows with cross-airflow, or better, work outdoors. A closed basement or bathroom with the fan on isn’t enough for a flammable solvent stripper.
- No open flame or spark source nearby. That includes pilot lights, running power tools, and space heaters in the work area while the product is wet.
- Nitrile gloves, splash goggles, organic-vapor respirator. Skip the paper dust mask – it does nothing against solvent vapor.
- Expect hazmat handling. Retailers ship this under hazardous-materials shipping rules and most won’t accept it back once opened – buy the size you’ll actually use.
- Dispose of rags and scrapings properly. Solvent-soaked rags and paint scrapings go in a sealed metal container, not a household trash bag, per most local hazardous-waste rules.
How 2 Minute Remover Advanced Compares To Other Strippers
Worth knowing up front: the EPA banned retail sale of methylene-chloride paint strippers to consumers in 2019 after a string of fatalities tied to fume exposure in enclosed spaces. Every product below, including this one, is a post-2019 reformulation built around different solvents – so “which one” mostly comes down to speed, thickness, and smell rather than the older methylene-chloride-vs-everything-else question.
Citristrip
A citrus-solvent (d-limonene) semi-paste with a genuinely mild orange smell instead of a solvent smell. It trades speed for that lower odor – plan on a dwell time measured in tens of minutes to a few hours rather than 2-5 minutes, which makes it a reasonable pick for an indoor project with poor ventilation, but a slow one for a piece with many coats.
Multi-Strip Advanced Professional Strength
A heavier semi-paste aimed at contractors stripping many layers on non-wood substrates as often as wood. It works, but the thicker paste is harder to control on detailed mouldings than a gel, and the solvent smell is stronger and lingers longer.
Klean-Strip And Jasco Paint & Epoxy Removers
Klean-Strip and Jasco are both W.M. Barr brands, and their current retail lineups (Premium, Professional Strength, and the standard formula) are the post-2019 NMP or DBE-based replacements rather than the old methylene-chloride versions. They’re effective on tough, multi-layer epoxy and marine finishes but generally carry a stronger, more persistent odor than 2 Minute Remover Advanced and need the same respirator-grade ventilation.
For most furniture refinishing on wood specifically, 2 Minute Remover Advanced sits in a useful middle spot: faster than the citrus-based options, less overpowering than the heavy-duty industrial pastes, and the gel version is purpose-built for assembled furniture instead of just flat panels.
Frequently Asked Questions Of How To Use 2 Minute Remover Advanced On Wood
How Do You Use Two Minute Paint Remover?
Shake the container, pour what you need into a metal or glass tray, and apply the heaviest coat you can with a chip brush. Cover it immediately with plastic sheeting, wait at least 2 minutes for paint or varnish (5 minutes for epoxy, polyurethane, or marine finish), then scrape with a plastic putty knife. Reapply to any spots that didn’t lift cleanly. Wear nitrile gloves, splash goggles, and an organic-vapor respirator throughout.
How Do You Use Paint Remover On Wood?
The process is the same as on any surface, with one wood-specific caution: scrape with a plastic tool, not metal, since solvent-softened wood gouges more easily than bare wood. Neutralize the surface with mineral spirits and let it dry fully before sanding or applying a new finish, or leftover residue can cause blotchy stain absorption.
How Long Do You Leave Varnish Remover On Wood?
For 2 Minute Remover Advanced specifically, alkyd/spar varnish and shellac start lifting in about 2 minutes under plastic; polyurethane needs closer to 5 minutes. A varnish with several coats built up over the years may need a second application left covered overnight. Other brands vary widely – citrus-based strippers can take 30 minutes to several hours, so always check the specific product’s label rather than assuming the timing carries over.
What Is The Best Paint Remover For Wood?
It depends on the piece. For assembled furniture with vertical surfaces and multiple coats of paint or varnish, 2 Minute Remover Advanced Gel strips fast and stays put where you brush it. For an indoor project with limited ventilation where speed matters less than a milder smell, a citrus-based stripper like Citristrip is the safer trade-off. Either way, avoid any product still marketed with methylene chloride – it was pulled from consumer retail sale in the US in 2019 for good reason.
Conclusion
2 Minute Remover Advanced earns its reputation on the finishes it’s built for – paint, varnish, and shellac lift in as little as 2 minutes once it’s sealed under plastic, and the gel version handles assembled furniture without running everywhere. The name oversells the harder cases, though: epoxy, polyurethane, and anything with several stacked coats really does need the full 5 minutes or a second overnight application.
Treat the safety warnings on the can as literal instructions, not boilerplate – real ventilation, nitrile gloves, and an organic-vapor respirator make the difference between an easy afternoon and a bad reaction to the fumes. Get those two things right – gear and dwell time – and this is one of the faster, less smelly ways to bring old wood back to bare grain.
Sponsored / affiliate links. As an Amazon Associate I earn from qualifying purchases. I may earn additional commission from eligible campaigns.