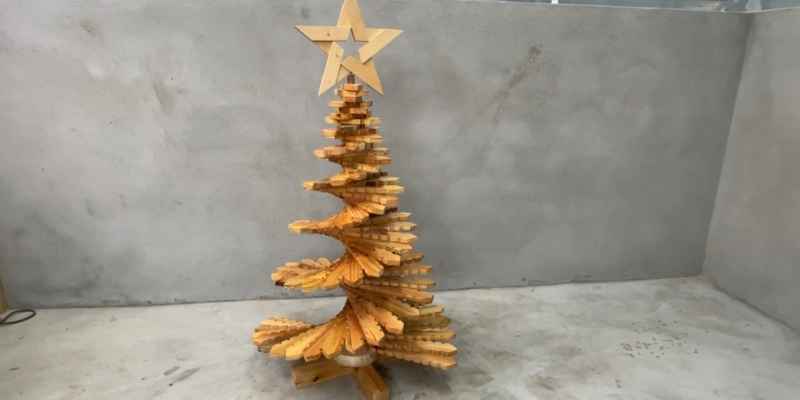
DIY Christmas Wooden Tree: Craft Your Holiday Masterpiece
Create a DIY Christmas wooden tree for a festive touch. Perfect for holiday decor and personalization.
Decorating your home for the holiday season brings joy and warmth to your space. One creative way to add a personalized touch to your decor is by making a DIY Christmas wooden tree. This simple and fun project allows you to showcase your creativity while adding a festive element to your home.
Whether you’re a seasoned crafter or new to DIY projects, creating a wooden tree can be a rewarding experience. In this blog post, we will explore the steps to make your own DIY Christmas wooden tree, along with tips and ideas for customization. Let’s dive in and get crafty this holiday season!
Introduction To DIY Christmas Wooden Trees
The Appeal Of Handmade Holiday Decorations
Handmade decorations add warmth and charm.
Personal touch makes them special.
Unique pieces stand out.
Why Choose A Wooden Tree?
Eco-friendly and sustainable choice.
Natural look and feel.
Durable and reusable for years.
Materials Needed For Your Wooden Tree
Creating your DIY Christmas wooden tree requires the right materials. Here’s what you need:
Choosing The Right Wood
You need to select the appropriate type of wood for your project. Opt for:
- Pine
- Cedar
- Birch
Tools And Supplies List
Ensure you have these tools and supplies ready:
| Tools | Supplies |
|---|---|
| Saw | Wood glue |
| Drill | Paint or stain |
| Sandpaper | Decorative ornaments |
Designing Your Christmas Wooden Tree
When it comes to designing your Christmas wooden tree, there are several key factors to consider to ensure that your creation turns out just as you envision. From sketching your concept to determining the size and proportions, each step plays a crucial role in the overall design and aesthetics of your DIY Christmas wooden tree.
Sketching Your Concept
To begin the design process, start by sketching your concept on a piece of paper. This will help you visualize the shape, style, and overall look of your Christmas wooden tree. Consider whether you want a traditional triangular tree shape or a more modern and abstract design. Sketching allows you to experiment with different ideas before committing to a final design.
Size And Proportions
When determining the size and proportions of your Christmas wooden tree, consider the space where it will be displayed. Take measurements to ensure that the tree will fit comfortably in its designated area. Additionally, think about the height and width of the tree to maintain proper proportions and balance. A taller tree may be suitable for larger rooms, while a smaller tree could be ideal for compact spaces.
Cutting And Assembling The Tree
Building a DIY wooden Christmas tree is a wonderful way to add a personal touch to your holiday decor. In this section, we’ll guide you through the cutting and assembling process, ensuring your safety and providing step-by-step instructions for a successful project.
Safety First: Preparing To Cut
Before you begin cutting the wood for your Christmas tree, it’s crucial to prioritize safety. Follow these essential steps to ensure a safe and successful DIY project:
- Wear protective eyewear and gloves to shield your eyes and hands from potential hazards.
- Ensure that your work area is well-ventilated to minimize exposure to wood dust and fumes.
- Use a sharp and properly maintained saw to achieve clean and precise cuts.
- Secure the wood firmly in place before cutting to prevent any unexpected movement.
Step-by-step Assembly Guide
Now that you’ve taken the necessary safety precautions, it’s time to proceed with the step-by-step assembly of your DIY wooden Christmas tree:
- Begin by laying out all the cut wooden pieces in the order of assembly, ensuring that you have all the required components ready.
- Start from the base of the tree and gradually work your way up, attaching each section securely to the one below it.
- Use wood glue or screws to firmly connect the individual segments of the tree, ensuring stability and durability.
- Once the main structure is assembled, add any additional decorations or embellishments to personalize your wooden Christmas tree.
Decorating Your Wooden Tree
Once you’ve assembled your DIY Christmas Wooden Tree, it’s time to bring it to life with delightful decorations. Transform your wooden tree into a festive centerpiece with these simple and creative ideas.
Painting And Staining Tips
If you prefer a traditional look, painting your wooden tree in classic holiday colors can be a wonderful choice. To achieve a smooth finish, sand the surface first, then apply a primer before painting. Choose acrylic paints for vibrant colors and allow each coat to dry completely before adding another layer.
For a rustic touch, staining your wooden tree can enhance the natural beauty of the wood. Before staining, sand the surface to create a smooth texture. Apply the stain using a brush or cloth, following the wood grain. Allow the stain to penetrate for the recommended time, then wipe away any excess with a clean cloth.
Adding Festive Ornaments
Once you’ve painted or stained your wooden tree, it’s time to add the finishing touches with festive ornaments. Here are some ideas to inspire you:
- Hang colorful baubles and ornaments from the branches to bring a pop of holiday cheer.
- String fairy lights around the tree to create a warm and magical ambiance.
- Add personalized ornaments with family names or initials to make your wooden tree truly unique.
- Attach small pinecones, berries, or dried citrus slices for a natural and rustic look.
- Top your tree with a sparkling star or a glittery bow for a festive touch.
Feel free to get creative and experiment with different ornaments that match your personal style and holiday theme.
Decorating your DIY Christmas Wooden Tree is a delightful way to add charm and festive spirit to your holiday decor. Whether you choose to paint or stain, and whether you go for traditional or personalized ornaments, your wooden tree will surely become a cherished part of your Christmas celebrations.
Lighting Up Your Masterpiece
Decorating a DIY Christmas wooden tree can be a fun and creative activity, but it’s important to choose the right lights to ensure your masterpiece shines bright. Here are some tips for choosing and installing the perfect lights for your tree.
Choosing The Right Lights
When selecting lights for your Christmas wooden tree, it’s important to consider the size and shape of your tree. A smaller tree may only need a strand or two of lights, while a larger tree may require several strands. Additionally, consider the color and style of the lights. Clear or warm white lights can create a classic look, while colored or multi-colored lights can add a playful touch.
LED lights are a popular choice for Christmas trees as they are energy-efficient, long-lasting, and come in a variety of colors and styles. You can also choose between traditional plug-in lights or battery-operated lights for added convenience.
Installation Tips
Before installing your lights, make sure to test them to ensure they are working properly. Begin by wrapping the lights around the tree, starting at the top and working your way down. Use zip ties or twist ties to secure the lights to the branches, making sure to evenly space them for a balanced look.
For added safety, use a surge protector and avoid overloading the electrical outlet. Additionally, consider using a timer to automatically turn the lights on and off each day.
With these tips, your DIY Christmas wooden tree will be sure to shine bright and bring joy to all who see it.
Alternative Design Ideas
When it comes to DIY Christmas wooden trees, there are several alternative design ideas that can add a unique touch to your festive decor. From minimalist designs to themed trees, there are endless possibilities to explore. Let’s dive into some alternative design ideas for your DIY Christmas wooden tree.
Minimalist Designs
If you prefer a clean and simple aesthetic, minimalist designs offer a chic and understated approach to Christmas decor. Consider using sleek wooden branches arranged in a symmetrical pattern to create a minimalist wooden tree. Enhance the simplicity with subtle touches of metallic or monochromatic ornaments for a sophisticated look.
Themed Trees
Themed trees allow you to infuse your personal style and creativity into your DIY Christmas wooden tree. Whether it’s a rustic-themed tree adorned with burlap ribbons and natural elements or a vintage-inspired tree with antique ornaments and lace accents, themed trees offer a delightful way to showcase your unique design sensibilities.
Caring For Your Wooden Christmas Tree
Caring for your wooden Christmas tree is essential to keep it looking beautiful and vibrant for years to come. Proper cleaning and maintenance, as well as appropriate storage, are key to preserving the natural charm of your DIY wooden tree.
Cleaning And Maintenance
To maintain the pristine appearance of your wooden Christmas tree, regular dusting with a soft, dry cloth is recommended. Avoid using harsh cleaning products or water, as these can damage the wood. For stubborn dirt or stains, lightly dampen the cloth with a gentle wood cleaner and wipe the affected areas. Always dry the tree thoroughly after cleaning to prevent moisture damage.
Storing Your Tree
When the festive season comes to an end, proper storage is crucial to protect your wooden Christmas tree. Disassemble the tree carefully, ensuring each piece is clean and dry before storage. Store the components in a cool, dry place away from direct sunlight and moisture. Consider using a protective cover or a dedicated storage bag to shield the tree from dust and potential damage during the off-season.

Frequently Asked Questions
How To Make A DIY Wooden Christmas Tree?
To make a DIY wooden Christmas tree, follow these simple steps:
1. Cut wooden boards in the shape of a tree.
2. Sand the edges and paint the boards in your desired color.
3. Drill holes in the boards and assemble them using screws or nails.
4. Decorate the tree with ornaments, lights, and a star on top.
5. Enjoy your unique and eco-friendly Christmas decoration!
How To Make A Driftwood Xmas Tree?
To make a driftwood Xmas tree, gather driftwood branches of different sizes. Arrange them in a triangular shape, with the largest at the bottom and smallest at the top. Secure with twine or wire. Add ornaments, lights, and a tree topper.
Enjoy your unique and eco-friendly Christmas tree!
What Wood Is Used For Christmas Trees?
The wood used for Christmas trees is typically from fir, pine, or spruce trees. These varieties are popular for their lush foliage and needle retention, making them ideal for holiday decorations.
How To Make A Wooden Triangle Christmas Tree?
To make a wooden triangle Christmas tree, cut three equal wooden planks, assemble them into a triangle shape, and secure with nails or screws. Decorate with lights and ornaments. You can also paint or stain the wood for a festive touch.
Enjoy your unique handmade tree!
Conclusion
Crafting a DIY Christmas wooden tree is an excellent way to infuse creativity into your holiday decor. Not only is it a fun and engaging project, but it also adds a personal touch to your festive decorations. With just a few simple materials and some basic woodworking skills, you can create a unique and beautiful centerpiece for your home during the holiday season.
So why not give it a try and see how your wooden tree can add warmth and charm to your Christmas decor this year?