DIY Lithium Battery Pack: Ultimate Power Solution
To build a DIY lithium battery pack, gather required materials and follow a detailed online tutorial. Are you interested in creating your own DIY lithium battery pack for various electronic projects or devices?
Building a custom battery pack can be a cost-effective and rewarding endeavor, allowing you to tailor the specifications to suit your specific needs. By sourcing high-quality lithium cells and assembling them correctly, you can create a reliable power source for your gadgets.
In this guide, we will explore the steps involved in creating a DIY lithium battery pack, highlighting key considerations and safety measures along the way. Let’s dive into the fascinating world of DIY battery pack assembly!
Understanding Lithium Battery Packs
Lithium battery packs are a popular choice for DIY enthusiasts due to their high energy density and lightweight nature. Understanding the key aspects of lithium battery packs is crucial for proper utilization. Below, we delve into the essentials.
What Are Lithium Battery Packs?
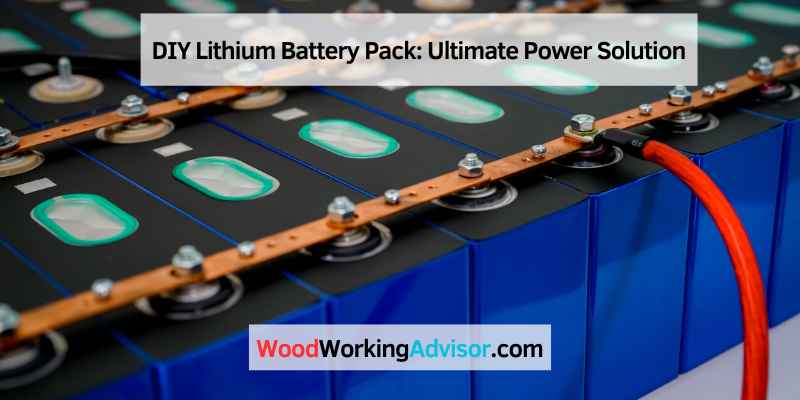
Lithium battery packs consist of individual lithium-ion cells connected in series or parallel to create a larger power source. These packs are rechargeable, offering a high energy density and long lifespan.
Advantages Of Lithium Battery Packs
- Lithium battery packs offer higher energy density than other battery types.
- They have a long lifespan with a high number of charge cycles.
- Lithium packs are lightweight and ideal for portable applications.
- They provide consistent voltage throughout the discharge cycle.
Components Of A DIY Lithium Battery Pack
A DIY lithium battery pack consists of various key components that work together to power different devices efficiently and sustainably. Understanding the components is crucial for successful assembly and safe operation.
Lithium Cells
Lithium cells are the building blocks of a DIY battery pack, providing the energy storage capacity needed. These cells come in various sizes and configurations to suit different power requirements.
Battery Management System (BMS)
A Battery Management System (BMS) is essential for monitoring and regulating the charging and discharging of lithium cells. It helps prevent overcharging, over-discharging, and maintains balanced cell voltages.
Connectors And Cables
The connectors and cables in a DIY lithium battery pack provide the necessary links between the cells, BMS, and the device being powered. Proper connectors and cables ensure efficient power transfer and reliable connections.
Planning Your DIY Lithium Battery Pack
Are you considering building your own lithium battery pack? Proper planning is crucial to ensure the safety and efficiency of your DIY project. Before diving into the construction process, it’s essential to carefully consider factors such as power requirements, cell selection, and capacity calculation. Let’s break down the steps for planning your DIY lithium battery pack and ensure a successful outcome.
Determining Power Requirements
Understand the power needs of your application. Calculate the maximum current draw and voltage requirements to ensure your lithium battery pack can adequately meet the demands of your project. Consider factors such as peak power consumption and average power usage to determine the suitable power requirements for your DIY battery pack.
Selecting The Right Cells
Choosing the right cells is essential for the performance and safety of your DIY lithium battery pack. Look for high-quality lithium cells with the appropriate capacity and discharge ratings that align with your power requirements. Consider factors such as brand reputation, cell chemistry, and compatibility with your charging system when selecting the cells for your battery pack.
Calculating The Capacity Needed
Calculate the required capacity of your lithium battery pack to ensure it can provide sufficient power for your application. Consider the amp-hour (Ah) rating and voltage requirements of your project to calculate the total capacity needed for the battery pack. Proper capacity calculation is crucial for achieving the desired runtime and performance of your DIY lithium battery pack.
Assembling Your Diy Lithium Battery Pack
Building your own lithium battery pack can be a rewarding and cost-effective project, allowing you to customize your power source for various applications. Assembling the battery pack involves a few important steps to ensure the safety and functionality of your project. In this section, we will walk you through the process of soldering the cells, installing the battery management system, and wiring and testing your DIY lithium battery pack.
Soldering The Cells
Before assembling the lithium battery cells, it is crucial to prepare them for soldering. Start by aligning and arranging the cells in the desired configuration, taking care not to damage the delicate terminals. Make sure to plan the layout and spacing of the cells to optimize the overall size and shape of the battery pack.
Once the cells are in place, it’s time to solder them together. Apply a small amount of flux to each terminal to ensure good electrical contact during soldering. Use a soldering iron with a fine tip and carefully solder the interconnections between the cells. Take note to solder quickly to minimize heat transfer to the cells, as excessive heat can damage them or reduce their lifespan.
Installing The Battery Management System
A battery management system (BMS) is vital for monitoring and protecting your lithium battery pack from overcharging, overdischarging, and short circuits. Carefully install the BMS according to the manufacturer’s instructions, ensuring proper insulation to prevent any potential short circuits.
Connect the BMS to the individual cell terminals, ensuring the correct polarity. Double-check the connections to ensure they are secure and snug. The BMS will provide a balance function to equalize the voltage of the cells, helping to prolong their life and maintain optimum performance.
Wiring And Testing
Once the cells and BMS are in place, it’s time to wire the battery pack and perform initial tests. Use high-quality copper wires with appropriate gauge to minimize resistance and ensure efficient power distribution. Connect the positive and negative terminals of the cells to the corresponding terminals on the BMS and check for proper alignment.
Before fully securing the connections, perform a thorough test to ensure everything is functioning as intended. Use a multimeter to measure the voltage across each cell and verify that they are balanced. Monitor the temperature of the cells during the testing process to ensure they are not overheating.
Once you are satisfied with the wiring and testing, secure all the connections with appropriate insulating materials and ensure that the battery pack is securely housed in its designated enclosure. Remember to follow safety precautions and handle lithium batteries with care to avoid any accidents or damages.
Safety Considerations And Best Practices
When it comes to DIY Lithium Battery Packs, safety should always be the top priority. Lithium batteries are powerful energy storage devices that require careful handling and storage. By following a few best practices, you can ensure the safe use and longevity of your DIY Lithium Battery Pack.
Handling And Storage Of Lithium Cells
The proper handling and storage of lithium cells are crucial to prevent accidents and maintain the batteries’ performance. Here are a few best practices:
- Always handle lithium cells with care, avoiding any physical damage, such as bending or dropping them.
- Store lithium cells in a cool, dry place away from direct sunlight and extreme temperatures. Ideally, the storage temperature should be between 20 to 25 degrees Celsius.
- Avoid storing lithium cells near flammable materials or gases, as they can pose a fire hazard.
- Keep lithium cells away from water or any sources of moisture, as they are highly reactive to it.
- When transporting lithium cells, ensure they are properly insulated and protected from any potential impact.
Ensuring Proper Ventilation
Proper ventilation is essential for DIY Lithium Battery Packs to dissipate heat and prevent the accumulation of potentially combustible gases. Consider the following guidelines:
- Provide sufficient space around the battery pack for airflow.
- Strategically position cooling fans or thermal management systems to maintain optimal operating temperatures.
- Regularly inspect and clean ventilation openings to prevent dust or debris accumulation, ensuring unrestricted airflow.
- Consider using flame-retardant enclosures or materials to enhance overall safety.
Testing And Monitoring The Battery Pack
Regular testing and monitoring are crucial for detecting potential issues and ensuring the performance of your DIY Lithium Battery Pack. Here are some recommendations:
- Use a high-quality battery management system (BMS) to monitor the voltage, current, and temperature of the battery pack.
- Perform regular capacity tests to assess the overall health of the batteries and identify any potential degradation.
- Ensure all connections and wiring are secure and well-insulated to prevent short circuits or electrical failures.
- Familiarize yourself with the warning signs of battery failure, such as rapid temperature increase or abnormal voltage fluctuations, and take appropriate action immediately.
Frequently Asked Questions For DIY Lithium Battery Pack
How Do You Make A DIY Lithium Battery Pack?
To make a DIY lithium battery pack, gather lithium cells, a battery management system, and a case. Connect the cells in series or parallel, depending on your desired voltage and capacity. Use the battery management system to monitor and protect the battery, and then enclose everything in a secure case.
What Are The Advantages Of A DIY Lithium Battery Pack?
A DIY lithium battery pack offers several advantages. Firstly, it allows customization of the battery’s capacity and voltage to meet specific needs. Secondly, it can be cost-effective compared to buying pre-made battery packs. Lastly, making your own battery pack can give you a better understanding of battery technology and enhance your DIY skills.
Are DIY Lithium Battery Packs Safe?
While DIY lithium battery packs have the potential to be safe, it is crucial to follow proper safety measures. Use quality cells from reputable sources, handle them with care, and ensure proper insulation and protection. Additionally, the use of a battery management system is essential to monitor and regulate the battery’s performance, voltage, and temperature, ensuring safe operation.
Conclusion
To sum up, creating your own DIY lithium battery pack can be a rewarding and cost-effective project for any tech enthusiast. With the right materials and precautions, you can customize a battery pack that fits your specific needs. Remember to prioritize safety and follow proper guidelines for assembling and maintaining your battery.
Happy DIY-ing!