DIY Wooden Lantern Plans: Illuminate Your Space!
Looking to create DIY wooden lanterns? There are a variety of plans available online, including those from The House of Wood, The Home Depot, and Jaime Costiglio.
These plans range from simple designs that can be made with scrap wood to more intricate lanterns with curved tops and multiple panels. Many of the plans include step-by-step instructions and helpful tips for assembly. Whether you’re looking to make lantern centerpieces for a wedding or rustic outdoor lanterns for your patio, there’s a DIY wooden lantern plan out there for you.
With a little woodworking skill and some basic tools, you can create beautiful and functional lanterns to light up your space.
Introduction To DIY Wooden Lanterns
Welcome to the world of DIY wooden lanterns! Creating your own wooden lantern can be a rewarding and enjoyable experience, allowing you to customize the design to suit your personal style and preferences. Whether you’re looking to add a warm glow to your outdoor space or create a unique centerpiece for your home, making your own wooden lantern can be a fun and fulfilling project. In this guide, we’ll explore the reasons why making your own wooden lantern can be a great idea, the materials you’ll need to get started, and the steps to bring your vision to life.
Why Make Your Own?
There are several compelling reasons to embark on a DIY wooden lantern project. First and foremost, creating your own lantern allows you to unleash your creativity and bring a personal touch to your living space. Additionally, making your own lantern can be a cost-effective alternative to purchasing a pre-made one, and it gives you the freedom to choose the specific materials and design elements that best suit your needs.
Materials You’ll Need
Before diving into your DIY wooden lantern project, it’s essential to gather the necessary materials. Here’s a list of the basic items you’ll need to get started:
- Wood (such as cedar, pine, or reclaimed wood)
- Glass panes or panels
- Saw
- Wood glue
- Nails or screws
- Hammer or screwdriver
- Candle or LED light
- Sandpaper
- Measuring tape
- Protective gear (safety goggles, gloves, etc.)
These materials will serve as the foundation for your DIY wooden lantern and set the stage for a successful and enjoyable crafting experience.
Selecting The Right Wood
Crafting DIY wooden lantern plans involves the crucial step of selecting the right wood for a sturdy and aesthetic finish. Opt for durable and visually appealing wood types like cedar or pine to enhance the lantern’s overall look and longevity.
Experiment with different wood grains to achieve a unique and personalized lantern design.
Types Of Wood To Consider
When it comes to building DIY wooden lanterns, selecting the right wood is crucial. Choosing the wrong type of wood can result in a lantern that doesn’t last long or doesn’t look as good as you expected. Some of the best types of wood to consider include pine, cedar, redwood, and cypress. These woods are known for their durability, resistance to decay, and beautiful grain patterns.
Prepping Your Wood
Once you have chosen the right type of wood, it’s important to prep it properly before you start building your lantern. This involves sanding the wood to remove any rough spots or splinters, and then wiping it down with a damp cloth to remove any dust or debris. If you’re planning on staining or painting your lantern, it’s important to apply a wood conditioner to the surface of the wood first, as this will help the stain or paint adhere better and result in a more even finish.
When it comes to building your DIY wooden lantern, taking the time to select the right wood and properly prep it will make all the difference in the final product. With the right wood and proper preparation, you can create a beautiful, long-lasting lantern that will add warmth and charm to any space.
Tools Of The Trade
Crafting your own DIY wooden lanterns is a great way to add a rustic touch to your home decor. With step-by-step plans and easy-to-follow instructions, you can create beautiful lantern centerpieces or outdoor lanterns using scrap wood. Get creative and let your woodworking skills shine with these unique lantern projects.
When it comes to DIY wooden lantern plans, having the right tools is crucial to ensure a successful project. Whether you’re a seasoned woodworker or a beginner, having the essential tools for the job will make the process smoother and more efficient. Additionally, it’s important to prioritize safety by using the appropriate safety equipment throughout the project.
Essential Tools For The Job
To start your DIY wooden lantern project, you’ll need the following essential tools:
- Saw: A reliable saw is essential for cutting the wooden pieces to the desired measurements. Whether you prefer a handsaw or a power saw, make sure it’s sharp and suitable for woodworking.
- Drill: A drill will be necessary for creating holes and assembling the lantern. Invest in a quality drill with various drill bit sizes to accommodate different needs.
- Sander: A sander will help smooth out the wooden surfaces and remove any rough edges. Consider using a palm sander or an orbital sander for efficient and effective sanding.
- Clamps: Clamps are useful for holding the wooden pieces together securely during assembly. They ensure stability and accuracy in your lantern construction.
- Measuring Tools: Accurate measurements are crucial for a well-built lantern. Make sure you have a tape measure, ruler, and square to ensure precise cuts and assembly.
- Screwdriver: A screwdriver will be necessary for attaching screws and fasteners during the assembly process. Have a variety of screwdriver sizes and types to accommodate different screws.
Safety Equipment
Safety should always be a priority in any woodworking project. Ensure you have the following safety equipment to protect yourself:
- Safety Glasses: Protect your eyes from flying debris or wood particles by wearing safety glasses throughout the project.
- Dust Mask: Woodworking often produces fine dust particles that can be harmful when inhaled. Wear a dust mask to protect your lungs.
- Hearing Protection: Power tools can generate loud noises that can damage your hearing. Wear earplugs or earmuffs to safeguard your hearing.
- Work Gloves: Working with wood can sometimes lead to splinters or cuts. Wear work gloves to protect your hands from potential injuries.
- Apron or Protective Clothing: Woodworking can be messy, so wearing an apron or protective clothing will help keep your clothes clean and protected.
By having the essential tools and safety equipment, you’ll be well-prepared to tackle your DIY wooden lantern project. Remember to prioritize safety and take your time to ensure a successful and enjoyable woodworking experience.
Designing Your Lantern
Before starting your DIY wooden lantern project, sketch out a plan detailing the design.
Dimensions And Details
- Consider the dimensions of your lantern, ensuring it fits your space.
- Add intricate details like carvings or cutouts for a personalized touch.
- Plan the type of wood to use based on the design and durability needed.
Cutting And Assembling
Discover the art of cutting and assembling with these DIY wooden lantern plans. Create your own rustic lantern centerpiece using scrap wood and simple woodworking techniques. Illuminate your space with a touch of handmade charm.
Measuring And Cutting
Before you start assembling your DIY wooden lantern, it’s important to have the right measurements and make precise cuts. This will ensure that all the pieces fit together perfectly and create a beautiful finished product. Here are the steps to follow:
- First, gather all the necessary materials, including the wood, measuring tape, pencil, and saw.
- Measure and mark the dimensions for each component of the lantern, such as the sides, top, and bottom.
- Use a saw to carefully cut along the marked lines, ensuring straight and clean cuts.
- Double-check the measurements and adjust if needed before moving on to the next step.
By taking your time to measure accurately and cut precisely, you’ll be setting yourself up for success in the assembly process.
Piecing It Together
Now that you have all the necessary components cut to size, it’s time to start assembling your DIY wooden lantern. Follow these steps to put it all together:
- Begin by laying out all the cut pieces in front of you, making sure you have everything you need.
- Start by attaching the sides to the bottom piece, using wood glue and nails or screws.
- Make sure to align the edges and corners properly to ensure a tight fit.
- Next, attach the top piece to the sides, again using wood glue and nails or screws.
- Double-check that everything is aligned and secure before moving on.
- If desired, you can add additional decorative elements or handles at this stage.
Once you’ve completed these steps, you’ll have a fully assembled DIY wooden lantern ready for finishing touches such as sanding, staining, or painting. Remember to take your time and enjoy the process of creating something beautiful with your own hands.
Adding The Finishing Touches
Create stunning DIY wooden lanterns with these easy-to-follow plans. Transform scrap wood into beautiful rustic lanterns that add the perfect finishing touch to any space. Whether you’re decorating for a wedding, outdoor event, or just want to add some cozy ambiance to your home, these lanterns are a must-try project.
Get started and bring warmth and charm to your surroundings.
Sanding For Smoothness
Sand the wooden lantern to achieve a smooth texture.
Stains And Finishes
Apply stains and finishes to enhance the wooden lantern’s appearance.
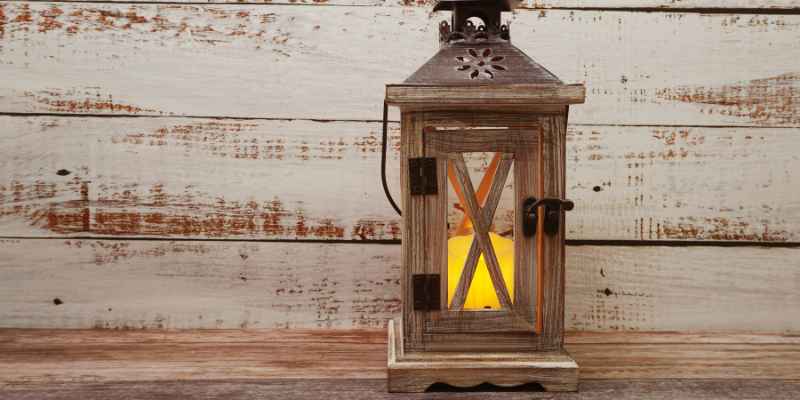
Lighting Options
When it comes to lighting your DIY wooden lantern, there are several options to consider. Choosing the right light and installing it safely are crucial steps in the process.
Choosing The Right Light
When choosing the right light for your wooden lantern, consider the ambiance you want to create. LED candles or fairy lights provide a soft, warm glow perfect for indoor or outdoor settings. For a more traditional look, consider using real wax candles. Solar-powered lights are also a sustainable and energy-efficient option for outdoor lanterns.
Installing Lighting Safely
Installing lighting safely is essential to prevent any fire hazards. If using real candles, ensure they are placed securely within the lantern and never leave them unattended. For electrical lights, use battery-operated options to avoid the need for wiring. Always follow the manufacturer’s instructions for safe installation and operation.
Decorating And Displaying
Once you’ve completed your DIY wooden lantern, it’s time to think about how you want to decorate and display it. Whether you’re placing it indoors or outdoors, styling your lantern to complement its surroundings is key to creating a visually appealing and inviting atmosphere. Let’s explore some ideas for styling your lantern and considerations for indoor versus outdoor use.
Styling Your Lantern
When it comes to styling your lantern, consider the overall aesthetic you want to achieve. For a rustic look, you can adorn the lantern with twine or burlap accents, while for a more elegant feel, embellish it with faux flowers or delicate ribbons. Experiment with different elements to match your personal style and home decor, and consider incorporating LED candles or fairy lights for a cozy and warm ambiance.
Indoor Vs. Outdoor Use
Before deciding where to place your wooden lantern, think about its intended purpose. If you’re aiming to create an intimate atmosphere indoors, position the lantern on a mantel, side table, or as a centerpiece for your dining table. For outdoor use, such as on a patio or in the garden, ensure the lantern is made from weather-resistant materials and can withstand outdoor elements. Additionally, consider using solar-powered LED candles to illuminate your outdoor space sustainably.

Frequently Asked Questions
What Are The Measurements For A Wooden Lantern?
The measurements for a wooden lantern vary depending on the design and style. It is important to have accurate measurements for the wood pieces to ensure proper assembly. DIY wooden lantern plans and tutorials are available online, providing step-by-step instructions on how to make lanterns of various sizes and shapes using scrap wood or pre-cut pieces.
How To Make A Simple Lantern?
To make a simple lantern, cut wood pieces to size, assemble them, and attach them together. You can find DIY plans and tutorials online.
How To Make A Table Lantern?
To make a table lantern, gather materials, like wood, glass, and a candle. Then, cut the wood to size, assemble the lantern, and add the glass panels. Finally, place the candle inside and enjoy your handmade table lantern.
How To Make A Japanese Lantern?
To make a Japanese lantern, find a mold and wrap wire around it. Remove the frame, secure openings, create a base, cut paper panels, and glue them for stability.
Conclusion
Elevate your space with charming DIY wooden lanterns. These simple projects add warmth and ambiance to any setting. Embrace creativity and craftsmanship with these rustic lantern designs. Illuminate your home with personalized flair using easy-to-follow plans. Unleash your woodworking skills and create your own unique lantern masterpiece today.