
How Hard is It to Install Laminate Flooring? 5 Expert-Proven Tips
Installing laminate flooring can be moderately difficult for beginners due to precise measurements and tools needed. However, with proper preparation and technique, it can be an achievable DIY project even for novices.
Laminate flooring offers a cost-effective and easy-to-maintain option for updating the look of your space. Whether you are adding flooring to a room for the first time or replacing existing flooring, the step-by-step process of installing laminate flooring can be a rewarding task that enhances the aesthetics of your home.
By following manufacturer instructions and ensuring a level subfloor, you can successfully install laminate flooring to create a stylish and durable flooring solution.
:max_bytes(150000):strip_icc()/hlt-product-dyson-gen-5-defect-cordless-stick-vacuum-dburreson-017-3ea17c82084849a3b9a79be0c6e4838f.jpeg)
Credit: www.health.com
Choosing The Right Flooring
When it comes to installing laminate flooring, choosing the right flooring is crucial for a successful outcome.
Consideration Of Room Usage
Assess the primary function of the room to determine the appropriate type of laminate flooring.
Assessment Of Subfloor
Examine the condition of the existing subfloor before selecting the suitable laminate material.
Gathering Necessary Tools And Materials
When installing laminate flooring, the first step is gathering necessary tools and materials to ensure a smooth process.
Essential Tools
- Measurement tape
- Utility knife
- Pry bar
- Hammer
- Safety goggles
Required Materials
- Laminate flooring planks
- Underlayment
- Moisture barrier
- Spacers
- Wood glue
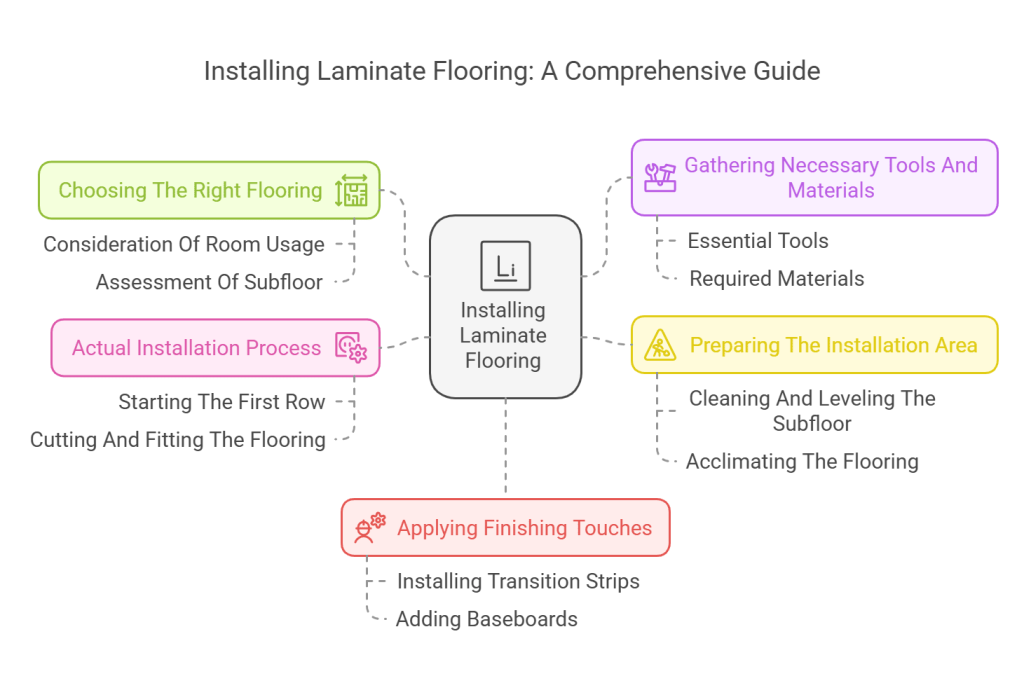
Preparing The Installation Area
Before you embark on the installation of laminate flooring, it’s essential to properly prepare the installation area. This includes cleaning and leveling the subfloor and acclimating the flooring. These initial steps are crucial in ensuring a successful and long-lasting installation. Let’s take a closer look at what’s involved in preparing the installation area for laminate flooring.
Cleaning And Leveling The Subfloor
The first step in preparing the installation area is to ensure that the subfloor is clean and level. Any debris, dust, or protrusions on the subfloor can affect the performance and appearance of the laminate flooring. Use a vacuum to thoroughly clean the subfloor, and fill in any gaps or uneven areas with a suitable leveling compound. A smooth and clean subfloor is essential for a trouble-free installation, so be sure to pay close attention to this step.
Acclimating The Flooring
Another important aspect of preparing the installation area is acclimating the laminate flooring. This involves allowing the flooring to adjust to the humidity and temperature of the installation area. Be sure to carefully follow the manufacturer’s guidelines on acclimating the flooring, as failure to do so could result in issues such as buckling or gaps in the installation.
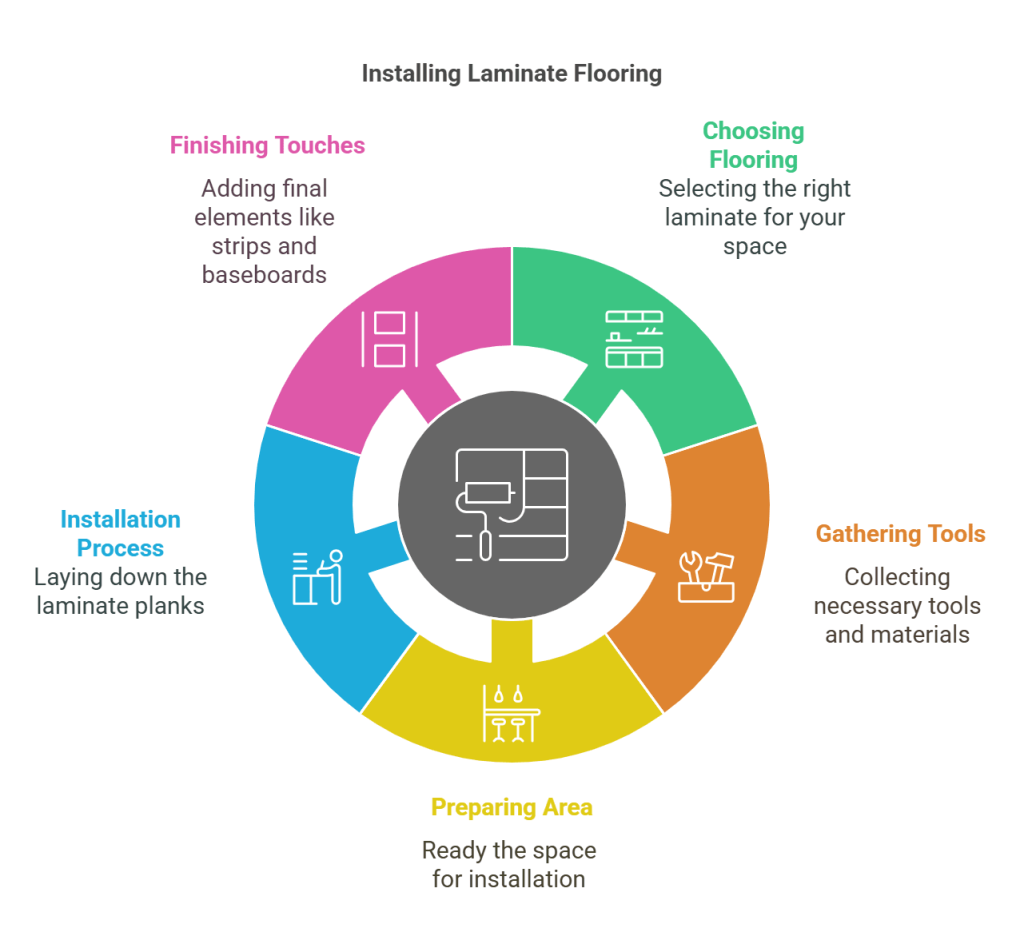
Actual Installation Process
Installing laminate flooring may seem daunting, but it’s a relatively straightforward process. With the right tools and a bit of patience, the actual installation can be manageable for most DIY enthusiasts. Following the manufacturer’s instructions and taking the time to properly prepare the subfloor are key to achieving a successful installation.
Starting The First Row
Before starting the actual installation process of laminate flooring, it’s important to begin with the first row. This is a crucial step that sets the foundation for the rest of the installation. To start, you’ll need to ensure that the subfloor is clean, dry, and level. Remove any existing carpet, padding, or debris to create a smooth surface.
Once the subfloor is prepped, you can start laying down the first row of laminate flooring. Begin by measuring and cutting the first board to fit against the starting wall. It’s essential to leave a small gap, typically around a quarter of an inch, to account for expansion and contraction due to temperature changes.
Secure the first board to the subfloor, making sure it is aligned parallel to the starting wall. This can be done using an adhesive, nails, or a click-and-lock system, depending on the type of laminate flooring you’re installing. Once the first board is in place, continue adding boards to complete the first row, ensuring they are snugly fitted together without any gaps.
Cutting And Fitting The Flooring
As you progress with the installation, you’ll likely encounter areas that require cutting and fitting the laminate flooring. This includes sections around doorways, corners, and irregularly shaped rooms. To achieve a seamless look, precise measurements and accurate cutting are essential.
Using a tape measure and a saw, carefully measure the dimensions of the area where the flooring needs to be fitted. Transfer these measurements to the laminate planks, ensuring accuracy. Take note of any obstacles such as heating vents or pipes that might require additional cuts or adjustments.
Once you have the measurements marked on the planks, use a saw to make precise cuts. This can be done with a circular saw, jigsaw, or even a handsaw, depending on your comfort level and the complexity of the cuts.
Fit the cut pieces into their designated spaces, ensuring they are snug and secure. Remember to leave gaps for expansion and contraction, and use spacers to maintain consistent spacing throughout the installation. Continuously check for any visible gaps or misalignment in the flooring, which may require adjustments before proceeding.
Applying Finishing Touches
Now that you’ve successfully installed your laminate flooring, it’s time to focus on applying the finishing touches. These final touches will not only enhance the appearance of your flooring but also ensure a polished and professional-looking result. In this section, we’ll discuss two essential steps: installing transition strips and adding baseboards.
Installing Transition Strips
Transition strips are an important component when it comes to laminate flooring installation. They are used to join different types of flooring or cover the gaps between rooms, providing a seamless transition and protecting the edges of the laminate.
Here’s how you can install transition strips:
- Measure the width of the doorway or the gap that needs to be covered.
- Cut the transition strip to the measured length, ensuring a precise fit.
- Place the strip in the doorway or gap, aligning it with the desired position.
- Secure the strip in place using adhesive or nails, depending on the manufacturer’s instructions.
- Tip: Use a mallet or a rubber mallet to ensure a tight fit.
Adding Baseboards
Baseboards play an essential role in achieving a polished look for your newly installed laminate flooring. They not only cover the expansion gap between the floor and walls but also provide protection against potential damage.
Here’s how you can add baseboards to your laminate flooring:
- Measure the length of each wall where you plan to install the baseboards.
- Cut the baseboards to the measured length, considering any angles or corners.
- Apply adhesive or use a nail gun to secure the baseboards in place, ensuring they are level and snug against the wall.
- Tip: Pre-painting or staining the baseboards before installation can save time and effort.
By following these simple steps for installing transition strips and adding baseboards, you can give your laminate flooring a professional finish, adding a touch of elegance to your space.

Credit: www.amazon.com
Frequently Asked Questions On How Hard Is It To Install Laminate Flooring
Is It Cheaper To Install Laminate Flooring Yourself?
Yes, installing laminate flooring yourself is generally cheaper than hiring professionals. It can save on labor costs.
Is Installing Laminate Hard?
Installing laminate flooring is moderately challenging but doable for DIYers with basic skills. Clear instructions and handy tools are essential.
How Long Does It Take To Install Laminate Flooring Yourself?
It usually takes 1-2 days to install laminate flooring yourself, depending on the size of the area.
What Are Some Common Mistakes When Laying Laminate Flooring?
Common mistakes when laying laminate flooring include improper measurement and cutting, failure to acclimate the flooring to the room’s humidity, poor subfloor preparation, incorrect installation of underlayment, and lack of expansion gap. Careful measurement, preparation, and installation techniques are essential for a successful laminate flooring project.
Conclusion
Installing laminate flooring can be a DIY project for many. Understanding the process and following the correct steps can make it a manageable task. However, if you lack the time or expertise, hiring a professional can ensure a smooth and successful installation.
With the right tools and preparation, laminate flooring can transform and enhance the aesthetics of your home.