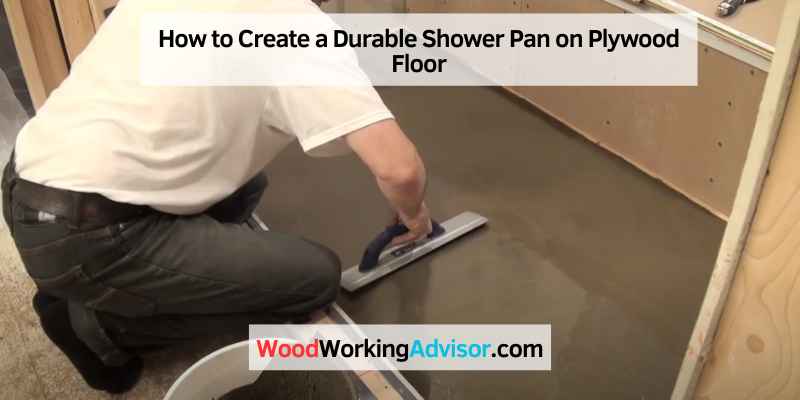
How to Create a Durable Shower Pan on Plywood Floor
To build a shower pan on a plywood floor, start by installing a waterproof membrane directly onto the plywood surface. Then, apply a layer of mortar and lay the shower pan liner before creating the slope and pouring the final mortar bed.
Building a shower pan on a plywood floor requires precision and attention to detail to ensure proper drainage and waterproofing of the shower area. By following the necessary steps and using the right materials, you can successfully construct a durable and functional shower pan that will stand the test of time.
Credit: www.familyhandyman.com
Selecting The Right Materials
When building a shower pan on a plywood floor, selecting the right materials is crucial. Opt for waterproof and durable options like cement backer board, waterproof membrane, and high-quality tile. These materials will ensure a long-lasting and leak-free shower pan that’s built to withstand moisture and daily use.
Waterproofing Membrane
When building a shower pan on a plywood floor, selecting the right materials is crucial for a leak-proof and durable shower base.
Tile Backer Board
For the shower pan’s structural integrity, choose a quality tile backer board that is moisture-resistant and suitable for wet areas.
Preparing The Plywood Subfloor
Inspecting the subfloor is crucial for a solid foundation. Repair any damaged areas immediately.
Inspecting And Repairing The Subfloor
- Check for any water damage or rot in the plywood subfloor.
- Fill any gaps or cracks with wood filler or a leveling compound.
- Ensure the subfloor is level and sturdy before proceeding.
Applying A Vapor Barrier
- Lay down a thin sheet of plastic or membrane to prevent moisture buildup.
- Secure the vapor barrier with construction tape or adhesive for a tight seal.
Building The Shower Pan
Building a shower pan on a plywood floor is an essential step in the construction of a shower. It ensures proper drainage and provides a solid base for the shower floor. Building the shower pan involves several key steps, including installing the drain assembly, pouring and sloping the mortar bed, and waterproofing the shower pan.
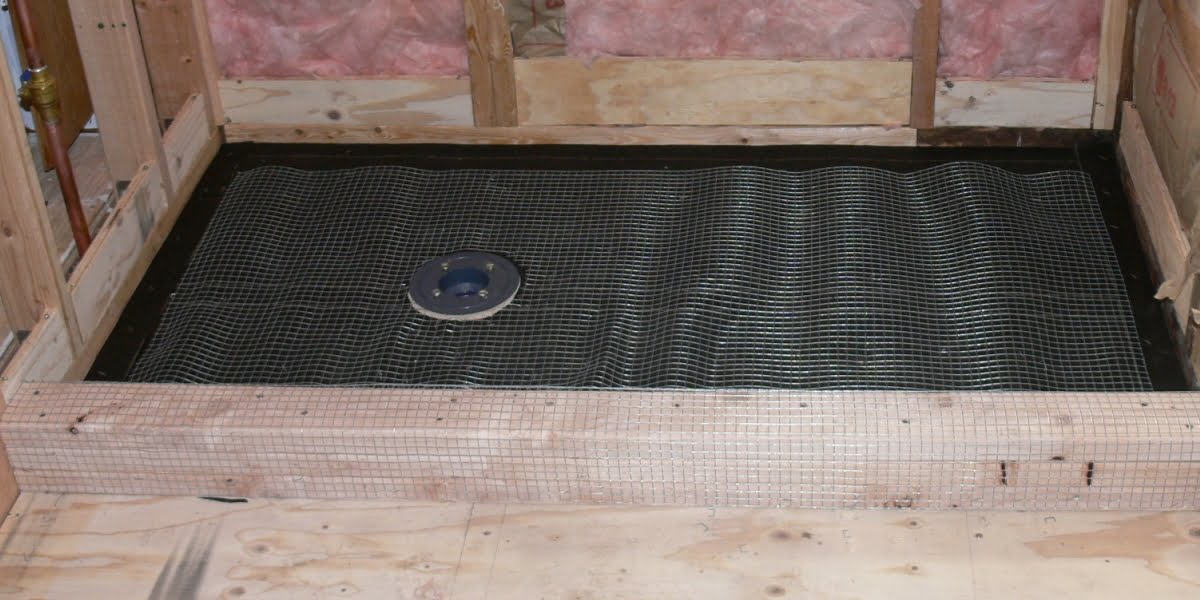
Installing The Drain Assembly
To start, position the drain in the center of the shower area. Next, secure the drain flange to the subfloor, ensuring a proper fit. Then, connect the drain pipe to the drain assembly, ensuring a watertight seal. Finally, test the drain to ensure proper drainage before proceeding to the next step.
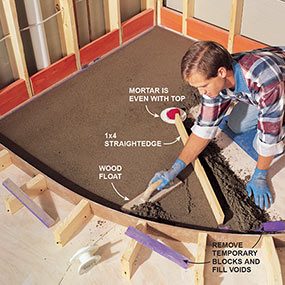
Pouring And Sloping The Mortar Bed
Once the drain assembly is in place, mix the mortar according to the manufacturer’s instructions. Then, pour the mortar into the shower pan area, ensuring it is evenly distributed. Next, slope the mortar bed towards the drain to ensure proper water drainage. Check the slope with a level to ensure it meets the required specifications.
Credit: cabindiy.com
Applying Waterproofing Techniques
When building a shower pan on a plywood floor, applying waterproofing techniques is a crucial step to prevent water leakage and protect the subfloor. Proper waterproofing ensures that your shower remains in good condition for years to come. There are several methods to achieve a watertight seal, but in this article, we will focus on two key techniques: sealing the seams and corners and using a liquid waterproofing membrane.
Sealing The Seams And Corners
Before applying any waterproofing membrane, it is important to seal the seams and corners properly. These areas are prone to water infiltration and must be treated with care.
Here are the steps to seal the seams and corners effectively:
- Clean the seams and corners thoroughly, removing any debris or dust. Ensure the surface is dry before proceeding.
- Apply a high-quality silicone sealant to the seams and corners. Use a caulking gun for precise application.
- Smooth out the sealant using a caulk smoother or your finger. This will ensure a tight seal and prevent any water from seeping through.
- Allow the sealant to cure completely before moving on to the next step.
Sealing the seams and corners is a crucial step in waterproofing a shower pan on a plywood floor. It provides an additional layer of protection and prevents water from damaging the subfloor.
Using A Liquid Waterproofing Membrane
Once the seams and corners are properly sealed, it’s time to apply a liquid waterproofing membrane to the entire shower pan. This membrane creates a continuous barrier that prevents water from penetrating the plywood floor.
Follow these steps when using a liquid waterproofing membrane:
- Prepare the surface by cleaning it thoroughly. Remove any dirt, dust, or debris that may affect the adhesion of the membrane.
- Apply the liquid waterproofing membrane using a roller or brush. Start from the back wall and work your way towards the drain, ensuring even coverage on the entire pan surface.
- Apply a second coat for added protection. Make sure to follow the manufacturer’s instructions regarding drying time between coats.
- Allow the membrane to cure completely before proceeding with the installation of tiles or other finishing materials.
The liquid waterproofing membrane provides a seamless and durable barrier against water damage. It ensures that your shower pan remains watertight and protects the underlying plywood floor.
Installing Tile And Finishing Touches
Learn how to construct a shower pan on a plywood floor by installing tiles and adding finishing touches for a complete and waterproof shower enclosure. Create a durable structure that is both functional and visually appealing, transforming your bathroom with a professional touch.
Laying The Tile On The Shower Pan
Now that you have successfully built your shower pan on the plywood floor, it’s time to move onto the next step: laying the tile. This is an important part of the process, as it not only adds aesthetic appeal but also helps protect your shower from water damage.
Before you begin laying the tile, make sure you have all the necessary materials on hand. This includes the tile itself, thin-set mortar, a trowel, tile spacers, and a tile cutter. Once you have everything you need, you can start the tiling process.
- Clean the shower pan: Start by cleaning the shower pan to remove any dust or debris. This will ensure that the tile adheres properly to the surface.
- Apply thin-set mortar: Mix the thin-set mortar according to the manufacturer’s instructions and apply it to the shower pan using a trowel. Make sure to spread it evenly and in small sections to prevent it from drying out.
- Lay the tile: Place the first tile in the corner of the shower pan and press it firmly into the mortar. Use tile spacers to maintain even spacing between the tiles. Continue laying the tiles, making sure to check for level and adjust as necessary.
- Cut the tiles: If you encounter areas where full tiles won’t fit, you will need to cut the tiles using a tile cutter. Measure and mark the tiles before cutting them, ensuring a precise fit.
- Let the mortar dry: Allow the thin-set mortar to dry according to the manufacturer’s recommended drying time. This is typically around 24 hours but may vary depending on the specific product you are using.
Grouting And Sealing
Once the tiles are in place and the mortar is dry, it’s time to move on to the next step: grouting and sealing. Grouting fills the gaps between the tiles, while sealing helps protect the grout and tiles from moisture and stains.
- Mix the grout: Follow the instructions on the grout packaging to mix the grout to the right consistency. It is important to mix only as much grout as you can work with in a short amount of time, as it can dry quickly.
- Apply the grout: Use a grout float to apply the grout to the gaps between the tiles. Hold the float at a 45-degree angle and work the grout into the gaps, ensuring they are completely filled.
- Clean the tiles: Once the grout is applied, use a damp sponge to wipe away any excess grout from the tile surface. Be careful not to remove too much grout from the gaps.
- Seal the grout and tiles: After the grout has dried, apply a grout sealer to protect it from moisture and stains. Follow the manufacturer’s instructions for application and drying times.
By following these steps and taking your time, you can successfully lay the tile on your shower pan and give your bathroom a beautiful and functional finish.
Credit: www.fromtheforest.com
Frequently Asked Questions Of How To Build A Shower Pan On Plywood Floor
How Do You Build A Shower Pan On A Plywood Floor?
To build a shower pan on a plywood floor, first, create a sloped subfloor with a 1/4 inch drop per foot towards the drain. Then, install a waterproof membrane on top of the plywood. Apply a layer of mortar and set the shower pan liner.
Finally, secure the liner, install the drain, and pour the top concrete layer. Ensure proper curing before tiling.
Can I Install A Shower Pan Directly On Plywood?
No, it is not recommended to install a shower pan directly on plywood. Plywood is not waterproof and can rot when exposed to moisture. It is essential to create a waterproof barrier by using a shower pan liner or a waterproof membrane over the plywood before installing the shower pan.
This will prevent leaks and water damage.
What Materials Are Needed To Build A Shower Pan On A Plywood Floor?
To build a shower pan on a plywood floor, you will need the following materials:
1. Plywood
2. Waterproof membrane or shower pan liner
3. Mortar or masonry mix
4. Shower pan drain assembly
5. Concrete or other suitable flooring material for the top layer
6. Tile and grout for the finishing. These materials are necessary to ensure a sturdy and water-resistant shower pan installation.
Conclusion
To sum up, building a shower pan on a plywood floor is a manageable task that can be completed with the right tools and knowledge. By following the steps outlined in this guide, you can create a sturdy, leak-proof shower base that will provide years of reliable service.
Whether you’re a seasoned DIY enthusiast or a novice, with the right guidance, you can successfully tackle this project and enjoy the satisfaction of a job well done.