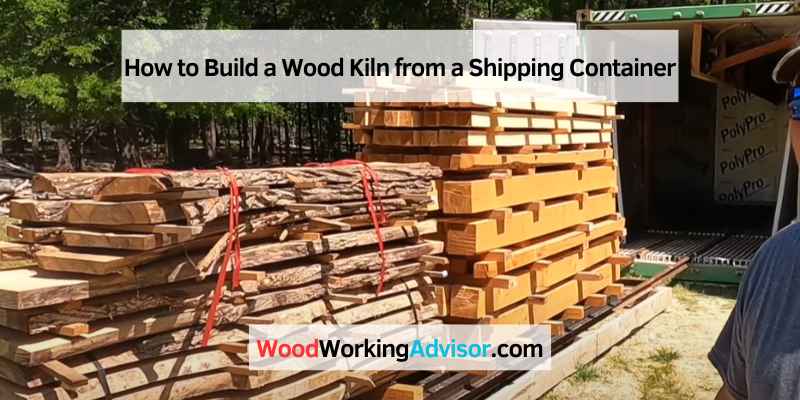
How to Build a Wood Kiln from a Shipping Container
A wood kiln is a type of oven used to dry lumber. Using a wood kiln allows for the drying of lumber in a controlled environment, which helps to prevent warping and cracking. One way to build a wood kiln is by using a shipping container.
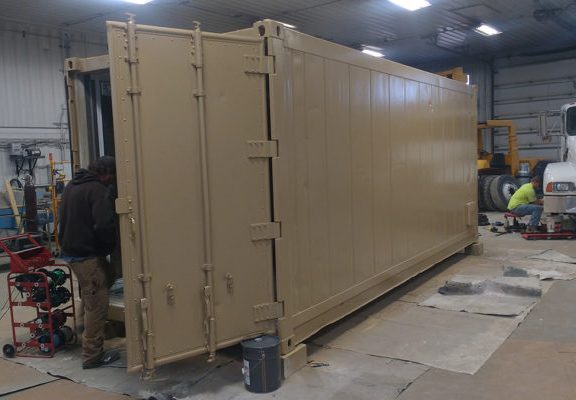
Shipping containers are typically made from steel, which makes them durable and fire-resistant. Several things need to be considered when converting a shipping container into a wood kiln. This includes insulation, ventilation, and heat source.
- Decide on the size of kiln you want to build
- A shipping container is typically 20 feet long, so you need to cut it down to the desired size.
- Cut the top and bottom off of the shipping container using a metal saw
- Remove any sharp edges from the cut metal with a grinder
- Attach wood framing to the sides of the kiln using screws or nails
- Install insulation inside the kiln by attaching it to the wood frame with screws or nails
- Hang firebrick from the ceiling of the kiln using metal wire or hooks
- Place a steel door over one end of the opening for loading and unloading wood pieces
Credit: www.usa-containers.com
How Do You Make a Cheap Wood Kiln?
One of the most common ways to make a cheap wood kiln is using an old metal drum or barrel. Place some bricks inside the barrel so that they are evenly spaced out. Then, drill holes into the side of the barrel and insert steel rods.
Next, build a fire inside the barrel and let it burn for several hours. Once the fire has died, carefully remove the rods and place them in another container filled with water. Finally, cover the barrel with a lid or tarp and allow it to cool completely before opening.
How Do You Build a Small Kiln for Drying Wood?
A small kiln for drying wood can be built quickly and cheaply with some basic materials and some know-how. The most important thing to remember when creating a kiln is that it needs to be well-vented so that the heat can circulate evenly and not cause any damage to the wood. The first step is to build a frame out of 2x4s or other sturdy lumber.
Make sure that the frame is big enough to fit all of the pieces of wood that you want to dry at once. If you’re unsure, it’s better to make the frame too big than too small. Once the structure is built, cover it with chicken wire or another type of mesh so that air can flow freely.
Next, you’ll need to build a fire inside the kiln. This can be done using a metal barrel or drum filled with combustible material such as charcoal briquettes, sawdust, or shredded paper. Place the barrel in the center of the kiln and light it according to the instructions on whatever fuel you use.
Once the fire is going, close up the kiln so that no air can escape. You may need to prop open one door slightly so fresh air can enter as old air escapes through cracks in the structure – this will help keep your fire burning evenly. Leave the kiln closed for at least 24 hours, then check on your wood to see if it’s dried sufficiently.
If not, close up again and leave for another day or two until everything is nice and dry!

How Long Does It Take to Dry Wood in a Homemade Kiln?
Assuming you are talking about drying lumber in a homemade kiln, a few things need to be considered. The first is the thickness of the lumber. The thicker the boards, the longer it will take to dry them.
It generally takes about two weeks per inch of thickness to air-dry lumber. So, if you have 2″ thick boards, it will take approximately four weeks to air dry them. If you are using a kiln to speed up the process, you need to consider the temperature and humidity of the kiln.
The ideal conditions for drying lumber in a kiln are between 130-140 degrees Fahrenheit and 30-40% humidity. Under these conditions, it should take around three days per inch of thickness to dry your lumber. However, e source of wood is different, so these timelines are only estimates.
To get an accurate idea of how long it will take to dry your particular batch of lumber, check the moisture content with a moisture meter periodically throughout the drying process until it reaches 20%.
How Do You Turn a Shipping Container into a Workshop?
If you’re looking for a large, affordable workspace, a shipping container converted into a workshop could be a great option. Here’s what you need to know about how to turn a shipping container into a workshop. First, you’ll need to find a suitable shipping container.
A 20-footer is typically the smallest size that will work well as a workshop, but you may want something more significant if you have the space and budget. Once you’ve found the correct container, you’ll need to clean it out and prep it for conversion. This involves removing rust, sanding rough edges, and painting or sealing the interior and exterior surfaces.
Next, you’ll need to outfit your containers with electricity and ventilationYoured). You can install solar panels or run an extension cord from you for electrical power at home or another power source. To ventilate your workspace, consider installing an air conditioner or fan system.
And finally, insulate your container if noise reduction is essential or if you live in an area with extreme temperatures. Once these preparations are complete, your shipping container workshop will be ready to use! You can use it for woodworking projects, auto repairs, art creation – anything that requires ample indoor space.
Keep your workspace clean and organized to stay functional and comfortable for years to come.
Shipping Container Kiln for Sale
A shipping container kiln is a great way to save money on your firing costs. They are very efficient and can be used for both bisque and glaze firings. We have a wide variety of sizes and types available, so finding the perfect one for your needs is easy.
Our most popular size is our ten cubic foot model. It has plenty of space for large jobs yet is still small enough to maneuver easily. It also comes with an allowing nature door design, allowing you to load and unload quickly and easily.
If you are looking for something a little larger, we also offer a 20 cubic foot model. This kiln is perfect for those who need to fire large quantities at once or want extra space for larger projects. No matter what size or type of shipping container kiln you need, we have it in stock and ready to ship.
Order today and take advantage of our low prices!
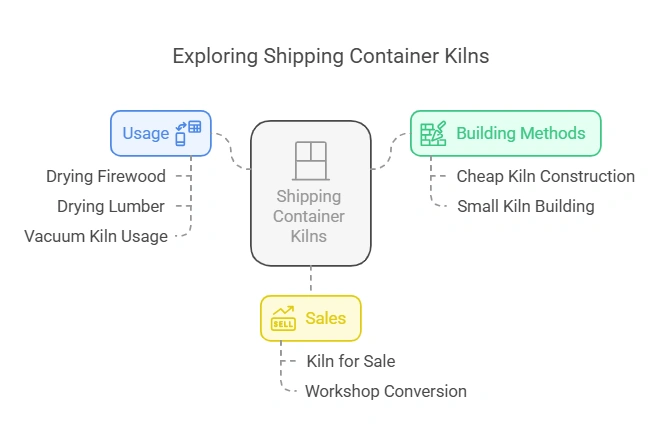
Drying Firewood in a Shipping Container
A shipping container is an excellent option if you’re looking for an efficient way to dry firewood. Using the natural airflow inside the container, you can dry your wood in a fraction of the time it would take outdoors. Here’s how to set up your drying system:
1. Choose a sunny spot for your container. The sun will help heat the air inside, making it easier for the water to evaporate from the wood.
2. Place your wood in the container on racks or pallets so that air can circulate freely.
3. C up the container and open the flow to allow airflow. You may need to prop open the doors slightly if they don’t have ventilation holes.
4. Check on your wood regularly and turn it so that all sides have a chance to dry evenly.
After a few days, your firewood should be ready to use!
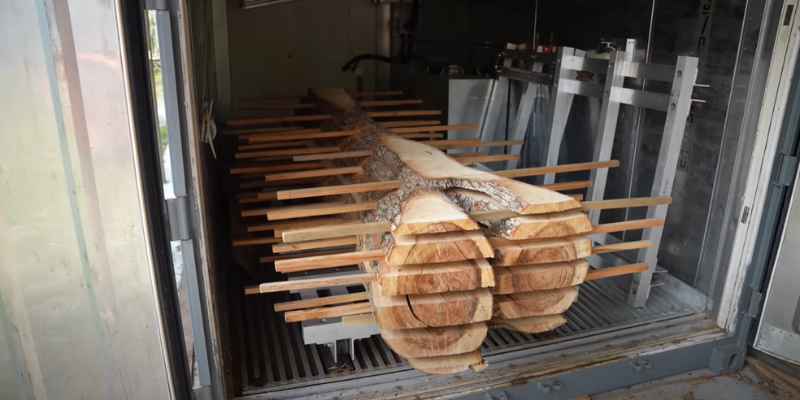
Shipping Container Lumber Kiln
A shipping container lumber kiln is a type of kiln that is used to dry lumber. These kilns are typically made from shipping containers. They can be woodworkers, furniture makers who often use container lumber kilns, and furniture makers who need to quickly and efficiently dry lumber for their projects.
There are several benefits to using a shipping container lumber kiln. First, these kilns are very efficient at drying lumber. They can typically dry a load of lumber in just a few days, much faster than other methods, such as air-drying or using a conventional oven kiln.
Additionally, shipping container lumber kilns evenly distribute heat throughout the chamber, which helps to prevent the warping and cracking of the wood. If considering purchasing a, you should keep a few things in mind. First, make sure to choose a reputable manufacturer who has experience building these types of kilns.
Second, consider the unit size carefully – you want one that will be large enough to accommodate the amount of lumber you need to dry but not so large that it becomes cumbersome to move around or operate.
Shipping Container Vacuum Kiln
A shipping container vacuum kiln is a type of kiln that uses a shipping container as its chamber. The chamber is sealed, and the air is removed, creating a vacuum. This vacuum allows for the controlled heating of the room and its contents.
Shipping container vacuum kilns are typically used for drying or curing wood but can also be used for other materials such as concrete, ceramic, and metal. The advantages of using a shipping container vacuum kiln include the ability to control the temperature and humidity within the chamber and create a perfect seal. This makes them ideal for delicate items that need to be dried or cured without exposure to oxygen or moisture.
Shipping container vacuum kilns are also much cheaper than traditional kilns, making them a good option for those on a budget. If you’re considering using a shipping container vacuum kiln for your next project, there are a few things you should keep in mind. First, ensure your container is large enough to accommodate your project.
Second, ensure adequate ventilation, so fumes from the drying or curing process don’t build up inside the chamber. Finally, be aware that these kilns can get very hot – take precautions to protect yourself and your belongings while operating one!
Conclusion
If you’re interested in building your wood kiln, one option is to repurpose a shipping container. Shipping containers are made of steel, an excellent conductor of heat. This means that they can be used evenly and efficiently in dry lumber.
Start welding or bolting the doors shut to build a wood kiln from a shipping container. Next, cut out vents on the sides of the container and install fans to circulate air. Then, line the container’s interior with a firebrick and install a burner system.
Finally, seal the container and let it preheat before loading it with lumber. With some planning and effort, you can turn a shipping container into a high-quality wood kiln.