How to Install Wood Stove Pipe Through Cathedral Ceiling: Expert Guide
Are you dreaming of cozy winter evenings by a crackling fire, right in the heart of your living room? Installing a wood stove can transform your home into a warm haven, especially when you have a cathedral ceiling that adds to the charm.
But how do you navigate the complexities of installing a wood stove pipe through that high, sloping ceiling? It might seem daunting at first, but don’t worry—you’ve come to the right place. In this guide, you’ll discover clear, easy-to-follow steps that will make the process not just manageable, but straightforward.
Imagine the satisfaction of completing this project yourself and the comfort you’ll feel as the warmth envelops your home. Ready to dive in and make your dream a reality? Let’s get started!

Credit: www.youtube.com
Tools And Materials Needed
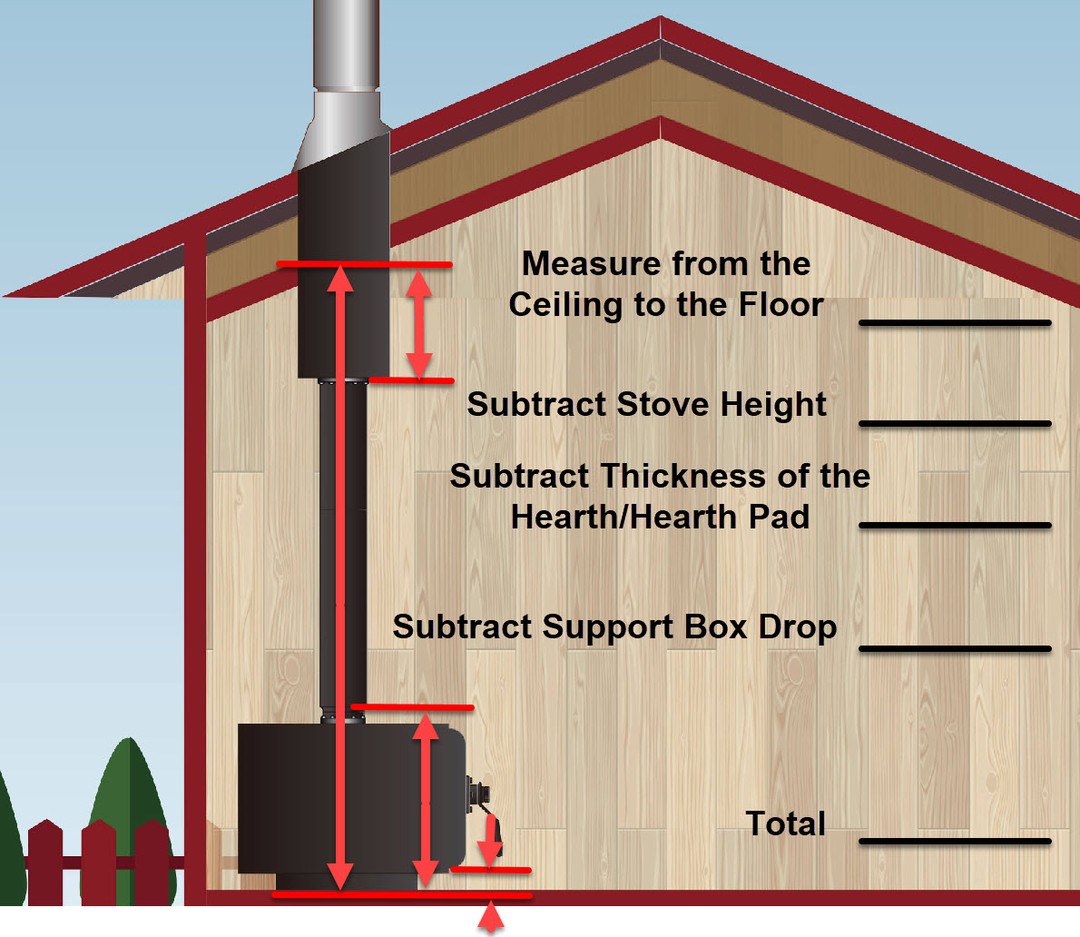
Begin with gathering important toolsand materials. A measuring tapeis vital. It helps you measure the area. You need a markerto mark the ceiling. Get a drillfor making holes. A screwdriveris essential too. It helps fix screws in place. You will need pipe sections. Make sure they fit well. Have bracketsready to secure pipes. These hold the pipes firmly. Buy a ceiling support box. It ensures safety. Get a firestopspacer. It prevents heat escape. Finally, have sealantready to close gaps. This prevents air leaks.
Credit: allfuelhst.com
Safety Precautions
Safetyis very important with wood stove pipes. Make sure your tools are ready. Check for any damages or missing parts. Use strong gloves to protect your hands. Wear safety gogglesto guard your eyes. Keep a fire extinguisher nearby. This helps in case of a fire. Ensure the ladder is sturdy. It should not wobble or slip. Ask a friend to hold the ladder. This provides extra safety.
Keep your work area clean. Remove any clutteron the floor. Avoid stepping on sharp objects. Check the ceiling for leaks. Water can damage your stove pipe. Follow all safety instructions carefully. Read the manual before starting. It has important information. Don’t rush the installation. Take your time and be safe.
Choosing The Right Stove Pipe
Selecting the proper stove pipe is very important. It ensures safety and efficiency. First, measure the diameter of your stove’s opening. This helps in getting the right fit. A snug fit prevents leaks. There are two main types of pipes: single-wall and double-wall. Single-wall pipes are less expensive. They need more clearance from walls. Double-wall pipes are safer. They keep more heat inside. This means less risk of burning nearby objects.
Materials matter too. Stainless steel is a great choice. It’s durable and resists rust. This means the pipe will last longer. Always check local building codes. They tell you what type of pipe to use. Following them keeps your home safe. Remember, a good stove pipe keeps your home warm and safe.
Determining The Pipe Path
Find the best place for your wood stove pipe. Keep it straight and short. This makes the smoke go out easily. Use a plumb line to check the path. It helps keep the pipe straight. Avoid touching walls or wood. This keeps your home safe from heat. Measure the distance from the stove to the ceiling. Ensure it fits well. Look for beams in the ceiling. Avoid cutting them. Use a stud finder for this task. Mark the path with a pencil. Check twice before cutting. Safety comes first.
Preparing The Ceiling
Joists are strong beams in the ceiling. They hold up the roof. Finding the joists is important. Use a stud finder to locate them. This tool beeps when it finds a joist. Mark the spots with a pencil. Measure the space between joists. This helps you plan the pipe path. Always check twice to be sure.
Measure the stove pipe size. Use these numbers to make an outline on the ceiling. Draw the circle where the pipe will go. Use a saw to cut the opening carefully. Make sure the hole is the right size. Wear safety goggles while cutting. Dust can hurt your eyes. Clean the area once the hole is cut. Ensure no debris is left behind.
Credit: allfuelhst.com
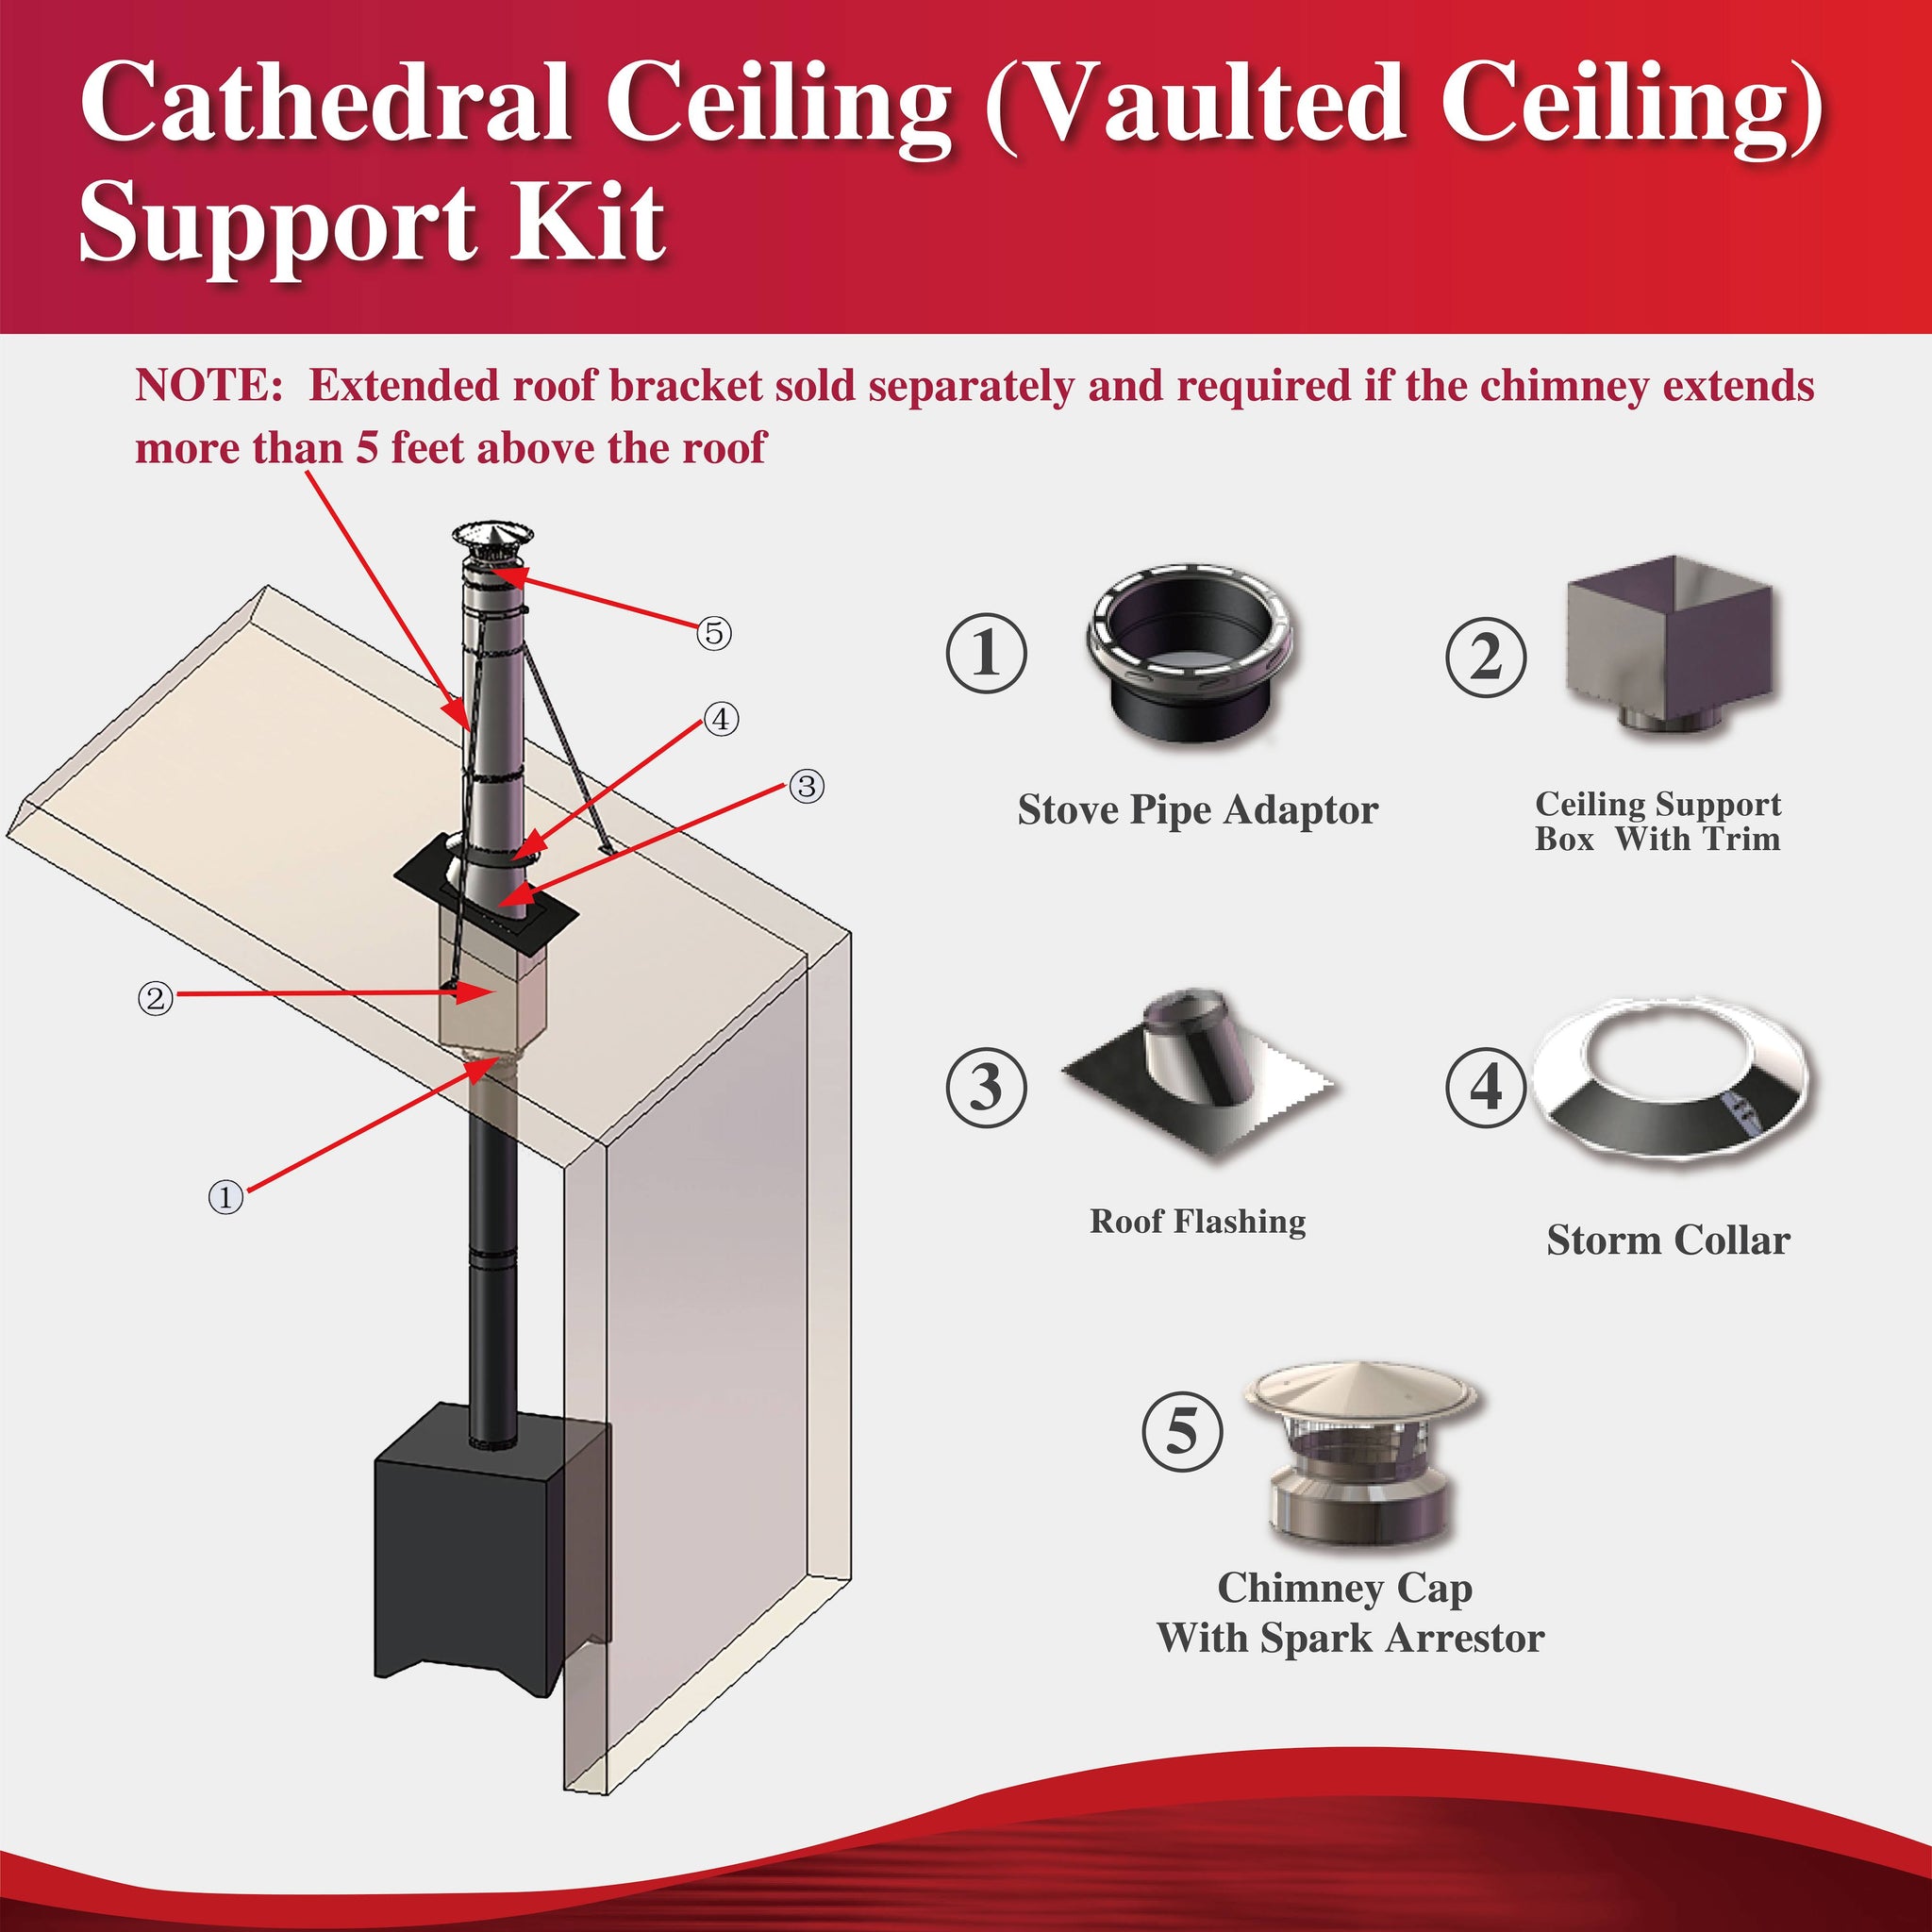
Installing Support Structures
First, find the right spot on the ceiling. Use a stud finder to locate beams. Mark the spot for the mounting bracket. Drill holes in the marked spots. Secure the bracket with screws. Make sure it is tight and level.
The support box holds the pipe. Cut a hole in the ceiling. The hole must match the box size. Fit the box into the hole. Use screws to secure the box. Make sure it is straight and firm.
Assembling The Stove Pipe
Start by aligning the pipe sections. Ensure they fit together snugly. Twist the sections to lock them into place. Check for gaps between the sections. Gaps can cause smoke to leak. Seal any gaps you find. Use high-temperature sealant for this job. This keeps smoke inside the pipe.
Use fasteners to hold the pipes in place. Choose screws or brackets for this. Place fasteners at regular intervals. Make sure they are tight. Loose fasteners can be dangerous. Check each fastener. Ensure they are secure. This keeps the pipe steady. Avoid using too few fasteners. More fasteners mean better support.
Sealing And Insulating
Installing a wood stove pipe through a cathedral ceiling requires careful sealing and insulating. Proper insulation prevents heat loss and enhances safety. Ensure all joints and gaps are tightly sealed to keep your home warm and efficient.
Applying Heat-resistant Sealant
Choose a heat-resistant sealant. It keeps the pipe safe from heat damage. Clean the area around the pipe first. Apply the sealant evenly to avoid gaps. Let it dry completely before you move on. This prevents smoke leaks. Ensure a tight seal for better safety.
Adding Insulation
Use proper insulation around the pipe. It helps to keep heat inside. Cut the insulation to fit snugly. Wrap the pipe with it carefully. Secure the insulation with tape or clips. Insulation keeps the home warm and saves energy. It is crucial for safety and efficiency.
Testing The Installation
Checking for Leaksis very important. Look at the joints and seams. Water or smoke should not come out. Use a flashlight to see any small holes. If you find a leak, fix it right away. Use sealant or tape made for stoves. This keeps your home safe.
Ensuring Proper Ventilationis also crucial. The stove needs air to burn well. Check if the air moves freely through the pipe. Feel if there is any warm air coming out. Make sure nothing blocks the pipe. This helps the fire burn cleanly. A well-vented stove keeps the room warm and cozy.
Maintenance Tips
Regularly check your stove pipefor any leaks. Leaks can cause smoke to escape. This can be dangerous. Clean the pipe at least once a year. This helps to remove soot. Soot can block the pipe. Always use the correct tools for cleaning. This keeps the pipe in good shape.
Inspect the sealsaround the joints. They should be tight and secure. Loose seals can cause problems. They might let smoke into the house. Replace any damaged partsquickly. This prevents bigger issues later.
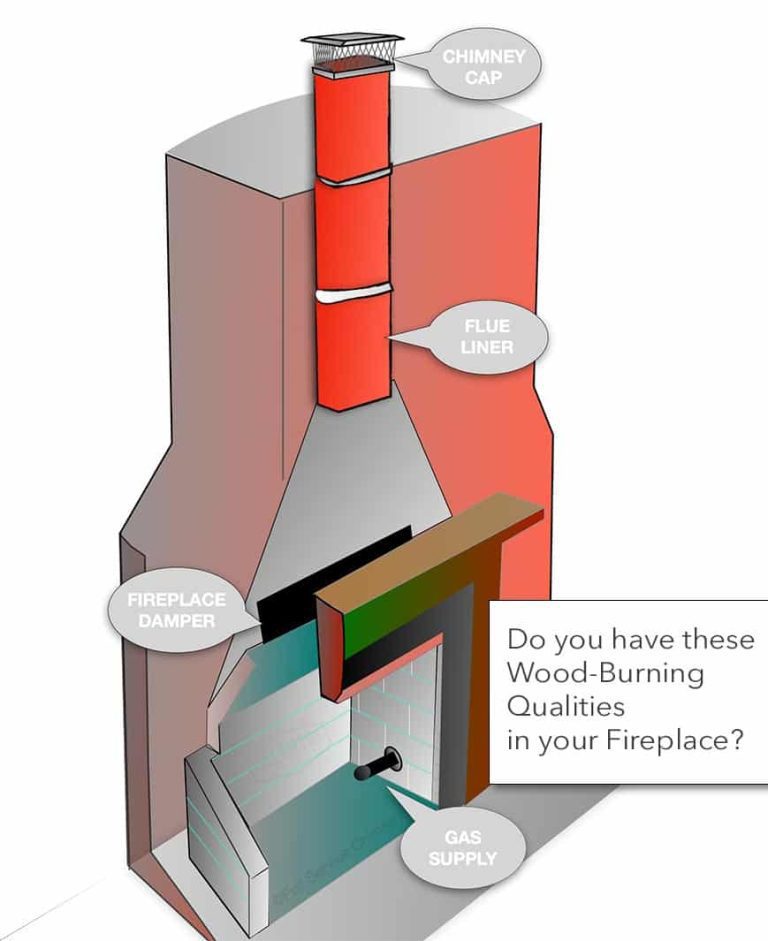
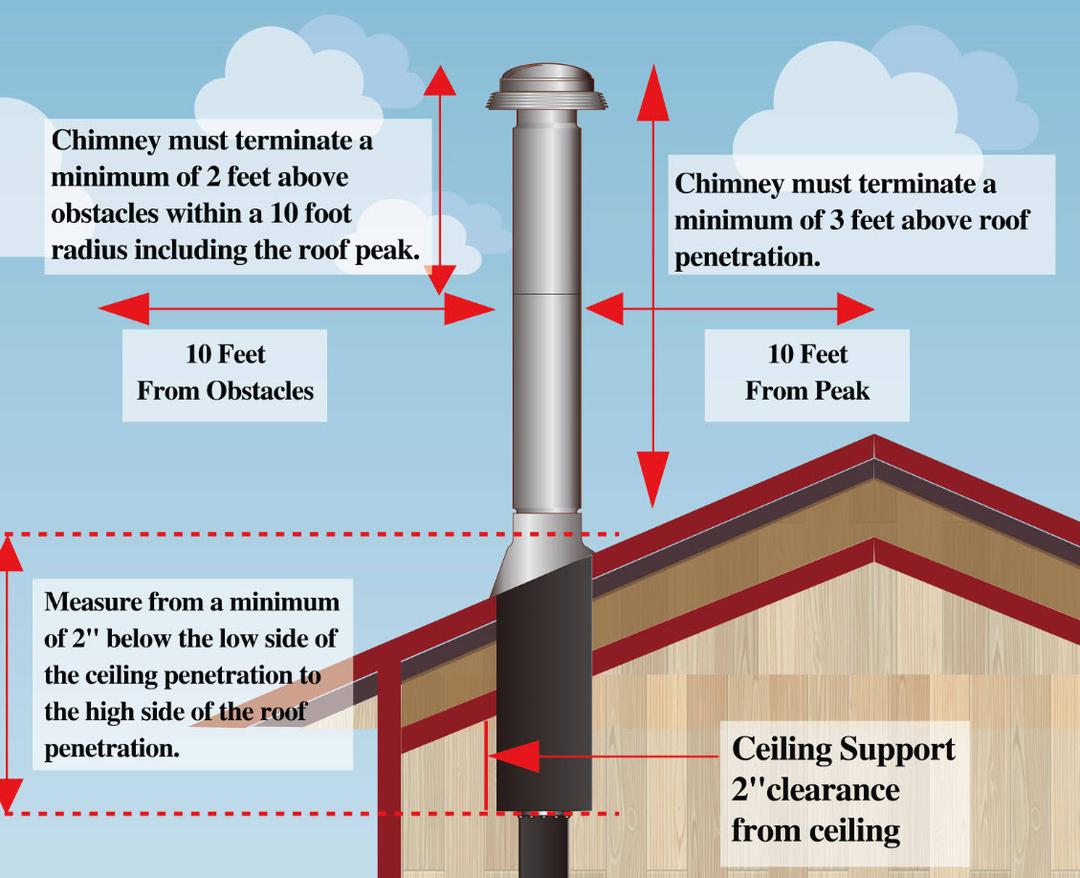
Keep an eye on the chimney cap. Make sure it’s not blocked. Birds or leaves might block it. A blocked cap can cause smoke backup. Regular care keeps your wood stove safe and efficient.
Frequently Asked Questions
How Do I Start Installing A Wood Stove Pipe?
Begin by gathering all necessary materials and tools. Ensure you have safety gear, including gloves and goggles. Identify the installation path through the ceiling. Mark the cutting area precisely, and ensure you follow the wood stove manufacturer’s guidelines. Always prioritize safety and double-check measurements before proceeding.
What Materials Are Needed For This Installation?
You’ll need a wood stove pipe, ceiling support kit, flashing, and firestop spacer. Additionally, have a roof flashing, storm collar, and chimney cap on hand. Safety gear, such as gloves and goggles, is essential. Ensure all materials are heat-resistant and comply with local building codes for optimal safety.
How Do I Ensure Safety During Installation?
Wear protective gear like gloves and goggles. Double-check measurements and follow manufacturer guidelines closely. Ensure proper ventilation and maintain clearances from combustible materials. Use a firestop spacer and follow local building codes. It’s advisable to have a professional inspect the installation for added safety.
Can I Install The Stove Pipe Myself?
Yes, you can, but it requires careful planning and precision. Ensure you follow all manufacturer instructions and local building codes. If unsure, consulting a professional is recommended. Safety is paramount, so prioritize it throughout the installation process.
Conclusion
Installing a wood stove pipe through a cathedral ceiling is doable. Follow each step carefully for safety. Remember to use the right tools and materials. Double-check all measurements and clearances. Safety gear is essential during installation. Regularly inspect the pipe for wear and tear.
This ensures the stove works efficiently. Proper installation keeps your home warm and safe. Enjoy the cozy warmth of your wood stove. It’s a rewarding project when done right. Always prioritize safety in every step. Happy heating!