How to Lighten Walnut Wood: Transform Your Furniture with These Power Techniques
To lighten walnut wood, use a wood bleach or oxalic acid solution for a lighter finish. Lightening walnut wood can enhance its natural beauty and create a brighter look for your furniture or woodworking projects.
By following the right techniques and using the appropriate products, you can achieve the desired lightening effect on walnut wood. Whether you are refinishing old furniture or working on a new project, lightening walnut wood can give it a fresh and modern appearance.
It is essential to prepare the wood surface properly, apply the lightening solution evenly, and finish with a protective coat for a professional-looking result. Lightened walnut wood can add a touch of elegance and sophistication to any interior space.
Understanding Walnut Wood
Discover effective ways to lighten walnut wood for a brighter finish. Using bleaching techniques or sanding can help achieve desired results while maintaining the natural beauty of walnut wood. Experiment with different methods to find what works best for your project.
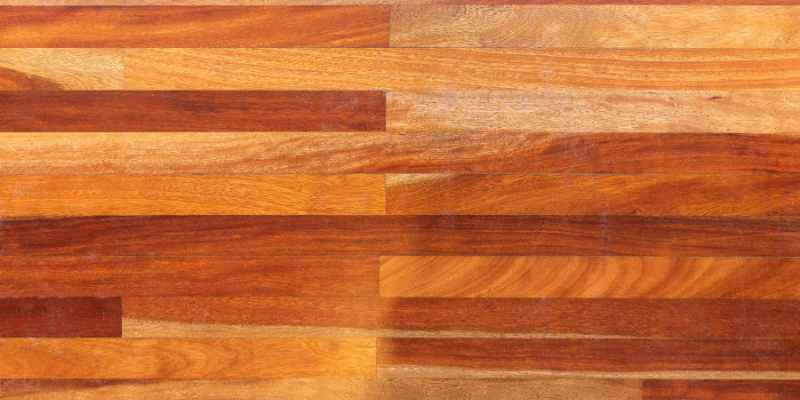
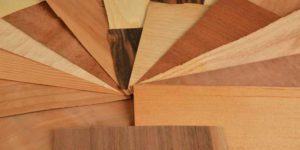
Walnut wood is renowned for its rich, dark color and elegant grain pattern, making it a highly sought-after material for furniture, flooring, and decorative items. It is a versatile hardwood that is prized for its strength, stability, and lustrous appearance. Lightening walnut wood is a popular technique to enhance its natural beauty and to achieve a more contemporary look while still showcasing its distinctive characteristics.
Characteristics Of Walnut Wood
Walnut wood is known for its deep, chocolate-brown hue, which can sometimes exhibit purplish or gray undertones. The wood has a fine, even texture with a straight grain, although it can occasionally display wavy or curly patterns, adding to its allure. This wood is moderately heavy and hard, with excellent dimensional stability, making it a favorable choice for both indoor and outdoor applications.
Common Uses Of Walnut Wood
Furniture: Walnut wood is frequently used for crafting high-quality furniture such as cabinets, tables, and chairs due to its durability and attractive appearance.
Flooring: Its rich color and hardness make walnut wood an excellent choice for elegant and long-lasting flooring options.
Decorative Items: Walnut wood is often utilized for creating decorative items, like clocks, picture frames, and bowls, because of its natural beauty and workability.
In summary, walnut wood is a top-choice material, valued for its distinctive characteristics and numerous applications. Whether utilized for furniture, flooring, or decorative pieces, its lustrous appearance and strength make it an ideal option for both aesthetic and functional purposes.
Importance Of Lightening Walnut Wood
Lightening walnut wood can significantly transform its appearance, giving it a fresh and modern look. By lightening walnut wood, you can enhance its natural beauty and versatility, making it suitable for various interior design styles.
Enhancing Natural Beauty
Lightening walnut wood brings out the rich grain patterns and natural colors of the wood, creating a stunning visual appeal. It adds warmth and character to the wood, making it a focal point in any space.
Matching Different Interior Styles
Lightened walnut wood can seamlessly blend with a variety of interior decor styles, from traditional to contemporary. Its versatile appearance makes it a perfect choice for both classic and modern settings.
Preparing Walnut Wood For Lightening
To lighten walnut wood, begin by sanding off the existing finish using fine-grit sandpaper. Next, apply a wood conditioner to ensure an even lightening process. Then, use a wood bleach or hydrogen peroxide solution to lighten the wood to your desired shade, ensuring to follow safety precautions.
Before you can achieve the desired lighter shade for your walnut wood, it is important to properly prepare the surface. This involves a few key steps such as cleaning and sanding the wood, as well as selecting the right stain or bleach. In this section, we will explore each of these steps in detail.
Cleaning and Sanding
To start the process, you will need to thoroughly clean the walnut wood. This helps remove any dirt, grime, or old finishes that may interfere with the lightening process. Use a mild wood cleaner and a soft cloth to gently wipe down the surface, making sure to remove any residue.
Once the wood is clean, the next step is sanding. Sanding helps to smooth out the surface and prepares it for the application of the lightening agent. Start by using a medium-grit sandpaper and sand along the grain of the wood. Be sure to make smooth, even strokes and avoid applying too much pressure. Sanding with a fine-grit sandpaper afterward will help achieve a smoother finish.
Selecting the Right Stain or Bleach
Now that the walnut wood is clean and smooth, it’s time to choose the right stain or bleach to achieve the desired lightening effect. There are several options available, depending on the look you want to achieve.
When it comes to lightening walnut wood, one common method is to use a wood bleach. This bleach is specially formulated to lighten the natural color of the wood. Follow the manufacturer’s instructions carefully when using a wood bleach, as it can be potent and may require multiple applications for the desired result.
Another option is to use a wood stain that is specifically designed to lighten the color of the wood. These stains often contain a bleaching agent, allowing you to achieve a lighter shade while still preserving the natural grain of the walnut wood. Choose a stain that is compatible with walnut wood and follow the instructions for best results.
In conclusion, preparing walnut wood for lightening involves the important steps of cleaning and sanding the wood, as well as selecting the right stain or bleach. Taking these steps will help ensure that you achieve the desired lighter shade while maintaining the natural beauty of the walnut wood.
Techniques For Lightening Walnut Wood
Explore effective techniques to lighten walnut wood. From bleaching to sanding, discover methods to achieve the desired lighter hue. Whether for furniture or flooring, these methods can revitalize walnut wood with a new, brighter appearance.
Walnut wood is known for its rich, dark color and beautiful grain patterns. However, there may be times when you want to lighten walnut wood to achieve a different look or match it with lighter pieces of furniture. Thankfully, there are several techniques you can use to achieve this desired effect. In this article, we will explore two common methods for lightening walnut wood: the bleaching method and the fuming method.
Bleaching Method
The bleaching method is a popular technique used to lighten walnut wood. This method involves using a chemical solution to remove or lighten the natural color of the wood. Here’s how you can do it:
- Mix a bleach solution according to the manufacturer’s instructions. Ensure you wear protective gloves and work in a well-ventilated area.
- Apply the bleach solution to the walnut wood using a brush or sponge. Make sure to cover the entire surface evenly.
- Allow the bleach to sit on the wood for the recommended amount of time. This duration may vary depending on the type of bleach used, so make sure to follow the instructions carefully.
- After the recommended time has elapsed, rinse the wood thoroughly with water to remove any residual bleach.
- Let the wood dry completely before assessing the desired lightness. If you want to lighten it further, you can repeat the bleaching process.
Fuming Method
The fuming method is another effective way to lighten walnut wood. This technique involves exposing the wood to ammonia fumes, which react with the natural tannins in the wood to create a lighter color. Here’s how you can lighten walnut wood using the fuming method:
- Ensure you have a well-ventilated area as ammonia fumes can be strong. It’s also important to wear protective gloves and work in a safe environment.
- Place the walnut wood in an airtight container or a fume chamber.
- Place a shallow dish filled with ammonia at the bottom of the container.
- Seal the container tightly to prevent the escape of ammonia fumes.
- Allow the wood to be exposed to the ammonia fumes for several hours or even days, depending on the desired lightness.
- After the desired time has passed, remove the wood from the container and let it air out for a few hours or days to dissipate any residual fumes.
Both the bleaching method and the fuming method can be effective techniques for lightening walnut wood. Whether you choose to bleach the wood or expose it to ammonia fumes, make sure to test the method on a small, inconspicuous area first to ensure the desired results. With these techniques, you can achieve the lighter look you desire for your walnut wood.
Applying Stain And Finish
When lightening walnut wood, applying the right stain and finish is crucial in achieving the desired look. Below are key steps:
Choosing The Right Stain For Walnut Wood
- Consider using a gel stain for a more controlled application.
- Water-based stains are also a good option for walnut wood.
- Test the stain on a small area to ensure it achieves the desired color.
Applying The Finish
- Ensure the wood is clean and dry before applying the finish.
- Use a brush to apply the finish in smooth, even strokes.
- Allow the finish to dry completely between coats for best results.
Protecting And Maintaining Lightened Walnut Wood
After successfully lightening your walnut wood, it is crucial to know how to protect and maintain its newly achieved appearance. By following some simple steps, you can ensure that your lightened walnut wood remains in pristine condition for years to come.
Applying Protective Coating
One effective way to protect your lightened walnut wood is by applying a protective coating. This coating creates a barrier that shields the wood from external elements, such as moisture, dirt, and UV rays. It helps maintain its lightened color and prevents it from darkening over time.
To apply a protective coating, follow these steps:
- Clean the wood surface thoroughly to remove any dust or debris.
- Choose a suitable protective coating, such as a clear varnish or polyurethane.
- Apply the coating evenly using a paintbrush or a clean cloth.
- Allow the coating to dry completely before applying additional layers, if necessary.
- Repeat the process if multiple coats are recommended for optimal protection.
Regular Maintenance Tips
To keep your lightened walnut wood looking its best, it’s essential to implement regular maintenance practices. Here are some practical tips to help you maintain the color and quality of your wood:
- Keep the wood dust-free by regularly dusting it with a soft, lint-free cloth.
- Avoid exposing the wood to direct sunlight, as prolonged exposure can cause fading.
- Use coasters or placemats to protect the wood surface from spills, stains, and heat damage.
- Wipe up any spills immediately to prevent them from seeping into the wood.
- Use furniture wax or polish specifically designed for wood to enhance its shine and protect it.
- Inspect the wood periodically for any signs of wear or damage and address them promptly.
By following these maintenance tips and applying a protective coating, you can ensure that your lightened walnut wood retains its beauty and durability throughout the years. With proper care, your lightened walnut wood will continue to be a stunning addition to your home decor and furniture.
Project Inspiration And Tips
When it comes to enhancing the beauty of walnut wood, lightening the color can be a great option. By strategically using certain techniques, you can transform your walnut wood into a lighter, more vibrant shade. In this section, we will provide you with some project inspiration and useful tips to help you achieve professional results. Whether you are a seasoned DIYer or just starting out, these ideas and techniques will guide you in your quest to lighten walnut wood.
DIY Project Ideas
There are numerous ways to incorporate lightened walnut wood into your DIY projects. Here are a few inspiring ideas to get you started:
- Create stunning furniture pieces: Lightened walnut wood can add a modern and airy feel to furniture designs. Consider crafting a sleek coffee table or a beautiful bookshelf, or repurpose existing wooden furniture to give it a fresh and rejuvenated look.
- Add elegance to your kitchen: Transform your kitchen by using lightened walnut wood for cabinets, countertops, or even a stylish kitchen island. The light tones will complement a wide range of color schemes and provide a warm and inviting atmosphere.
- Accentuate your walls: Incorporate lightened walnut wood as wall paneling or create eye-catching wall art to bring a touch of natural beauty to your living spaces. The light colors will provide a stunning contrast against any paint or wallpaper.
Tips For Achieving Professional Results
Here are some tips that will help you achieve the best possible results when lightening walnut wood:
- Prepare the wood surface: Start by ensuring the wood is clean and free from any dirt, dust, or previous finishes. Smooth out any imperfections with sandpaper to create a smooth and even surface.
- Choose the right bleaching method: There are different methods to bleach walnut wood, such as using oxalic acid or hydrogen peroxide. Research and select a method that suits your preferences and the nature of your project.
- Apply the bleaching agent carefully: Follow the instructions of the bleaching agent you choose and apply it evenly across the wood surface. Use a brush or a sponge to ensure thorough coverage.
- Monitor the bleaching process: Keep a close eye on the wood as it bleaches to achieve the desired color. Different woods will react differently to bleaching agents, so regular checks are crucial.
- Protect and seal the wood: Once the desired color is achieved, rinse the wood with water to neutralize the bleaching agent. Apply a sealant or finishing product to protect the lightened wood and enhance its durability.
Conclusion And Final Thoughts
Discover effective methods to lighten walnut wood, enhancing its natural beauty and highlighting the wood grain for a stunning finish. Experiment with various techniques like bleaching or using wood stains to achieve the desired lightness in walnut wood projects. Experimentation is key to achieving the perfect look for your woodworking projects.
Enhancing Your Furniture
Transform your walnut wood furniture with a lighter finish to revamp its look and feel.
Enjoying The Transformed Look
Admire the beauty of your lightened walnut wood furniture, adding a fresh touch to your space.
Frequently Asked Questions Of How To Lighten Walnut Wood
How Do You Lighten The Color Of Walnut Wood?
To lighten the color of walnut wood, you can use a wood bleach or a combination of oxalic acid and water. Apply the bleach to the surface of the wood and let it sit for a few minutes. Rinse with water and repeat if necessary.
Sanding can also help achieve a lighter tone.
Can Walnut Wood Be Stained Light?
Yes, walnut wood can be stained light.
Does Walnut Wood Get Lighter Over Time?
Walnut wood typically darkens over time due to exposure to light and air. It does not get lighter.
What Is The Easiest Way To Lighten Wood?
To lighten wood, use a wood bleach or sandpaper to remove dark stains and finishes. Apply a light-colored stain for a brighter effect.
Conclusion
Incorporating these techniques can help achieve the desired lightening effect on walnut wood. Experiment with different methods to find what works best for your project. With patience and a bit of creativity, you can transform your walnut wood into a beautifully lightened masterpiece that enhances your space beautifully.