Can You Stain Over Polyurethane With Gel? Discover the Power of Versatility
Yes, you can stain over polyurethane with gel. Gel stain is an effective option for refreshing and updating the appearance of polyurethane-coated surfaces.
With its thick consistency, gel stain can adhere and provide even coverage over polyurethane finishes, making it a suitable choice for refinishing projects. By following a few simple steps, such as light sanding and thorough cleaning, you can successfully apply gel stain over polyurethane to achieve a desired color and finish.
Whether you want to change the color of your polyurethane-coated furniture or enhance the existing look, gel stain offers a versatile and effective solution. We’ll explore the process of staining over polyurethane with gel in detail, providing all the information you need to tackle your next refinishing project with confidence.
What Is Gel Stain?
Gel Stain is a versatile product that allows you to stain over polyurethane without the need for stripping or sanding. It provides an easy and effective way to change the color of your wood surfaces while saving time and effort.
Gel stain is a type of stain that is thicker in consistency compared to traditional liquid stains. It is composed of a mix of pigment and resin, giving it a gel-like texture. This unique formulation allows gel stain to cling to vertical surfaces without dripping or running, making it ideal for staining projects that require precision and control. Gel stain is commonly used on wood surfaces, such as furniture, cabinets, and doors, to achieve a rich, even color that enhances the natural beauty of the wood.
Benefits Of Gel Stain
Gel stain offers several advantages over traditional liquid stains. Here are some key benefits of using gel stain:
- Gel stain is easier to apply: The thick consistency of gel stain makes it easier to control during application. It doesn’t seep into the wood as quickly as liquid stains, allowing for more even coverage and fewer mistakes.
- Gel stain doesn’t require a lot of prep work: Unlike some stains that need to be applied to bare wood, gel stain can be used over existing finishes like polyurethane. This saves time and effort in removing previous finishes.
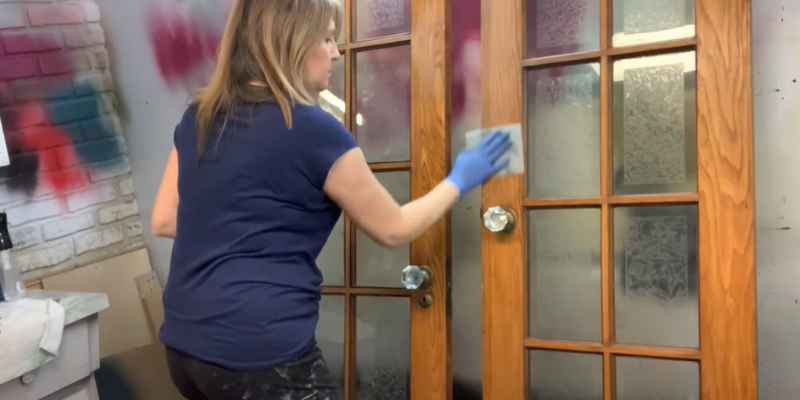
- Gel stain can be used on vertical surfaces: Thanks to its thick consistency, gel stain is perfect for staining vertical surfaces such as doors, cabinets, and furniture. It adheres well without dripping or running.
- Gel stain provides better color control: Gel stain allows you to achieve a more precise and consistent color. It can be layered to intensify the hue or thinned out for a more translucent effect, giving you more control over the final look.
- Gel stain offers longer working time: Gel stain doesn’t dry as quickly as liquid stains, providing a longer working time for application and manipulation. This is especially useful for large or detailed projects that require more time and attention.
Characteristics Of Gel Stain
Gel stain has a unique set of characteristics that sets it apart from other types of stains:
- Thicker consistency: Gel stain has a thick, viscous texture that clings to the wood surface without running or dripping. This makes it easier to work with and control during application.
- Opaque color: Gel stain provides a more opaque color compared to liquid stains. This allows for better coverage and the ability to hide imperfections in the wood.
- Minimal grain definition: Due to its thicker consistency, gel stain tends to mask the natural grain of the wood. If you prefer a finish that showcases the wood’s grain, a liquid stain may be a better option.
- No need for sanding: Gel stain can be applied directly to the surface without the need for extensive sanding or stripping. However, it is recommended to lightly sand the surface to improve adhesion and ensure a smooth finish.
- Longer drying time: Gel stain has a longer drying time compared to liquid stains. This allows for more time to work with the stain and manipulate the color before it sets.
In conclusion, gel stain is a versatile and user-friendly option for staining wood surfaces. Its unique characteristics and numerous benefits make it an excellent choice for both beginners and experienced DIYers looking to achieve a professional-looking finish. Whether you’re staining furniture, cabinets, or doors, gel stain provides an easy and effective way to enhance the beauty of your wood projects.
Understanding Polyurethane
Polyurethane is a durable coating, but can you stain over it with gel? Discover if gel stain can be applied over polyurethane for a beautiful and lasting finish.
Types Of Polyurethane
Polyurethane is a popular finish used to protect and enhance the appearance of wood surfaces. It comes in different forms, each with its own unique properties. Here are the main types of polyurethane you need to know about:
- Oil-Based Polyurethane: Also known as solvent-based polyurethane, this type is the traditional choice for many woodworkers. It provides a durable and long-lasting finish with a warm, amber hue. Oil-based polyurethane takes longer to dry but offers excellent protection.
- Water-Based Polyurethane: This type has gained popularity in recent years due to its low odor and quick drying time. It has a milky appearance when wet but dries to a clear finish. Water-based polyurethane is also available in a variety of sheen levels, from matte to high gloss.
- Gel Polyurethane: Gel polyurethane is a thicker formula that allows for easy application and less drips and brush marks. It provides a more even finish and is often used when working on vertical surfaces or items with intricate details. Gel polyurethane has a longer curing time compared to other types.
Benefits Of Polyurethane
Polyurethane offers several advantages that make it a popular choice among woodworkers and DIY enthusiasts:
- Protection: Polyurethane forms a protective barrier on wood surfaces, shielding them from scratches, stains, and everyday wear and tear.
- Enhanced Appearance: With its glossy finish, polyurethane brings out the natural beauty and grain of the wood, making it look more rich and vibrant.
- Durability: Polyurethane is highly resistant to moisture, chemicals, and UV rays, ensuring that your wood surfaces stay looking great for a long time.
- Easy Maintenance: Once applied, polyurethane requires minimal upkeep, making it a great choice for busy households.
Limitations Of Polyurethane
While polyurethane has many benefits, it also has a few limitations to consider:
- Application Challenges: Polyurethane can be tricky to apply, especially for beginners. Proper surface preparation, technique, and timing are crucial for achieving a smooth and flawless finish.
- Drying Time: Oil-based polyurethane takes longer to dry compared to water-based or gel polyurethane. This can be a disadvantage if you’re looking for a quick project turnaround.
- Yellowing Over Time: Oil-based polyurethane tends to yellow slightly over time, especially in areas exposed to sunlight. Water-based and gel polyurethane are less prone to yellowing.
- More Layer Build-Up: Achieving a high-quality finish may require multiple coats of polyurethane, resulting in a thicker layer on the surface. This can affect the wood’s natural feel and appearance.
Can You Stain Over Polyurethane?
Yes, you can stain over polyurethane with gel. Gel stains are designed to adhere to previously finished surfaces, making them ideal for staining over polyurethane. Make sure to properly prepare the surface and follow the manufacturer’s instructions for the best results.
The Challenge Of Staining Over Polyurethane
Staining over polyurethane can be a challenging task for any DIY enthusiast or professional woodworker. Polyurethane is a durable and protective finish that creates a hard, glossy surface on wood, making it resistant to stains and spills. However, if you want to change the color of your furniture or woodwork, or if the polyurethane coating has become worn or damaged, you may be wondering if it’s possible to stain over polyurethane.
Staining over polyurethane is not as straightforward as staining bare wood. The hard and glossy surface of polyurethane doesn’t allow the stain to penetrate and adhere properly, resulting in an uneven or blotchy finish. Moreover, the pigments in the stain may not show their true color when applied over polyurethane, leading to disappointment and frustration.
Gel Stain As A Solution
Luckily, there is a solution to the challenge of staining over polyurethane: gel stain. Gel stain is a thick, oil-based stain that is specifically formulated to adhere to difficult surfaces like polyurethane. Unlike traditional liquid stains, gel stain sits on top of the surface rather than penetrating it deeply. This makes it ideal for staining over polyurethane, as it allows for a more even and consistent color application.
Gel stains also have a longer drying time compared to other types of stain, which gives you ample time to work with the product and achieve the desired finish. Additionally, gel stain is available in a wide range of colors, allowing you to find the perfect shade to complement your project.
Preparing The Surface For Staining
Before you can begin staining over polyurethane with gel stain, it’s important to properly prepare the surface. This ensures that the stain adheres well and provides a smooth and professional-looking finish. Here’s how to prepare the surface for staining:
- Start by thoroughly cleaning the surface with a mild detergent and water to remove any dirt, debris, or grease.
- Next, lightly sand the polyurethane with fine-grit sandpaper to create a rough surface that the gel stain can adhere to. Be careful not to sand too aggressively, as this can remove the protective layer of polyurethane completely.
- After sanding, wipe down the surface with a clean, damp cloth to remove any dust or sanding residue.
- Finally, apply a thin layer of gel stain using a brush or cloth, following the manufacturer’s instructions. It’s best to work in small sections and blend the stain as you go to achieve an even finish.
Once the gel stain is dry, you can apply additional coats if desired to deepen the color or enhance the richness of the finish. Make sure to allow sufficient drying time between coats to ensure proper adhesion and avoid smudging or smearing the stain.
So, if you’re wondering if you can stain over polyurethane, the answer is yes, you can! With the right preparation and the use of gel stain, you can transform the look of your polyurethane-coated wood and achieve a beautiful, long-lasting finish.
Advantages Of Using Gel Stain Over Polyurethane
Gel stain offers a range of advantages when compared to traditional polyurethane stains. Whether you’re working on a new project or looking to refresh existing furniture, using gel stain can provide enhanced versatility, ease of application, and a wide selection of color and finish options.
Enhanced Versatility
Gel stain is known for its enhanced versatility, making it a popular choice among DIY enthusiasts and professional woodworkers. Unlike polyurethane, gel stain can be applied over existing finishes, including polyurethane itself. This means you can easily transform the appearance of your furniture without having to strip off the old finish. Its ability to adhere well to different surfaces, such as wood and metal, further increases its versatility.
Ease Of Application
When it comes to ease of application, gel stains are a clear winner. Unlike liquid stains, which tend to drip and run, gel stain has a thicker consistency that helps it stay in place during application. This ensures more controlled and even coverage, resulting in a professional-looking finish. Gel stain can be applied using a brush, cloth, or foam applicator, allowing you to choose the method that works best for your project.
Color And Finish Options
Gel stain offers a wide range of color and finish options, allowing you to achieve the exact look you’re aiming for. Whether you prefer a traditional wood finish or want to experiment with vibrant hues, gel stains come in a variety of shades and tones to suit your taste. Furthermore, gel stains can be mixed together to create custom colors, giving you endless possibilities for creativity. The thicker consistency of gel stain also allows for more control over the depth and intensity of the color, helping you achieve the desired effect.
Step-by-step Guide To Staining Over Polyurethane
Achieve a flawless stain over polyurethane with this step-by-step guide. Discover how gel staining can transform your furniture surfaces into beautiful works of art.
Surface Preparation
Before applying a gel stain over polyurethane, proper surface preparation is essential. Follow these steps to ensure optimal results:
- Clean the surface: Begin by thoroughly cleaning the polyurethane-coated surface. Wipe away any dust, dirt, or grime using a soft, lint-free cloth or a vacuum cleaner with a brush attachment.
- Sand the surface: Use fine-grit sandpaper to lightly sand the polyurethane. This will scuff up the surface, allowing the gel stain to adhere better. Sand in the direction of the wood grain for even results. Use a tack cloth or a damp cloth to remove any sanding residue.
- Perform a test patch: Apply a small amount of gel stain to a discrete area of the surface and allow it to dry completely. This will help determine if the stain color and finish are to your liking before proceeding with the full application.
Applying Gel Stain
Once the surface is properly prepared, follow these steps to apply the gel stain over the polyurethane:
- Stir the gel stain: Thoroughly mix the gel stain using a stir stick or a paint mixing tool. This will ensure an even consistency and optimal color throughout the application process.
- Apply the gel stain: Using a brush or a clean cloth, apply a thin and even layer of gel stain to the surface. Work in small sections, following the direction of the wood grain. Avoid applying too much stain at once to prevent drips or streaks.
- Allow drying time: Follow the recommended drying time mentioned on the gel stain packaging. Ensure proper ventilation during the drying process to allow for a smooth and even finish.
Sealing The Stained Surface
To protect the stained surface and enhance its longevity, sealing is essential. Follow these steps to seal the stained surface effectively:
- Choose the sealer: Select a clear polyurethane sealer suitable for the desired finish. Consider factors such as durability, sheen, and compatibility with the gel stain.
- Apply the sealer: Using a brush or a clean cloth, apply a thin and even layer of the sealer. Work in small sections, following the direction of the wood grain. Allow the sealer to dry according to the manufacturer’s instructions before applying additional coats, if desired.
- Ensure proper curing: Give the sealed surface enough time to cure before subjecting it to heavy use or placing objects on it. This will allow the sealer to harden and provide maximum protection to the stained surface.
Conclusion
When attempting to stain over polyurethane with gel, it is important to follow the correct steps and use the right products for optimal results. By properly preparing the surface, choosing a suitable gel stain, and applying it with care, you can achieve a beautiful finish.
Remember to test on a small area first and always follow the manufacturer’s instructions. With patience and attention to detail, staining over polyurethane with gel can be a successful and rewarding endeavor.