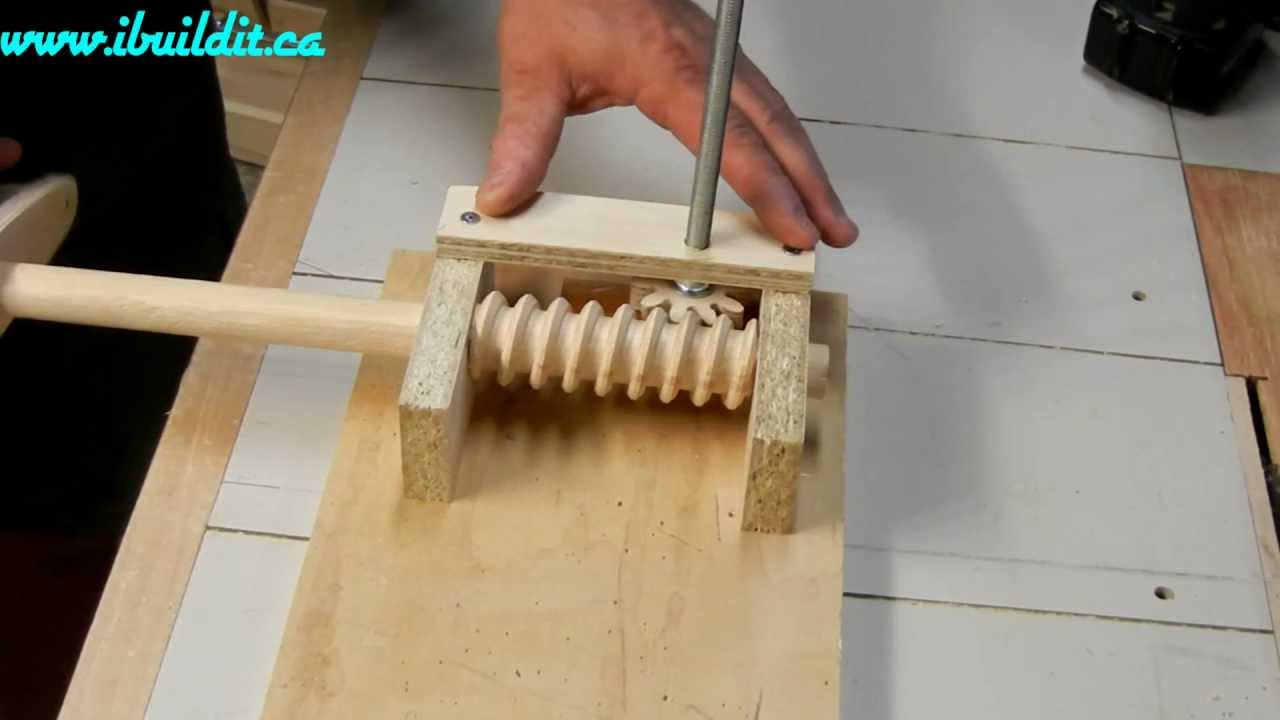
How to Make a Worm Gear Using Simple Woodworking Techniques
Wooden worm gears are one of the most efficient ways to transfer rotational force from one shaft to another. They are often used in mechanical devices such as clocks and sewing machines. Making a wooden worm gear is not as difficult as it may seem.
Anyone can make high-quality wooden worm gear with a few simple tools and patience.
- Cut a piece of wood to the desired size for the gear
- Use a router to cut a groove around the edge of the gear
- Cut notches into the edge of the equipment at regular intervals.
- Insert wooden dowels into the cracks and glue them in place
- Cut another piece of wood to create the worm gear
- Drill a hole through the center of the worm gear and insert a dowel or screw
- Place the worm gear on top of the other equipment and secure it with screws or nails.
Credit: www.youtube.com
How Do You Make Worm Gears?
There are a few different ways to make worm gears, but cutting threads into a cylindrical blank is the most common way. This blank is then mounted on a lathe and shaped into a bag. The teeth on worm gears are much shorter and finer than regular bags, so it’s essential to use a high-quality cutter when making them.
Worm gears are used in various applications where high reduction ratios are needed. They’re ubiquitous in gearboxes for vehicles such as cars and trucks. Worm gears can also be found in many types of machinery, including conveyors, pumps, and compressors.
How Do You Make Wooden Gear at Home?
You can make wooden gear at home in a few different ways. One way is to use a router. Another way is to use a jigsaw.
If you want to use a router, you will need to create a template of the gear you want to make. You can do this by tracing the outline of the bag onto a piece of paper. Once you have the design of the gear, you will need to transfer it onto a piece of wood.
After the outline is transferred onto the wood, you need to cut it out with a router. To use a jigsaw, you must create a template for the gear you want to make. However, you will use a jigsaw to cut out the bag’s shape instead of a router.
Where is a Worm Gear Used in Real Life?
A worm gear is a type of gear that is used in many different types of machinery. It comprises a spiral-shaped shaft, known as a worm, and a toothed wheel, known as the gear. Worm gears are used in many different types of applications, including:
-Automotive transmissions
-Elevators
-Conveyor belts
-Treadmills
How Do You Get Worm Gear Teeth?
There are a few ways to cut worm gear teeth, but the most common is using a hob. A hob is a type of cutter specifically designed for cutting gears. It looks similar to a drill bit but has sharp teeth arranged in a spiral pattern.
To cut the teeth, the hob is rotated against the workpiece while fed into the gear blank. This cuts away material and forms the teeth. The number of teeth on the hob dictates how many teeth will be cut on the gear.
For example, if you’re using a 24-tooth hob to cut a 48-tooth gear, each tooth on the equipment will be missed by two teeth on the hob (24 x 2 = 48). The main advantage of using a hob is that it can generate accurate results. The main disadvantage is that it’s a slow process, so it’s not well suited for mass production.
DIY Wood Thread Cutter
If you’re looking for an easy way to cut threads in wood, a DIY wood thread cutter is a great option. With this cutter, you can clamp the workpiece and use a drill to spin the cutting bit. The result is clean, precise threads that are perfect for any project.
Here are a few things to remember when using a DIY wood thread cutter. First, use sharp drill bits – dull bits make for messy, uneven threads. Second, take care not to over-tighten the clamp – too much pressure can damage both the workpiece and the cutter.
And finally, always wear eye protection while operating the drill – flying debris can be dangerous! With these tips in mind, anyone can easily cut clean threads in wood using a DIY wood thread cutter. Give it a try on your next project!
How to Make Wooden Screws
Wood screws are one of the essential tools in any woodworker’s toolbox. They attach two pieces of wood and can be adjusted to create a tight or loose fit. While they may seem like a simple tool, it is a bit of an art to use them correctly.
In this blog post, we’ll teach you how to make wooden screws so that you can get the most out of your next project. Drill a pilot hole slightly smaller in diameter than the screw itself into one piece of wood. This will ensure that the screw doesn’t split the wood when inserted.
If you’re using hardwood, it’s a good idea to countersink the pilot hole so that the head of the screw sits just below the surface of the wood. Next, insert the screw into the pilot hole and start turning it clockwise with a drill or screwdriver. As you turn, keep an eye on the entry angle – you want it to be as close to perpendicular as possible so that the screw doesn’t strip out as you drive it home.
Once the thread has caught on both sides, continue turning until it’s snug against both pieces of wood. Don’t overtighten – just snug is good! Now sit back and admire your handy work – well done!
Wooden Thread Cutter
Thread cutting is creating threads on a workpiece using a lathe. Various methods can be used to create lines, but the most common way is using a wooden thread cutter. The first step in using a wooden thread cutter is to select the appropriate tool for the job.
There are many different types and sizes of wooden thread cutters available, so it is essential to choose one that will fit the workpiece and create the desired type of thread. After selecting the correct tool, it must be mounted onto the lathe. The next step is to set up the lathe for thread cutting.
This includes setting the speed, feed rate, and depth of cut. Once everything is set up, the actual cutting can begin. To start cutting, the cutter’s tip is positioned at the starting point of the thread.
The lathe is then started and slowly moved forward while simultaneously being fed into the workpiece. As it moves forward, the cutter will start to create threads in the workpiece. The cut and feed rate depth will determine how deep and wide each line is.
How to Make Gears
Gears are a fundamental part of many machines and mechanisms, providing the driving force that makes them work. Creating gears is a complex process, but it can be broken down into simple steps. First, the teeth of the gear must be cut into the metal.
This can be done with various tools, including milling machines, lathes, and router bits. The specific device used will depend on the size and material of the gear being made. Next, the teeth must be shaped to mesh correctly with other packs in the system.
This step is critical to ensure that the gears work together smoothly and without issue. Again, various tools can be used to achieve this, depending on the size and material of the bag. Finally, any holes or other features required for mounting or assembly must be created.
This may involve drilling, tapping, or other machining operations. Once all these steps are complete, the gear is ready for use!
Conclusion
If you’re looking for a fun woodworking project that’s both challenging and rewarding, look no further than making your wooden worm gear! Worm gears transmit motion and force between two rotating shafts and are often found in mechanical devices such as clocks, cars, and bicycles. Making your wooden worm gear is a great way to learn about mechanical engineering principles and can be an impressive addition to any woodworker’s portfolio.
The first step in making your wooden worm gear is to cut out all the necessary pieces from plywood or other sturdy lumber. You’ll need two circular disks for the top and bottom of the gear, as well as four rectangular strips for the sides. Once all of your pieces are cut out, use a drill to create holes around the perimeter of each disk.
These will be used to attach the side strips later on. Now it’s time to start assembling your gear! Begin by attaching two side strips at their top corners using screws or nails.
Then do the same with the remaining two side strips. Next, please place one of your circular disks over one end of the assembled frame so that the holes you drilled earlier line up. Secure this disk with screws or nails before attaching the other circular disk to the opposite end of the frame.
Once both disks are in place, it’s time to add some teeth! Cut small notches into all four sides of each disk using a saw or router. Be sure that these notches are evenly spaced around each circumference; otherwise, your gear may not mesh properly when complete.
Finally, use sandpaper or a file to smooth down any rough edges on your newly-crafted worm gear before putting it to use!