How to Install Threaded Inserts in Wood: Step-by-Step Guide with Drill Size Chart (2026)
Threaded inserts for wood give you a permanent metal thread inside any wood workpiece — so you can drive a bolt in and out dozens of times without stripping the wood. They’re the go-to fastener for furniture, jigs, and any project that needs to be disassembled and reassembled. This guide covers installation step-by-step, the correct drill sizes for common insert sizes, and which type of insert to use for hardwood versus softwood.
How to install threaded inserts in wood: Drill a pilot hole to the recommended diameter (for a 1/4-20 insert, use a 5/16″ bit). Apply wax or soap to the insert threads. Drive the insert straight using a hex key or the bolt-and-nut method — never use a screwdriver tip. Stop when the flange sits flush. For softwood or end grain, apply epoxy to the hole before inserting for maximum holding strength.
To install threaded inserts in wood, choose the appropriate insert type. Prepare the wood surface by cleaning it thoroughly. Use a drill bit to create a pilot hole at the marked location. Insert the thread into the hole and use a bolt or tool to drive it in until it is flush with the surface.
In this comprehensive guide, I will walk you through the step-by-step installation of threaded inserts in wood. Moreover, I will provide some tips to help you confidently tackle any project.
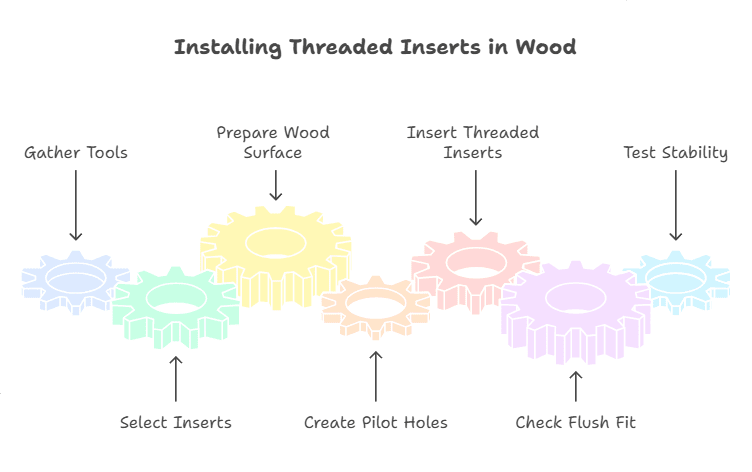
7 Steps To Install Threaded Inserts In Wood Like A Pro!
Installing threaded inserts in wood is effortless if you follow the proper guidelines. From selecting the appropriate inserts to preparing the wood surface and achieving a flush fit, I’ll cover each crucial aspect of the installation process. Following these detailed steps will give you the knowledge and confidence needed to incorporate threaded inserts into your woodworking projects.
![How to Install Threaded Inserts in Wood the Right Way [A Detailed Guide]](https://cdn.woodworkingadvisor.com/2022/12/How-to-Install-Threaded-Inserts-in-Wood-the-Right-Way-A-Detailed-Guide-visual-selection.webp)
Step 1: Gather The Necessary Tools
Before diving into the process of installing threaded inserts in wood, it’s essential to gather the necessary tools. The right equipment will ensure a smooth and efficient installation process. Here are the essential tools you’ll need for this project:
- Power drill or handheld drill;
- Drill bits (matching the external thread size of the inserts);
- Threaded insert driver or hand tool;
- Mallet or hammer;
- Screwdriver;
- Allen wrench or hex key;
- Pliers or adjustable wrench.
Step 2: Select The Appropriate Threaded Inserts
Consider the specific requirements of your project, such as load capacity, thread size, and the type of material you’ll be working with. Choose the appropriate threaded inserts, such as screw-in inserts, press-fit inserts, or flange inserts, to ensure a secure and reliable connection.
Step 3: Prepare The Wood Surface
Clean the area where the inserts will be installed, removing any dust, debris, or other contaminants. A clean surface ensures a proper bond between the wood and the threaded insert, enhancing the strength and longevity of the connection.
Step 4: Create Pilot Holes
Carefully create pilot holes in the wood using a drill bit with a diameter that matches the external thread size of the insert. The depth of the hole should be longer than the length of the insert to allow for a proper fit.
Step 5: Insert The Threaded Inserts
Gently insert the threaded insert into the pilot hole, ensuring it aligns properly with the wood grain. Depending on the insert type, you can use a hand tool or a drill with a compatible driver to drive the insert into the wood. Apply steady and even pressure to avoid damaging the threads or causing misalignment.
Step 6: Check For Flush Fit
Once the insert is fully installed, check if it is flush with the wood surface. Tap a mallet or a hammer gently if needed, ensuring seamless integration into the wood.
Step 7: Test The Threaded Insert
To verify the integrity of the installation, insert a bolt into the threaded insert. The bolt should thread smoothly and snugly into the insert without wobbling or looseness. This test confirms the stability and reliability of the threaded connection.
Mistakes Should Be Avoided To Install Threaded Inserts In Wood:
When installing threaded inserts in wood, it’s essential to be aware of potential mistakes and take precautions to avoid them. Here are some common mistakes to watch out for and how to prevent them.
- Incorrect Pilot Hole Size:
Using the wrong-sized drill bit for creating pilot holes can lead to a loose or unstable fit. Ensure that the drill bit diameter matches the external thread size of the threaded insert to achieve a proper grip.
- Over-tightening:
Excessive force when driving the threaded insert into the wood can cause damage or strip the threads. Apply firm and steady pressure without overtightening to ensure a secure fit without compromising the integrity of the wood or the insert.
- Misalignment:
Failing to align the threaded insert properly with the wood grain can result in an unstable connection. Take care to insert the threaded insert straight into the pilot hole, following the natural direction of the wood grain for optimal strength.
- Insufficient Depth:
Not drilling the pilot hole to the appropriate depth can prevent the threaded insert from fully embedded into the wood, resulting in an insecure attachment. Ensure the pilot hole is slightly more profound than the length of the insert to achieve a flush fit.
- Lack Of Test Fit:
Neglecting to test the threaded insert with a bolt or fastener before finalizing the installation can lead to issues. Always check the fit and functionality of the insert by inserting a bolt to ensure it threads smoothly and securely.
- Incorrect Insert Type:
Choosing the wrong type of threaded insert for your specific application can compromise the strength and stability of the connection. Consider factors such as load requirements, material compatibility, and the project’s intended use when selecting the appropriate insert type.
10 Proven Tips To Install Threaded Inserts In Wood Perfectly And Safely
When installing threaded inserts in wood, following proven tips can make a significant difference in achieving an ideal and secure outcome. These tips, derived from experience and expertise, provide guidance for precision and safety during the installation process.
Tip 1: Measure And Mark
Take accurate measurements and mark the locations where the threaded inserts will be installed. This helps ensure precise alignment and spacing, avoiding guesswork during installation.
Tip 2: Use High-quality Inserts
Invest in high-quality threaded inserts that are specifically designed for wood applications. These inserts are typically made from durable materials and provide better grip and stability.
Tip 3: Start With Pilot Holes
Always create pilot holes in the wood using an appropriate drill bit. Pilot holes help guide the threaded inserts and prevent the wood from splitting or cracking during installation.
Tip 4: Optimal Hole Size
Choose a drill bit that matches the external thread size of the insert to ensure a proper fit. The hole diameter should be slightly smaller than the outer diameter of the insert threads for a secure grip.
Tip 5: Apply Controlled Pressure
Applying steady and controlled pressure when driving the threaded insert into the pilot hole. Avoid excessive force, which can damage the wood or distort the insert.
Tip 6: Test For Stability
Once the insert is installed, test its stability by gently rotating or pulling it out. Remove it and reinstall it using a slightly larger pilot hole if it feels loose or unstable.
Tip 7: Lubricate The Inserts
Apply a small amount of lubricant, such as beeswax or soap, to the external threads of the insert before installation. This reduces friction and allows the insert to glide smoothly into the wood.
Tip 8: Consider Adhesive Support
For added strength, consider using a wood adhesive or epoxy with the threaded insert. Apply a small amount to the insert before driving it into the wood for enhanced stability.
Tip 9: Allow Sufficient Drying Time
If adhesive is used, follow the manufacturer’s instructions regarding drying or curing time. Avoid putting excessive stress on the insert until the adhesive has fully set.
Tip 10: Practice Safety Precautions
Wear appropriate safety gear, such as safety glasses and gloves, during installation to protect yourself from any potential accidents.
Related Questions:
Are Threaded Inserts For Wood Strong?
Threaded inserts for wood are solid, providing a reliable and durable fastening solution. They can securely embed into the wood and create robust connections that can withstand substantial stress and load. These inserts distribute the force evenly, preventing damage to the wood and ensuring long-lasting stability.
From furniture construction to structural projects, threaded inserts offer the strength to fortify joints and keep your woodworking creations intact for years. They fortify joints, resist loosening, and protect against wear and tear, giving you the peace that your woodworking projects will stand firm for years.
Why Use Threaded Inserts In Wood?
Threaded inserts provide a solid and reliable fastening solution. Creating a threaded hole within the wood allows for inserting screws, bolts, or other fasteners, resulting in a secure and stable connection. This is particularly beneficial for applications that require disassembly and reassembly.
Secondly, threaded inserts help prevent wear and tear on the wood itself. Providing a metal surface for the screw or bolt to thread into reduces the risk of stripping or damaging the wood over time.

Is It Necessary To Use A Threaded Insert Driver, Or Can It Be Done Manually?
While it is possible to install threaded inserts manually using a wrench or pliers, using a threaded insert driver or hand tool specifically designed for the task is highly recommended. These tools provide better control and accuracy and ensure that the inserts are driven straight into the wood without damaging the threads or the wood itself.
Final Remark
Now, armed with this guide’s knowledge and practical tips, you have the key to transforming your woodworking projects into enduring masterpieces. Seamlessly installing threaded inserts in wood unlock a world of strength, stability, and versatility.
From furniture construction to creative crafts, threaded inserts provide a reliable anchor, fortifying your connections with unwavering resilience. Embrace this technique, and witness your woodworking ventures reach new heights of durability and craftsmanship. Let the journey begin, where wood meets the threaded strength!
Drill Size Chart for Threaded Inserts in Wood
Using the wrong drill bit size is the #1 reason threaded inserts fail — too small and the insert cracks the wood during installation; too large and it spins freely with no grip. Here are the standard pilot hole sizes for the most common wood insert thread sizes:
| Insert Thread Size | Pilot Hole (Softwood) | Pilot Hole (Hardwood) | Insert OD |
|---|---|---|---|
| #10-24 | 1/4″ (6.35mm) | 17/64″ (6.75mm) | 5/16″ |
| 1/4-20 | 5/16″ (7.94mm) | 11/32″ (8.73mm) | 3/8″ |
| 5/16-18 | 3/8″ (9.53mm) | 13/32″ (10.32mm) | 7/16″ |
| 3/8-16 | 7/16″ (11.11mm) | 15/32″ (11.91mm) | 1/2″ |
| M6 | 8mm | 8.5mm | 10mm |
| M8 | 10mm | 10.5mm | 12mm |
Rule of thumb: use the softwood size for MDF and plywood — they compress easily. Use the hardwood size for oak, maple, and other dense species to avoid splitting as the insert threads bite in.
Types of Threaded Inserts for Wood
Not all threaded inserts are the same — choosing the right type for your material makes a significant difference in holding strength and ease of installation.
- Knife-thread inserts (E-Z LOK / screw-drive): The most common type for woodworking. External threads are sharp knife-like flanges that cut into wood fibers. Drive in with a hex key. Best for face grain in solid wood and plywood.
- Barrel nuts (cross dowels): Cylindrical insert that goes into a cross-drilled hole perpendicular to the bolt. Ideal for knockdown furniture and flat-pack joints where there’s no face to drive a standard insert into.
- Hex nut inserts: A standard hex nut pressed or epoxied into a hex-shaped recess. Common in CNC-machined jigs and router tables where a clean flush nut is needed without a dedicated insert driver.
- T-nuts: A flange with prongs that bite into the wood surface, driven from the back of the workpiece. Best for applications like workbench dog holes where bolt access is from below. Not suitable for end grain.
- Heat-set inserts: Brass inserts installed with a soldering iron. Technically for plastics, but work in dense MDF for 3D-printed jig components.
Installing Threaded Inserts in Thick Wood (Deep Stock)
For thick workpieces — benchtop slabs, laminated legs, or any stock over 2 inches — a few extra considerations apply to get a reliable installation:
- Maintain edge clearance: Keep the center of the insert at least one insert diameter away from the nearest edge. Closer than that and the wood will split as threads bite in.
- Add a depth stop: Wrap painter’s tape around the drill bit at the correct depth, or use a commercial depth stop collar. Over-drilling into a thick piece wastes thread engagement and weakens the connection.
- Use epoxy for end grain: End grain has open wood cells that don’t grip threads reliably. Inject epoxy into the pilot hole, let it cure for 30 minutes until tacky, then drive the insert. The epoxy fills the cells and creates a bonded connection that’s far stronger than threads alone.
- DIY installation tool: Thread a bolt and nut of the same size as the insert’s internal threads. Screw the nut onto the bolt, then thread the insert onto the end. Tighten the nut against the insert flange, then use a wrench to drive the insert straight. This is more accurate than a hex key alone for deep installations.
- Lubricate first: Rub beeswax or a bar of soap across the external threads before driving. This reduces the torque needed and prevents splitting in tight-grained hardwoods like maple.
🛒 Recommended: Threaded Inserts for Wood
E-Z LOK Threaded Inserts for Wood (1/4-20, 25-Pack)
Knife-thread brass inserts — the most popular size for jigs and furniture. Drive with a hex key into a 5/16" pilot hole (softwood) or 11/32" (hardwood).
View on Amazon →Rockler Threaded Insert Installation Tool Set
Dedicated driver set for installing knife-thread inserts straight and flush. Includes 1/4-20, 5/16-18, 3/8-16 sizes. Prevents cross-threading and cam-out.
View on Amazon →