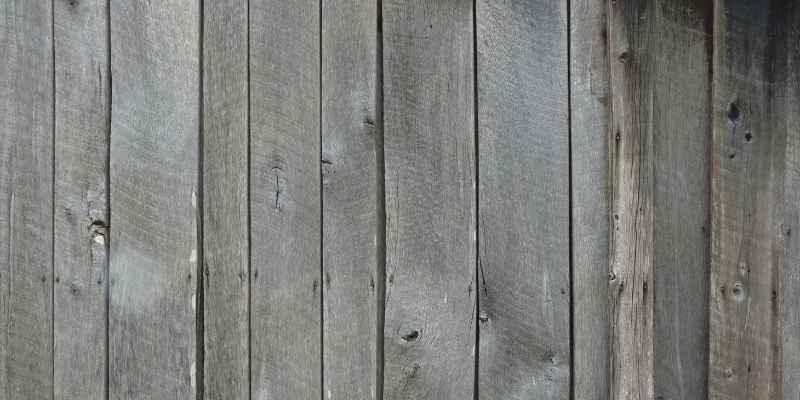
How to Make Wood Look Old And Gray: Pro Tips for Authentic Aging
To make wood look old and gray, use a combination of vinegar, steel wool, and a stain. Transforming new wood into weathered and gray-looking wood can be achieved using a simple DIY technique.
By using vinegar, steel wool, and a stain, you can create a stunning aged effect on your wooden furniture or surfaces. This method involves soaking steel wool in vinegar for a few hours or overnight, then applying the solution to the wood to create a chemical reaction that gives it a weathered appearance.
Afterward, apply a gray stain or paint to enhance the aged look. Whether you’re aiming for a rustic, vintage, or coastal-style aesthetic, this technique can help you achieve the desired outcome. Read on to learn more about how to make wood look old and gray.
Credit: www.familyhandyman.com
Choosing The Right Wood
When it comes to achieving that rustic and weathered look for your wood projects, choosing the right type of wood is key. Not all wood species are suitable for achieving the desired aged and gray appearance. In this section, we will explore how to select the perfect wood for your project, taking into consideration the wood species and grain patterns to create the desired effect.
Selecting Wood Species
Not all wood species are created equal, and some are better suited for achieving an aged and gray appearance. When choosing the right wood, it is important to opt for species that naturally possess characteristics that lend themselves to being aged and weathered. Some of the best types of wood for this purpose include:
- Pine: Known for its soft and straight grains, pine wood tends to absorb stain and paint more easily, allowing for a more pronounced aged effect.
- White Oak: With its straight, vertical grain pattern, white oak takes on a beautiful gray hue over time, making it perfect for achieving an aged look.
- Cedar: Cedar wood possesses natural tannins that give it a grayish tone as it weathers, making it an excellent choice for achieving an aged appearance.
While these species are highly recommended, it is important to keep in mind that the aging process may vary depending on the region and specific conditions the wood is exposed to.
Considering Grain Patterns
The grain patterns of wood play a crucial role in creating an authentic aged and weathered appearance. Different grain patterns can result in varying levels of detail and character once the wood has been aged and stained. When selecting wood, consider the following grain patterns:
- Straight Grain: Wood with straight grain patterns, such as pine and white oak, tend to age more uniformly, creating a cohesive and consistent aged look.
- Open Grain: Wood species with open grain patterns, like oak, tend to absorb stain more efficiently, leading to deeper and more pronounced weathering effects.
- Tight Grain: Species with tight grain patterns, such as cedar, can still achieve an aged appearance but may result in a more subtle and nuanced weathering effect.
By considering the grain pattern of the wood, you can ensure that it aligns with your desired overall aesthetic for the aged and gray appearance.
Preparing The Wood Surface
To make wood appear weathered and gray, start by sanding it down and applying a vinegar and steel wool solution to create an aged look. Follow with a coat of diluted paint, allowing it to dry before sanding for a distressed finish.
Before you can achieve that beautiful aged and gray look on your wood, it’s crucial to properly prepare the wood surface. This step ensures that the subsequent techniques adhere to the wood and deliver the desired results. In this section, we will cover essential steps such as sanding and creating texture to help you achieve an authentic weathered appearance.
Sanding Techniques
Sanding plays a vital role in preparing the wood surface for the aging process. Start by using coarse-grit sandpaper to remove any existing finish or paint. Smoothly run the sandpaper along the wood grain, applying gentle pressure to avoid damaging the wood. Shape the wood edges with sanding blocks or a sanding sponge, providing a consistent look throughout.
Next, transition to a medium-grit sandpaper to refine the wood surface. Continue sanding, focusing on smoothing out any rough edges or imperfections. Remember to always sand in the direction of the wood grain for optimal results.
Once you’ve achieved a smooth surface, switch to a fine-grit sandpaper and lightly sand the entire piece of wood. This step helps to create a receptive surface for the aging techniques that follow.
Creating Texture
Texture is crucial in making your wood look old and gray. It adds depth and character, mimicking the natural wear and tear of aged wood. A variety of techniques can be used to create texture, depending on the desired effect.
One effective method is distressing the wood with tools like a hammer, chains, or screws. Gently tap or scrape these objects on the wood surface to mimic the appearance of natural dents, scratches, or divots. Remember to focus on areas that would naturally experience more wear over time, such as corners, edges, and high-touch areas.
In addition to distressing, you can also add texture using techniques such as wire brushing, which involves running a stiff-bristled wire brush along the wood grain to create a weathered look. Another option is using a wood grain tool to create realistic grain patterns.
Keep in mind that the amount of texture you create should be based on your desired outcome. While some projects may call for heavy texture, others may require only subtle variations.
By meticulously following these sanding techniques and incorporating texture, you’ll be well on your way to achieving that gorgeous old and gray appearance on your wood. The next step in the process involves applying stains and finishes, which we will cover in the upcoming section.
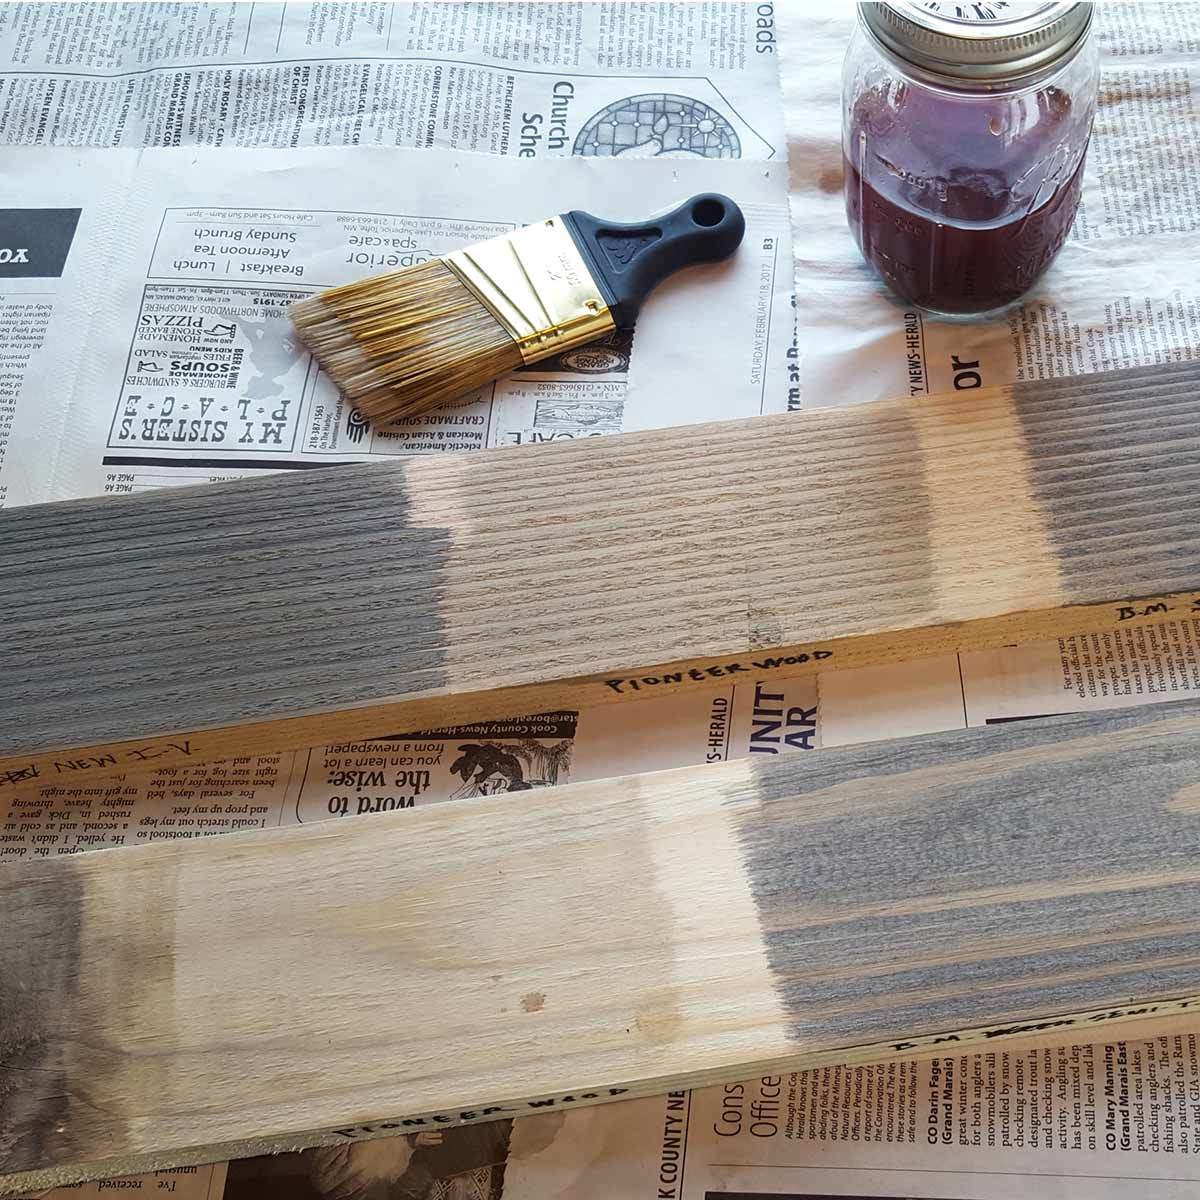
Staining And Color Selection
Staining and Color Selection: Transforming new wood into an aged, weathered look involves Choosing the Right Stain and Layering Stains for Depth.
Choosing The Right Stain
- Consider using gray or ashy stains for an aged appearance.
- Test a small area first to ensure it achieves the desired effect.
- Opt for water-based stains for more control over the color intensity.
Layering Stains For Depth
- Apply an initial coat of your chosen base stain color.
- Allow it to dry completely before applying a second, darker stain for depth.
- Use a rag or brush to blend the layers for a natural, aged look.
Applying Aging Techniques
Applying aging techniques to wood is a great way to achieve that sought-after weathered and gray look. Whether you’re looking to revamp old furniture, create a vintage aesthetic in your home, or simply adore the weathered wood appearance, the process can be both fun and rewarding. In this section, we’ll explore some popular methods for achieving that authentic aged look, such as creating faux weathering and utilizing vinegar and steel wool.
Creating Faux Weathering
One of the most popular techniques for giving wood an aged and weathered appearance is to apply a faux weathering method. This involves using various materials and tools to mimic the natural aging process of wood. The process often includes distressing the wood surface, adding layers of stains and paints, and strategically sanding and scraping to create a worn-down look.
Using Vinegar And Steel Wool
Another effective method for giving wood a weathered and gray look is to utilize a mixture of vinegar and steel wool. This simple yet powerful concoction can accelerate the aging process of wood, resulting in a beautiful silvery-gray patina. By combining steel wool with white vinegar and applying the mixture to the wood surface, you can achieve a natural weathered appearance that enhances the wood’s grain and texture.
Sealing And Protecting The Finish
When you have achieved the desired aged and gray look on your wood, it’s essential to properly seal and protect the finish to maintain its appearance. The right sealant and proper maintenance are crucial in preserving the aged look of wood, ensuring it lasts for years to come.
Selecting The Right Sealant
Choosing the appropriate sealant is vital in preserving the aged appearance of the wood. Look for water-based sealants that provide a matte finish to maintain the authentic weathered look. Make sure the sealant is UV-resistant to prevent the wood from fading due to sun exposure. Additionally, opt for a sealant that offers moisture protection to safeguard the wood against environmental elements. Always follow the manufacturer’s instructions for the best results.
Maintaining The Aged Look
After sealing the wood, regular maintenance is necessary to ensure the aged gray appearance remains intact. Avoid using harsh chemical cleaners that can strip away the patina. Instead, gently clean the wood with a mild soap and water solution, and dry thoroughly to prevent moisture damage. Inspect the sealant periodically and reapply as needed to maintain the protective barrier. By taking these precautions, you can uphold the aged look of the wood for years to come.
Frequently Asked Questions For How To Make Wood Look Old And Gray
How Do You Make Wood Look Grey And Aged?
To make wood look grey and aged, apply a combination of wood stain and water-based paint. First, sand the wood to create a smooth surface. Then, apply a layer of grey wood stain with a brush or cloth. Finally, brush on a diluted water-based paint mixture and wipe away the excess for an aged, weathered appearance.
How Do I Get A Washed Grey Effect On Wood?
To achieve a washed grey effect on wood, follow these steps:
1. Begin by sanding the wood to prepare the surface.
2. Apply a coat of grey wood stain or dilute grey paint with water.
3. Use a brush or cloth to apply the stain/paint mixture in long, even strokes.
4. Wipe off any excess and let it dry completely.
5. Optionally, seal the wood with a clear coat for added durability.
How Do You Change Wood Color To Grey?
To change wood color to grey, apply a wood stain or paint in grey hues. Sand the surface and finish with a protective sealer for a lasting effect.
How Do You Make Distressed Gray Wood?
To make distressed gray wood, start by sanding the wood to create a smooth surface. Apply a coat of gray wood stain, then sand it again to expose the natural wood underneath. Finally, add a clear top coat for protection and a finished look.
Conclusion
Achieving that aged, gray look on wood is simple and effective. With a few techniques, you can transform new wood into a weathered masterpiece. Remember to embrace the natural imperfections for an authentic finish. Experiment with different methods to find what works best for your project.
Enjoy the vintage charm in your wood creations.