How to Dry Wood in an Oven: A Quick and Effective Method
To dry wood in an oven, preheat the oven to a low temperature, around 200-225°F, and place the wood inside for several hours until it is dried thoroughly. This method is helpful for small pieces of wood or for wood that needs to be dried quickly for a project or use.
Drying wood is an essential step in various woodworking projects, such as furniture making or crafting musical instruments. Properly dried wood ensures stability, reduces the risk of warping, and enhances its workability. While air drying is a common method, it can be time-consuming.
If you’re looking for a quicker solution, using an oven can be a viable option. This article will provide you with a concise guide on how to dry wood in an oven. By following a few simple steps and ensuring the correct temperature, you can effectively dry small pieces of wood or expedite the drying process for urgent woodworking needs. Let’s dive right in!
Choosing The Right Wood
Our Pick: Tools For Oven-Drying Wood Safely
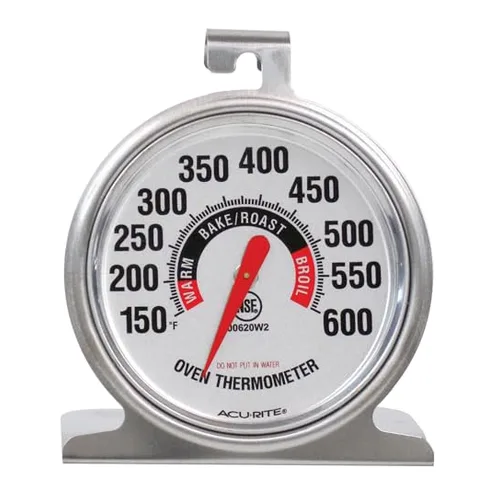
AcuRite Stainless Steel Oven Thermometer
Best for: Confirming your oven actually holds 200-225°F, since built-in dials can run hot or cold.
Why we picked it: Oven-safe for leave-in use, so you can watch the temperature the whole time the wood is drying.
Main drawback: Reads oven air temperature, not the wood’s internal temperature.
Check on Amazon
General Tools Pin-Type Moisture Meter
Best for: Checking when the wood has actually reached target moisture content.
Why we picked it: 5-50% range covers everything from green wood down to fully dried.
Main drawback: Pins leave small marks, so test on an inconspicuous spot.
Check on Amazon →As an Amazon Associate we earn from qualifying purchases at no extra cost to you.
Before you start the process of drying wood in an oven, it’s essential to choose the right type of wood.
Wood Selection
When selecting wood for drying, you need to consider a few key factors. First, make sure the wood is suitable for the project you have in mind. Different types of wood have different characteristics and uses.
Some popular wood choices include:
- Oak
- Maple
- Walnut
- Birch
Each type of wood has its own unique grain patterns and color variations, so choose the one that suits your preference and project requirements.
Additionally, it’s important to consider the moisture content of the wood. Ideally, you want to choose wood that is relatively well-seasoned, as it will dry more evenly and efficiently in the oven.
If you’re unsure about the moisture content of the wood, you can use a moisture meter to determine it. Aim for a moisture content of around 15-20% for the best results.
Wood Preparation
Once you have chosen the right wood, it’s time to prepare it for drying in the oven.
First, start by cutting the wood into smaller pieces. This will not only help it fit better in the oven but also facilitate more efficient drying.
Next, inspect the wood for any defects or imperfections that could affect the drying process. Look for cracks, knots, or insect infestations, and remove or treat them accordingly.
Afterward, stack the wood in a way that allows for proper airflow. This can be achieved by creating small gaps between the wood pieces, ensuring air can circulate freely and aid in the drying process.
It’s also helpful to place a moisture barrier, such as aluminum foil or a baking sheet, underneath the wood to protect the oven from any drips or stains.
Remember to preheat your oven to a low temperature of around 200°F (93°C) before placing the wood inside. This gradual heating will prevent the wood from cracking due to sudden temperature changes.
In conclusion, choosing the right wood with the appropriate moisture content is crucial for successfully drying wood in an oven. By carefully selecting the wood and preparing it properly, you can achieve optimal drying results.

Preparing The Oven
To prepare the oven for drying wood, start by removing the oven racks and placing them aside. Then, place the wood pieces on the racks and set the oven temperature to around 200-225 degrees Fahrenheit. Allow the wood to dry out for several hours until the moisture content is reduced.
Setting The Temperature
To successfully dry wood in an oven, it is essential to set the right temperature. Start by adjusting the oven temperature to around 200°F (93°C), and never exceed 225°F (107°C). This relatively low temperature allows the wood to dry slowly and evenly, minimizing the risk of cracking or warping. Avoid setting the oven temperature too high as it can damage the wood or, in extreme cases, pose a fire risk. It’s crucial to monitor the temperature throughout the drying process to ensure it remains consistent and within the recommended range.
Preheating The Oven
Before placing the wood in the oven, it’s essential to preheat it to the desired drying temperature. Begin by preheating the oven to the set temperature, typically 200°F (93°C). This allows the oven to reach the desired temperature and ensures a stable environment for the wood drying process. Give the oven sufficient time to heat up, usually around 15 to 20 minutes. To confirm if the oven has reached the desired temperature, you can use an oven thermometer for accuracy.
Temperature Consistency
Maintaining a consistent temperature is crucial for successful wood drying. Fluctuations in temperature can lead to uneven drying and potential damage to the wood. To ensure temperature consistency, avoid opening the oven frequently during the drying process. Each time the oven door is opened, heat escapes, and it takes time for the oven to return to the desired temperature. If you need to check on the progress, try to limit oven door openings to the absolute minimum.
Ventilation
Proper ventilation is essential for drying wood in the oven. Consider cracking open the oven door slightly to allow air circulation. This helps prevent moisture buildup in the oven and enhances the drying process. However, take caution not to open the door too much, as it can significantly affect the oven temperature and compromise the drying efficiency. A small wire rack can help keep the oven door propped open slightly.
Additional Tips
– Use a fan in the kitchen to circulate air and aid in drying the wood. A fan can help speed up the drying process and improve overall airflow.
– Ensure the wood pieces are positioned in the oven with enough space between them for air circulation.
– Place the wood on a wire rack or baking sheet to allow air to circulate underneath the pieces.
– Avoid drying wood with bark attached, as it can trap moisture and hinder the drying process.
– Regularly check the wood’s moisture content using a moisture meter or a touch test to determine if it is drying properly.
Drying Process
When it comes to drying wood in an oven, the process requires careful monitoring and precision to avoid damaging the wood. Drying wood in an oven can be a convenient method, especially for smaller projects or when time is of the essence. Let’s delve into the drying process and explore the essential steps to ensure the wood dries effectively.
Placing The Wood In The Oven
To begin the drying process, place the wood evenly spaced on the oven racks to ensure proper airflow and consistent drying. Avoid overcrowding the oven to allow the hot air to circulate around each piece of wood. Position the racks in the center of the oven, providing an even distribution of heat to all the wood pieces.
Monitoring The Drying
Regularly monitor the drying progress to prevent over-drying, which can lead to cracks and warping. Use a reliable oven thermometer to maintain a consistent drying temperature and open the oven door periodically to release any built-up moisture. Frequent checks enable you to adjust the temperature or airflow as needed to ensure the wood dries evenly.
Ensuring Quality
If you’re an avid woodworker or simply enjoy DIY projects, you may find yourself in a situation where you need to dry wood quickly. While there are various methods to accomplish this, drying wood in an oven is a convenient and efficient option. To ensure that your wood is properly dried and ready for use, here are a few important steps to follow.
Checking For Dryness
Once the suggested drying time has passed, it’s crucial to check if the wood is dry enough. A reliable method is to use a moisture meter. Ensure that the wood’s moisture content is around 6-8% for indoor projects and 12-14% for outdoor projects. If the moisture content is higher, your wood may still need more time in the oven.
In addition to using a moisture meter, you can also visually inspect the wood for signs of dryness. Look for cracks or splits in the wood surface, as these indicate that the moisture has evaporated.
“Heat treatment kills most, but not all, wood borers… results indicate the current ISPM 15 heat treatment standard… greatly reduces, but does not eliminate, the risk.” — USDA Forest Service, Northern Research Station
If the wood feels damp or cool to the touch, it may require further drying. Return it to the oven for additional time, checking periodically until the desired moisture level is reached.
Resting And Testing
After removing the wood from the oven, let it rest for a few days in a controlled environment. This allows the wood to acclimate to its surroundings and ensures that it retains its new moisture content.
During this resting period, it’s a good idea to periodically test the moisture content of the wood using a moisture meter. If the moisture level remains stable, it indicates that the wood is properly dried and ready for use.
Keep in mind that the resting time may vary depending on the type and thickness of the wood, as well as the drying process used. It’s essential to be patient and not rush the process, as premature use of the wood could lead to warping or other issues.
By following these steps and adhering to recommended moisture levels, you can ensure that your wood is properly dried in the oven and ready for your woodworking projects. Remember to always prioritize safety and monitor the wood closely throughout the drying process to achieve the best possible results.
Utilizing The Dried Wood
Now that you have successfully dried your wood in the oven, it’s time to explore how you can make the most out of the beautifully seasoned lumber. Whether you’re a woodworker or simply have a creative streak, there are numerous ways to utilize the dried wood for your next project or storage needs.
Storage Tips
Proper storage of dried wood is crucial to maintain its quality and prevent any potential damage. Here are some helpful tips to keep your dried wood in top condition:
- Keep it indoors: Store the dried wood in a cool and dry indoor space, away from direct sunlight or moisture.
- Stack it properly: Stack the wood boards with spacers between them to allow proper airflow, reducing the risk of mold or mildew.
- Protect from pests: Cover the wood stack with a breathable material, such as a tarp, to prevent insects or rodents from infesting the wood.
Project Ideas
With your oven-dried wood ready to use, let’s explore some exciting project ideas that will put your newfound material to good use:
- Furniture making: Create stunning tables, chairs, or shelves using your dried wood. The seasoned lumber will provide stability and enhance the aesthetic appeal of your furniture.
- Decorative items: Craft unique and eye-catching decorative pieces like picture frames, wall art, or wooden sculptures. Let your imagination run wild with the possibilities the dried wood offers.
- Woodworking crafts: Build smaller woodworking projects such as cutting boards, coasters, or keepsake boxes. These make excellent personalized gifts or practical additions to your home.
- Outdoor projects: Utilize the dried wood to construct outdoor structures like pergolas, garden benches, or planters. The durability of the seasoned wood will ensure long-lasting results even in different weather conditions.
Remember, the only limit to what you can create with dried wood is your imagination. So, roll up your sleeves, embrace your creativity, and turn that oven-dried wood into something truly remarkable!
Frequently Asked Questions On How To Dry Wood In An Oven
Can I Put the Wood In The Oven To Dry?
Yes, you can put wood in the oven to dry, as long as you keep the temperature low. Wood’s ignition point is far above the 200-225°F (93-107°C) range this guide recommends, so at those settings there is no realistic fire risk. Never crank the oven higher to speed things up, stay within the recommended range, and keep an eye on the wood throughout the process.
What Is The Oven Dry Method For Wood?
The oven-dry method for wood is a process of removing moisture from the wood by placing it in an oven and using heat to evaporate the water content. This helps to reduce the moisture level in the wood, making it more suitable for various applications.
Can You Harden Wood In An Oven?
Yes, you can harden wood in an oven by baking it at a low temperature. This process removes moisture and strengthens the wood fibers, making it more durable. It’s important to monitor the temperature carefully to avoid scorching the wood.
How Can I Dry Wood Quickly?
To dry wood quickly, follow these tips:
1. Cut wood into smaller pieces to expose more surface area.
2. Use a moisture meter to monitor the drying process.
3. Place wood in a well-ventilated area with proper air circulation.
4. Use a dehumidifier or fan to speed up the process.
5. Apply heat, like an oven or kiln, to remove moisture faster.
Does Drying Wood In The Oven Also Kill Woodworm Or Insects?
Direct answer: Not reliably at these settings. Killing wood-boring insects requires the wood’s core to reach at least 56°C (133°F) for a full 30 minutes — the international ISPM 15 standard used for heat-treating wood packaging. The 200-225°F oven-drying method in this guide will often get there incidentally on thin pieces, but it isn’t a substitute for a proper heat-treatment schedule if pest elimination, not moisture removal, is your actual goal.
If woodworm or other wood-boring insects are the real concern, use a probe thermometer to confirm the center of the piece — not just the oven air — holds at least 133°F for 30 minutes; thicker logs and turning blanks can take considerably longer than thin boards to reach that core temperature.
Conclusion
Drying wood in an oven is a convenient and efficient method for DIY projects. With careful monitoring and attention to detail, you can achieve perfectly dried wood for your woodworking endeavors. By following the right steps and precautions, you can use your oven to speed up the drying process for various types of wood.
Sponsored / affiliate links. As an Amazon Associate I earn from qualifying purchases. I may earn additional commission from eligible campaigns.