How to Take a Drill Bit Out Quick Fixes
Sometimes, when you’re working on a project, a drill bit can get stuck. This can be a bit tricky, especially if you’re new to DIY or home repairs. It’s a common problem that can stop you in your tracks.
But don’t worry, it’s usually not a big deal. We’ll show you exactly how to tackle this issue with simple, easy-to-follow steps. This guide on How to Take a Drill Bit Out: Quick Fixes for Stuck Bits will get you back to your work quickly.
Getting a Stuck Drill Bit Out
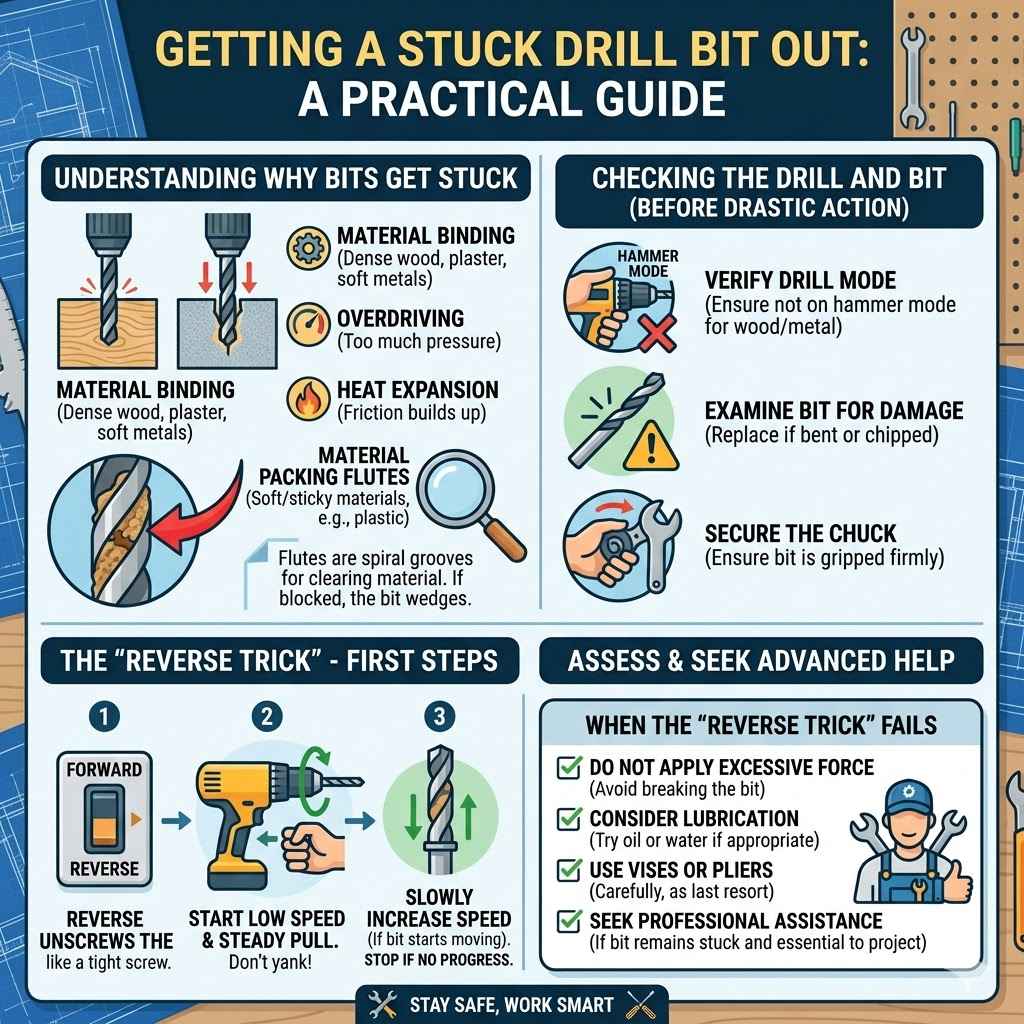
This section covers the main reasons a drill bit might get stuck and the very first things you should try. Often, a bit jams because the material you’re drilling into is too hard, or the bit itself might be dull. Sometimes, the hole you’ve drilled is just a bit too tight for the bit to spin freely.
We will explore some simple techniques to loosen it up. You’ll learn how to assess the situation and begin freeing the bit without causing further damage.
Checking the Drill and Bit
Before you try anything drastic, it’s smart to look closely at your drill and the bit. Make sure the drill is not set to hammer mode if you’re drilling into wood or metal, as this can cause it to bind. Check if the drill bit is bent or damaged.
A bent bit is more likely to get stuck. Also, ensure the chuck is properly tightened. A loose chuck can cause the bit to wobble and jam.
- Inspect the drill’s settings: Confirm the drill is on the correct mode for the material. If you’re drilling into wood or metal, use the standard drilling setting, not the hammer drill setting. The hammer action can force the bit deeper and make it harder to remove.
- Examine the drill bit for damage: Look for any signs of bending, chipping, or excessive wear. A damaged bit is more prone to getting stuck and can create a less clean hole, further complicating removal. If the bit looks compromised, it might be time to replace it.
- Verify the chuck is secure: Ensure the drill bit is held firmly in the chuck. A bit that isn’t gripped tightly can spin and bind in the material. Tighten the chuck by hand or with a chuck key until the bit feels very secure.
Understanding Why Bits Get Stuck
Drill bits become stuck for a few key reasons. When drilling into certain materials like dense wood, plaster, or even soft metals, the material can bind around the flutes of the drill bit. This is especially true if the hole is slightly undersized for the bit.
Heat can also play a role; friction builds up, causing the bit and material to expand slightly, making removal harder. Overdriving the bit can also embed it more deeply.
A drill bit is essentially a metal rod with cutting edges. The flutes are the spiral grooves that run along the bit. These flutes are designed to clear away the material being drilled.
If the material is soft and sticky, like some plastics, it can pack into these flutes. This packing prevents the bit from rotating freely and can wedge it tightly.
When drilling, there’s a specific amount of pressure needed. Too much pressure can force the bit deeper into the material than intended. This can cause the material to close in around the bit, especially if the material is somewhat flexible.
Imagine trying to pull a twig out of mud; the mud can hold onto it tightly.
The “Reverse Trick” First Steps
The simplest and often most effective method is to use the drill’s reverse function. Many drills have a switch that allows you to change the direction of rotation. If the bit is stuck, setting the drill to reverse and applying a gentle pull can often dislodge it.
Start with low speed and steady pressure. Don’t just yank it hard, as this could break the bit or damage your drill.
The reverse function is designed to unscrew things, and in this context, it can help unscrew the drill bit from the material it’s caught in. Think of it like trying to remove a screw that’s a bit too tight. You would turn it counter-clockwise.
The drill’s reverse mode does the same for the drill bit.
Start by setting your drill to its lowest speed setting. Select the reverse rotation. Hold the drill firmly and apply a steady, gentle pulling force while the drill motor is running in reverse.
If the bit begins to move, slowly increase the speed but maintain the gentle pulling pressure. If it doesn’t budge, stop and try a different method. Force is rarely the answer here.
Advanced Techniques for Stubborn Drill Bits
When the basic reverse trick doesn’t work, it’s time to explore more involved methods. This section looks at how to apply force effectively and use tools that can help loosen the bit. We will discuss using pliers, screwdrivers, and even a bit of tapping to create space.
These techniques require a bit more care but are highly effective for bits that are really jammed in. You’ll learn how to minimize damage to both the material and the drill bit itself.
Using Pliers for Grip
If a portion of the drill bit is sticking out, pliers can offer a better grip than your fingers. Vise-grips or locking pliers are excellent for this as they can clamp down tightly and maintain their grip. Grip the bit as close to the material surface as possible.
Twist the pliers in the reverse direction of how the drill was spinning. Work the bit back and forth gently, increasing the pulling force slightly with each twist.
Pliers work by providing mechanical leverage. They allow you to apply torque, or twisting force, to the drill bit. A good pair of pliers can grip the bit much more effectively than trying to grab it with just your fingers.
This increased grip translates to more power to twist the bit free from the material.
When using pliers, try to grab the shank of the drill bit, which is the part that extends out of the chuck. If you can get a good grip, twist slowly and steadily in the reverse direction. If the bit is still stuck, try gently wiggling it up and down while twisting.
This back-and-forth motion can help break the bond between the bit and the material.
Choose the right pliers: For stubborn bits, locking pliers (like Vise-Grips) are ideal because they provide a secure, non-slip grip. Regular pliers can work, but you might need to re-grip the bit more often.
Grip firmly and twist: Clamp the pliers onto the drill bit shank. Apply steady, firm pressure in the counter-clockwise direction. If the bit moves even a little, continue in that direction.
Avoid sudden jerks, which could snap the bit.
Apply leverage carefully: Use the pliers to slowly work the bit back and forth. Sometimes, a slight rocking motion combined with the twisting force can help break the material’s grip. Be patient; forcing it too hard can damage the bit or the surrounding material.
The Tapping Method
Sometimes, a bit gets stuck because the material has compressed around it. A gentle tapping can help loosen this grip. Using a small hammer, lightly tap the side of the drill bit shank, away from the material.
You can also tap the chuck of the drill. The vibrations can help break the friction hold. Be very careful not to hit the drill bit hard enough to bend or break it.
This method is about gentle persuasion through vibration.
The tapping method relies on creating vibrations. These vibrations can disrupt the static friction that is holding the drill bit in place. Think about how tapping a stubborn jar lid can sometimes make it easier to open.
The tiny movements and shifts caused by the tapping can release the binding pressure.
When tapping, use a light hammer, like a ball-peen hammer or a small claw hammer. Aim to tap the side of the bit’s shank. You can also try tapping the drill chuck itself, which will vibrate the entire bit.
Focus on short, light taps rather than heavy blows. The goal is to create small disturbances that free the bit, not to damage it.
Using Penetrating Oil or Lubricant
For bits stuck in metal or hard materials, a penetrating oil can be a lifesaver. Spray a small amount of penetrating oil around the point where the bit enters the material. Let it sit for 15-30 minutes to allow it to work its way into the tight spaces.
The oil helps to reduce friction and break down any rust or corrosion that might be holding the bit. After the waiting period, try the reverse trick again or use pliers.
Penetrating oils are designed to seep into very small gaps. They often contain solvents that can break down rust and lubricants that reduce friction. This makes them perfect for situations where a metal drill bit is tightly bound within a metal workpiece or even hard wood.
Apply the oil carefully. You don’t want to soak the entire drill or surrounding area. A small straw applicator that comes with many penetrating oil cans is very useful for directing the oil precisely.
After applying the oil and letting it sit, try to carefully rotate the bit in reverse again. The lubrication should make it easier.
Real-Life Example: Stuck Bit in a Metal Bracket
John was assembling a metal shelf unit and his drill bit got stuck while drilling a pilot hole for a bolt. The bit was firmly lodged in a thick steel bracket. He tried reversing the drill but it wouldn’t budge.
He then applied a generous amount of penetrating oil around the bit and let it sit for an hour. After waiting, he used a pair of locking pliers to grip the bit and slowly twisted it counter-clockwise. The bit eventually came free with a slight pop, allowing him to continue his project.
When to Consider Breaking the Bit
In very rare and difficult cases, the drill bit might be so firmly jammed that attempting to remove it could damage your drill or the workpiece. If the bit is broken off flush with the surface and cannot be gripped or loosened by other means, you might have to consider breaking it further or drilling it out. This is a last resort.
If the bit has snapped, you’ll need to drill around it or use a screw extractor.
Breaking a drill bit is not ideal, but sometimes it’s necessary. If a bit is broken off below the surface and cannot be accessed, you might need to drill a larger hole around the broken piece. This is a delicate process.
Alternatively, if the bit is broken off, but a small portion is accessible, you might try drilling a small pilot hole into the center of the broken bit and then using a screw extractor.
A screw extractor is a tool designed to remove broken screws or bolts. It has a tapered, reverse thread. You drill a pilot hole into the broken piece, then insert the extractor and turn it counter-clockwise.
The extractor bites into the broken piece and, with luck, unscrews it. This requires precision, as drilling too deep or off-center can cause further problems.
Preventing Drill Bits from Getting Stuck
The best approach to dealing with a stuck drill bit is to avoid the situation in the first place. This section offers tips on how to drill effectively and prevent bits from binding. We’ll discuss using the right bit for the job, maintaining your tools, and proper drilling techniques.
A little bit of planning and care goes a long way in preventing frustrating moments and ensuring your projects run smoothly.
Choosing the Right Drill Bit
Using the correct drill bit for the material you’re working with is crucial. For wood, use brad-point bits or twist bits. For metal, use high-speed steel (HSS) bits, often coated for durability.
For masonry, use carbide-tipped masonry bits. Using the wrong type of bit can lead to overheating, dulling, and increased chances of getting stuck.
Different materials require different cutting geometries and hardness. For example, wood is relatively soft, and a brad-point bit has a sharp center spur that helps it start cleanly and prevent walking. Metal is harder and requires bits made of tougher materials like HSS, often with special coatings like titanium nitride (TiN) to reduce friction and heat.
Masonry contains abrasive aggregates like stone and concrete, so carbide tips are needed to withstand the wear.
Consider the size of the hole needed. If a project calls for a specific hole size, ensure you have a bit of that exact diameter. Drilling with a bit that’s too large or too small for the intended purpose can lead to issues.
For larger holes, especially in wood, spade bits or hole saws are more appropriate than standard twist bits.
- Match bit to material: Always select a drill bit designed for the material you are drilling. Wood, metal, plastic, and masonry all require different bit types and sharpness. Using a metal bit in hardwood can clog it quickly, for instance.
- Use sharp bits: A dull drill bit requires more force, generates more heat, and is more likely to bind. Sharpen your bits regularly or replace them when they become dull. You can usually tell a bit is dull if it’s not cutting cleanly and requires excessive pressure.
- Correct size matters: Ensure you are using the correct diameter bit for the hole size required. If you need to drill a pilot hole for a screw, use a bit size recommended for that screw thread. For larger holes, consider spade bits or hole saws.
Proper Drilling Technique
When you drill, apply steady, consistent pressure. Don’t force the drill. Let the bit do the work.
Periodically pull the drill bit back out of the hole while it’s still spinning in the forward direction. This clears away sawdust or metal shavings and prevents them from packing into the flutes. This is especially important in deeper holes or softer materials.
The act of drilling creates waste material, such as sawdust or metal chips. These shavings need somewhere to go. The flutes on the drill bit are designed to carry this waste material up and out of the hole.
If the hole gets packed with debris, the bit can no longer cut effectively, and the debris acts like a wedge, binding the bit.
Pulling the bit out periodically while it’s still spinning forward is like giving the flutes a chance to clear themselves. It’s a simple step that dramatically reduces the risk of binding. For very deep holes, you might need to do this several times.
Ensure you do this while the drill is still moving forward, not in reverse, as this helps the flutes eject the material.
Sample Scenario: Drilling into Drywall
Imagine you need to hang a picture on a drywall wall. You grab a standard twist drill bit. As you start drilling, you feel the bit bind up.
This often happens in drywall because the material is soft and can crumble. If you didn’t pull the bit out periodically, the drywall dust could pack the flutes. A quick pull-out and re-insertion while spinning forward would clear the dust, allowing you to finish the hole smoothly.
Maintenance of Drill Bits and Drills
Keep your drill bits clean and rust-free. A bit of light oil can prevent rust on metal bits when they’re stored. Ensure your drill’s chuck is clean and free of debris, as this can affect its grip.
Regularly check your drill’s manual for any specific maintenance recommendations.
Rust can degrade the cutting edges of a drill bit and also increase friction. Keeping bits clean and dry, and using a light coating of oil for storage, especially for metal bits, can significantly prolong their lifespan and performance. A clean chuck ensures the jaws can grip the bit firmly and evenly.
Some drills benefit from occasional lubrication of the chuck mechanism itself, though this is less common for consumer-grade drills. For professional or industrial drills, regular servicing might be recommended. Always refer to your drill’s user manual for specific care instructions.
Statistics show that using dull drill bits can increase drilling time by up to 50% and requires 25% more energy. This extra effort also increases the likelihood of the bit binding. Maintaining sharp bits is not just about ease of use, but also efficiency and preventing tool damage.
Frequently Asked Questions
Question: What is the quickest way to remove a slightly stuck drill bit?
Answer: The quickest way is usually to set your drill to reverse and gently try to back the bit out. Start on a low speed setting and apply steady, light pulling pressure. If it doesn’t move easily, don’t force it.
Question: Can I use a screwdriver to get a stuck drill bit out?
Answer: If the drill bit is stuck in a wooden material, you might be able to carefully pry around the bit with a flathead screwdriver to create a little space. However, this can damage the wood. Pliers are generally a better tool for gripping and twisting.
Question: My drill bit broke off inside the material. What should I do?
Answer: If a bit breaks off flush, you may need to use a screw extractor or drill a larger hole around the broken piece. If a small part is sticking out, locking pliers might work to twist it out.
Question: How can I prevent my drill bit from getting stuck in the future?
Answer: Use the right bit for the material, ensure your bits are sharp, and pull the bit out periodically while drilling to clear debris. Apply steady, consistent pressure, and don’t force the drill.
Question: Is it safe to use penetrating oil on all materials?
Answer: Penetrating oil is generally safe for use on metal and hard materials like dense wood. Be cautious when using it on softer woods or plastics, as it might cause staining or slight damage to the surface.
Summary
Getting a drill bit out of a jam is often simple. Start with the drill’s reverse function. If that fails, try locking pliers for a better grip.
Gentle tapping can also help loosen a bound bit. Always use the correct bit for your material and drill with steady pressure, pulling out periodically to clear debris. Proper care keeps your tools working well.