What Is Liquid Sandpaper and How to Use It on Wood
Liquid sandpaper is a chemical deglosser that etches the surface of an existing finish so new paint, stain, or varnish can bond properly. Apply it with a lint-free cloth in circular motions, let it sit 15–20 minutes, wipe clean, then prime or paint. Unlike physical sandpaper, it leaves no dust and reaches intricate carvings and corners easily — but it will not remove scratches or level uneven wood.
Quick Answer
To use liquid sandpaper: clean the surface, saturate a lint-free cloth and wipe in circular motions, let sit 15–20 minutes, then wipe off. Allow 30 minutes to dry. It deglossers existing finishes so new paint sticks — it does not sand wood smooth or remove scratches.
What Is Liquid Sandpaper?
Liquid sandpaper is a solvent-based chemical solution that removes the glossy top layer of a painted or varnished surface so new coatings can adhere. It is also called liquid deglosser or liquid sander. The active ingredients — typically ethyl alcohol, acetone, or other solvents — soften and etch the existing finish without physically abrading the wood beneath.
How Does It Work?
Traditional sandpaper works by physically grinding away the surface. Liquid sandpaper works chemically: the solvent penetrates the top coat, breaks down its molecular bonds, and leaves the surface microscopically rough — giving the next coat of paint or stain something to grip. The result is the same as mechanical sanding for adhesion purposes, but with no dust, less effort, and better reach into tight spots.
Benefits Of Using Liquid Sandpaper
- No dust: No airborne particles means cleaner work and no post-sanding cleanup.
- Reaches intricate areas: Brushes into carved molding, spindles, and furniture details that sandpaper cannot reach.
- Safe for thin veneers: Because it does not abrade, it will not sand through a thin wood veneer the way aggressive sanding can.
- Faster on large flat surfaces: Wiping a tabletop with deglosser takes minutes vs. 20–30 minutes of sanding.
- Less physical effort: No arm fatigue from orbital sanders or hand sanding blocks.

Does Liquid Sandpaper Work on Wood?
Yes — liquid sandpaper works well on finished wood surfaces, but only when there is an existing finish present. It deglossers the top coat (paint, varnish, polyurethane, lacquer) so new paint or stain bonds better. It does not work on bare unfinished wood, and it will not correct scratches, gouges, or raised grain. For bare or damaged wood, always use traditional sandpaper first.
For wood refinishing projects, liquid sandpaper is best used in these situations:
- Repainting furniture: When the old paint is sound and you just need to dull the sheen for adhesion.
- Refreshing cabinet faces: Flat panel doors and drawer fronts respond well — no edge profiling needed.
- Wood trim and molding: Intricate profiles that are impossible to sand by hand.
- Wood veneer surfaces: Thin veneers risk sanding through — deglosser removes only the finish layer.
When NOT to use liquid sandpaper on wood: If the wood surface has deep scratches, raised grain, paint drips, or uneven texture, deglosser alone will not fix these. Sand the problem areas first, then use deglosser as the final prep step before painting. For staining bare wood, see our guide on how to sand wood for staining for the correct prep sequence.
Preparing The Surface
Cleaning The Surface
Before applying liquid sandpaper, the surface must be completely clean. Grease, wax, silicone, or soap residue will block the solvent from making contact with the finish. Wipe down the surface with a degreaser or TSP substitute and rinse with clean water. Allow it to dry fully — moisture trapped under deglosser causes adhesion failures later.
Repairing Any Imperfections
Liquid sandpaper does not fill gaps or level surface defects. Before deglossing, repair cracks with wood filler, sand any drips or runs smooth, and address any damaged veneer edges. Once repairs are sanded flat, then apply the deglosser over the entire surface to unify the sheen level before painting.
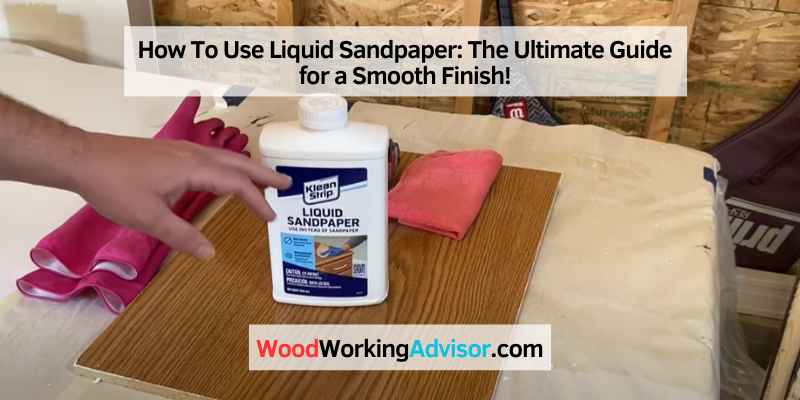
Applying The Liquid Sandpaper
Pour the liquid sandpaper directly onto a clean, lint-free cloth — do not apply directly to the surface. This gives you control over the amount applied and prevents pooling in corners. Fold the cloth frequently to expose a clean surface and avoid redepositing dissolved finish back onto the wood.
Applying Liquid Sandpaper
Choosing The Right Product
Klean-Strip Liquid Sandpaper (QKLS285) is the most widely available and trusted brand, sold at Home Depot and online. For water-based paints and delicate surfaces like veneer, look for a water-based deglosser, which has lower fumes and is easier to clean up. For repainting over oil-based finishes, solvent-based deglosser works more aggressively and is the better choice. Always check the product label for compatibility with your specific finish type.
★ Best seller
Klean-Strip Liquid Sandpaper Deglosser (Qt)
The go-to deglosser for furniture, cabinets, and trim. Prepares surfaces for paint without sanding dust. Works on wood, metal, and most painted surfaces. Ready for paint in 30 minutes.
- No sanding dust — chemical prep only
- Works on wood, metal, laminate, and painted surfaces
- Ready for primer or paint in 30 minutes
As an Amazon Associate we earn from qualifying purchases.
Safety Precautions
Solvent-based liquid sandpaper is flammable and produces strong fumes. Always work in a well-ventilated area — open windows and run a fan. Wear chemical-resistant nitrile gloves and splash goggles (not standard safety glasses). Keep the product away from open flames, pilot lights, and sparks. Store the container tightly sealed in a cool, dry location away from heat sources.
Application Techniques
- Clean the surface thoroughly and allow to dry completely.
- Put on nitrile gloves and goggles. Open windows for ventilation.
- Pour liquid sandpaper onto a clean, lint-free cloth — not directly on the surface.
- Wipe the surface using firm, circular motions. Fold the cloth to expose a clean face as it picks up residue.
- Work in sections of 2–3 square feet at a time on large surfaces.
- Allow the product to dwell for 15–20 minutes (or per label instructions).
- Wipe off excess with a fresh clean cloth.
- Allow the surface to dry for 30 minutes before applying primer or paint.
Sanding Technique
Although liquid sandpaper handles deglossing, combining it with light physical sanding produces the best results on previously painted wood. Use 220-grit sandpaper on any problem spots — drips, runs, or raised grain — before deglossing. The deglosser then unifies the sheen across the entire surface. For wood species with open grain like oak or ash, a light 220-grit pass after deglossing helps open the grain for better paint penetration.
Using Sandpaper Grits
When combining liquid sandpaper with traditional sanding, use the right grit for each stage. For spot repairs before deglossing, 120–150 grit levels drips and scratches. For final smoothing between coats, 220–320 grit removes dust nibs without cutting through primer. A grit guide: 80–120 = heavy removal; 150–180 = surface prep; 220 = between coats; 320+ = final finish pass. For cedar specifically, our grit guide for cedar covers the full sequence.
Working With The Grain
When applying liquid sandpaper on wood, wipe in the direction of the grain for the final pass. Circular motions work well in the middle of the session to ensure full coverage, but finish with a grain-direction wipe to prevent circular scratches from telegraphing through paint. Always identify grain direction before starting — it runs parallel to the length of boards in most furniture and cabinet construction.
Avoiding Over-sanding
Liquid sandpaper cannot over-sand wood the way mechanical abrasion can, but applying too much product or leaving it on too long can lift the existing finish entirely rather than just etching it. Follow the dwell time on the product label. If the cloth is pulling up significant amounts of color (especially on stained wood), the finish is too thin for deglosser — switch to 220-grit sandpaper and apply a fresh seal coat instead.

Finishing The Surface
Removing Residue
After the dwell time, wipe off all deglosser residue with a clean, dry cloth. Do not rinse with water — water can raise the grain and create new adhesion issues. If the surface feels tacky after wiping, apply a small amount of fresh deglosser to a new cloth and wipe again. The surface should feel slightly rough to the touch (like very fine sandpaper) when ready — that texture indicates the finish has been properly etched.
Applying Primer Or Paint
Allow the deglossed surface to dry for 30 minutes before priming or painting. Use a bonding primer on slick surfaces like laminate or previously painted metal. On wood furniture, a shellac-based primer gives the best stain-blocking and adhesion. Apply paint in thin, even coats and allow full cure between coats. For painted wood doors and trim, our guide on painting doors for a wood look covers the full finishing sequence.
Frequently Asked Questions
Can You Use Liquid Sandpaper Instead of Sanding?
You can use liquid sandpaper instead of sanding when the goal is deglossing an existing finish for repainting. It is not a replacement for sanding when the wood surface has scratches, uneven texture, raised grain, or bare spots. For those situations, physical sanding is required first. Think of liquid sandpaper as a prep step for repainting over sound existing finishes — not a universal sanding alternative.
Does Liquid Sandpaper Remove Paint From Wood?
Liquid sandpaper does not remove paint from wood. It only etches and dulls the surface of the existing paint so new paint bonds better. If you need to remove paint entirely, use a chemical paint stripper, heat gun, or mechanical sanding. Liquid sandpaper is a surface prep product, not a paint remover — using more product or longer dwell time will not strip paint down to bare wood.
How Long Does Liquid Sandpaper Take to Dry?
Liquid sandpaper typically takes 30 minutes to dry before you can apply primer or paint. The dwell time (while the product is working on the surface) is 15–20 minutes, after which you wipe it off. The additional 30-minute dry period allows remaining solvents to fully evaporate. In cold or humid conditions, extend the dry time to 45–60 minutes. Always check the specific product label, as water-based deglossers may have different timing.
Can Liquid Sandpaper Be Used on Stained Wood?
Liquid sandpaper can be used on stained wood only if a clear topcoat (varnish, polyurethane, or lacquer) was applied over the stain. The deglosser etches the topcoat, not the stain itself. If the stained wood was not sealed with a clear finish, deglosser may remove the stain color and you will need to restain. Always test on a hidden area first. For bare stained wood without a topcoat, use 220-grit sandpaper for prep instead.
Conclusion
Liquid sandpaper is the fastest way to prepare a previously finished wood surface for repainting or refinishing. It saves time on large flat surfaces, reaches corners and profiles that sandpaper cannot, and eliminates the dust cleanup problem entirely. Use it when the existing finish is sound and you need deglossing only — pair it with physical sanding for any surface defects before applying the deglosser across the full piece.