Interior Wood Mouldings: Types and Ideas
Interior wood mouldings add elegance and sophistication to any space. They are decorative trim pieces made of wood that add architectural detail to walls, ceilings, and floors.
Wood mouldings can be used to frame doors and windows, accentuate crown moulding, or embellish baseboards, creating a polished and finished look to interior spaces. Incorporating interior wood mouldings into a design scheme can elevate the overall aesthetic of a room.
From traditional to contemporary styles, wood mouldings offer versatility and timeless appeal. Whether stained, painted, or left natural, they bring warmth and character to interior design. Additionally, wood mouldings can increase the value of a home and provide a sense of craftsmanship and quality. With a wide range of profiles and designs available, interior wood mouldings offer endless possibilities for enhancing the beauty of any interior space.
The Impact Of Interior Wood Mouldings
Interior wood mouldings play a crucial role in enhancing the overall aesthetics and elegance of a space. Their impact goes beyond purely decorative purposes, as they contribute to the architectural features and character of a room. Let’s delve into the significant influence interior wood mouldings have on interior design and the overall ambiance of a space.
Enhancing Architectural Features
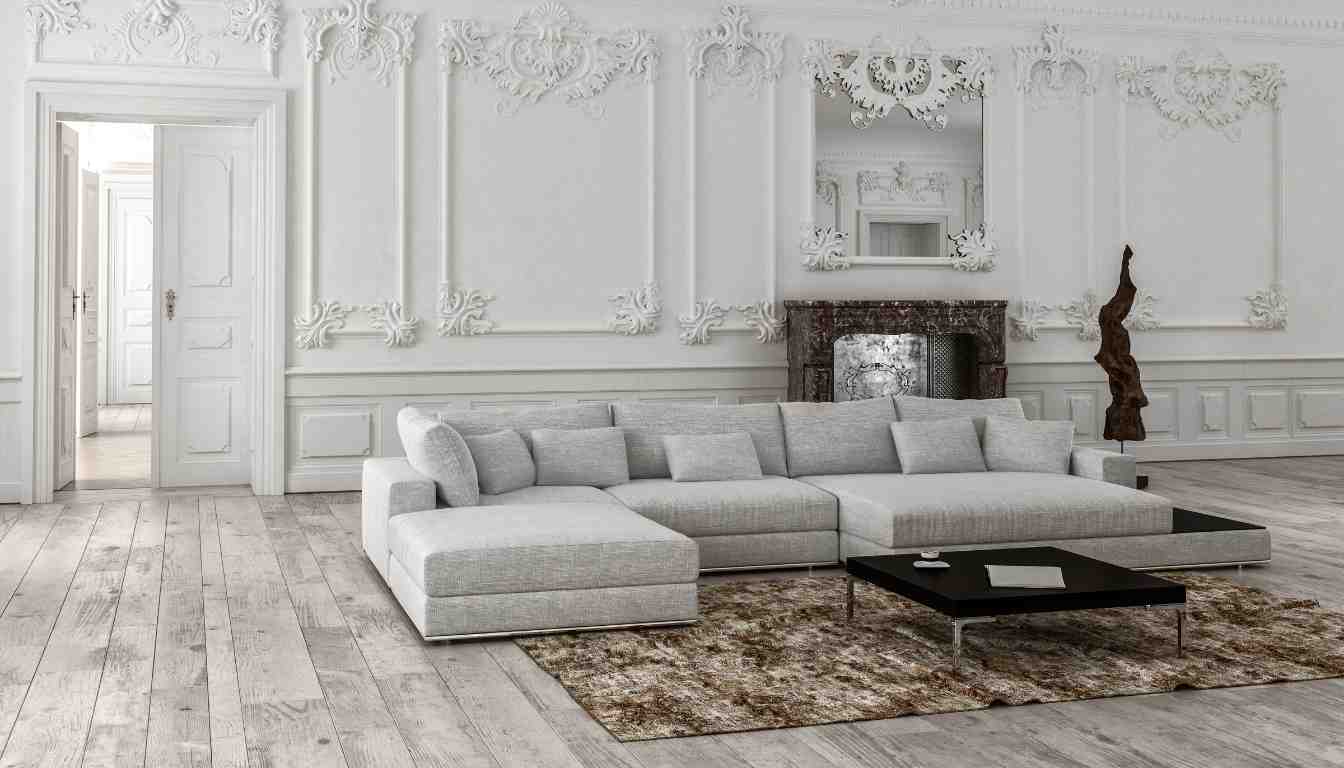
Wood mouldings have the remarkable ability to enhance the architectural features of a space. Whether it’s intricate crown moulding or ornate baseboards, these elements add depth and dimension to the walls and ceilings, transforming bland surfaces into visually captivating focal points. Their installation can elevate the overall design and make a room feel more sophisticated and refined.
Adding Character And Elegance
Interior wood mouldings bring an unparalleled level of character and elegance to any interior. They serve as a defining element that adds a touch of timeless charm and sophistication. Whether it’s a traditional, ornate moulding or a sleek, modern profile, these elements contribute to the overall personality of a space, making it feel truly unique and inviting.
Choosing The Right Wood Mouldings
Interior wood mouldings can instantly upgrade the look of your home, adding elegance and character to your spaces. When it comes to choosing the right wood mouldings, there are several key factors to consider for a cohesive and visually appealing design.
Selecting The Appropriate Style
Choosing the appropriate style of wood mouldings is essential to complement the overall aesthetic of your home. Consider the architectural style of your space and whether you prefer traditional, modern, or contemporary designs.
Considering Different Wood Species
When selecting wood mouldings, it’s crucial to consider different wood species to achieve the desired look and feel. Each wood species has its unique characteristics, from the rich warmth of cherry to the timeless beauty of oak.
Please copy and paste this HTML code into your WordPress editor to maintain the SEO-friendly content structure.
Installation Process
When it comes to beautifying your home, interior wood mouldings are a fantastic option. They not only add elegance and charm to any space but also provide a finishing touch that ties the whole room together. Installing wood mouldings may seem like a daunting task, but with the right approach and preparation, it can be a satisfying DIY project. In this section, we will guide you through the installation process, covering the preparation steps and how to install cornices, baseboards, and panel mouldings.
Preparation Steps
Installing interior wood mouldings requires proper planning and preparation to ensure a smooth and successful installation. Here are some essential preparation steps:
- Measurements: Measure each wall and ceiling carefully to determine the required lengths and angles for the mouldings.
- Materials: Gather all the necessary tools and materials, including wood mouldings, adhesive or nails, a miter saw, a level, a tape measure, a pencil, and a caulking gun.
- Cut and Shape: Cut the wood mouldings to the desired lengths and angles using a miter saw. Remember to wear safety goggles and follow all safety guidelines when operating the saw.
- Paint or Stain: Decide whether you want to paint or stain the mouldings before installation. It’s easier to paint or stain them before mounting to avoid any accidental spills or mess on the walls.
- Clean and Dry: Ensure that the walls and ceilings are clean, smooth, and dry before beginning the installation process. Any dust, debris, or moisture can affect the adhesion of the mouldings.
Installing Cornices, Baseboards, And Panel Mouldings
Now that you have completed the preparation steps, it’s time to start installing the different types of wood mouldings:
Cornices:
- Measurements: Measure the length of the wall where you want to install the cornice. Mark the desired position on the wall.
- Adhesive or Nails: Apply a suitable adhesive to the back of the cornice or use nails to secure it to the marked position.
- Level and Adjust: Use a level to ensure that the cornice is straight and adjust if necessary. Secure it firmly in place.
- Caulking: Fill any gaps between the cornice and the wall using caulking. Smooth the caulking with a wet finger or a caulking tool.
Baseboards:
- Measurements: Measure the length of each wall where the baseboards will be installed. Mark the desired position on the walls.
- Adhesive or Nails: Apply a suitable adhesive to the back of the baseboard or use nails to secure it to the marked position.
- Level and Adjust: Use a level to ensure that the baseboards are straight and adjust if necessary. Secure them firmly in place.
- Caulking: Fill any gaps between the baseboards and the walls using caulking. Smooth the caulking for a seamless finish.
Panel Mouldings:
- Measurements: Measure the length of each wall where the panel mouldings will be installed. Mark the desired position on the walls.
- Adhesive or Nails: Apply a suitable adhesive to the back of the panel moulding or use nails to secure it to the marked position.
- Level and Adjust: Use a level to ensure that the panel mouldings are straight and adjust if necessary. Secure them firmly in place.
- Caulking: Fill any gaps between the panel mouldings and the walls using caulking. Smooth the caulking to achieve a professional look.
By following these installation steps, you can transform your space with the timeless beauty of interior wood mouldings. Take your time, pay attention to detail, and enjoy the process of enhancing your home’s interior aesthetics.
Finishing And Painting Techniques
Proper finishing and painting play a crucial role in enhancing the beauty of interior wood mouldings. By applying the right techniques, you can achieve a seamless look that adds elegance and charm to your space. Whether you are a DIY enthusiast or a professional, this section will guide you through the essential steps to achieve a flawless finish for your wood mouldings.
Achieving A Seamless Look
When it comes to achieving a seamless look for your interior wood mouldings, attention to detail is key. Here are some essential tips to help you achieve a flawless finish:
- Ensure the wood mouldings are properly sanded and free from any rough edges or imperfections.
- Fill any gaps, cracks, or nail holes with wood filler or putty and smooth it out.
- Use a primer specifically designed for wood surfaces to ensure proper paint adhesion.
- Apply thin coats of paint or finish to avoid drips or uneven coverage.
- Allow each coat to dry thoroughly before applying the next layer.
By following these steps, you can achieve a seamless look that gives your interior wood mouldings a professional and polished appearance.
Choosing The Right Paint And Finish
Choosing the right paint and finish is crucial to ensure long-lasting and visually appealing results for your interior wood mouldings. Here are some factors to consider:
| Factor | Considerations |
|---|---|
| Color | Choose a color that complements your overall interior design and enhances the beauty of the wood. |
| Finish | Consider the desired level of sheen – whether you want a matte, satin, or glossy finish. |
| Durability | Select a paint and finish that are resistant to stains, scratches, and fading, especially for high-traffic areas. |
| Type | Opt for a paint and finish that are specifically formulated for wood surfaces to ensure proper adhesion and protection. |
By carefully considering these factors, you can choose the right paint and finish that will not only enhance the appearance of your interior wood mouldings but also provide long-lasting durability.
Maintenance And Care
Proper maintenance and care of interior wood mouldings is essential to preserve their beauty and longevity. Regular cleaning, polishing, and protecting them from moisture and sunlight are key to ensuring their continued elegance and functionality.
Cleaning And Upkeep
Wood mouldings lend a timeless elegance to any interior space. To maintain their beauty and prolong their lifespan, regular cleaning and upkeep are essential.
– Dust the mouldings frequently to prevent buildup.
– Use a soft cloth or brush to clean gently.
– Avoid harsh chemicals that can damage the wood finish.
Addressing Common Issues
Over time, wood mouldings may encounter common issues that can be addressed with simple care techniques.
– Scratches: Apply a wood filler followed by sanding and refinishing if needed.
– Water Damage: Dry the affected area immediately to prevent warping.
– Sunlight Exposure: Consider using UV protectant finishes to prevent fading.
Regular maintenance and prompt attention to any issues will ensure your interior wood mouldings stand the test of time.
Stunning Transformation Ideas
Interior wood mouldings offer a world of possibilities when it comes to transforming the look and feel of your home. These decorative elements have the power to elevate any space, adding character and charm to your interiors. By incorporating the right wood mouldings, you can create stunning transformations that will leave your guests in awe. In this blog post, we will explore two key areas where wood mouldings can make a significant impact: creating statement ceilings and enhancing doorways and windows.
Creating Statement Ceilings
Your ceiling is often an overlooked canvas for design, but with the right wood mouldings, you can turn it into a captivating centerpiece. Statement ceilings add depth and sophistication to any room, making it feel more visually appealing and inviting. To achieve this stunning transformation, consider the following ideas:
- Install crown moulding along the perimeter of the ceiling to add elegance and create a seamless transition between the walls and ceiling.
- Add ceiling beams to create a rustic and warm atmosphere, perfect for cozy living spaces or traditional-themed interiors.
- For a more contemporary look, opt for geometric patterns or intricate designs that will add a modern twist to your ceiling.
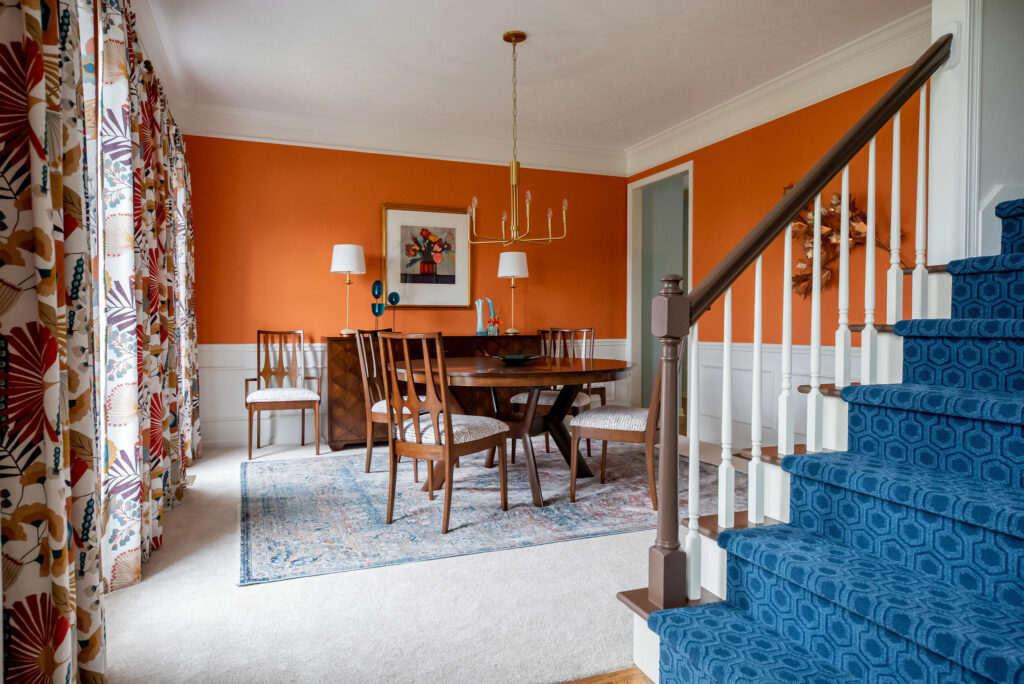
Enhancing Doorways And Windows
Doorways and windows are essential architectural features that can benefit greatly from the addition of wood mouldings. By enhancing these areas, you can elevate the overall aesthetic of your home. Here are some ideas to consider:
- Frame your doorways with pilasters or columns to create a grand entrance that exudes sophistication and elegance.
- Add decorative casing around your windows to draw attention to their beauty and create a more finished look.
- Consider installing window headers to add a touch of grandeur to your windows and make them stand out.
The possibilities are endless when it comes to transforming your home with interior wood mouldings. Whether you’re looking to create statement ceilings or enhance doorways and windows, these ideas will help you achieve a stunning transformation that will leave a lasting impression.
Incorporating Mouldings With Modern Designs
When it comes to interior design, incorporating wood mouldings with modern designs can bring a timeless elegance to any space. In today’s design trends, the marriage of traditional elements, such as wood mouldings, with contemporary styles has become increasingly popular. These intricate details create a sense of warmth and sophistication, adding depth and texture to minimalist interiors. Let’s explore how to seamlessly integrate mouldings with modern designs, balancing the traditional and contemporary styles and incorporating them into minimalist interiors.
Balancing Traditional And Contemporary Styles
Balancing traditional and contemporary styles involves finding the perfect harmony between the old and the new. Modern interior design often features clean lines and sleek surfaces, and the addition of wood mouldings can soften these edges, adding character and visual interest. By marrying the clean aesthetics of contemporary design with the warmth of traditional wood mouldings, a space can achieve a unique balance between the two styles.
Integrating Mouldings In Minimalist Interiors
In minimalist interiors, less is more. By integrating wood mouldings into these spaces, you can infuse a sense of luxury and refinement without overwhelming the streamlined aesthetic. The key lies in choosing understated moulding profiles that complement the clean, uncluttered lines of minimalism. Whether it’s a subtle crown moulding detail or a simple baseboard, these minimalistic wood mouldings can add a touch of sophistication to the space without detracting from its minimalist charm.
Credit: lindseyputzier.com
Cost-effective Ways To Use Mouldings
Discover cost-effective ways to use mouldings to elevate your home’s interior design with these clever tips. From easy DIY projects to creative repurposing ideas, interior wood mouldings offer versatility and style without breaking the bank.
Diy Projects For Moulding Upgrades
- Create a stunning picture frame collage using various moulding styles.
- Design a custom headboard by framing a bed with decorative mouldings.
- Craft elegant bookshelves by adding mouldings to existing shelving units.
Repurposing Mouldings For Decorative Elements
- Transform plain mirrors into chic statement pieces with moulding frames.
- Repurpose old mouldings as wall art or decorative trim for furniture.
- Use small pieces of mouldings as drawer pulls or cabinet embellishments.
Frequently Asked Questions For Interior Wood Mouldings
How Does Interior Wood Mouldings Enhance Home Aesthetics?
Interior wood mouldings add elegance and character to any space, enhancing the overall aesthetic appeal of your home. They create visual interest, depth, and sophistication, elevating the look and feel of the room.
What Are The Different Types Of Interior Wood Mouldings Available?
Various types of interior wood mouldings include crown moulding, baseboards, chair rails, and wainscoting. Each type serves a specific purpose, ranging from decorative enhancements to functional additions that protect walls and floors.
Why Choose Wood Mouldings Over Other Materials For Interior Decor?
Wood mouldings offer a timeless and classic look that brings warmth and richness to your interior decor. They are versatile, easy to work with, and can be customized to suit different design styles, making them a popular choice among homeowners.
Conclusion
Enhance your interior design with versatile wood mouldings. Elevate your space’s character and charm effortlessly. Discover the endless design possibilities wood mouldings offer. Transform your home with timeless elegance and make a lasting impression. Start your moulding journey today for a truly sophisticated living environment.