Vinyl Flooring Repairs: Quick Fixes for a Stunning Floor
Vinyl flooring repairs involve fixing scratches, dents, or tears to restore the floor’s appearance. Quick and effective methods can help maintain its durability and style.
Vinyl flooring is popular for its affordability and resilience. Over time, wear and tear can occur, leading to scratches, dents, or even tears. Addressing these issues promptly is essential for maintaining the floor’s aesthetic appeal and functionality. Various repair techniques, such as patching and using adhesive, can effectively restore damaged areas.
Regular maintenance also plays a crucial role in prolonging the life of vinyl flooring. Understanding how to tackle common problems can save you time and money, ensuring your space remains inviting and stylish. With the right tools and knowledge, anyone can perform simple repairs and enhance the longevity of their vinyl floors.
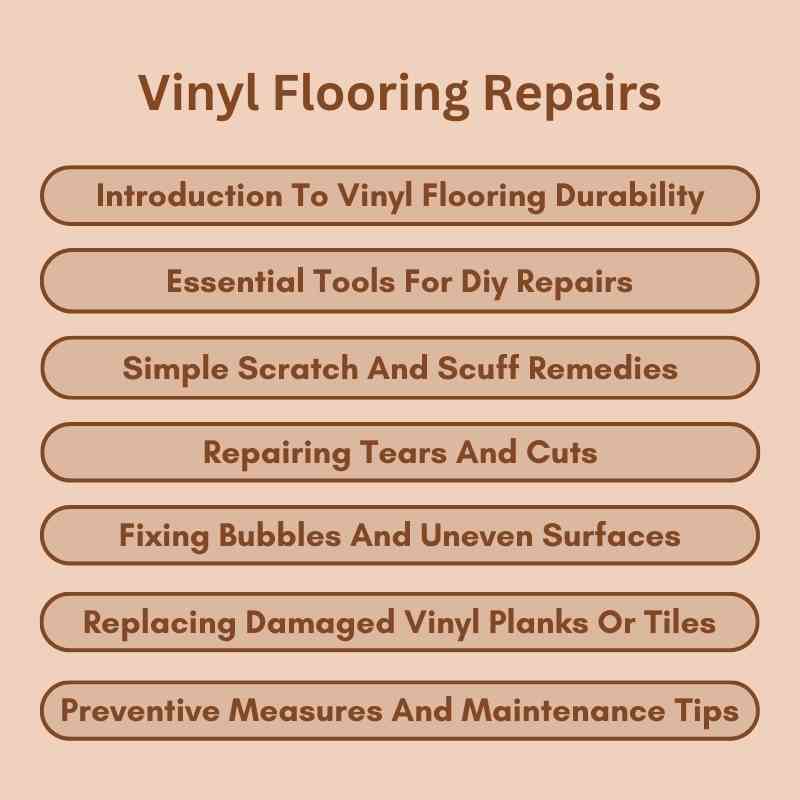
Introduction To Vinyl Flooring Durability
Vinyl flooring is known for its impressive durability. It withstands heavy foot traffic and resists scratches. This makes it a popular choice for homes and businesses alike.
Understanding its durability helps homeowners maintain it better. Regular care and timely repairs can extend its life significantly.
Popularity Of Vinyl Flooring
Vinyl flooring has gained immense popularity for various reasons:
- Affordable: It offers a cost-effective flooring solution.
- Variety: Available in many colors and styles.
- Water-resistant: Ideal for kitchens and bathrooms.
- Easy installation: Can be installed over existing floors.
These features make vinyl flooring a top choice among homeowners.
Common Issues And Damage
Despite its durability, vinyl flooring can face issues:
| Issue | Description | Repair Method |
|---|---|---|
| Scratches | Surface marks from furniture or pets. | Use a vinyl floor repair kit. |
| Peeling | Edges lifting from the subfloor. | Re-glue or replace sections. |
| Water damage | Moisture causing warping or mold. | Dry area and replace damaged tiles. |
Addressing these issues promptly can prevent further damage.
Assessing Vinyl Floor Damage
Understanding how to assess vinyl floor damage is crucial. Proper assessment helps determine if repairs are needed or if replacement is better. Start by closely inspecting your vinyl flooring for signs of wear and tear.
Identifying Types Of Damage
Different types of damage can affect vinyl flooring. Recognizing these types is essential for effective repairs. Here are the most common types:
- Scratches: Small marks on the surface.
- Scuffs: Surface blemishes from shoes or furniture.
- Bubbles: Air pockets that lift the vinyl.
- Rips and Tears: Cuts that penetrate through the material.
- Fading: Loss of color due to sunlight exposure.
Use this table to summarize the damage types and their causes:
| Type of Damage | Common Causes |
|---|---|
| Scratches | Pets, furniture, sharp objects |
| Scuffs | High heels, heavy furniture |
| Bubbles | Moisture trapped beneath |
| Rips and Tears | Heavy items dropped |
| Fading | Sunlight exposure |
When To Repair Vs. Replace
Deciding between repair and replacement depends on the damage severity. Here are some guidelines:
- Repair: Small scratches and scuffs.
- Repair: Minor bubbles that can be flattened.
- Replace: Large rips or tears that can’t be fixed.
- Replace: Extensive fading across large areas.
- Replace: Multiple damaged sections in different areas.
Evaluate the cost of repairs versus replacement. Sometimes, replacing a section may be more economical. Always weigh your options carefully before deciding.
Essential Tools For Diy Repairs
Repairing vinyl flooring can be simple with the right tools. Having a well-stocked toolbox makes fixing issues easier. Knowing what tools to use saves time and effort.
Basic Repair Kit
A basic repair kit is essential for small fixes. Here are the must-have tools:
- Utility Knife: Cuts vinyl accurately.
- Measuring Tape: Ensures precise measurements.
- Adhesive: Secures loose planks.
- Putty Knife: Smooths out adhesive and fills gaps.
- Floor Roller: Ensures a strong bond.
Each tool plays a key role in repairs. Keep this kit handy for quick fixes.
Advanced Tools For Complex Fixes
Some repairs require more advanced tools. Consider adding these items to your collection:
| Tool | Purpose |
|---|---|
| Heat Gun | Softens vinyl for easier manipulation. |
| Floor Scraper | Removes old adhesive or damaged flooring. |
| Jigsaw | Cuts intricate shapes in vinyl. |
| Seam Roller | Presses down seams for a smooth finish. |
These advanced tools help tackle tougher jobs. Invest in them for long-lasting results.
Simple Scratch And Scuff Remedies
Vinyl flooring can easily get scratched or scuffed. Fortunately, many simple remedies exist. These quick fixes restore your floor’s beauty without spending much. Let’s explore home solutions and buffing techniques.
Home Solutions For Minor Scratches
Minor scratches on vinyl floors can be annoying. Luckily, you can fix them with common household items. Here are some effective methods:
- Baking Soda Paste: Mix baking soda with water to form a paste. Apply it to the scratch and gently rub with a soft cloth. Rinse with water.
- Vinegar Solution: Combine equal parts vinegar and water. Dampen a cloth with the solution and wipe the scratch. This helps clean and reduce visibility.
- Baby Oil: Apply a few drops of baby oil to a cloth. Gently rub it over the scratch. This can help fill in minor grooves.
Buffing Out Scuffs And Marks
Scuffs and marks can make vinyl floors look worn. Buffing is a great way to make them disappear. Follow these steps for effective buffing:
- Gather Supplies: You’ll need a soft cloth, a microfiber cloth, and a vinyl floor cleaner.
- Apply Cleaner: Spray the vinyl floor cleaner on the scuffed area. Let it sit for a minute.
- Buff the Area: Use the soft cloth to gently buff the scuff. Move in circular motions for best results.
- Finish with Microfiber Cloth: Wipe the area with a microfiber cloth. This removes any residue and adds shine.
Using these simple methods, you can keep your vinyl flooring looking great. Regular maintenance helps prevent deeper scratches and marks.
Repairing Tears And Cuts
Tears and cuts in vinyl flooring can happen easily. They can occur from sharp objects, heavy furniture, or wear over time. Fortunately, repairing these damages is simple and effective. This section covers how to seal small tears and perform patchwork for larger cuts.
Sealing Small Tears
Small tears in vinyl flooring can often be fixed without extensive work. Follow these steps to seal them:
- Clean the Area: Remove dirt and debris around the tear.
- Apply Adhesive: Use a vinyl floor adhesive. Apply a small amount inside the tear.
- Press Together: Gently press the edges of the tear together.
- Weight the Area: Place a heavy object on the tear to hold it in place.
- Let It Cure: Allow the adhesive to dry according to the instructions.
These steps make small tears less noticeable. The repair blends well with the flooring.
Patchwork For Larger Cuts
Larger cuts require a bit more effort. Here’s how to handle them:
- Gather Materials: You will need a patch of vinyl, adhesive, and a utility knife.
- Cut a Patch: Cut a piece of vinyl that’s slightly larger than the damaged area.
- Trim the Damaged Area: Use the utility knife to create a clean edge around the cut.
- Apply Adhesive: Spread adhesive on the back of the patch and the surrounding area.
- Place the Patch: Center the patch over the damaged area and press it down.
- Weight It Down: Use a heavy object to keep the patch in place.
- Let It Dry: Allow the adhesive to cure completely.
This method restores the look and function of your vinyl flooring. Proper patchwork ensures durability and longevity.
Fixing Bubbles And Uneven Surfaces
Vinyl flooring can develop bubbles and uneven spots over time. These issues can make your floor look unattractive. They can also cause tripping hazards. Fixing these problems quickly is important for safety and appearance.
Flattening Bubbles In Vinyl
Bubbles in vinyl flooring often form due to trapped air or moisture. Follow these steps to flatten them:
- Identify the bubble. Press down gently.
- Use a utility knife to make a small slit.
- Apply adhesive beneath the bubble.
- Press the bubble down firmly.
- Cover the slit with a weight for 24 hours.
This method helps to release air and ensures a smooth surface.
Leveling High Spots And Edges
High spots in vinyl flooring can create uneven surfaces. Here’s how to level them:
- Locate the high spots by walking on the floor.
- Mark the areas that feel uneven.
Use the following tools and materials:
| Tool/Material | Purpose |
|---|---|
| Floor Leveling Compound | To fill low areas and create a flat surface |
| Sandpaper | To smooth high edges |
| Putty Knife | To apply leveling compound |
Follow these steps:
- Smooth high edges with sandpaper.
- Apply leveling compound in low areas.
- Allow it to dry according to instructions.
- Check the surface for evenness.
These steps will ensure a flat and safe vinyl floor.
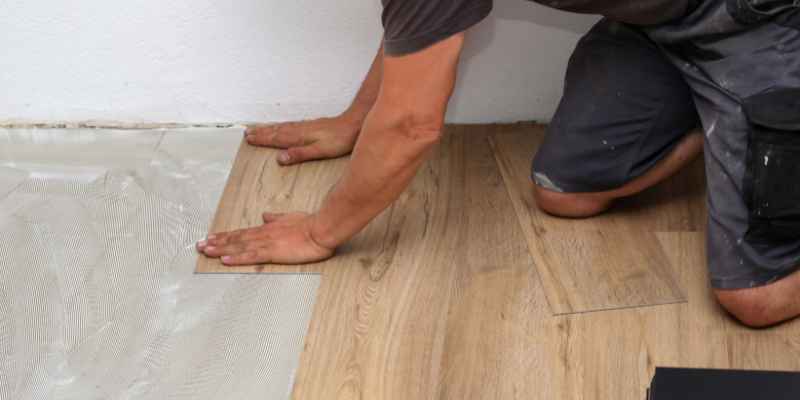
Replacing Damaged Vinyl Planks Or Tiles
Replacing damaged vinyl planks or tiles can restore beauty to your floors. Quick repairs save time and money. Follow these steps for a seamless fix.
Removal Of Affected Sections
Start by identifying the damaged areas. Use the following steps for removal:
- Gather Tools: You will need a utility knife, pliers, and a straight edge.
- Score the Damaged Area: Cut around the damaged tile or plank.
- Lift the Plank: Use pliers to gently pull it up.
- Clean the Subfloor: Remove any adhesive or debris.
Seamless Replacement Techniques
Replacing the removed sections requires skill for a flawless look. Follow these techniques:
- Select Matching Vinyl: Use the same style and color for uniformity.
- Cut New Planks: Ensure they fit snugly in the space.
- Apply Adhesive: Use appropriate glue for vinyl flooring.
- Press Down Firmly: Ensure the new piece adheres well.
- Seal Edges: Consider using caulk for a neat finish.
By following these steps, you can achieve a professional-looking repair. Your vinyl flooring will look as good as new.
Preventive Measures And Maintenance Tips
Keeping your vinyl flooring in great shape is easy. Regular maintenance helps prevent damage. Simple care routines can extend the life of your flooring.
Protecting Vinyl From Future Damage
Take steps to protect your vinyl flooring. Here are some effective methods:
- Use Rugs and Mats: Place rugs in high-traffic areas.
- Avoid Sharp Objects: Keep pets’ claws trimmed. Don’t drag heavy furniture.
- Control Humidity: Keep indoor humidity between 30%-50%.
- Use Floor Protectors: Attach felt pads to furniture legs.
Regular Cleaning And Care Routine
Maintaining a regular cleaning schedule is vital. Follow these tips for best results:
| Task | Frequency |
|---|---|
| Dusting or Sweeping | Daily |
| Mopping | Weekly |
| Deep Cleaning | Monthly |
Use the right cleaning solutions. Avoid harsh chemicals. Use a damp mop, not soaking wet. Here are some cleaning products to use:
- pH-neutral floor cleaners
- Vinegar and water solution
- Commercial vinyl cleaners
Regular maintenance keeps your vinyl looking fresh. Following these tips ensures a long-lasting, beautiful floor.
Professional Repair Services
Vinyl flooring offers durability and style. Even the best floors can get damaged. Professional repair services can restore your flooring’s beauty. Experts use specialized tools and techniques for effective repairs. This ensures long-lasting results and saves you time.
When To Call The Pros
Some signs indicate it’s time to hire a professional:
- Deep scratches or gouges in the vinyl.
- Severe water damage or buckling.
- Multiple tiles or planks are loose.
- Stains that won’t come out.
- Complex repairs beyond DIY skills.
Cost Vs. Benefit Of Expert Repairs
Understanding costs helps in decision-making. Here’s a breakdown:
| Repair Type | Estimated Cost | Benefits |
|---|---|---|
| Scratch Repair | $50 – $150 | Restores appearance quickly. |
| Water Damage | $100 – $300 | Prevents further damage. |
| Full Replacement | $500 – $1,500 | Complete fresh start. |
Benefits of hiring professionals include:
- Expert knowledge and experience.
- High-quality materials used.
- Less risk of further damage.
- Time-saving and efficient repairs.
Conclusion: Restoring Your Floor’s Beauty
Restoring your vinyl floor enhances your home’s charm. A well-maintained floor boosts its overall appeal. Repairing minor damages can save you money and time.
The Satisfaction Of A Repair Well Done
Completing a repair brings a sense of accomplishment. You can enjoy a beautiful floor once again. Here are some benefits of a successful repair:
- Improved Aesthetics: A repaired floor looks brand new.
- Enhanced Comfort: A smooth surface feels better underfoot.
- Increased Safety: Repairs prevent slips and falls.
DIY repairs can be fun. Many people find joy in fixing their floors. The satisfaction of seeing your hard work pay off is unmatched.
Long-term Value Of Maintained Flooring
Maintaining your vinyl flooring offers significant long-term benefits. Here are some key points to consider:
| Benefit | Description |
|---|---|
| Cost Savings | Regular repairs prevent costly replacements. |
| Durability | Proper care extends the life of your flooring. |
| Increased Home Value | A well-maintained floor attracts potential buyers. |
Investing time in repairs pays off. Your vinyl flooring remains attractive and functional. Prioritize maintenance for lasting beauty.
Frequently Asked Questions
How Can I Fix Scratches On Vinyl Flooring?
To fix scratches on vinyl flooring, use a vinyl floor repair kit. Clean the area first, then apply the filler according to the instructions. For deeper scratches, consider using a color-matched marker. Always ensure the repair blends seamlessly with your existing floor for a polished look.
What Are Common Vinyl Flooring Repairs?
Common vinyl flooring repairs include fixing scratches, dents, and tears. You might also need to address seams that have come apart or bubbles caused by moisture. These issues can usually be repaired with DIY methods or professional help, depending on the extent of the damage.
Can I Replace Just One Vinyl Plank?
Yes, you can replace just one vinyl plank. First, carefully lift the damaged plank using a putty knife. Then, replace it with a new, matching plank. Ensure the adhesive is applied properly to prevent future issues. This method saves time and money compared to replacing the entire floor.
How Do I Prevent Vinyl Flooring Damage?
To prevent vinyl flooring damage, avoid dragging heavy furniture across the surface. Use felt pads under furniture legs and maintain a regular cleaning routine. Also, avoid excessive moisture and direct sunlight, which can warp the material. Regular maintenance helps prolong the life of your vinyl flooring.
Conclusion
Vinyl flooring repairs can transform your space and extend the life of your floors. Regular maintenance and prompt attention to damage are essential. Whether you tackle minor issues yourself or seek professional help, addressing repairs quickly saves time and money.
Enjoy your beautiful, durable vinyl floors for years to come.