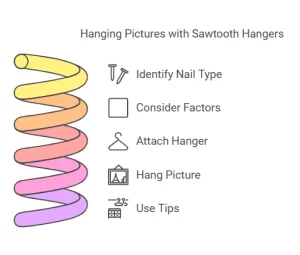
What Nails to Use for Sawtooth Hangers: A Beginner’s Guide
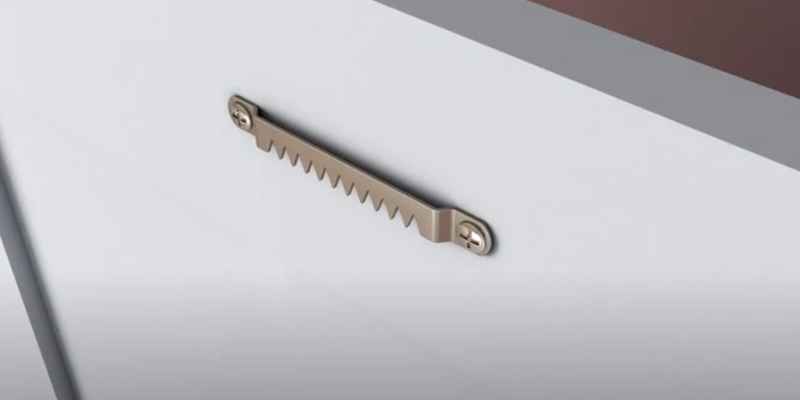
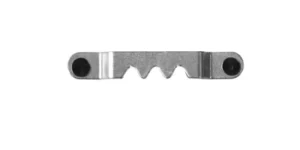
Use a flat headed nail with a sawtooth hanger to hang a picture frame. Sawtooth hangers are commonly used with wooden frames and can be attached with screws or nails.
However, if screws are included with the hanger, a screwdriver will be needed to attach them. It’s important to attach the hanger to the frame rather than any backing material, even if it appears sturdy, to prevent the hanger from ripping through the material when the picture is placed on the wall.
Nailess sawtooth hangers are also available and don’t require additional hardware. We’ll take a closer look at the different types of nails and screws to use with sawtooth hangers, as well as some tips on how to hang a frame with a sawtooth hanger onto a wall.
Different Types Of Nails For Sawtooth Hangers
Sawtooth hangers require specific types of nails for proper installation. Some options include flat-headed nails, self-attaching hangers, or standard picture hangers. It’s important to choose the right nail for your frame to ensure it hangs securely on the wall.
When it comes to hanging picture frames, sawtooth hangers are a popular choice due to their strength and durability. Sawtooth hangers require nails or screws to attach them securely to the wall and even the slightest mistake in selecting the right nail can cause the picture frame to fall off the wall. In this blog post, we discuss the different types of nails that can be used with sawtooth hangers to ensure a safe and secure hanging experience.
Flat Head Nails
Flat head nails are the most commonly used nails for attaching sawtooth hangers to picture frames. They have a large head that distributes weight evenly across the back of the frame, making them an ideal choice for heavier frames. Flat head nails can easily be hammered into the frame without causing damage while ensuring a stable and secure attachment.
Nailess Sawtooth Hanger Nails
Nailess sawtooth hanger nails are a popular option for those who prefer a quick and easy installation process. These nails are designed to be self-attaching and do not require any screws or additional hardware to attach them to the frame. The sharp edges on the nails dig into the back of the frame, providing a secure and stable attachment that is perfect for lighter frames.
Standard Picture Hangers
Standard picture hangers are another option for those who prefer a more traditional approach to hanging picture frames. These hangers are attached to the back of the frame using small screws and come with a hook for hanging the frame. While these hangers are not specifically designed for use with sawtooth hangers, they can still be used effectively with them.
In conclusion, selecting the right nail is crucial when using a sawtooth hanger to hang picture frames. Flat head nails are ideal for heavier frames, while nailess sawtooth hanger nails are perfect for lighter frames that require an easy and quick installation process. Standard picture hangers can also be used effectively with sawtooth hangers, providing a more traditional approach to picture hanging.
What To Consider When Choosing Nails For Sawtooth Hangers
When choosing nails for sawtooth hangers, consider the weight of the item being hung and the type of material the hanger will be attached to. Use nails with a large head or a screw to ensure a secure hold. Avoid using small or lightweight nails that may cause the hanger to loosen or fall off over time.
Sawtooth hangers are a popular way to hang pictures and artwork due to their ease of use and strength. Choosing the right nail for the sawtooth hanger is just as important as the hanger itself. You need to consider the frame material and thickness, picture weight, and wall type.
Frame Material and Thickness
Different types of frames have different thicknesses. You need to choose a nail that is long enough to hold the hanger firmly in place. The best nails for sawtooth hangers attach to the frame with a flat head. Flat-headed nails will keep the hanger flush against the back of the frame, ensuring the artwork hangs straight. A nail that is too long can split the frame, while a nail that is too short can cause the frame to detach from the wall.
Picture Weight
Another important factor to consider is the weight of the artwork or picture. If the picture is heavy, you need a stronger hanger and a longer nail. A thicker nail will provide more support and hold the hanger firmly in place. If the picture is very heavy, consider using two nails for added support. Make sure to evenly distribute the weight so that the hanger stays level.
Wall Type
The type of wall you are hanging the picture on is also important. Drywall is a popular choice but requires special sawtooth hangars to ensure the hanger stays in place. If you’re hanging a picture on concrete or brick, you need a heavier-duty nail capable of supporting the weight of the picture. You may also need to use a hammer drill to create a hole in the wall for the nail.
In conclusion, when it comes to choosing nails for sawtooth hangers, you need to consider the frame material and thickness, picture weight, and wall type. Choosing the right nail will ensure your artwork stays safely attached to the wall for years to come.
How To Attach Sawtooth Hangers To A Frame

When attaching sawtooth hangers to a frame, it is important to use the right nails for the job. A relatively large-headed nail, like a common nail or a screw, can be hammered or screwed in to secure the hanger properly.
It is also possible to use self-attaching hangers that don’t require nails or screws.
Sawtooth hangers are a popular way to hang up pictures, mirrors, and artwork on your walls. They’re easy to install and provide a secure hold. However, it’s important to use the right nails when attaching sawtooth hangers to a frame to ensure that your hung objects stay in place. In this section, we’ll discuss the different nails you can use and how to attach sawtooth hangers to a frame.
Positioning the Hanger
Before you start attaching the sawtooth hanger to your frame, it’s important to decide where you want to hang it. Position the hanger on the top center of the frame, making sure it’s level. You can mark the spot where you want to attach the hanger with a pencil first.
Using Pliers or a Screwdriver
Once you have decided where to position the sawtooth hanger, it’s time to attach it to the frame. You can use pliers or a screwdriver to hammer the tiny nails into the frame. Make sure you position the hanger properly over the pencil mark, and gently tap the nails in place. Ensure that the hanger is level while attaching the nails.
Pre-drilling Holes (optional)
If you’re using a hard or thick frame, pre-drilling small holes in the frame can make the process of attaching the hanger easier. Make sure the holes are slightly smaller in diameter than the nails so that the nails will fit snugly into place.
In conclusion, using the right nails and properly positioning the sawtooth hanger on the frame can make all the difference in securely hanging your pictures, mirrors, and artwork. By following these simple steps of positioning the hanger, using pliers or a screwdriver, and pre-drilling holes if necessary, you can avoid the risk of your hung objects falling and breaking.
How To Hang A Picture With A Sawtooth Hanger
When using a sawtooth hanger, it’s important to use the right kind of nails for a secure mount. Instead of using standard nails, try using hanger nails or screws for a more secure hold. These can be found at most hardware stores or online retailers such as Amazon or eBay.
Finding The Right Location On The Wall
Before you begin, determine where you want to hang your picture. The spot should be level with the surrounding décor, and be easily visible from a comfortable distance. Also, choose an area with good lighting. Place the picture against the wall and adjust its position until you are satisfied with the location. Use a pencil to put a light mark on the wall to indicate where the top of the sawtooth hanger will be.
Using A Level
Next, use a level to ensure that your picture will hang straight. Hold the level up against the wall, making sure the bubble is centered in the level’s vial. Then, adjust the picture slightly until it’s level. Using a level is crucial for creating a professional-looking display.
Hammering The Nail Into The Wall
Now that you’ve found the perfect spot and leveled your picture, it’s time to hammer in the nail. There are different types of nails you can use, but for sawtooth hangers, use a narrow nail with a small head. The nail should be long enough to secure the sawtooth hanger to the wall. You can also use screws, but ensure that they are the correct size for the hanger.
For easy installation, hold the sawtooth hanger against the back of the picture frame with the teeth facing up. Place the picture against the wall, and align the sawtooth hanger with the mark you made.
Now, hold the picture firmly against the wall. Use a hammer to tap the nail into the wall at the pencil mark. Be sure to hold the nail perpendicularly to the wall and aim for a strong part of the wall frame. Hammer the nail in until it’s flush with the wall.
In conclusion, hanging a picture with a sawtooth hanger is a quick and easy way to add style and personality to any room. By finding the right location on the wall, using a level and hammering the nail into the wall, your picture will be hung in no time.
Tips For Using Sawtooth Hangers
When using sawtooth hangers, it’s important to choose the right nails. Flat headed nails work well with sawtooth hangers, and screws can also be used. Make sure to attach the hanger to the frame, and avoid using screws if the picture has a sturdy canvas backing.
When it comes to hanging pictures, sawtooth hangers are a popular choice. They are easy to install and can hold a decent amount of weight. However, to ensure that your pictures are hanging safely and securely, there are a few tips you should keep in mind. Here are some tips for using sawtooth hangers.
Using Two Hangers for Larger Pictures
If you have a larger picture that is too heavy for one sawtooth hanger, consider using two hangers. This will help distribute the weight and make the picture more stable. Simply attach one hanger to each side of the frame and use two nails to hang it on the wall. Be sure to measure the distance between the two hangers accurately to ensure that the picture is level.
Ensuring the Hanger is Level
Speaking of level pictures, it is important to ensure that the sawtooth hanger is level to avoid any slanting or crookedness. Use a level tool or ruler to double-check the alignment of the hanger. Even a small difference in the alignment can throw the entire picture out of balance.
Double-checking Picture Weight and Hanger Capacity
Before using a sawtooth hanger, it is essential to check the weight of the picture and the capacity of the hanger. To ensure that the hanger can safely hold the picture, choose a hanger that can support a weight of more than the picture’s weight. Using a hanger with less capacity than the picture’s weight can result in a dangerous situation where the picture falls, potentially causing injury or damage.
To summarize, using two hangers for larger pictures, ensuring the hanger is level, and double-checking picture weight and hanger capacity are key tips for using sawtooth hangers. Keeping these tips in mind will help you hang pictures securely and with ease.
Frequently Asked Questions Of What Nails To Use For Sawtooth Hangers
What Do You Hang A Sawtooth Hanger On?
Sawtooth hangers can be hung on walls with nails or screws. If it comes with screws, use a screwdriver. Attach the hanger to the picture frame, even if there’s paper covering it. A relatively large head flat nail or standard picture hanger will also work.
Nailess sawtooth hangers are also available.
What Screws To Use For Sawtooth Hangers?
It is recommended to use nails with a flat head when hanging a picture frame with a sawtooth hanger. Alternatively, screws can also work well and allow for easy adjustment. Nailess sawtooth hangers are also available and do not require additional hardware like screws or nails.
How Do You Use No Nail Sawtooth Hangers?
To use no nail Sawtooth hangers, attach the hanger to the back of your frame with screws or a flat-headed nail. Make sure the hanger is securely attached to the frame. Then, hang the frame on a nail or screw in the wall.
If your Sawtooth hanger does not come with screws, you can purchase them separately.
How Do You Nail In A Picture Hanger?
To nail in a picture hanger, use a flat-headed nail or a standard picture hanger if you don’t have a nail. For sawtooth hangers, use a relatively large head nail, screws or nailess sawtooth hangers that have a two-prong design and don’t require additional hardware.
Attach the hanger to the frame and avoid damaging the surface behind it when hanging the picture.
Conclusion
When it comes to hanging pictures using sawtooth hangers, the kind of nails you use matters a lot. Using the wrong nail can cause the picture to fall and get damaged. Therefore, it is essential to choose the right nail for your sawtooth hangers to ensure they stay secure on the wall.
With the options outlined in this post, you can easily find nails that work well with your sawtooth hangers and ensure your pictures stay securely in place for a long time. Happy hanging!