Wood Burning Stove Pipe Installation: A Step-by-Step Guide
Proper installation of a wood-burning stove pipe is crucial for safety and efficiency. Follow local codes and manufacturer guidelines for best results.
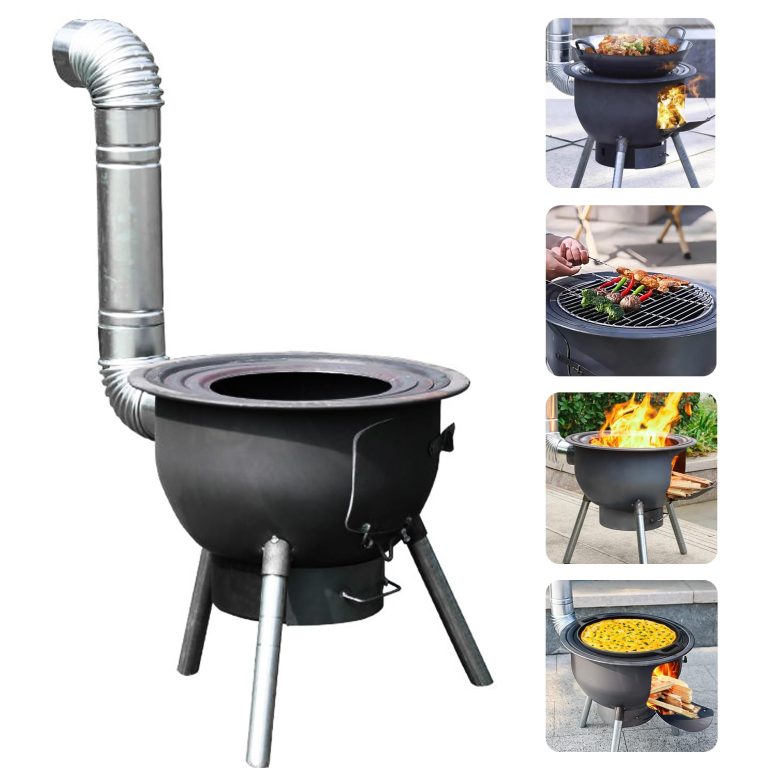
Installing a wood-burning stove pipe is essential for effective venting and maintaining indoor air quality. A well-installed pipe prevents smoke and harmful gases from entering your home, ensuring a safe environment. It also maximizes the stove’s efficiency, providing better heat output.
Start by selecting the right type of pipe and measuring the distance from your stove to the chimney. Proper clearance from combustible materials is vital. Regular maintenance and inspections will keep your system functioning optimally. Understanding these elements can enhance your wood stove experience, making it more enjoyable and worry-free. Investing time in correct installation pays off with improved performance and safety.
Introduction To Wood Burning Stove Pipes
Wood burning stoves are popular for heating homes. They provide warmth and a cozy atmosphere. However, proper installation of stove pipes is crucial for safety. Stove pipes help vent smoke and gases outside. Understanding their role and types is important for effective use.
The Role Of Stove Pipes
Stove pipes play a vital role in wood burning systems. They connect the stove to the chimney. This connection helps remove harmful smoke and gases. Proper venting ensures better air quality inside your home.
Key functions of stove pipes include:
- Smoke Removal: They carry smoke outside.
- Heat Retention: They help retain heat in the room.
- Pressure Regulation: They balance air pressure in the stove.
Types Of Stove Pipes
Different types of stove pipes suit various needs. Choosing the right one is essential for safety and efficiency. Here are the main types:
| Type | Description | Use Case |
|---|---|---|
| Single-Wall Pipe | Basic pipe made of metal. | Used for short runs. |
| Double-Wall Pipe | Insulated pipe for safety. | Used for longer runs. |
| Class A Pipe | Designed for high-temperature use. | Used for exterior chimneys. |
Selecting the right type ensures safe operation. Proper installation of stove pipes enhances efficiency. Always follow local codes and manufacturer guidelines.

Assessing Installation Needs
Proper installation of a wood burning stove pipe is crucial. Assessing your installation needs ensures safety and efficiency. Consider space, building codes, and other essential factors.
Space Requirements
Understanding the space around your stove is vital. Adequate clearance helps prevent fires and improves airflow. Here are some key points:
- Stove height: Ensure enough vertical clearance.
- Distance from walls: Maintain at least 36 inches.
- Floor protection: Use a non-combustible pad under the stove.
Measure your room carefully. Consider the following:
| Item | Minimum Clearance |
|---|---|
| Rear Wall | 12 inches |
| Side Wall | 18 inches |
| Ceiling Height | 7 feet |
Building Codes And Regulations
Check local building codes before installation. Each area has specific regulations. Follow these steps:
- Contact local authorities for regulations.
- Review the National Fire Protection Association (NFPA) guidelines.
- Ensure proper permits are obtained.
Regulations may include:
- Pipe material specifications
- Installation height requirements
- Ventilation guidelines
Compliance with these codes ensures safety and avoids fines.
Choosing The Right Stove Pipe
Choosing the right stove pipe is crucial for your wood burning stove. It impacts efficiency, safety, and overall performance. Understanding materials, diameter, and length helps you make the best choice.
Materials And Durability
The material of your stove pipe affects its lifespan and safety. Common materials include:
- Stainless Steel: Highly durable and resistant to corrosion.
- Galvanized Steel: Affordable, but less durable over time.
- Single Wall Pipe: Best for less heat retention.
- Double Wall Pipe: Insulated, retains heat and reduces creosote buildup.
Consider your environment. Choose materials that withstand local weather conditions. A durable stove pipe ensures safety and efficiency.
Diameter And Length Considerations
The diameter of the stove pipe affects airflow. A correct diameter maximizes efficiency. Common diameters include:
| Diameter (inches) | Recommended Stove Size (inches) |
|---|---|
| 3 | Up to 12 |
| 4 | 12 to 20 |
| 6 | 20 to 30 |
Length is equally important. A longer pipe may affect draft. Follow these guidelines:
- Keep the pipe as short as possible.
- Avoid sharp bends; they restrict airflow.
- Maintain a vertical rise for optimal draft.
Measure carefully. Proper diameter and length enhance stove efficiency.
Tools And Materials
Installing a wood burning stove pipe requires the right tools and materials. Using proper equipment ensures safety and effectiveness. Gather everything before starting the installation. Below are essential tools, safety equipment, and materials needed for the job.
Essential Tools For Installation
- Drill: Needed for making holes in the wall.
- Screwdriver: Used to secure the pipe.
- Measuring Tape: For accurate measurements.
- Level: Ensures the pipe is straight.
- Wrenches: Useful for tightening nuts and bolts.
- Hacksaw: Cuts the pipe to the desired length.
- Flashlight: Provides light in dark spaces.
- Pliers: Helps grip and bend materials.
Safety Equipment
Safety is crucial during installation. Always wear protective gear to avoid injuries. Here are some essential safety items:
- Safety Goggles: Protects eyes from dust and debris.
- Gloves: Shields hands from sharp edges.
- Dust Mask: Prevents inhalation of harmful particles.
- Hard Hat: Protects head from falling objects.
- Ear Protection: Reduces noise from power tools.
| Item | Purpose |
|---|---|
| Drill | Making holes in walls |
| Measuring Tape | Ensuring precise measurements |
| Safety Goggles | Protecting eyes from hazards |
| Gloves | Protecting hands during installation |
Preparing The Installation Area
Preparing the installation area is crucial for a safe wood burning stove pipe setup. Proper preparation ensures efficiency and minimizes fire hazards. Follow these steps to create a secure environment for your installation.
Clearing The Area
Start by clearing the installation area. Remove any flammable materials, furniture, or debris. A clean space reduces the risk of fire hazards.
- Move furniture at least 3 feet away.
- Remove rugs or curtains nearby.
- Ensure the floor is clean and dry.
Check the ceiling height. Ensure there is enough space for the stove pipe. It should have proper clearance from walls and ceilings.
Fireproofing Measures
Implement fireproofing measures in your installation area. These steps protect your home from potential fire risks.
| Fireproofing Measure | Description |
|---|---|
| Use a fireproof pad | Place under the stove to prevent heat damage. |
| Install heat shields | Use on walls to reflect heat away. |
| Seal gaps | Use fireproof caulk around the pipe. |
Install a smoke detector nearby. This adds an extra layer of safety. Ensure a fire extinguisher is easily accessible.
Check local building codes. They may require specific fireproofing measures. Follow these guidelines for compliance and safety.
Step-by-step Installation Process
Installing a wood burning stove pipe requires careful steps. Follow this guide for a safe and effective installation. Each section focuses on a key part of the process.
Connecting The Pipe To The Stove
Start by preparing your wood burning stove. Ensure it is placed correctly. Follow these steps to connect the pipe:
- Gather necessary tools: screwdriver, tape measure, and clamps.
- Attach the stove adapter: Fit it to the top of the stove.
- Measure the pipe: Cut it to the needed length.
- Insert the pipe: Connect it to the adapter securely.
- Seal the joints: Use high-temperature silicone for tight seals.
Securing The Pipe Through The Ceiling
Next, secure the pipe as it passes through the ceiling. This step keeps everything stable.
- Check clearance: Ensure the pipe has at least 18 inches from combustible materials.
- Install a ceiling support: This holds the pipe in place.
- Cut a hole in the ceiling: Use a hole saw for a clean cut.
- Insert the pipe: Push it through the ceiling hole.
- Attach a firestop: This prevents heat from escaping.
Finalizing The Outdoor Section
The last step is to finalize the outdoor section of the stove pipe. This ensures proper ventilation.
| Step | Action |
|---|---|
| 1 | Install a chimney cap: Prevents rain and debris. |
| 2 | Check for leaks: Inspect all connections. |
| 3 | Test the draft: Ensure smoke exits properly. |
| 4 | Secure with screws: Fasten all outdoor sections. |
Follow these steps carefully. Proper installation ensures safety and efficiency for your wood burning stove.
Sealing And Insulation
Proper sealing and insulation are vital for your wood burning stove pipe. They ensure safe operation and improve efficiency. This section covers how to achieve an airtight seal and the best insulation methods.
Ensuring An Airtight Seal
Creating an airtight seal prevents smoke and gases from escaping into your home. Follow these steps for a tight seal:
- Use high-temperature silicone sealant around joints.
- Ensure all connections fit snugly.
- Check for gaps or holes in the pipe.
- Replace any damaged sections immediately.
Regularly inspect your stove pipe for wear and tear. A tight seal enhances safety and efficiency.
Insulating The Stove Pipe
Insulation protects your home from heat loss. It also prevents condensation. Follow these steps for effective insulation:
- Choose suitable insulation material like mineral wool or fiberglass.
- Wrap the stove pipe with insulation, covering all areas.
- Secure insulation with heat-resistant tape.
- Ensure insulation meets local building codes.
Proper insulation improves the performance of your wood burning stove. It helps keep your home warm and cozy.
Safety Checks And Maintenance
Keeping your wood burning stove pipe safe is essential. Regular safety checks and maintenance prevent fires and ensure efficiency. Follow these steps to maintain your stove pipe.
Initial Safety Inspection
Before using your wood burning stove, perform an initial safety inspection. Check these key areas:
- Pipes and Joints: Look for cracks or loose connections.
- Clearances: Ensure proper distance from walls and ceilings.
- Chimney Cap: Inspect for blockages or debris.
- Flue Damper: Test its functionality for proper airflow.
Record any issues. Fix them before using the stove. Safety is your top priority.
Routine Maintenance Tips
Routine maintenance keeps your stove pipe in good condition. Follow these tips:
- Clean Regularly: Remove creosote buildup every month.
- Inspect Annually: Hire a professional to check the entire system.
- Check Gaskets: Replace worn or damaged gaskets.
- Verify Connections: Ensure all joints are tight and secure.
Use this maintenance checklist:
| Task | Frequency |
|---|---|
| Clean stove pipe | Monthly |
| Inspect chimney cap | Monthly |
| Professional inspection | Annually |
Following these safety checks and maintenance tips ensures a safe, efficient wood burning stove. Stay warm and safe.
Troubleshooting Common Issues
Wood burning stoves are great for warmth. Yet, issues can arise during use. Knowing how to troubleshoot can save time and frustration. Here are some common problems and solutions.
Dealing With Draft Problems
Draft problems can affect your stove’s efficiency. A poor draft may lead to smoke backdrafts. Here are steps to fix it:
- Check the Damper: Ensure it opens and closes properly.
- Examine the Chimney: Clean the chimney to remove blockages.
- Inspect the Height: Make sure the chimney is tall enough.
Use these tips to improve draft:
- Burn dry wood only.
- Keep the air intake open.
- Install a chimney cap to prevent downdrafts.
Addressing Leaks And Corrosion
Leaks and corrosion can lead to safety risks. Identifying these issues early is vital.
Check the following areas:
| Area to Check | Signs of Trouble |
|---|---|
| Stove Seams | Rust or smoke around seams |
| Pipe Connections | Visible gaps or soot buildup |
| Chimney Cap | Corrosion or missing parts |
To fix leaks:
- Seal Cracks: Use high-temperature silicone sealant.
- Replace Damaged Sections: Change any corroded or damaged pipes.
- Regular Maintenance: Inspect your stove and chimney yearly.
By addressing these issues, you ensure safety and efficiency.
Final Thoughts
Installing a wood burning stove pipe is an important task. Proper installation ensures safety and efficiency. Consider professional help for best results. Here are some final thoughts on this topic.
Benefits Of Professional Installation
Choosing a professional for your stove pipe installation has many advantages:
- Safety: Professionals understand safety standards.
- Efficiency: A correct installation improves stove performance.
- Warranty: Many manufacturers require professional installation for warranty coverage.
- Time-saving: Experts complete the job quickly and correctly.
Hiring a professional can save you from future headaches. Ensure your stove works well and lasts longer.
Long-term Care For Your Stove Pipe
Regular maintenance is key to a long-lasting stove pipe. Follow these tips:
- Inspect: Check for rust or damage regularly.
- Clean: Remove soot buildup at least once a year.
- Seal: Ensure all joints are sealed properly to prevent leaks.
- Check: Look for blockages in the flue.
Proper care extends the life of your stove pipe. Stay safe and enjoy the warmth of your wood burning stove
Frequently Asked Questions
How Do I Install A Wood Burning Stove Pipe?
To install a wood burning stove pipe, start by measuring the distance from your stove to the chimney. Use proper flashing and sealing to prevent leaks. Ensure the pipe has a slight upward slope towards the chimney for optimal draft.
Always follow local building codes and safety regulations.
What Materials Are Needed For Stove Pipe Installation?
You will need a double-walled stove pipe, pipe connectors, and chimney flashing. Additional items include a pipe support bracket and high-temperature sealant. Ensure all materials are approved for wood burning appliances. Safety gear like gloves and goggles is also recommended for protection during installation.
How Do I Maintain My Stove Pipe?
Regular maintenance of your stove pipe is crucial for safety. Inspect it for creosote buildup and clean it at least once a year. Check for any cracks or damage that could lead to leaks. Ensure all connections are secure to prevent smoke from escaping into your home.
What Is The Best Height For A Stove Pipe?
The best height for a stove pipe is typically at least 10 feet above the stove. This height helps ensure proper draft and minimizes smoke backflow. Local regulations may dictate specific height requirements, so consult your building codes for compliance.
Proper height also reduces the risk of chimney fires.
Conclusion
Proper installation of a wood burning stove pipe is crucial for safety and efficiency. Following guidelines ensures optimal performance and minimizes risks. Regular maintenance is key to longevity. Always consult professionals if unsure about any aspect. Enjoy the warmth and ambiance your wood stove brings to your home.
Stay safe and cozy!