Can You Apply Polyurethane With a Roller? Best Technique for a Smooth Coat
Yes, you can apply polyurethane with a roller. Applying polyurethane with a roller is a quick and easy way to achieve a smooth and even finish on wood surfaces.
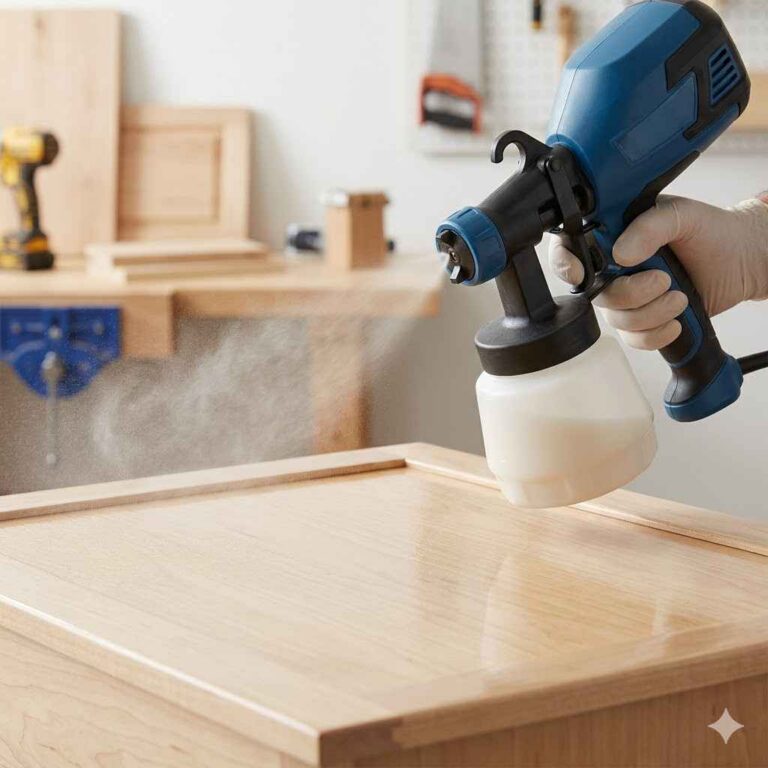
By using a high-quality synthetic or foam roller, you can effectively apply the polyurethane without leaving streaks or bubbles. It is important to apply thin, even coats and let each coat dry thoroughly before applying the next one. This method is ideal for larger surfaces, such as floors or tabletops, but may not be suitable for intricate details or small areas.
Overall, using a roller to apply polyurethane is an efficient and effective option for finishing wood projects.
Benefits Of Using A Roller For Polyurethane Application
Using a roller for polyurethane application offers smooth, even coverage and reduces streaking. This method is efficient, saves time, and allows for easy cleanup. Additionally, it provides a seamless finish and is suitable for large surface areas.
Smooth And Even Finish
When it comes to applying polyurethane, achieving a smooth and even finish is essential. Using a roller for polyurethane application offers several benefits that contribute to a flawless end result.
Firstly, a roller allows for the even distribution of polyurethane across the surface you are coating. The roller’s cylindrical shape allows it to spread the polyurethane uniformly, ensuring a consistent layer without any streaks or brush marks. This is especially important when working with larger surfaces, as it can be challenging to maintain an even application with a brush.
In addition, using a roller allows you to achieve a smoother finish compared to using a brush. The roller’s nap, or texture, helps to create a uniform layer of polyurethane, minimizing the risk of uneven spots or clumps. The smooth surface not only enhances the aesthetic appeal of the coated object but also provides excellent protection against wear and tear.
| Benefits of Using a Roller for Polyurethane Application |
| Even the distribution of polyurethane |
| Smooth finish with minimal streaks or brush marks |
| Efficient application, especially on larger surfaces |
In conclusion, using a roller for polyurethane application ensures a smooth and even finish, eliminating the need to worry about streaks, brush marks, or uneven spots. This method is particularly beneficial when working with larger surfaces, saving you time and effort. So, if you’re looking for a time-saving and effective technique to achieve a flawless polyurethane finish, using a roller is the way to go.
Time-saving Application
One of the significant benefits of using a roller for polyurethane application is the time-saving aspect it offers. When compared to using a brush, applying polyurethane with a roller is more efficient, especially when working on large surfaces.
With a roller, you can cover a broader area in less time, thanks to its ability to hold and release a significant amount of polyurethane onto the surface. This means you can complete your polyurethane application project in a fraction of the time it would take with a brush.
Moreover, a roller allows for faster and easier cleanup. Cleaning a brush after each coat of polyurethane can be time-consuming and tedious, whereas, with a roller, you can simply remove the cover or roller sleeve, clean it, and reuse it for the next application.
- Efficient application on large surfaces
- Time-saving due to faster coverage
- Easier cleanup compared to using a brush
To summarize, using a roller for polyurethane application is a time-saving approach, ideal for projects that involve covering large surfaces. The roller’s ability to cover more area in less time, coupled with its easy cleanup process, makes it a convenient choice. So, if you want to save time and get your polyurethane project done efficiently, opt for a roller for a seamless application process.
:strip_icc()/can-you-paint-countertops-056-7791f3e7bee942d1affb502fe590c1f9.jpg)
Credit: www.bhg.com
Choosing The Right Roller For Polyurethane Application
When it comes to applying polyurethane, using the right roller can make all the difference. A roller allows for a smooth and even application, ensuring that your finished project looks professional and flawless. But with so many options to choose from, how do you know which roller is the right one for your polyurethane application? Let’s explore the different types of rollers and the key considerations to keep in mind when selecting the perfect roller for your project.
Types Of Rollers
There are various types of rollers available in the market, each with its unique characteristics and benefits. Here are the different types of rollers commonly used for applying polyurethane:
| Roller Type | Description |
|---|---|
| Foam Rollers | Foam rollers are excellent for smooth surfaces and provide a lint-free application. They are ideal for applying water-based polyurethane. |
| Nap Rollers | Nap rollers have a thick, textured surface that holds a larger amount of polyurethane, making them perfect for rough or porous surfaces. |
| Microfiber Rollers | Microfiber rollers offer excellent absorption and release, providing a smooth application and minimizing streaks and bubbles. |
Considerations For Roller Selection
When selecting a roller for your polyurethane application, there are a few factors to consider:
- Surface Type: Determine whether your surface is smooth or rough, as different rollers perform better on specific surfaces.
- Polyurethane Type: Consider whether you’re using water-based or oil-based polyurethane, as certain rollers are better suited for each type.
- Thickness: The thickness of the roller nap determines how much polyurethane it can hold. For porous surfaces, a thicker nap is recommended to ensure sufficient coverage.
- Length of the Pile: The length of the pile affects the roller’s ability to reach into crevices and provide an even application.
- Quality: Invest in a high-quality roller to ensure durability and to avoid shedding fibers onto your finished surface.
By carefully considering these factors and selecting the right roller, you can achieve professional-looking results when applying polyurethane. Whether you’re working on a small DIY project or a large-scale renovation, choosing the right roller is a crucial step in achieving a flawless finish.
Preparing For Polyurethane Application With A Roller
When preparing to apply polyurethane with a roller, it’s crucial to ensure that the surface is properly prepped. This preparation can significantly impact the final result. By following the right techniques and using the correct tools, you can achieve a smooth and professional finish.
Surface Preparation
Before applying polyurethane with a roller, it’s essential to thoroughly prepare the surface. Begin by sanding the surface with fine-grit sandpaper to smooth out any imperfections. Clean the area to remove any dust or debris, ensuring a clean and smooth base for the polyurethane application.
Using Proper Techniques For Roller Application
- Prepare the polyurethane by stirring it gently to avoid creating bubbles.
- Use a high-quality synthetic roller cover suitable for applying polyurethane smoothly.
- Apply the polyurethane in thin, even coats, working in the direction of the wood grain to ensure a uniform finish.
- Allow each coat to dry completely before applying the next one, following the manufacturer’s recommended drying times.
- After the final coat, lightly sand the surface with fine-grit sandpaper for a smooth, professional finish.
Applying Polyurethane With A Roller
Polyurethane can be applied with a roller, making it a convenient option for DIYers. Using a roller ensures even coverage and a smooth finish, but be sure to follow proper techniques and apply multiple thin coats for best results.
When it comes to applying polyurethane, many people think of using a brush. However, you might be surprised to learn that you can also use a roller to achieve a smooth and even finish. Applying polyurethane with a roller has its advantages, including faster application and a more uniform coat. In this article, we will take a closer look at how to apply polyurethane with a roller, focusing on applying the first coat and applying subsequent coats.
Applying The First Coat
Before you begin applying polyurethane with a roller, it’s important to prepare your surface properly. Start by sanding the surface with fine-grit sandpaper to smooth out any imperfections. Once the surface is smooth, wipe away any dust or debris with a clean cloth.
- Clean the surface: Before applying the first coat, make sure the surface is clean and free from any dirt or grease. Use a mild detergent and water to clean the surface if needed.
- Use a high-quality roller: To achieve the best results, use a high-quality roller with a medium or long nap. A roller with a shorter nap may not hold enough polyurethane and could result in a rough finish.
- Pour the polyurethane: Pour the polyurethane into a clean paint tray. Make sure to only pour a small amount at a time to prevent waste.
- Start rolling: Dip the roller into the polyurethane, making sure to evenly coat the roller. Begin rolling the polyurethane onto the surface using long, smooth strokes. Apply light pressure and avoid overworking the polyurethane.
- Work in sections: To maintain a wet edge and prevent overlap marks, work in small sections at a time. Start at one end of the surface and work your way towards the other end.
- Allow drying: Once you have applied the first coat, allow it to dry according to the manufacturer’s instructions. It’s important not to rush the drying process to ensure a durable and long-lasting finish.
Applying Subsequent Coats
After the first coat has dried, you can apply subsequent coats of polyurethane to further enhance the durability and appearance of the finish. Follow these steps to apply subsequent coats:
- Lightly sand: Before applying the next coat, lightly sand the surface with fine-grit sandpaper. This will help to smooth out any imperfections or brush marks from the previous coat.
- Clean the surface: Once you have sanded the surface, clean it thoroughly to remove any sanding dust. Use a clean cloth or tack cloth to ensure the surface is free from debris.
- Repeat the process: Repeat the process of pouring the polyurethane into a paint tray, coating the roller evenly, and applying the polyurethane in smooth, even strokes. Work in small sections, allowing each coat to dry fully before applying the next.
- Apply multiple coats: Depending on your desired level of protection and sheen, you may need to apply multiple coats of polyurethane. Each subsequent coat will deepen the color and provide additional protection.
- Finishing touches: Once you have applied all the necessary coats, allow the polyurethane to dry completely. Depending on the product, this may take several hours or even overnight. Take care not to disturb the finish during the drying process.
By following these steps, you can achieve a professional-looking finish by applying polyurethane with a roller. Remember to work in a well-ventilated area and wear appropriate safety gear, such as gloves and a mask, when working with polyurethane.
Achieving A Professional Finish With A Roller
When it comes to applying polyurethane, many DIY enthusiasts wonder if they can achieve a professional finish using a roller. The good news is that applying polyurethane with a roller is not only possible but also a great option for achieving a flawless outcome. In this section, we will discuss some tips for a flawless outcome and troubleshoot common issues that may arise during the application process.
Tips For A Flawless Outcome
1. Prepare the Surface:
Before you begin applying polyurethane with a roller, it is crucial to prepare the surface properly. Start by sanding the area to remove any imperfections or rough spots. This will ensure a smooth and even finish.
2. Choose the Right Roller:
Choosing the right roller is essential for achieving a professional finish. Opt for a high-quality roller with a medium nap, around 3/8 inch. This nap size will help in holding the polyurethane and providing a consistent application.
3. Apply Thin Coats:
When applying polyurethane, it is best to apply multiple thin coats rather than one thick coat. Thin coats dry quicker, reducing the likelihood of dust or debris settling onto the surface. It also allows for better control over the application.
4. Use a High-Quality Polyurethane:
The quality of the polyurethane you choose plays a significant role in achieving a professional finish. Higher-quality polyurethane tends to level out and self-level, reducing the appearance of brush or roller marks. So, invest in a reputable brand for the best results.
Troubleshooting Common Issues
1. Brush or Roller Marks:
If you notice brush or roller marks on the surface, it could be due to using the incorrect roller or not applying the polyurethane evenly. To fix this issue, lightly sand the surface with fine-grit sandpaper and apply a thin, even coat of polyurethane using a high-quality roller.
2. Bubbles or Blisters:
Bubbles or blisters can occur if air gets trapped in the polyurethane during the application process. To prevent this issue, make sure to stir the polyurethane properly before application. If bubbles or blisters appear, gently sand the affected area, wipe away the dust, and apply another coat.
3. Uneven Finish:
If you notice an uneven finish after applying polyurethane, it could be due to improper application or insufficient drying time between coats. To fix this, sand the surface lightly, remove any dust, and apply another coat following the instructions carefully.
4. Dust or Debris:
If dust or debris settles onto the surface while the polyurethane is drying, it can mar the finish. To prevent this, work in a clean and dust-free environment. If dust or debris appears, lightly sand the affected area and apply a fresh coat.
By following these tips and troubleshooting common issues, you can confidently apply polyurethane with a roller and achieve a professional finish. Remember to take your time, work in a controlled environment, and choose high-quality materials for the best results.
Credit: ruggedrestore.com
Frequently Asked Questions Of Can You Apply Polyurethane With A Roller
Is It Better To Roll Or Brush Polyurethane?
Rolling polyurethane is better because it ensures a smooth and even application with fewer brush marks. Brushing may result in streaks and uneven coverage.
What Is The Easiest Way To Apply Polyurethane?
The easiest way to apply polyurethane is by using a high-quality brush to apply thin, even coats. Sand lightly between coats to ensure a smooth finish. Follow the manufacturer’s directions for drying times and application techniques.
How Do You Roll Polyurethane Without Bubbles?
To roll polyurethane without bubbles:
1. Thoroughly mix the polyurethane before applying.
2. Use a good-quality roller with a smooth texture.
3. Roll slowly and evenly in one direction.
4. Avoid excessive rolling and backtracking.
5. Apply multiple thin coats, allowing proper drying time between each coat.
How To Apply Water-based Polyurethane To Floors With Roller?
Apply water-based polyurethane to floors using a roller by following these steps:
1) Prep the surface by sanding and cleaning it thoroughly.
2) Stir the polyurethane well before applying.
3) Pour the polyurethane into a paint tray.
4) Dip the roller into the tray and roll off excess.
5) Apply the polyurethane evenly in thin coats, following the grain of the wood.
Conclusion
Using a roller to apply polyurethane can be an effective method for achieving a smooth finish on your surfaces. It offers an even coat and requires minimal cleanup. By following the appropriate techniques and using high-quality materials, you can ensure a successful application.
Consider the benefits and limitations before deciding if this method is suitable for your project.