Does Maple Stain Well: The Best Proven Methods
Yes, maple can stain beautifully, but it requires the right technique. Due to its dense, tight grain, maple often absorbs stain unevenly, leading to a blotchy finish. The secret to success lies in proper surface preparation, specifically using a pre-stain wood conditioner or choosing a gel stain to ensure a smooth, even color.
Have you ever spent hours carefully sanding a beautiful piece of maple, only to have the stain turn it into a blotchy, uneven mess? It’s a frustrating moment that makes many DIYers think maple is impossible to stain. You’re not alone in this struggle, and I promise, it’s not your fault—it’s just the nature of this tricky wood.
Maple is known for its light color and smooth, tight grain. While these qualities make it look clean and modern, they also make it resist stain. But don’t give up on that project just yet! With a little bit of know-how and a couple of proven techniques, you can achieve a stunning, professional-looking finish on any maple piece. Let’s walk through the steps together, and I’ll show you exactly how to get it right every time.
Why Is Maple So Difficult to Stain?
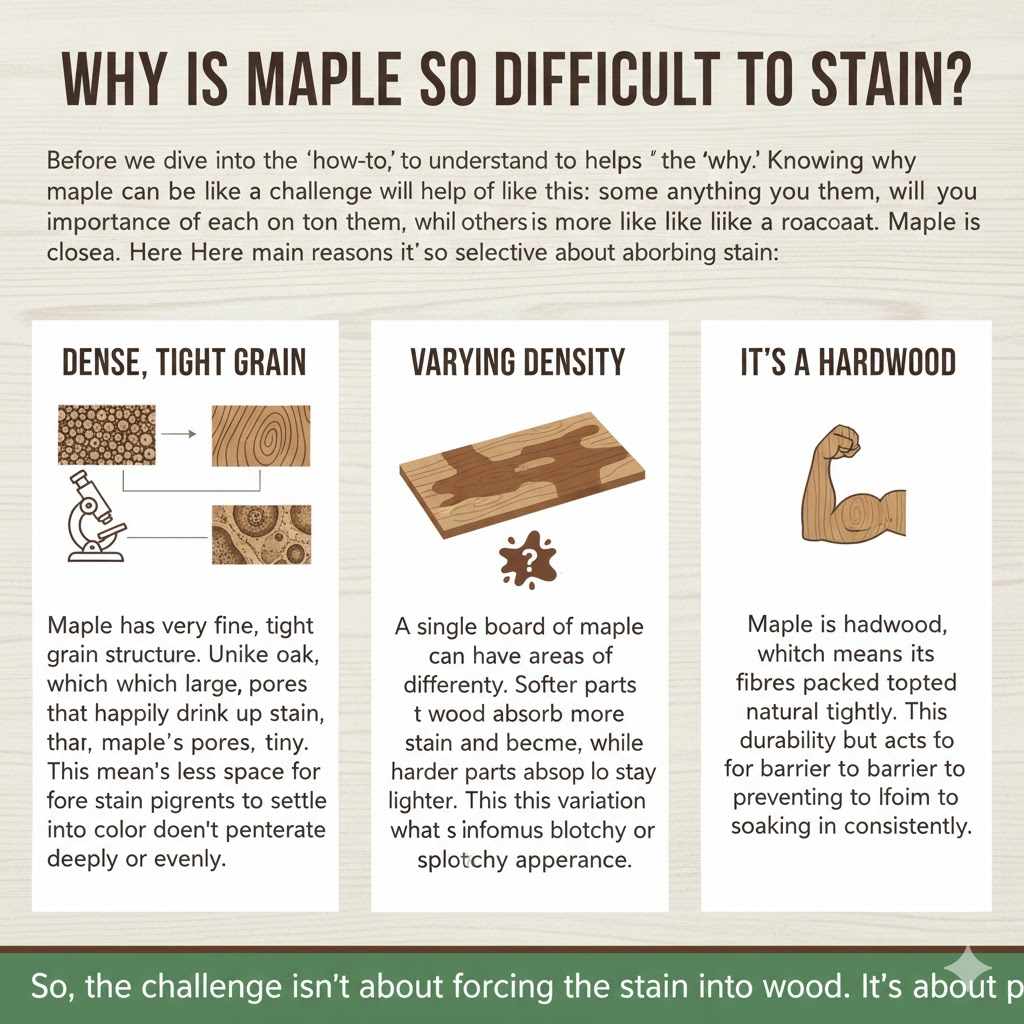
Before we dive into the “how-to,” it helps to understand the “why.” Knowing why maple can be a challenge will help you appreciate the importance of each step. Think of it like this: some woods are like a sponge, soaking up anything you put on them, while others are more like a raincoat.
Maple is closer to the raincoat. Here are the main reasons it’s so selective about absorbing stain:
- Dense, Tight Grain: Maple has a very fine, tight grain structure. Unlike oak, which has large, open pores that happily drink up stain, maple’s pores are tiny. This means there’s less space for the stain pigments to settle into, so the color doesn’t penetrate deeply or evenly.
- Varying Density: A single board of maple can have areas of different density. Softer parts of the wood absorb more stain and become darker, while harder parts absorb less and stay lighter. This variation is what causes the infamous blotchy or splotchy appearance.
- It’s a Hardwood: Maple is a hardwood, which means its wood fibers are packed together tightly. This natural density is great for durability but acts as a barrier to liquid stain, preventing it from soaking in consistently.
So, the challenge isn’t about forcing the stain into the wood. It’s about preparing the surface so the stain can be applied evenly. Once you master that, staining maple becomes a rewarding process.
The Golden Rule: Preparation is Everything
If you take away only one thing from this guide, let it be this: Your success in staining maple is 90% preparation and 10% application. Skipping or rushing the prep work is the number one reason people get poor results. It’s the foundational step that ensures everything else goes smoothly.
Proper preparation addresses maple’s natural tendency to blotch. By preparing the surface, you are creating a perfect canvas that is ready to accept color evenly. It involves meticulous sanding and, most importantly, conditioning the wood. This isn’t an optional step—it’s the secret weapon for a flawless finish.
Think of it as painting a wall. You wouldn’t just slap paint on a dirty, cracked wall, would you? Of course not. You’d clean it, patch the holes, and apply a primer first. Woodworking is no different. The time you invest in preparation will pay off tenfold in the final result.
Your Essential Tools and Materials Checklist
Before you begin, let’s gather everything you need. Having all your tools and materials ready will make the process smooth and enjoyable. You don’t need a professional workshop—just a few key items.
- Safety First:
- Safety glasses
- Dust mask
- Nitrile gloves (to protect your hands from stain)
- Sanding & Prep:
- Random orbital sander (highly recommended for a smooth finish)
- Sandpaper in various grits (120, 150, and 180 grit are perfect)
- Sanding block (for hand sanding edges and details)
- Shop vacuum with a brush attachment
- Tack cloth or a microfiber cloth lightly dampened with mineral spirits
- Conditioning & Staining:
- Pre-stain wood conditioner (oil-based if using oil-based stain)
- Your choice of stain (we’ll discuss types below)
- Clean, lint-free cloths or rags (old cotton t-shirts work great)
- Foam brushes or natural bristle brushes
- Stir sticks
- Finishing:
- A clear topcoat (polyurethane, lacquer, or varnish)
- High-quality paintbrush or foam brush for the topcoat
Method 1: The Pre-Stain Conditioner Method (Classic & Reliable)
This is the go-to method for most woodworkers when dealing with blotch-prone woods like maple, pine, and birch. A pre-stain wood conditioner is a thin, sealer-like product that you apply before the stain. It works by partially sealing the wood, especially in the more porous areas. This forces the stain to absorb more evenly across the entire surface.
Step 1: The Perfect Sanding Job
Sanding is not just about making the wood smooth; it’s about opening up the wood grain to accept the finish evenly. Start with your random orbital sander and 120-grit sandpaper. Move the sander slowly and consistently across the surface, following the direction of the wood grain.
After the first pass, switch to 150-grit sandpaper and repeat the process. Finally, finish with 180-grit sandpaper. For maple, you generally don’t want to sand any finer than 180 grit. Sanding too smoothly can polish the wood and close off the pores, making it even harder for the stain to penetrate.
Pro Tip: After sanding, lightly wipe the surface with a damp cloth to raise the grain. Let it dry completely, then give it a final, very light sanding with 180-grit paper. This will knock down any fuzzy fibers and give you an ultra-smooth surface.
Step 2: Clean the Surface Meticulously
Sanding creates a lot of fine dust. If you leave any of it behind, it will get trapped in your finish and create a gritty, unprofessional look. First, use a shop vacuum with a brush attachment to remove the majority of the dust. Then, follow up with a tack cloth or a lint-free rag lightly dampened with mineral spirits to pick up any remaining particles.
Step 3: Apply the Pre-Stain Wood Conditioner
Now for the magic step. Stir your pre-stain conditioner thoroughly (don’t shake it, as this can create bubbles). Apply a liberal, even coat to the entire surface using a clean cloth or a foam brush. The goal is to fully saturate the wood.
Let the conditioner penetrate for the time recommended by the manufacturer, which is typically 5 to 15 minutes. After the recommended time, wipe off ALL of the excess conditioner with a clean, dry cloth. This is crucial—leaving excess conditioner on the surface will prevent the stain from absorbing properly. The surface should feel dry to the touch, not oily or wet.
Step 4: Apply Your Stain
You must apply your stain within the “re-coat window” of the conditioner, usually within two hours. Be sure to check the can for specific instructions. Stir your stain well, making sure all the pigments are mixed in.
- Apply the stain generously with a clean rag or foam brush, working in manageable sections.
- Let the stain sit for a few minutes (again, check the can’s instructions) to allow the color to penetrate.
- With a new, clean cloth, wipe off the excess stain. Always wipe in the direction of the wood grain. The more pressure you apply, the more stain you’ll remove, making the color lighter. The key is to be consistent.
- Allow the stain to dry completely. This can take anywhere from 8 to 24 hours, depending on the stain type and your workshop’s humidity and temperature.
Step 5: Protect Your Work with a Topcoat
Stain provides color, but it offers very little protection. To protect your project from scratches, spills, and UV light, you need a durable topcoat. Polyurethane is a great, user-friendly choice for beginners.
Apply a thin, even coat of your chosen topcoat with a high-quality brush. Let it dry, then lightly sand with 220-grit sandpaper, clean the dust off, and apply a second coat. Two or three coats are usually sufficient for a durable, beautiful finish.
Method 2: The Gel Stain Method (For a Darker, More Even Finish)
Gel stain is another fantastic solution for staining maple. Unlike traditional liquid stains that penetrate the wood, gel stains are thick and sit more on top of the wood surface. This quality makes them perfect for blotch-prone woods because they don’t rely on absorption to provide color. Instead, they act more like a transparent paint, creating an incredibly even finish.
Step 1: Sand and Clean the Wood
The sanding process is the same as with the conditioner method. Sand thoroughly up to 180 grit to create a smooth, uniform surface. A good sanding job is still essential because it gives the gel stain a good surface to adhere to. After sanding, clean all the dust away with a vacuum and a tack cloth.
With gel stain, you don’t need a pre-stain conditioner. The gel stain itself is designed to prevent blotching.
Step 2: Apply the Gel Stain
Gel stains are thick, so they don’t run or drip like liquid stains. This gives you more control over the application. You can apply gel stain in a couple of ways:
- For a traditional stained look: Use a clean cloth to wipe on a thin, even coat of gel stain. Work in the direction of the wood grain. Let it sit for a few minutes, then use another clean cloth to wipe off the excess. This will reveal the wood grain and give you a very even color.
- For a darker, more opaque look: Apply the gel stain with a foam brush or cloth and leave it on. Use a dry, clean brush to lightly smooth out any streaks in the direction of the wood grain. This method gives you a much darker color, almost like paint, but with more depth.
Step 3: Add More Coats (If Desired)
One of the great things about gel stain is that you can easily build up the color. If you want a deeper, richer look, simply wait for the first coat to dry completely (check the can for drying times) and then apply another thin coat. Repeat until you reach your desired color depth.
Step 4: Apply a Protective Topcoat
Just like with liquid stain, gel stain needs to be protected with a durable topcoat. Once your final coat of gel stain has fully cured (this can sometimes take 24-48 hours), apply two to three coats of polyurethane or another clear finish, lightly sanding between coats.
Choosing the Right Stain for Maple: A Quick Comparison
Not all stains are created equal, especially when it comes to maple. Here’s a simple table to help you decide which type is best for your project.
| Stain Type | Pros | Cons | Best For |
|---|---|---|---|
| Gel Stain | – Excellent for preventing blotching – Easy to apply and control – Creates a very even color | – Can obscure some of the wood grain – Longer drying times | Beginners and anyone wanting a dark, even finish on maple. |
| Oil-Based Liquid Stain | – Deep penetration – Rich color – Long working time | – Prone to blotching without conditioner – Strong odor, requires good ventilation | Achieving classic, rich wood tones (with a pre-stain conditioner). |
| Water-Based Liquid Stain | – Low odor, easy cleanup – Dries quickly – Clear, crisp colors | – Can raise the wood grain – Very prone to blotching on maple | Projects where fast drying is a priority, but extreme care and conditioning are required. |
| Wood Dye | – Small particles penetrate dense wood well – Creates vibrant, transparent color – Can be mixed for custom colors | – Can still cause some blotching – Application can be tricky for beginners | Experienced woodworkers or those looking for bright, non-traditional colors. |
Common Mistakes to Avoid When Staining Maple
We all make mistakes, but knowing what to watch out for can save you a lot of time and frustration. Here are some of the most common pitfalls:
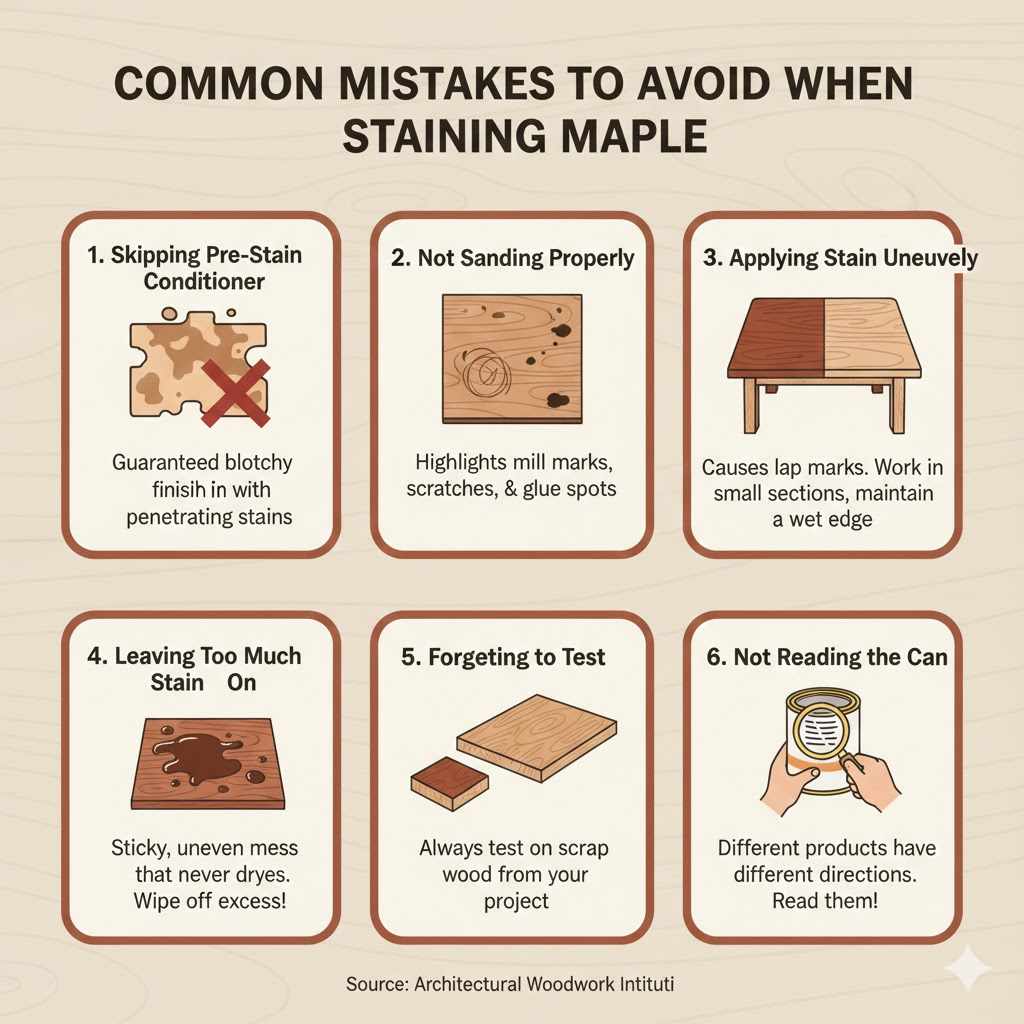
- Skipping the Pre-Stain Conditioner: This is the number one mistake. Forgetting or skipping this step with a penetrating stain is almost a guarantee of a blotchy finish.
- Not Sanding Properly: If you leave mill marks, scratches, or glue spots on your wood, the stain will highlight them. Consistent, thorough sanding is non-negotiable.
- Applying Stain Unevenly: Don’t try to stain a huge tabletop all at once. Work in smaller, manageable sections to maintain a wet edge and avoid lap marks.
- Leaving Too Much Stain On: Traditional stain is meant to be wiped off. Leaving a thick layer of excess stain on the surface will result in a sticky, uneven mess that never fully dries.
- Forgetting to Test: Always, always test your entire finishing schedule (sanding, conditioning, staining, and topcoat) on a piece of scrap wood from your project. This will show you exactly how it will look before you commit to the main piece.
- Not Reading the Can: Different products have different drying times and application instructions. Taking two minutes to read the manufacturer’s directions can prevent a lot of headaches. You can often find detailed safety and application guides, like these from the Architectural Woodwork Institute, to learn more.
Frequently Asked Questions (FAQ)
1. Can I use a darker stain on maple?
Yes, absolutely! Dark stains can look very dramatic and beautiful on maple. However, dark stains tend to highlight blotching more than light stains. For a dark finish, I highly recommend using the gel stain method, as it will give you the most even and consistent dark color.
2. Do I really need to use a wood conditioner?
If you are using a traditional oil-based or water-based penetrating stain, then yes, you absolutely should use a pre-stain wood conditioner. It is the single most important step for preventing a blotchy finish on maple. If you’re using a gel stain, you can skip the conditioner.
3. Why does my stained maple look blotchy?
Blotching on maple is caused by the wood’s uneven density. Softer areas absorb more stain and become dark spots, while harder areas resist the stain and remain light. This is a natural characteristic of the wood, and it can only be controlled with proper preparation, such as using a wood conditioner or gel stain.
4. Can I put polyurethane over an oil-based stain?
Yes, but you must ensure the oil-based stain is completely dry first. This can take 24-72 hours. Applying polyurethane too soon will result in a tacky finish that never cures. You can use either oil-based polyurethane or water-based polyurethane, but if you use water-based, make extra sure the oil stain is fully cured.
5. What is the best grit sandpaper to finish with before staining maple?
For maple, 180 grit is the ideal final sanding grit before staining. Sanding any finer can “polish” the wood and make it even less receptive to stain. Sanding with a coarser grit (like 120) can leave visible scratches that will show up after staining.
6. How can I fix a blotchy stain job on maple?
Fixing a blotchy stain job is difficult. The best option is often to sand the finish back down to bare wood and start over, this time using one of the proven methods in this guide. For very light blotching, you can sometimes use a gel stain of a similar or darker color over the top to help even out the appearance.
7. Is there a way to stain maple without it blotching?
Yes! Following either the pre-stain conditioner method or the gel stain method outlined in this article will give you excellent, blotch-free results. The key is to control how the stain is absorbed by the wood, and both of these techniques are designed to do exactly that.
Conclusion: You Can Conquer Staining Maple!
Staining maple doesn’t have to be a source of stress. While the wood has its challenges, it also has incredible potential for a beautiful finish. The key is to respect its nature and work with it, not against it. By embracing a patient, preparation-focused approach, you can turn this seemingly difficult task into a simple, predictable process.
Remember the two golden paths to success: use a pre-stain conditioner with liquid stains, or opt for the simple control of a gel stain. Either way, meticulous sanding and cleaning are your best friends. Always test on a scrap piece first, and trust the process.
So go ahead, grab that piece of maple you’ve been hesitant to stain. You now have the knowledge and the step-by-step plan to achieve a finish you can be truly proud of. Happy woodworking!