
How Lay Laminate Floor: Easy DIY Guide for Stunning Floors
To lay laminate floor, start by measuring the room and cleaning the floor. Then, install the laminate flooring by preparing the first row, cutting the laminate profile, and nailing the flooring down.
Finally, install the quarter round and transitions to finish the job. Always follow the manufacturer’s directions and acclimate the laminate flooring to the room where it will be installed. Begin the first row of flooring by placing the planks with the tongue side facing the wall and install the second plank next to the first by aligning the tongue into the groove and pressing the plank down to snap it in place.
Cut the length of plank needed to complete the row when you come to the end of the first row.
Getting Started With Laminate Flooring
Are you looking to learn how to lay laminate flooring? Starting with laminate flooring is a great choice for your floors. You can find a variety of flooring options in Austin at Lone Star Carpet. Install laminate flooring like a pro by following step-by-step tutorials on YouTube, such as DIY Creators, Home Repair Tutor, and The Carpentry Consultant.
Remember to start laying the planks in the left corner of the longest wall and align the tongue into the groove for a seamless installation.
When it comes to installing laminate flooring, getting started on the right foot is crucial. By following a few simple steps, you can ensure a smooth and successful installation process. In this section, we will discuss the tools and materials needed, as well as how to measure your space accurately.
Tools And Materials Needed
Before you begin installing laminate flooring, gather the necessary tools and materials to make the process easier and more efficient. Here is a list of essential items:
| 1. | Laminate flooring planks |
| 2. | Underlayment |
| 3. | Tape measure |
| 4. | Pencil |
| 5. | Utility knife |
| 6. | Saw (circular saw or miter saw) |
| 7. | Spacers |
| 8. | Tapping block |
| 9. | Hammer |
| 10. | Pull bar |
| 11. | Level |
| 12. | Knee pads |
Measuring Your Space
Accurate measurements are essential for a successful laminate flooring installation. Follow these steps to measure your space correctly:
- Clean the room: Before measuring, make sure the area is clear of any furniture or obstacles.
- Measure the length and width: Use a tape measure to determine the length and width of the room. Round up to the nearest foot for simplicity.
- Calculate the square footage: Multiply the length by the width to calculate the square footage of the room. This will help you determine how much laminate flooring you will need.
- Add extra for waste: It’s always a good idea to add an additional 10% to your square footage calculation to account for any mistakes or waste during the installation process.
By following these simple steps and using the right tools and materials, you’ll be well on your way to a successful laminate flooring installation. Stay tuned for the next section where we will discuss the actual installation process.

Prepping Your Floor
Before you start laying laminate flooring, it’s essential to properly prepare your floor. This step is crucial to ensure a smooth and long-lasting installation. In this section, we will guide you through the necessary prepping tasks to get your floor ready for the laminate installation process.
Cleaning The Surface
The first step in prepping your floor is to clean the surface thoroughly. Remove any debris, dust, or dirt from the floor using a broom or vacuum cleaner. Ensure that the surface is free from any obstructions or loose materials that may affect the installation process.
Leveling And Moisture Check
After cleaning the surface, it’s important to check for any uneven areas or moisture issues. Use a level tool to identify any high or low spots on the floor. If you notice any unevenness, consider leveling the floor using a suitable leveling compound. Additionally, conduct a moisture check to ensure the floor is dry and ready for laminate installation.
Undercutting Door Trims
Another crucial step is undercutting door trims to allow the laminate planks to fit seamlessly underneath. This process involves cutting the bottom of the door trim to create space for the laminate to slide under. Use a handsaw or a jamb saw to carefully trim the door trims, ensuring a precise and snug fit for the laminate flooring.
By following these prepping steps, you will create a solid foundation for your laminate flooring installation. Taking the time to clean the surface, level the floor, and undercut door trims will ensure a smooth and professional-looking result.
Underlay: The Foundation Of Laminate Flooring
Laminate flooring is a popular choice for many homeowners due to its durability, affordability, and easy maintenance. However, the key to a successful laminate flooring installation lies in the proper selection and installation of the underlay. The underlay serves as the foundation for the laminate flooring, providing essential support, moisture protection, and sound insulation.
Choosing Your Underlay
When choosing the underlay for your laminate flooring, consider factors such as the subfloor type, moisture levels, and desired level of sound insulation. Different types of underlay are available, including foam, rubber, and combination underlays. Foam underlays are ideal for concrete subfloors, while rubber underlays offer superior moisture resistance for areas prone to dampness.
Selecting the right underlay is crucial to ensure the longevity and performance of your laminate flooring. Additionally, some underlays come with built-in moisture barriers, providing added protection against moisture infiltration.
Laying The Moisture Barrier
Prior to laying the laminate flooring, it is essential to install a moisture barrier to safeguard against moisture seeping through the subfloor. A moisture barrier, typically made of polyethylene or foam, helps prevent water vapor from damaging the laminate flooring.
Carefully lay the moisture barrier across the entire surface area, ensuring that it overlaps by several inches to create a seamless shield against moisture. Additionally, seal the seams with moisture-resistant tape to further enhance the protective barrier.
First Row Fundamentals
When laying laminate flooring, getting the first row right is crucial for a successful and visually appealing installation. Here are some key fundamentals to keep in mind when working on the first row.
Aligning Planks With The Light Source
Start by positioning the first row of planks in the left corner of the longest wall in the room. It’s essential to align the planks in the same direction as the main light source, such as the primary window. This alignment helps to create a consistent and visually appealing look throughout the room.
Tongue And Groove Connection
As you begin the first row, ensure that the tongue side of the planks is facing towards the wall. This allows for a secure and seamless connection between the planks. The tongue and groove feature plays a vital role in providing a sturdy and tight fit, creating a smooth and uniform surface.
Cutting And Fitting Laminate
Learn how to lay laminate flooring with these easy steps. Start by measuring your room and cleaning the floor. Then, install the laminate flooring by preparing the first row and cutting the laminate profile. Finally, finish up by installing the quarter round and transitions.
Follow these guidelines to ensure a successful laminate floor installation.
Tools For Cutting Laminate
Before cutting laminate, it’s important to have the right tools on hand. You’ll need a saw, measuring tape, square, and a pencil. It’s recommended to use a saw with a fine-tooth blade, such as a jigsaw or handsaw, to avoid chipping the laminate. A power saw, like a circular saw or miter saw, can also be used but requires a special blade designed for laminate.
Cutting Laminate To Size
Once you have the tools, the next step is cutting the laminate to size. Measure the area where the laminate will be installed, and add an extra 10% to account for any cutting mistakes or future repairs. Then, use a square to mark the laminate with a pencil where it needs to be cut. Be sure to cut the laminate with the decorative side facing up, and use a fine-tooth blade saw to avoid chipping.
When cutting the laminate, it’s important to cut it slightly larger than needed to allow for a snug fit. You can then trim the edges to fit perfectly. It’s also important to cut the laminate in a well-ventilated area and wear protective gear, such as safety goggles and a dust mask, to avoid inhaling any dust.
In conclusion, cutting and fitting laminate can seem daunting, but with the right tools and techniques, it can be a straightforward process. By following these tips for cutting laminate, you can ensure a professional-looking finish for your flooring project.
Laying The Rest Of Your Floor
To lay laminate flooring, start by placing the planks with the tongue side facing the wall, aligning the tongue into the groove and pressing the plank down to snap it in place. Cut the length of plank needed to complete the row at the end of the first row.
Begin the first row in the left corner of the longest wall in the room and install the planks in the same direction as the main light source.
Sequential Installation
Once you have laid the first row of your laminate flooring, the next step is to continue with the sequential installation of the rest of the flooring. This involves laying the subsequent rows of planks in a staggered pattern, ensuring that the end joints of each plank are not aligned with the end joints of the adjacent planks. This will help to create a more stable and aesthetically pleasing floor.
When laying the rest of your laminate floor, you may encounter obstacles such as doorways, corners, and other irregular shapes. To navigate around these obstacles, you will need to measure and cut the planks accordingly. It is important to remember to leave a small gap between the edge of the plank and the obstacle to allow for expansion and contraction of the flooring. This gap can be covered with molding or trim once the installation is complete.
Here are some tips for navigating around common obstacles:
- For doorways, measure the width of the doorway and cut the plank to fit. Use a handsaw or jigsaw to make the cut.
- For corners, measure the angle of the corner and cut the plank accordingly using a miter saw or handsaw.
- For irregular shapes, use a cardboard template to trace the shape onto the plank and cut with a jigsaw.
Remember to always wear safety gear such as goggles and gloves when cutting the planks.
With these tips and techniques, you can successfully lay the rest of your laminate floor and achieve a beautiful and durable result.
Finishing Touches
When it comes to laying laminate flooring, installing transitions is a crucial step. Transitions ensure a smooth and seamless transition between different types of flooring, such as from laminate to carpet or laminate to tile. It not only enhances the visual appeal but also provides a safe and sturdy edge.
Adding quarter rounds is an essential part of the finishing touches when laying laminate flooring. These small, rounded moldings are installed around the perimeter of the room to cover the expansion gap and create a polished look. Quarter rounds also protect the edges of the laminate and add a professional touch to the overall installation.
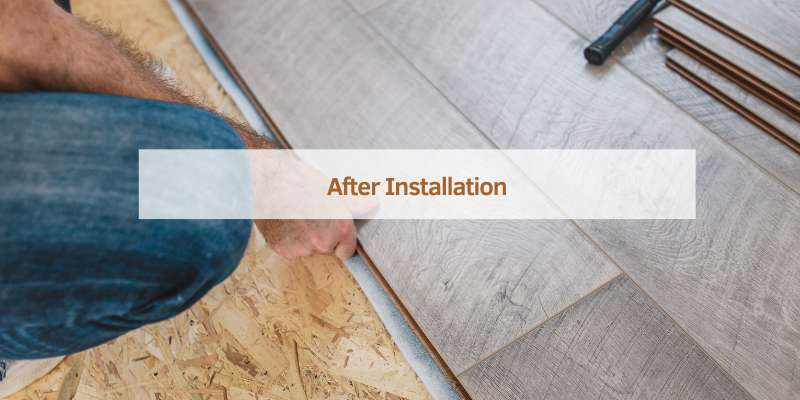
After Installation
Once the laminate flooring is installed, it’s important to take care of it to ensure its longevity and maintain its appearance. Here are some essential tips for cleaning and maintaining your new laminate floor and conducting a final inspection.
Cleaning And Maintenance
Proper cleaning and maintenance are crucial for preserving the beauty and durability of your laminate floor. Here are some key points to keep in mind:
- Regularly sweep or vacuum the floor to remove dust and debris.
- Use a damp mop with a mild cleaning solution specifically designed for laminate floors.
- Avoid excessive water or liquid on the floor to prevent damage to the planks.
- Immediately clean up any spills to prevent staining or warping of the laminate.
- Use felt pads under furniture legs to prevent scratches and dents.
Final Inspection Tips
Before considering the installation process complete, it’s essential to conduct a thorough final inspection to ensure everything is in order. Here are some final inspection tips to consider:
- Check for any visible gaps or unevenness in the flooring.
- Ensure all transitions and moldings are properly installed and secure.
- Inspect the entire floor for any signs of damage or imperfections.
- Verify that all planks are firmly locked together with no gaps.
- Examine the perimeter of the room for any areas that may require additional attention.
Frequently Asked Questions
Where Do You Start Laying Laminate Flooring?
To start laying laminate flooring, begin in the left corner of the longest wall in the room. Install the planks in the same direction as the main light source, such as the main window. Always install the planks from left to right, with the tongue side facing the wall.
Align the tongue into the groove of the second plank and press it down to snap it in place. Cut the length of plank needed to complete the row at the end of the first row. Before installing, check moisture levels, level the floor, undercut door trims and door jambs, clean the floor, and lay a moisture barrier.
Acclimate the laminate flooring to the room before installation.
How To Start The First Row Of Laminate Flooring?
To start the first row of laminate flooring, place the planks with the tongue side facing the wall. Align the tongue into the groove of the second plank and press it down to snap it in place. Cut the length of plank needed to complete the row at the end.
It is recommended to start in the left corner of the longest wall and install the planks in the same direction as the main light source. Make sure to prepare the floor properly before installation.
How Do You Prepare A Floor Before Laying Laminate?
To prepare a floor before laying laminate, follow these steps:
1. Check moisture levels and level the floor.
2. Undercut door trims and clean the floor.
3. Lay a moisture barrier and acclimate the laminate to the room.
4. Start the first row with the tongue side facing the wall.
5. Install the planks in the same direction as the main light source.
Do You Put Anything Under Laminate Flooring?
Yes, it is recommended to use underlayment when installing laminate flooring. Underlayment provides cushioning, sound reduction, and helps to smooth out any minor imperfections in the subfloor. It also acts as a moisture barrier and helps to prolong the lifespan of the laminate flooring.
Conclusion
Installing laminate flooring can be a straightforward process if you follow the proper steps. From measuring your room to cleaning the floor and installing the laminate, there are several key considerations to keep in mind. It is important to start in the left corner of the longest wall and align the planks with the main light source.
Additionally, preparing the floor with moisture barriers and leveling it beforehand can ensure a successful installation. Overall, with the right tools and techniques, anyone can lay laminate flooring with ease.