
How to Build a Table Saw Stand: Step-by-Step Guide
To build a table saw stand, measure and cut the base, assemble the frame using bolts, and add wheels for mobility. When building a table saw stand, consider factors such as stability, portability, and material cost to ensure a functional and durable design.
Constructing a stand that adequately supports the table saw while allowing for easy movement and storage will enhance the overall efficiency and safety of the woodworking setup. By following the steps for building a table saw stand, woodworkers can create a customized solution that meets their specific needs and enhances their workshop productivity.
Employing the right tools and materials, as well as adhering to safety precautions, will contribute to a successful construction project. In this guide, we will explore the essential steps and considerations for building a table saw stand that meets your requirements.
Crafting Your Table Saw Stand
Welcome to the essential guide on how to craft a sturdy and stable table saw stand. Crafting your table saw stand is crucial to ensure safety, precision, and efficiency in your woodworking projects. A properly constructed stand provides a stable foundation for your table saw, enhancing its usability and accuracy. Let’s delve into the important aspects of constructing your table saw stand.
Importance Of A Stable Table Saw Stand
Having a stable table saw stand is pivotal for a safe and efficient woodworking experience. A sturdy stand minimizes vibrations, reduces the risk of accidents, and facilitates precise cuts. An unstable stand can jeopardize the safety and accuracy of your work, making it essential to focus on constructing a solid and stable foundation for your table saw.
Key Considerations Before Starting
- Space and Layout: Assess the available space in your workshop and plan the layout of your stand to ensure optimal use of space.
- Material Selection: Choose durable and sturdy materials that can support the weight of the table saw and provide long-term stability.
- Height and Ergonomics: Consider the height of the stand to ensure a comfortable working position, minimizing strain on your back and arms during prolonged use.
- Mobility: Determine if you require a stationary stand or a mobile one based on your workshop setup and project requirements.
- Additional Features: Decide if your stand needs additional features such as storage shelves, dust collection ports, or accessories to enhance functionality.
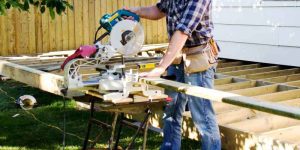 Build a Table Saw Stand” width=”808″ height=”404″ />
Essential Tools And Materials
When planning to build a table saw stand, it’s essential to have the right tools and materials to ensure the project’s success. The tools you use will affect the efficiency and precision of your work, while the quality of materials will determine the sturdiness and durability of the stand. Here’s a breakdown of the essential tools and materials you’ll need to build a sturdy table saw stand:
List Of Tools Needed For The Project
- Measuring Tape: Essential for accurate measurements and cuts.
- Table Saw: Needed for cutting materials to size.
- Drill and Bits: Used for assembly and creating holes.
- Screwdriver Set: Needed for fastening screws and bolts.
- Clamps: Important for securing materials during assembly.
- Square: Ensures precise angles and cuts.
- Safety Gear: Including goggles, gloves, and a dust mask for protection.
Summary Of Materials For The Stand
| Material | Quantity |
|---|---|
| Plywood | 2 sheets (4’x8′) |
| 2×4 Lumber | 4 pieces (8′ long) |
| Wood Screws | 50-60 pieces (2″ and 3″ long) |
| Nuts and Bolts | 20-30 pieces (1/4″ diameter) |
| Adjustable Feet | 4 pieces |
| Wood Glue | 1 bottle |
Designing The Stand Structure
When it comes to building a table saw stand, designing the stand structure is crucial in ensuring the functionality, mobility, and stability of the setup. In this section, we will discuss the key considerations for designing the stand structure, including determining the size for your needs and selecting a design for mobility and stability.
Determining The Size For Your Needs
Before diving into the construction of the table saw stand, it’s important to determine the appropriate size based on your specific needs. Consider the dimensions of your table saw and the available space in your workshop. Measuring the height, length, and width of the saw will guide you in creating a suitable stand that provides ample support for the tool while ensuring convenience during use. Keep in mind the ergonomics and accessibility to optimize your workflow.
Selecting A Design For Mobility And Stability
When selecting a design for the table saw stand, prioritize both mobility and stability to create a versatile and secure workstation. Whether you opt for a stationary stand or a portable one with wheels, consider the materials, weight capacity, and construction to ensure the stand can support the table saw while being easy to move around. Incorporating locking mechanisms for stability is essential to prevent any movement or wobbling during use, ultimately enhancing safety and precision.
Tailoring The Build Process
Tailoring the build process of a table saw stand involves precision and attention to detail. From cutting the wood to assembling the base, each stage of the process plays a crucial role in the stability and functionality of the final product. By understanding the specific steps involved in tailoring the build process, you can ensure a sturdy and durable table saw stand that meets your exact specifications.
Cutting The Wood: Measurements And Techniques
Cutting the wood for a table saw stand requires careful measurements and precise techniques to achieve the desired dimensions. Before beginning, make sure to gather the necessary materials, including the wood and the appropriate cutting tools. Once you have everything ready, follow these steps for accurate wood cutting:
- Measure twice, cut once: Take accurate measurements of the wood pieces based on the design specifications. Double-check the measurements before cutting to avoid errors.
- Use the right tool: Select the appropriate saw for the specific type of wood and cut you need, whether it’s a circular saw, table saw, or miter saw.
- Implement safety measures: Prioritize safety by using protective gear and ensuring the work area is clear of any obstructions or hazards.
Assembling The Base: Securing Components Together
Once the wood is cut to the required dimensions, the next step is assembling the base of the table saw stand. This process involves securing the components together to form a stable and sturdy foundation. Follow these guidelines for effective base assembly:
- Positioning the components: Arrange the wood pieces according to the assembly plan, ensuring all edges align perfectly for a seamless fit.
- Securing with fasteners: Use screws, nails, or adhesives to securely fasten the components together, providing structural integrity to the base.
- Check for stability: After assembling the base, ensure that each component is tightly secured and the overall structure is stable to support the weight of the table saw.
Adding Additional Features
When building a table saw stand, adding extra features can enhance its functionality and convenience. Whether it’s creating additional storage space or customizing it to suit your specific needs, these enhancements can make your woodworking projects more efficient. Below are some ideas for adding additional features to your DIY table saw stand.
Installing Shelves Or Drawers For Extra Storage
One way to maximize the utility of your table saw stand is to incorporate storage options. Installing shelves or drawers underneath the stand provides a convenient place to keep tools, accessories, and materials within arm’s reach. Consider utilizing the space beneath the table saw to build slide-out drawers or adjustable shelves to accommodate various tools and supplies.
Furthermore, labeling the drawers or shelves can help keep your workspace organized, saving time searching for specific items during a project. This added organization can contribute to a more efficient and enjoyable woodworking experience.
customization Options For Personal Needs
Every woodworker has unique preferences and work habits. Customizing your table saw stand to meet your personal needs can greatly improve your overall workflow. Consider factors such as the height of the stand, the addition of wheels for mobility, or incorporating a built-in power strip for easy access to electrical outlets.
Additionally, you may want to install a dust collection system or a miter saw station onto the stand. Tailoring the stand to your specific requirements can enhance both comfort and efficiency during woodworking activities.

Finishing Your Table Saw Stand
In order to complete your table saw stand project, it’s essential to focus on the finishing touches. This important stage ensures the durability, stability, and safety of your DIY table saw stand. In this section, we’ll cover the steps to sand and finish your stand, as well as the final measures to guarantee its stability and safety.
Sanding And Finishing For Durability
Once the construction of your table saw stand is complete, the next step is to ensure its longevity and resistance to wear and tear by sanding and finishing the surfaces. Follow these steps to achieve a polished finish:
- Start by sanding the entire surface of the stand using different grits of sandpaper, beginning with a coarse grit and finishing with a fine grit for a smooth texture. Sand in the direction of the wood grain to avoid splintering.
- After sanding, use a tack cloth to remove dust and debris from the surface. This will ensure a clean and smooth base for the finishing materials.
- Apply a wood conditioner to the surfaces to prepare the wood for staining and to prevent blotchiness. This step will help the wood absorb the stain evenly.
- Choose a suitable wood stain or finish that complements your workshop’s aesthetic and provides protection against moisture and other elements. Apply the stain evenly with a brush or rag, following the manufacturer’s instructions.
- Once the stain has dried, apply a clear protective finish, such as polyurethane or lacquer, to seal and protect the wood from scratches and moisture. Multiple coats may be necessary for optimal protection.
Final Steps To Ensure Stability And Safety
As you near the completion of your table saw stand, it’s crucial to take the following measures to ensure its stability and safety:
- Inspect all joints, connections, and fasteners to ensure they are secure and sturdy. Tighten any loose bolts or screws to prevent wobbling and instability.
- Install anti-vibration pads or feet on the bottom of the stand to minimize vibrations and improve stability while using the table saw.
- Attach levelers to the stand to compensate for uneven surfaces in the workshop, ensuring that the stand remains steady and level during use.
- Place rubber pads or a non-slip material on the stand’s top surface to secure the table saw and prevent it from shifting during operation.
- Finally, conduct a thorough safety check, ensuring that all moving parts of the table saw are properly guarded and the blade is aligned, and the stand is positioned in a safe and accessible location in the workshop.
Frequently Asked Questions For How To Build A Table Saw Stand
How To Choose The Right Material For Building A Table Saw Stand?
To choose the right material for your table saw stand, consider factors such as durability, weight, and stability. Heavy-duty materials like plywood or steel are popular choices due to their sturdiness and longevity. Make sure the material can withstand the weight of the saw and provide a stable base for your workspace.
What Are The Essential Tools Needed For Building A Table Saw Stand?
The essential tools for building a table saw stand include a saw, drill, measuring tape, screws, and a level. Additionally, you may need clamps, a square, and safety equipment such as goggles and gloves. Having the right tools ensures the construction process is smooth and efficient, resulting in a sturdy and functional table saw stand.
What Safety Measures Should Be Considered When Building A Table Saw Stand?
When building a table saw stand, it’s crucial to prioritize safety. Ensure proper ventilation in the workspace, wear protective gear, and keep the area well-lit. Always follow the manufacturer’s guidelines for using tools and equipment and handle them with caution.
Additionally, keep the work environment organized and free from clutter to prevent accidents.
Conclusion
In crafting a table saw stand, attention to detail and safety were the key underpinnings. Remember, the right measurements and sturdy materials are crucial. This DIY project can also save you money and provide a sense of accomplishment. With the right tools and a bit of effort, building your table saw stand can be a rewarding experience.