
How to Master the Art of Cutting 45 Degree Angles with a Table Saw: Proven Techniques and Tips
To cut a 45 degree angle with a table saw, set the miter gauge of the table saw to 45 degrees and position the material against the fence. Are you looking to learn how to cut a 45 degree angle with a table saw?
It’s a common and useful technique in woodworking, allowing you to create precise miters for various projects. By following a few steps, you can successfully achieve a clean and accurate cut. We will guide you through the process of cutting a 45 degree angle using a table saw.
Whether you are a beginner or have some experience with woodworking, these steps will help you achieve professional-looking results. So let’s dive in and learn how to cut a 45 degree angle with a table saw.
Understanding The Basics
Learn the basics of cutting a 45-degree angle with a table saw. Master this technique to create precise and professional-looking angled cuts for your woodworking projects.
Importance Of 45 Degree Angles In Woodworking
A 45-degree angle is a vital technique in woodworking that allows you to create seamless joints, strong corners, and add aesthetic appeal to your projects. Whether you’re building furniture, cabinetry, or simply crafting wooden artwork, understanding how to cut a precise 45-degree angle is essential.
Here’s why it’s important:
- Strength and Stability: A 45-degree angle creates a stronger joint by increasing the surface area for glue or screws to adhere to. This stability ensures that your project remains structurally sound over time.
- Seamless Connections: When two pieces of wood meet at a 45-degree angle, they form a clean and seamless joint, eliminating gaps that can compromise the appearance and integrity of your work.
- Enhanced Aesthetics: 45-degree angles bring visually appealing characteristics to your woodworking projects. They can create a professional and polished look, adding sophistication and craftsmanship to your final piece.
Overview Of Table Saws And Their Capabilities
Table saws are versatile power tools that make accurate angled cuts possible. Understanding the basics of table saws, their components, and their capabilities is fundamental for cutting precise 45-degree angles. Here’s an overview:
- Components: Table saws consist of a tabletop, a blade that protrudes through the tabletop, a fence to guide the workpiece, and miter gauge slots for angle adjustments. Understanding these components is essential for making accurate cuts.
- Adjustments: Table saws offer various adjustments to cut at different angles. Most models have a tilt mechanism that allows you to tilt the blade to achieve the desired angle.
- Safety Features: Table saws come equipped with safety features such as blade guards, anti-kickback pawls, and push sticks to ensure operator safety during the cutting process.
- Versatility: Table saws can perform a range of cuts, including rip cuts, crosscuts, and miter cuts. This versatility makes them a valuable tool for woodworking projects of all kinds.
By mastering the basics of table saws and understanding the importance of 45-degree angles, you’ll be well-equipped to tackle woodworking projects with precision and finesse. Remember to take your time, practice the techniques, and always prioritize safety.

Selecting The Right Tools And Equipment
Learn how to cut a precise 45-degree angle with a table saw by selecting the right tools and equipment. Master this technique and achieve professional results in your woodworking projects.
Essential Tools For Cutting 45 Degree Angles
When it comes to cutting precise 45 degree angles with a table saw, having the right tools is essential. Here are the must-have tools for this task:
- Miter gauge: This tool helps in making accurate angle cuts by allowing you to adjust the angle and securely hold the workpiece in place.
- Combination square: A combination square is useful for measuring and marking angles. It ensures that your cuts are precise and consistent.
- Carpenter’s pencil: This pencil with a flat edge makes it easier to mark the cutting lines on your workpiece accurately.
- Safety glasses: Safety should always be a priority when working with power tools. Protect your eyes with safety glasses to prevent any potential injuries.
Choosing The Best Table Saw For Precise Cuts
A table saw is a staple tool for making 45 degree angle cuts. Consider the following factors when choosing the best table saw for precise cuts:
- Power: Look for a table saw with enough power to tackle your cutting tasks effortlessly. A high-powered motor will provide smooth and accurate cuts.
- Fence system: A reliable fence system is crucial for maintaining accuracy and consistency in your cuts. Look for a table saw with a sturdy and adjustable fence.
- Blade quality: The quality of the blade plays a significant role in achieving precise cuts. Invest in a high-quality blade that is designed for cutting angles.
- Safety features: Ensure that the table saw has safety features such as a blade guard, anti-kickback pawls, and a riving knife. These features will protect you and help prevent accidents.
Remember, having the right tools and equipment greatly influences the quality of your 45 degree angle cuts. Choose tools that are reliable, durable, and suitable for the task at hand to achieve the best results.
Proper Setup And Safety Measures
Learn the proper setup and safety measures when cutting a 45-degree angle with a table saw. Follow these steps for a safe and precise cut every time.
Before you start cutting a 45-degree angle with a table saw, it’s crucial to ensure that your workstation is properly set up for accurate cuts. Additionally, taking the necessary safety precautions will help prevent any accidents and keep you safe throughout the process.
Preparing The Workstation For Accurate Cuts:
To achieve precise and clean 45-degree angle cuts, follow these steps for setting up your workstation:
- Ensure a stable and level workspace: Place the table saw on a level surface and secure it properly to prevent any movement or instability during the cutting process.
- Check the alignment of the saw blade: Make sure the saw blade is parallel to the miter gauge slot by using a reliable measuring tool such as a digital angle gauge or a dial indicator.
- Adjust the miter gauge: Set the miter gauge to the desired 45-degree angle. Use the angle scale on the gauge to make accurate adjustments.
- Utilize auxiliary fences: Attach auxiliary fences to the table saw’s rip fence or miter gauge to provide extra support and ensure that the workpiece stays in position during the cut.
- Use a zero-clearance throat plate: Install a zero-clearance throat plate on your table saw to reduce tear-out and increase the accuracy of the cut. This will help prevent the workpiece from splintering or breaking during the cut.
- Clamp the workpiece: Securely clamp the workpiece to prevent any movement or shifting during the cutting process. This will ensure a clean and accurate cut.
Safety Tips And Precautions When Using A Table Saw:
While working with a table saw, safety should always be your top priority. Here are some essential tips and precautions to follow to prevent accidents and injuries:
- Wear appropriate safety gear: Always wear safety goggles, ear protection, and a dust mask to protect your eyes, ears, and lungs from potential hazards such as flying debris and excessive noise.
- Keep the workspace clean and organized: Remove any clutter or obstructions from the work area to prevent accidents or distractions while operating the saw.
- Use a push stick or push block: When cutting narrow pieces or when your hands get too close to the blade, always use a push stick or push block to maintain a safe distance from the blade and prevent accidental contact.
- Ensure proper blade height: Set the blade height so that it extends approximately 1/4 inch above the workpiece. This will provide an optimal balance between cutting efficiency and safety.
- Avoid wearing loose clothing: Loose clothing, jewelry, or accessories can get caught in the blade, causing severe injuries. Always wear appropriate attire, such as fitted clothing, when using a table saw.
- Disconnect power when making adjustments: Before making any adjustments to the saw blade or changing the blade itself, disconnect the power and wait for the blade to come to a complete stop.
- Maintain a firm grip on the workpiece: When feeding the workpiece into the blade, ensure that you have a firm grip and control over it at all times. This will prevent kickback and ensure a smooth cut.
With these proper setup techniques and safety measures in place, you can confidently cut precise and clean 45-degree angle cuts using a table saw. Remember to always prioritize safety and follow the manufacturer’s guidelines for your particular table saw model.
Essential Techniques For Cutting 45 Degree Angles
Learn essential techniques for cutting precise 45 degree angles on your table saw. Master this skill using step-by-step instructions, ensuring accuracy and professional results every time.
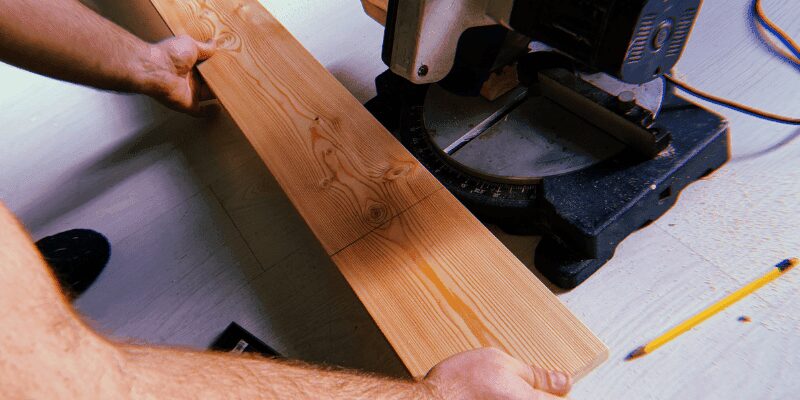
Are you looking to add a touch of precision to your woodworking projects? Learning how to cut 45 degree angles with a table saw is an essential skill that every woodworker should master. With the right techniques, you can achieve clean and accurate cuts that will enhance the quality of your work.
In this section, we will explore two important methods for cutting 45 degree angles: using the miter gauge and mastering bevel cuts with the table saw.
Using The Miter Gauge For Precise Angles
When it comes to cutting precise angles, the miter gauge is your best friend. Here’s how you can make the most out of this handy tool:
- Align the miter gauge: Start by aligning the miter gauge with the saw blade. Ensure that the gauge’s fence is perpendicular to the blade for accurate cuts.
- Set the desired angle: Most miter gauges have angle adjustments that allow you to set the desired angle. Set it to 45 degrees for your project.
- Secure your workpiece: Place your workpiece against the miter gauge fence, holding it firmly in place.
- Make the cut: Slowly push the workpiece through the saw blade, maintaining a steady and smooth motion. Let the saw do the cutting while you guide the material.
Remember to wear safety goggles and keep your fingers away from the blade at all times. Practice your technique on scrap wood first before working on your actual project.
Mastering Bevel Cuts With The Table Saw
Bevel cuts are another way to achieve precise 45 degree angles. Here’s how to master this technique with your table saw:
- Adjust the bevel angle: Start by adjusting the bevel angle of your table saw to 45 degrees. Refer to your saw’s manual for instructions on how to make this adjustment.
- Prepare your workpiece: Measure and mark the desired cut on your workpiece. Ensure that the side to be cut is facing the blade.
- Make the cut: Carefully guide your workpiece, keeping it flush against the table saw’s fence and making sure it doesn’t bind or kick back. Slowly push the material through the blade, allowing it to make a smooth and clean cut.
Practice proper safety precautions, such as wearing safety goggles and using a push stick or push block to keep your hands a safe distance from the blade. Take your time to ensure accuracy and always double-check your measurements before cutting.
By mastering these essential techniques for cutting 45 degree angles, you’ll be able to tackle a wide range of woodworking projects with confidence. Whether you’re working on furniture, cabinetry, or trim, these methods will elevate the quality of your craftsmanship.
Practice regularly, take your time, and always prioritize safety for the best results. Happy woodworking!
Adjusting For Different Angles And Measurements
Learn how to cut a perfect 45-degree angle with a table saw by adjusting for different angles and measurements. Master the technique to achieve precise and accurate cuts in your woodworking projects.
Whether you’re a woodworking enthusiast or a professional carpenter, having the ability to cut precise angles with a table saw is an essential skill. While a standard 90-degree cut may be the most common, there are instances where cutting at a 45-degree angle or other custom angles becomes necessary.
In this section, we will explore how to adjust your table saw to cut different angles and measurements, ensuring your woodworking projects turn out flawlessly.
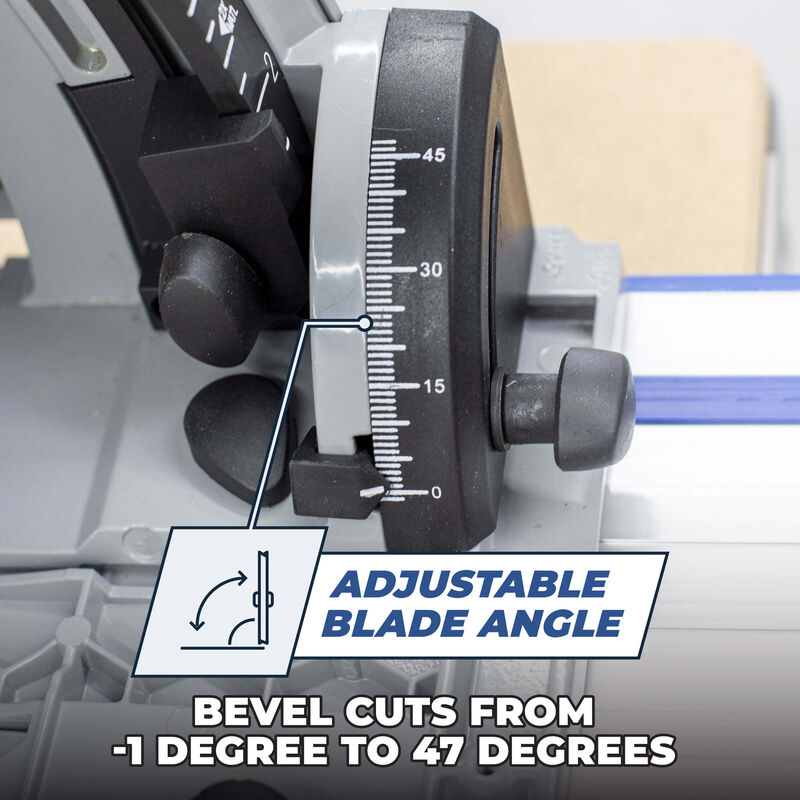
How To Set The Blade Angle To 45 Degrees
Setting your table saw blade to a 45-degree angle allows you to create clean and accurate bevel cuts. Follow these steps to achieve the perfect 45-degree angle:
- Start by disconnecting the power to your table saw for safety.
- Locate the bevel adjustment knob or lever on your table saw. It is typically situated on the front or side of the blade assembly.
- Loosen the knob or release the lever and tilt the blade to the desired angle, which in this case is 45 degrees.
- Once the blade is set at the correct angle, tighten the knob or secure the lever to lock it in place.
- Double-check the angle by using a square or angle gauge against the blade. Adjust if necessary.
Cutting Angles Other than 45 Degrees:
Cutting angles other than the standard 45 degrees may require some additional adjustments to your table saw. Here’s what you need to do:
- Disconnect the power before making any adjustments.
- Determine the desired angle and use a protractor or angle gauge to measure it accurately.
- Loosen the bevel adjustment knob or lever and adjust the blade to the required angle.
- Tighten the knob or secure the lever to lock the blade in place.
- Test the angle by making a few practice cuts on scrap wood before proceeding with your actual project.
Remember, safety is paramount when working with power tools. Always wear appropriate protective gear, such as safety glasses and ear protection, and ensure you have a clear workspace.
Adjusting your table saw to cut different angles and measurements is crucial in achieving precise and professional-looking cuts in your woodworking projects. By following the steps outlined above, you can confidently tackle bevel cuts at 45 degrees and custom angles, bringing your woodworking skills to the next level.

Achieving Clean And Smooth Cuts
Achieve clean and smooth cuts with these expert tips on how to cut a 45-degree angle using a table saw. Master the technique for precise woodworking projects.
When it comes to cutting a 45-degree angle with a table saw, one of the most important factors to consider is achieving clean and smooth cuts. Whether you are a beginner or a seasoned woodworker, getting precise and flawless results can make all the difference in your projects.
In this section, we will explore some key strategies to help you achieve those perfect cuts and prevent any tear-out or splintering on the wood.
Maintaining A Sharp And Properly Aligned Blade
To ensure clean and smooth cuts, maintaining a sharp and properly aligned blade is of utmost importance. Here are some tips to keep your blade in top condition:
- Regularly inspect and clean your blade: Remove any debris or resin build-up that could affect the blade’s performance.
- Sharpen the blade as needed: Dull blades can lead to rough cuts and tear-out. Invest in a quality sharpening tool or seek professional sharpening services.
- Check the blade alignment: Proper alignment not only enhances cutting accuracy but also prevents kickback. Make sure the blade is parallel to the miter gauge slots and fence.
Preventing Tear-Out And Splintering On The Wood
Tear-out and splintering can be frustrating, especially when you’re aiming for a clean and professional finish. Here are some effective ways to minimize these issues:
- Use a zero-clearance throat plate: Installing a zero-clearance throat plate helps support the wood fibers during the cut, reducing the likelihood of tear-out or splintering.
- Utilize masking tape: Applying masking tape along the cut line can provide extra support and prevent tear-out.
- Choose the right blade: Opt for a high-quality crosscut or combination blade with fine teeth. This will ensure cleaner cuts on both hardwood and softwood.
- Adjust the cutting speed: Feeding the wood too quickly can lead to tear-out. Take your time to make smoother and cleaner cuts.
Remember, achieving clean and smooth cuts is not only about the technique but also about the tools and maintenance involved. By following these guidelines and regularly practicing, you’ll gradually enhance your cutting skills and produce exceptional results in your woodworking projects.
Common Mistakes To Avoid
Learn how to cut a 45-degree angle with a table saw without making common mistakes. Follow these guidelines to ensure accurate cuts and avoid any errors for a seamless woodworking project.
Avoiding Common Errors When Cutting 45 Degree Angles
Cutting 45-degree angles with a table saw is a fundamental woodworking technique that can elevate your projects to the next level. However, beginners often make certain mistakes that can lead to inaccurate cuts or even accidents. To ensure your success and safety, it’s important to be aware of and avoid these common errors:
- Inadequate measurement: Failing to measure accurately can result in inconsistent angles. Use a reliable measuring tool and double-check your measurements before cutting.
- Incorrect blade height: Improper blade height adjustment can lead to imprecise cuts. Set the blade height so that it’s roughly 1/8 inch higher than the material you’re cutting.
- Incorrect table saw settings: Ensure that the table saw is properly set up to cut at a 45-degree angle. Check the fence alignment, miter gauge, and bevel settings to ensure everything is in order.
- Using a dull blade: A dull blade can make a clean cut difficult and increase the risk of kickback. Always use a sharp, clean blade specifically designed for cutting angles.
- Poor blade alignment: Make sure the blade is properly aligned with the miter gauge or fence. Misalignment can result in angled cuts that are not true 45 degrees.
- Lack of support: Cutting long or wide boards without sufficient support can lead to inaccurate cuts or even dangerous kickback. Always use additional supports such as sawhorses or roller stands when working with larger materials.
Troubleshooting Tips For Accurate And Clean Cuts
Even with careful attention to detail, problems can still arise when cutting 45-degree angles. Here are some troubleshooting tips to help you achieve accurate and clean cuts:
- Test cuts: Before making cuts on your final material, it’s a good idea to make small test cuts on scrap pieces. This allows you to fine-tune your setup and ensure that the angles are accurate.
- Slow and steady: Maintain a consistent, controlled speed throughout the cut to prevent any sudden movements or errors. Rushing through the cut can result in an uneven or jagged edge.
- Featherboards: Using featherboards can help to keep your workpiece securely in place and prevent unwanted movement during the cut. This can lead to cleaner and more precise angles.
- Clean the blade: Sawdust buildup on the blade can affect its cutting performance. Regularly clean the blade and remove any debris to ensure clean and accurate cuts.
- Safety precautions: Always prioritize safety when working with a table saw. Wear appropriate protective gear, such as safety glasses and ear protection, and follow all safety guidelines provided by the manufacturer.
By avoiding common mistakes and utilizing troubleshooting techniques, you can confidently cut accurate and clean 45-degree angles with your table saw. Practice patience, take your time, and soon you’ll be creating professional-looking angled cuts for your woodworking projects.
Advanced Techniques And Tips
Discover advanced techniques and valuable tips for cutting precise 45-degree angles with a table saw. Master this essential woodworking skill with our expert advice to create flawless cuts every time.
If you’re ready to take your table saw skills to the next level, it’s time to explore some advanced techniques and tips. These methods will allow you to create complex miters and compound angles, as well as master curved cuts and complex shapes.
Get ready to expand your woodworking repertoire with these expert strategies:
Creating Complex Miters And Compound Angles:
- Combine two pieces at a 45-degree angle to form a miter joint, ensuring a clean and precise cut.
- To cut compound angles, adjust the miter gauge alongside the blade to accommodate multiple angles.
Mastering Curved Cuts And Complex Shapes:
- Use a jigsaw to cut complex curves and irregular shapes by carefully following the marked lines.
- For smooth and accurate cuts, choose an appropriate blade for your specific project, such as a fine-tooth blade for intricate work.
- Consider using a coping sled when cutting curved moldings to ensure stability and prevent any unwanted movement.
Tips For Success:
- Always double-check your measurements and angles before making any cuts to avoid mistakes or wasted materials.
- Secure your workpiece firmly to the table saw with clamps or other suitable methods to prevent accidents or kickbacks.
- Make use of a push stick or push block when feeding smaller pieces through the table saw to maintain safety and control.
- Regularly inspect and maintain your table saw, ensuring the blade is sharp, the fence is properly aligned, and all safety features are functioning correctly.
By following these advanced techniques and tips, you’ll be able to tackle intricate projects with confidence and precision. Take your woodworking skills to new heights as you create stunning miter joints, compound angles, curved cuts, and complex shapes. Remember to prioritize safety and accuracy throughout your woodworking journey.
Happy cutting!
Enhancing Your Skills With Practice Projects
Enhance your woodworking skills with practice projects and learn how to cut precise 45-degree angles using a table saw. Gain confidence and improve your craftsmanship with hands-on experience.
Woodworking is a craft that requires skill, precision, and practice. Whether you’re a beginner or an experienced woodworker, mastering the art of cutting 45-degree angles with a table saw can take time. One way to improve your skills is by taking on practice projects that allow you to hone your technique and gain confidence.
In this section, we will explore some simple woodworking projects to practice 45-degree angle cuts and provide tips for perfecting your skills over time.
Simple Woodworking Projects To Practice 45 Degree Angle Cuts:
- Picture frames: Create custom picture frames using different types of wood and experiment with different styles and finishes. Cutting 45-degree angles for the frame corners will challenge your precision and accuracy.
- Small storage boxes: Build small storage boxes with hinged lids or slide-out compartments. These projects not only offer practical use but also give you ample opportunities to practice cutting 45-degree angles for the box corners.
- Shelving units: Construct simple shelving units with adjustable shelves. By incorporating 45-degree angles into the shelf supports, you’ll develop your proficiency in cutting and fitting joints.
Tips For Perfecting Your Skills Over Time:
- Invest in quality equipment: A high-quality table saw with a reliable miter gauge is crucial for achieving accurate and consistent 45-degree angle cuts. Consider purchasing a dedicated miter sled or jig to enhance your cutting precision.
- Start with scrap wood: Before working on your main project, practice making 45-degree angle cuts on scrap wood. This allows you to familiarize yourself with the saw and test different techniques without the fear of ruining valuable material.
- Measure twice, cut once: Taking accurate measurements is essential when cutting 45-degree angles. Use a reliable measuring tape or a precision square to ensure precise cuts. Remember the adage “measure twice, cut once” to minimize errors.
- Use guides and stop blocks: To achieve repetitive, consistent cuts, utilize guides and stop blocks. These accessories can be attached to your table saw’s miter gauge or fence and help maintain constant angles and dimensions.
- Maintain a steady pace: When cutting 45-degree angles, it’s important to feed the wood steadily through the blade without rushing or forcing it. Applying even pressure while maintaining control will result in cleaner and safer cuts.
- Practice different techniques: Explore various techniques for cutting 45-degree angles, such as using a miter gauge, a miter sled, or a crosscut sled. Familiarize yourself with the strengths and limitations of each method, and experiment with different blade angles and cutting depths.
- Focus on safety: Woodworking can be dangerous, so prioritize safety precautions. Always wear protective gear such as goggles and ear protection. Ensure that your table saw is properly tuned and the blade is sharp. Additionally, follow proper cutting techniques to avoid accidents.
By starting with simple practice projects and implementing these tips, you can gradually enhance your skills in cutting 45-degree angles with a table saw. Remember, practice makes perfect, so embrace each project as an opportunity to learn and grow. Keep challenging yourself, and soon you’ll be creating precise and seamless 45-degree angle cuts in your woodworking projects.
Credit: www.kregtool.com
Frequently Asked Questions (Faqs) From Woodworkers
Curious about cutting 45-degree angles with a table saw? Our woodworking FAQs have you covered. Learn the tips and techniques for achieving precise angled cuts with ease.
Addressing Common Questions About Cutting 45 Degree Angles With A Table Saw
Cutting 45-degree angles with a table saw can be a challenging task for woodworkers. To help you overcome any difficulties you may encounter, we have compiled a list of frequently asked questions (FAQs) and expert answers. Read on to find helpful tips and insights.
How Do I Set The Table Saw To Cut A 45-Degree Angle?
Setting up your table saw correctly is crucial to achieve accurate 45-degree angle cuts. Here’s what you need to do:
- Begin by checking if your blade is parallel to the miter slot. Adjust it if necessary to ensure accurate cuts.
- Use a protractor or angle gauge to measure and set the blade angle to 45 degrees.
- Adjust the fence to the desired distance from the blade.
- For added precision, consider using a miter gauge or sled to guide your workpiece while making the cut.
What Type Of Blade Should I Use For Cutting 45-Degree Angles?
Using the right blade is essential for achieving clean and precise cuts. Consider the following options:
- Combination blades: These blades are versatile and can handle a range of cuts, including 45-degree angles. Choose one with a high tooth count for smoother cuts.
- Crosscut blades: As the name suggests, these blades are specifically designed for clean crosscuts, making them suitable for cutting 45-degree angles.
- Alternate Top Bevel (ATB) blades: These blades feature alternating beveled teeth that provide clean crosscuts for your angled cuts.
How Can I Ensure My 45-Degree Angle Cuts Are Accurate And Consistent?
Achieving consistent and accurate cuts is crucial for any woodworking project. Here are some tips to help you:
- Use a reliable miter gauge or sled to guide your workpiece during the cut. This ensures stability and precision.
- Take your time in setting up the saw and measuring the angles accurately. Rushing through this step can lead to inaccurate cuts.
- Practice making test cuts on scrap wood before working on your actual project. This allows you to make adjustments and perfect your technique.
- Consider using a stop block or clamp to secure your workpiece, preventing any unwanted movement during the cut.
How Can I Prevent Tear-Out When Cutting 45-Degree Angles?
Tear-out, where wood fibers splinter or tear along the cut line, can mar the beauty of your workpiece. To minimize this issue:
- Use a sharp blade: Dull blades tend to tear wood fibers. Ensure your blade is sharp and in good condition before making any cuts.
- Apply masking tape: Placing masking tape along the cut line can help reduce tear-out. The tape provides support and prevents wood fibers from splintering.
- Cut with the good face down: When cutting angles, position the side of the wood with the best face down. This helps minimize tear-out on the visible side.
What Safety Precautions Should I Take When Cutting 45-Degree Angles With A Table Saw?
Safety should always be a top priority when working with power tools. Follow these safety precautions when cutting 45-degree angles:
- Wear safety goggles and ear protection to guard against flying debris and loud noise.
- Keep your hands and fingers away from the blade at all times. Use push sticks and other appropriate safety devices to maintain distance.
- Avoid wearing loose clothing or jewelry that could get caught in the machinery.
- Make sure the blade guard and riving knife are properly installed and functioning.
Now that you have answers to these frequently asked questions, you can confidently tackle cutting 45-degree angles with your table saw. Remember to follow proper setup procedures, use the right blade, maintain accuracy, prevent tear-out, and prioritize safety. Happy woodworking!
Frequently Asked Questions On How To Cut 45 Degree Angle With Table Saw
How Do You Cut A 45 Degree Angle With A Saw?
To cut a 45-degree angle with a saw, follow these steps: measure and mark the angle, adjust the saw, align the blade, and slowly cut along the line.
What Is The Best Tool For Cutting A 45 Degree Angle?
The best tool for cutting a 45 degree angle is a miter saw. It provides accurate and precise cuts.
How Do You Cut More Than A 45 Degree Angle On A Table Saw?
To cut angles greater than 45 degrees on a table saw, you can use a miter gauge or a sled.
How Do You Cut An Angle With A Table Saw?
To cut an angle with a table saw, set the angle on the saw’s bevel gauge and position the workpiece accordingly. Then, carefully guide the workpiece through the saw, keeping your hands clear of the blade.
Conclusion
Mastering the art of cutting a 45-degree angle with a table saw can greatly enhance your woodworking skills. With the proper technique and precautions, you can achieve precise and clean cuts, adding a professional touch to your projects. Remember to always prioritize safety by wearing protective gear and keeping your workspace organized.
Take the time to measure and mark your wood before making any cuts, double-checking your angles for accuracy. Utilize the appropriate tools, such as a miter gauge or sled, to ensure stability and control. Practice makes perfect, so don’t be discouraged if you don’t achieve perfection right away.
With patience and persistence, your ability to cut 45-degree angles will improve, allowing you to tackle more complex projects with confidence. So, grab your table saw and start crafting beautiful angled cuts today!