How to Cut Countertop for Sink: Expert Tips for Perfect Precision
To cut a countertop for a sink, measure the dimensions of the sink, mark the cutting lines, and use a jigsaw or circular saw to carefully cut along the lines. Countertops are an essential component of every kitchen, providing a functional workspace and enhancing the overall aesthetics.
If you’re planning to install a sink in your countertop, you may need to cut a hole to accommodate it. Although this task may seem daunting, with the right tools and techniques, you can easily achieve a professional-looking result. We will guide you on how to cut a countertop for a sink step-by-step, ensuring a precise and seamless fit.
So, let’s dive in and get started on this exciting DIY project.
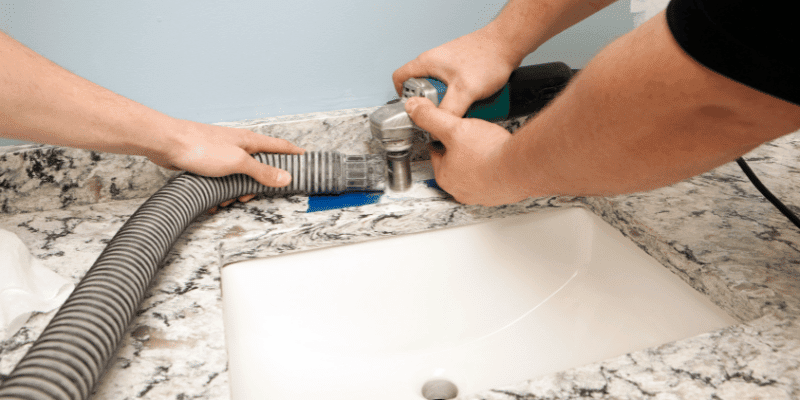
Credit: www.homedepot.com
Required Tools And Materials
Learn how to cut a countertop for a sink with the right tools and materials. This step-by-step guide will help you achieve a professional result in your kitchen or bathroom renovation project.
Whether you’re renovating your kitchen or installing a new sink, cutting a countertop requires the right tools and materials. Here are the essentials you’ll need to make a precise and clean cut:
- Measuring tape: Accurately measure the dimensions of the sink and the area where it will be installed.
- Pencil: Mark the cutting lines on the countertop for guidance.
- Straightedge: Use a straightedge to create straight, precise cutting guidelines.
- Circular saw: This power tool is a must-have for cutting through the countertop material efficiently.
- Jigsaw: A jigsaw is perfect for making curved or intricate cuts.
- Clamps: Secure the countertop in place to prevent movement during the cutting process.
- Safety goggles: Protect your eyes from any potential flying debris or dust.
- Dust mask: Ensure your respiratory health by wearing a mask to filter out dust particles.
Now that you have all the necessary tools and materials, you’re ready to tackle the process of cutting your countertop for the sink. Remember, safety should always be a priority, so make sure to wear your goggles and mask throughout the process.
Measuring The Sink Dimensions
Learn how to successfully cut your countertop to fit your sink dimensions with this informative and easy-to-follow guide. Follow these steps to achieve a precise and professional-looking installation.
Determining The Sink Size And Type:
When it comes to installing a new sink in your kitchen or bathroom, it’s essential to determine the right size and type. This will ensure a perfect fit and a seamless installation. Here are the steps to help you measure the sink dimensions accurately:
Measuring The Length, Width, And Depth Of The Sink:
To make sure your sink fits flawlessly into the countertop, you need to measure its length, width, and depth. Here’s how to do it:
- Measure the length: Place the measuring tape at the left edge of the sink and extend it to the right edge. Note down the measurement in inches or centimeters, depending on your preference.
- Measure the width: Position the measuring tape at the back of the sink and stretch it towards the front. Jot down the measurement, ensuring it covers the widest part of the sink.
- Measure the depth: Take the measuring tape and place it at the top edge of the sink. Extend it downwards until you reach the bottom, noting the measurement at the desired depth.
By measuring these dimensions accurately, you will have the necessary information to cut the countertop accordingly, ensuring a precise fit.
Marking The Sink Outline On The Countertop:
Once you have the sink dimensions, it’s time to mark the sink outline on the countertop. This step will help you determine where to cut the countertop to accommodate the sink. Follow these guidelines:
- Place the sink upside down on the countertop.
- Align the sink with the desired position and make sure it is centered.
- Take a pencil or marker and trace the sink outline onto the countertop carefully.
- Double-check the outline to ensure accuracy and make any necessary adjustments.
Once you have marked the sink outline, you are ready to move on to the next step of actually cutting the countertop to accommodate the sink. Remember to exercise caution and use the appropriate tools when cutting to avoid any mishaps.
Measuring the sink dimensions and marking the outline on the countertop are crucial steps in successfully cutting a countertop for a sink installation. By following these steps accurately, you can ensure a seamless fit and a professional-looking result. Now that you have completed these steps, you are ready to proceed with cutting the countertop to accommodate your sink.
Preparing The Countertop For Cutting
To prepare the countertop for cutting, follow these steps: measure the sink dimensions, mark the cutout area, protect the countertop surface, use a circular saw with a fine-tooth blade, make straight cuts, and double-check the measurements before cutting. Proper preparation ensures a precise and clean cut for installing the sink.
Before you begin cutting the countertop for your sink installation, there are a few essential steps to take in order to properly prepare the countertop surface. Follow these guidelines to ensure a smooth and successful cutting process:
Clearing The Countertop Surface:
To start off, it is crucial to clear the entire countertop surface of any objects or items that may obstruct the cutting process. Here’s what you need to do:
- Remove all appliances, dishes, and utensils from the countertop.
- Clear away any decorative items or personal belongings that may be in the way.
- Ensure that the entire surface is completely empty and free of any obstructions.
Removing Any Existing Fixtures Or Appliances:
In order to cut the countertop accurately, you must remove any existing fixtures or appliances that are attached to it. Follow these steps:
- Disconnect the water supply lines, electrical connections, and any other connections to the fixtures or appliances.
- Use appropriate tools, such as a screwdriver or wrench, to detach the fixtures or appliances from the countertop.
- Remove the fixtures or appliances carefully, ensuring not to damage the countertop or any surrounding areas.
Protecting Surrounding Areas With Drop Cloths Or Cardboard:
Cutting a countertop can create a lot of dust and debris, which can damage or dirty the surrounding areas. It is essential to protect these areas before starting the cutting process. Here’s what you should do:
- Lay down drop cloths or cardboard around the countertop to catch any dust or debris.
- Make sure the drop cloths or cardboard completely cover the surrounding areas to prevent any damage or mess.
- Secure the drop cloths or cardboard in place to ensure they stay in position during the cutting process.
By following these steps and preparing the countertop surface properly, you will be ready to cut the countertop for your sink installation with ease. Remember to always prioritize safety and take necessary precautions throughout the process. Happy cutting!
Cutting The Countertop
Learn how to cut a countertop for a sink with precision and ease. Follow these step-by-step instructions to ensure a flawless fit for your new sink.
Securing The Countertop With Clamps:
- To ensure stability and prevent movement while cutting, secure the countertop with clamps. Clamps will hold the countertop firmly in place, reducing the risk of accidents and allowing for more precise cuts.
- Use as many clamps as needed, placing them strategically around the area where you’ll be cutting to distribute the pressure evenly.
- Tighten the clamps securely, but be careful not to overtighten and damage the countertop.
- Double-check that the countertop is secure before proceeding with the cutting process.
Marking The Cutting Lines On The Countertop:
- Before making any cuts, accurately mark the cutting lines on the countertop. This will serve as a guide to ensure you achieve the desired sink hole size and shape.
- Use a tape measure to measure the dimensions of the sink hole, including length, width, and depth.
- Mark these measurements on the countertop using a pencil or marker, ensuring the lines are straight and aligned.
- Double-check your measurements and line markings to avoid any errors that could affect the final result.
Making The Initial Cut With A Circular Saw:
- Once the countertop is secured and the cutting lines are marked, it’s time to make the initial cut using a circular saw.
- Set the depth of the circular saw blade slightly deeper than the thickness of the countertop to ensure a clean cut through the entire material.
- Align the circular saw blade with the marked cutting lines and start the saw.
- Slowly guide the circular saw along the cutting lines, applying steady pressure and keeping a firm grip on the saw.
- Take caution and proceed with control to avoid any mistakes or damage.
Using A Jigsaw To Cut Out The Sink Hole:
- After making the initial cut, a jigsaw can be used to cut out the sink hole with more precision and maneuverability.
- Start by drilling a pilot hole near the inside corner of the marked cutting lines. This will allow you to insert the jigsaw blade and begin cutting.
- Insert the jigsaw blade into the pilot hole and carefully follow the marked cutting lines, keeping a steady hand as you maneuver through the countertop material.
- Take your time and make smooth, controlled movements to achieve clean and accurate cuts.
- Be mindful of the jigsaw blade’s position to prevent any unwanted damage to the countertop or surrounding areas.
Sanding The Edges For A Smooth Finish:
- Once the sink hole has been cut out, it’s essential to sand the edges for a smooth and professional-looking finish.
- Use sandpaper with a medium to fine grit to smooth down any rough edges, starting with rougher grits and gradually moving to finer ones.
- Hold the sandpaper securely and move it in a smooth, circular motion along the edges of the sink hole.
- Continue sanding until the edges feel smooth to the touch and any imperfections or sharp edges have been removed.
- Wipe away any dust or debris from the countertop surface, and your cut countertop is now ready for installation.

Installing The Sink
Learn how to cut a countertop for a sink installation with these easy steps. By following this guide, you can ensure a precise and professional-looking result for your kitchen or bathroom project.
Cleaning the sink and the countertop:
- Before installing the sink, make sure both the sink and the countertop are clean and free from any debris.
- Use a mild detergent and warm water to thoroughly clean the surface of the sink and the countertop.
- Rinse off the soap thoroughly and dry the surfaces completely.
Applying a bead of silicone caulk around the sink opening:
- Take a tube of silicone caulk and cut the tip to create a small opening.
- Apply a bead of silicone caulk around the perimeter of the sink opening on the countertop.
- Make sure the caulk is applied evenly and in a continuous line, ensuring there are no gaps or breaks in the seal.
Placing the sink into the cutout:
- Carefully lower the sink into the cutout on the countertop, ensuring it is properly aligned.
- Apply gentle pressure to secure the sink in place.
- Double-check the alignment and adjust if necessary before proceeding.
Tightening the sink clips or brackets:
- Locate the sink clips or brackets that came with your sink.
- Attach them to the underside of the countertop, securing the sink in place.
- Tighten the clips or brackets evenly to ensure a secure fit, but be careful not to overtighten and damage the countertop.
Connecting the plumbing and checking for leaks:
- Connect the appropriate plumbing components to the sink, such as the drain and water supply lines.
- Make sure all connections are securely tightened.
- Turn on the water supply and check for any leaks.
- If any leaks are found, tighten the connections further or replace faulty parts as necessary.
By following these steps, you can successfully install a sink into a cutout in your countertop. Taking the time to clean the surfaces, apply silicone caulk, secure the sink, and check for leaks will ensure a professional and durable installation.
Finishing Touches
Learn how to cut a countertop for a sink with these easy steps. Follow our comprehensive guide for a flawless finish to your kitchen or bathroom renovation.
Applying A Sealant To The Countertop Edges:
Applying a sealant is an essential step to protect your countertop and ensure durability. Here’s how to do it:
- Start by thoroughly cleaning the countertop edges to remove any debris or dust.
- Use a high-quality countertop sealant that is suitable for your countertop material. Read the manufacturer’s instructions for proper application.
- Apply the sealant evenly along the edges of the countertop, using a brush or roller.
- Allow the sealant to dry completely before moving on to the next step.
- Apply a second coat of sealant if necessary, following the same procedure.
- Once the sealant is completely dry, gently sand the edges to smooth out any rough spots.
- Use a damp cloth to wipe away any sanding dust.
- Your countertop edges are now protected with a sealant, providing a finished and polished look.
Reconnecting Any Fixtures Or Appliances:
After cutting the countertop for your sink, it’s time to reconnect the fixtures and appliances. Here’s what you need to do:
- Start by carefully reconnecting the sink. Align the sink with the countertop opening and secure it in place using the manufacturer’s recommended hardware.
- Once the sink is securely in place, reconnect the plumbing lines. Ensure that all connections are tight and secure to prevent leaks.
- If you had to disconnect any other fixtures or appliances during the countertop cutting process, reconnect them following the manufacturer’s instructions.
- Test each fixture or appliance to make sure it is functioning properly.
- Double-check all connections to ensure there are no leaks or loose fittings.
- Congratulations! Your fixtures and appliances are now reconnected and ready to be used.
Cleaning Up The Work Area:
A clean work area is essential for a successful countertop cutting project. Follow these steps to clean up after cutting the countertop for your sink:
- Dispose of any waste materials, such as excess countertop pieces or sawdust, in a proper manner.
- Sweep or vacuum the work area to remove any debris.
- Wipe down the countertops and surrounding surfaces with a damp cloth to remove dust and residue.
- Use an appropriate cleaning solution to sanitize the countertops, especially in areas where food preparation will take place.
- Clean any tools or equipment used during the cutting process and store them properly.
- Dispose of any used sealant or adhesive containers according to local regulations.
- Once the work area is clean and organized, you can enjoy your newly cut countertops.
Checking For Any Necessary Adjustments Or Repairs:
Before considering your countertop cutting project complete, it’s important to check for any necessary adjustments or repairs. Here’s what you need to do:
- Inspect the countertop edges carefully for any imperfections, such as rough spots or uneven cuts.
- If you notice any issues, use sandpaper or a file to smooth out the edges or make necessary adjustments.
- Check the fit of the sink or any other fixtures. Ensure that they sit flush with the countertop and are properly aligned.
- Test the functionality of each fixture or appliance to make sure they are working correctly.
- Pay attention to any signs of leaks or loose connections and address them immediately.
- If you encounter any significant problems or concerns, consider consulting a professional for assistance.
- By performing these checks and making any necessary adjustments or repairs, you can ensure that your countertop cutting project is finished to perfection.

Tips For Perfect Precision
Get the perfect precision when cutting a countertop for a sink with these simple tips. Learn how to achieve a precise cut and avoid common mistakes.
Double-checking the sink dimensions before cutting:
- Measure the sink accurately using a tape measure to ensure a perfect fit.
- Take note of the width, length, and depth of the sink.
- Confirm the measurements multiple times to avoid any mistakes.
- Use these dimensions as a guide when cutting the countertop.
Using a sharp saw blade for clean cuts:
- Opt for a fine-toothed saw blade to achieve cleaner and smoother cuts.
- A sharp blade is essential for preventing splintering and chipping.
- Replace old or dull blades to ensure precision.
Taking your time and making slow, steady cuts:
- Rushing through the cutting process can result in uneven and inaccurate cuts.
- Take your time and proceed with patience to maintain precision.
- Keep a steady hand and avoid any jerky movements during the cutting.
Sanding the edges for a precise fit:
- After cutting the countertop, sand down the edges for a precise fit.
- Start with coarse-grit sandpaper to remove any rough edges or imperfections.
- Gradually move to finer-grit sandpaper for a smooth and polished finish.
- Sand in a circular motion to even out the edges before testing the sink fit.
Testing the sink fit before installing permanently:
- Before permanently installing the sink, ensure it fits properly.
- Place the sink into the cutout on the countertop to check the fit.
- Pay attention to the alignment and make any necessary adjustments.
- Confirm that the sink sits flush with the countertop surface.
Remember, precision is key when cutting a countertop for a sink. By double-checking the sink dimensions, using a sharp saw blade, taking your time with slow, steady cuts, sanding the edges for a precise fit, and testing the sink fit before installing permanently, you can achieve a perfect result.
Now, you’re ready to move forward with your countertop installation project.
Frequently Asked Questions For How To Cut Countertop For Sink
How Do You Cut A Countertop For A Sink?
To cut a countertop for a sink, first measure and mark the area where the sink will be placed. Use a circular saw to make straight cuts along the marked lines. Then, use a jigsaw to cut out the hole for the sink.
Be sure to smooth the edges and check the fit before installing the sink.
What Tools Do You Need To Cut A Countertop For A Sink?
To cut a countertop for a sink, you will need a few tools. These include a tape measure for accurate measurements, a straight edge for marking lines, a circular saw for making straight cuts, and a jigsaw for cutting out the sink hole.
It’s also helpful to have sandpaper or a file to smooth the edges of the cut.
Can You Cut A Countertop Without Removing It?
Yes, you can cut a countertop for a sink without removing it. It’s best to leave the countertop in place if you want to keep it intact. Measure and mark the area where the sink will be installed. Use a circular saw to make straight cuts along the marked lines, and a jigsaw to cut out the sink hole.
Be sure to protect the surrounding area to avoid damage.
Final Thoughts
To sum up, cutting a countertop for a sink may seem like a daunting task, but with the right tools and techniques, it can be done successfully. Remember to measure carefully and mark the cut lines before using a circular saw or jigsaw to make the actual cuts.
Sand any rough edges and test-fit the sink before applying any adhesive. Whether you’re installing a new sink or replacing an old one, following these steps will ensure a professional and seamless result. Properly cutting the countertop not only enhances the overall aesthetic of your kitchen or bathroom but also improves functionality.
By doing it yourself, you can save money and gain a sense of accomplishment. With these tips in mind, you can confidently take on the task of cutting a countertop for a sink and enjoy the satisfying end result.