
How to Fill Grout Lines for Vinyl Flooring: Expert Tips & Tricks
To fill grout lines for vinyl flooring, follow these steps: Clean the grout lines thoroughly with a grout cleaner and brush, ensuring no dirt or debris remains. Prepare the grout mixture according to the manufacturer’s instructions and apply it to the grout lines using a grout float.
Wipe off any excess grout with a damp sponge and let it dry for at least 24 hours. Finally, seal the grout lines with a grout sealer for added protection.
Preparing The Grout Lines
When it comes to filling grout lines for vinyl flooring, proper preparation is key. Before you begin the process, ensure that you have a clean and stable surface to work with. This will help to ensure a seamless and long-lasting result. In this section, we will cover the essential steps needed to prepare your grout lines for filling. From cleaning the surface to repairing any damaged grout lines, we have you covered.
Cleaning The Surface
To start the process of filling grout lines for vinyl flooring, you need to ensure that the surface is clean and free of any dirt, debris, or residue. Follow these simple steps to clean the surface effectively:
- Begin by sweeping or vacuuming the area to remove any loose dirt or dust.
- Next, use a mild detergent mixed with warm water to mop the floor. Make sure to wring out the mop well to prevent excess moisture on the vinyl flooring.
- Gently scrub the grout lines using a soft-bristle brush or a grout cleaning brush. This will help to loosen any stubborn dirt or grime.
- Rinse the floor thoroughly with clean water to remove any traces of detergent.
- Finally, dry the floor completely using a clean towel or allow it to air dry before moving on to the next step.
Repairing Damaged Grout Lines
Before filling the grout lines, it’s important to inspect and repair any damaged or deteriorated grout. Here’s how you can repair damaged grout lines:
- Start by removing any loose or crumbling grout from the damaged areas using a grout removal tool or a small chisel.
- Clean the exposed grout lines with a brush to remove any debris.
- Prepare a batch of grout according to the manufacturer’s instructions. Choose a grout color that closely matches the existing grout for a seamless finish.
- Using a grout float, apply the grout to the damaged areas, pressing it firmly into the gaps.
- Smooth the grout lines using the edge of the float, ensuring that the lines are filled evenly and at the same level as the surrounding grout.
- Allow the grout to dry for the specified time recommended by the manufacturer.
- Once the grout is dry, use a damp sponge to remove any excess grout on the surface of the vinyl flooring.
By following these steps to clean the surface and repair damaged grout lines, you will be ready to fill the grout lines for your vinyl flooring. This preparation process ensures a strong foundation for the filling process and helps to achieve a professional-looking result. Now that you have prepared the grout lines, you are ready to move on to the next steps in filling them.
Choosing The Right Grout
Ensure the perfect finish for your vinyl flooring by selecting the right grout to fill in the grout lines. Find out how to achieve a seamless look with these expert tips.
Vinyl flooring is a popular choice for homeowners due to its durability and easy maintenance. However, one crucial aspect of installing vinyl flooring is filling the grout lines. Grout not only enhances the overall appearance of the flooring but also provides stability by filling in the gaps. To achieve a flawless finish, it’s essential to choose the right grout. Let’s delve into the different types of grout and factors to consider when selecting the perfect one for your vinyl flooring project.
Understanding Different Types Of Grout
When it comes to grout, there are primarily three types to choose from: cement-based grout, epoxy grout, and urethane grout. Each type has its unique properties and benefits. Understanding these differences will help you make an informed decision for your vinyl flooring.
Cement-based Grout: This is the most common type of grout used for various flooring types, including vinyl. It is composed of cement, sand, and additives to improve its bonding and water resistance. Cement-based grout is affordable, easy to work with, and provides a stable base. However, it may require sealing to prevent stains and discoloration over time.
Epoxy Grout: Epoxy grout is a popular choice for high-traffic areas due to its exceptional durability and stain resistance. It is made of epoxy resin and a hardener, providing a strong bond and protection against moisture. Epoxy grout is highly resistant to chemicals and is available in a wide range of colors. However, it can be challenging to work with and requires meticulous application and cleanup.
Urethane Grout: Urethane grout offers the advantages of both cement-based and epoxy grout. It is flexible, durable, and resistant to stains and cracking. Urethane grout is also easier to work with compared to epoxy grout. Additionally, it provides better resistance to water, making it suitable for wet areas such as bathrooms and kitchens.
Considering Color And Consistency
When choosing the grout for your vinyl flooring, color and consistency play crucial roles in achieving the desired look. Here are some factors to consider:
Color: The color of the grout can significantly impact the overall appearance of your flooring. You can either choose a grout color that matches closely with your vinyl tiles for a seamless look or opt for contrasting colors to create a more dramatic effect. Pay attention to the undertones of your vinyl tiles to select a grout color that complements them.
Consistency: Grout consistency refers to the thickness or flowability of the grout mixture. For vinyl flooring, it’s recommended to use non-sanded grout, which has a smoother, finer consistency. This type of grout is suitable for narrow grout lines typically found in vinyl tiles. Non-sanded grout is easier to work with and provides better coverage when filling in the gaps.
In conclusion, choosing the right grout is a crucial step in filling the grout lines for vinyl flooring. Consider the different types of grout available and their properties to determine which one best suits your needs. Additionally, factor in the color and consistency of the grout to achieve the desired aesthetic result. By paying attention to these details, you can ensure a flawless finish for your vinyl flooring project.
Applying The Grout
Discover the right technique for filling grout lines for vinyl flooring. Achieve a flawless finish by applying the grout accurately and meticulously, ensuring a durable and visually appealing result.
Mixing The Grout
Mixing the grout properly is crucial to achieving a smooth and consistent texture. Start by reading the manufacturer’s instructions on the package to determine the appropriate water-to-grout ratio. This will ensure that the grout has the right consistency for easy application. In a clean container, pour the required amount of grout powder. Slowly add water while stirring continuously until you achieve a thick paste-like consistency. A good way to test if the grout is mixed correctly is by using the spoon or trowel; if the mixture holds its shape without being too runny or dry, it’s ready to be applied.
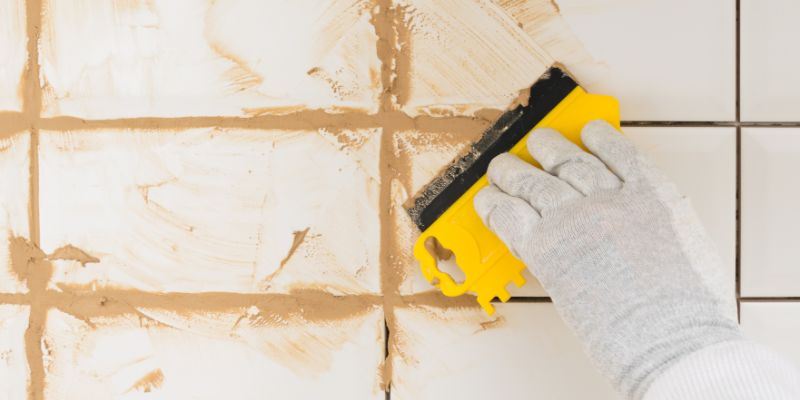
Applying The Grout To The Lines
Once the grout is mixed to the right consistency, it’s time to apply it to the grout lines. Using a grout float, start by taking a generous amount of grout and applying it diagonally to the lines. Make sure to push the grout firmly into the lines, ensuring it fills the gaps completely. Work in small sections to ensure that the grout doesn’t dry before you can smooth it out. As you go along, use the grout float at a 45-degree angle to scrape off any excess grout from the surface of the vinyl flooring. This will help create a smooth and even appearance once the grout dries.
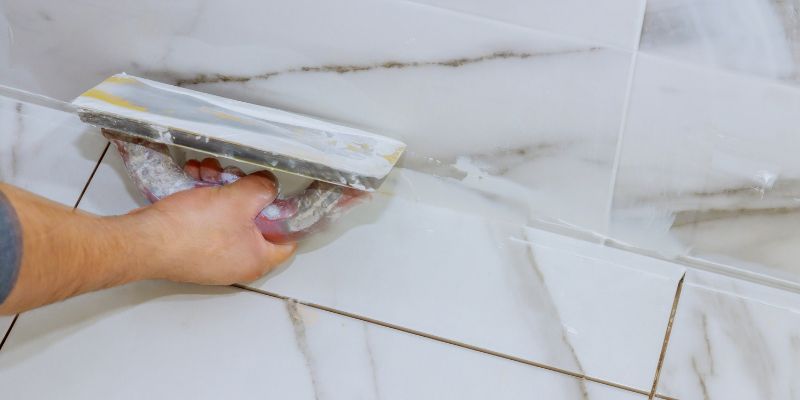
Removing Excess Grout
After applying the grout, it’s important to remove any excess before it dries. This will save you time and effort in the cleaning process later. Grab a damp sponge and gently wipe the surface of the vinyl flooring, ensuring that you don’t press too hard and dislodge the grout from the lines. Rinse the sponge frequently to avoid smearing the excess grout onto the floor again. Once you’ve removed most of the excess grout, let the grout dry for the recommended time as per the manufacturer’s instructions. Afterward, you can use a dry cloth to lightly buff the floor and remove any residue that may remain.
By following these steps, you can successfully apply and fill grout lines for vinyl flooring. Remember to mix the grout properly, apply it diagonally, and remove any excess before it dries. Taking the time to ensure that the grout fills the gaps completely will result in a professional-looking, durable vinyl flooring installation.
Frequently Asked Questions On How To Fill Grout Lines For Vinyl Flooring
What Do You Fill Grout Lines With?
Grout lines are typically filled with a mixture of cement and water, known as grout. This paste-like substance is applied to the gaps between tiles or stones, creating a solid and even surface.
How Do You Fill Gaps In Luxury Vinyl Flooring?
To fill gaps in luxury vinyl flooring, follow these steps:
1. Clean the gaps of dust and debris.
2. Measure the gap accurately.
3. Use a color-matched vinyl filler to fill the gaps.
4. Apply the filler carefully and smoothly.
5. Wipe off any excess filler and let it dry for the recommended time.
How Do You Hide Grout Lines?
To hide grout lines, consider using a grout colorant or sealer that matches your tile color. This helps to blend the lines and create a more seamless appearance. Additionally, using larger tiles or tiles with rectified edges can minimize the visibility of grout lines.
Will Grout Lines Show Through Vinyl Flooring?
Yes, grout lines may show through vinyl flooring depending on the thickness of the vinyl and the depth of the grout lines.
Conclusion
To sum up the process of filling grout lines for vinyl flooring, begin by prepping the surface and ensuring it is clean and dry. Next, apply the grout using a trowel or grout sponge, making sure to fill the entire space between the tiles.
Once the grout is applied, wipe off any excess and allow it to dry thoroughly. Finally, seal the grout to protect it from dirt and moisture. By following these steps, you can achieve a professional and long-lasting finish for your vinyl flooring.