How to Install a Threaded Insert: Step-by-Step Guide
To install a threaded insert, first choose the appropriate size for your project. Then, drill a hole that matches the size of the insert and use a threaded insert installation tool to insert it into the hole.
Factors To Consider When Selecting A Threaded Insert
Selecting a threaded insert requires considering several factors such as material compatibility, thread size, and installation method. By carefully assessing these elements, you can ensure a successful installation process and optimal performance of the insert.
When it comes to installing a threaded insert, it is essential to consider several factors to ensure optimal performance and longevity. Here are the key factors to keep in mind when selecting a threaded insert:
Material Compatibility:
- Threaded insert material: Select a threaded insert that is compatible with the material of the workpiece. Common materials for threaded inserts include brass, stainless steel, and zinc alloy.
- Workpiece material: Determine the material of the workpiece, such as wood, plastic, or metal, and choose a threaded insert that is suitable for that specific material.
- Thread type: Consider the thread type required for your application, whether it is a coarse thread, fine thread, or a specific type like UNC or UNF. Ensure that the threaded insert matches the corresponding workpiece thread.
Load Requirements:
- Insert strength: Assess the load requirements of your project and choose a threaded insert with sufficient strength to withstand the anticipated loads. Factors such as shear strength and pull-out strength should be considered.
- Weight distribution: Evaluate the weight distribution of your application and select a threaded insert that can evenly distribute the load to prevent any concentration of weight in specific areas.
- Environmental conditions: Take into account the environmental conditions the threaded insert will be exposed to, such as high temperatures or corrosive elements, and choose a material that can withstand these conditions.
Installation Method:
- Insertion technique: Consider the type of installation method that suits your needs. Threaded inserts can be installed using various techniques, including hand installation, press installation, or heat installation.
- Tool requirements: Determine the tools that will be needed to install the threaded insert correctly. Some installation methods may require specialized tools or equipment.
- Ease of installation: Evaluate the ease of installation for each method and choose the one that aligns with your skill level and available resources.
Remember to carefully consider these factors when selecting a threaded insert to ensure a successful installation and optimal performance. By choosing the right threaded insert that is compatible with the material, meets the load requirements, and utilizes the appropriate installation method, you can ensure a sturdy and durable connection.
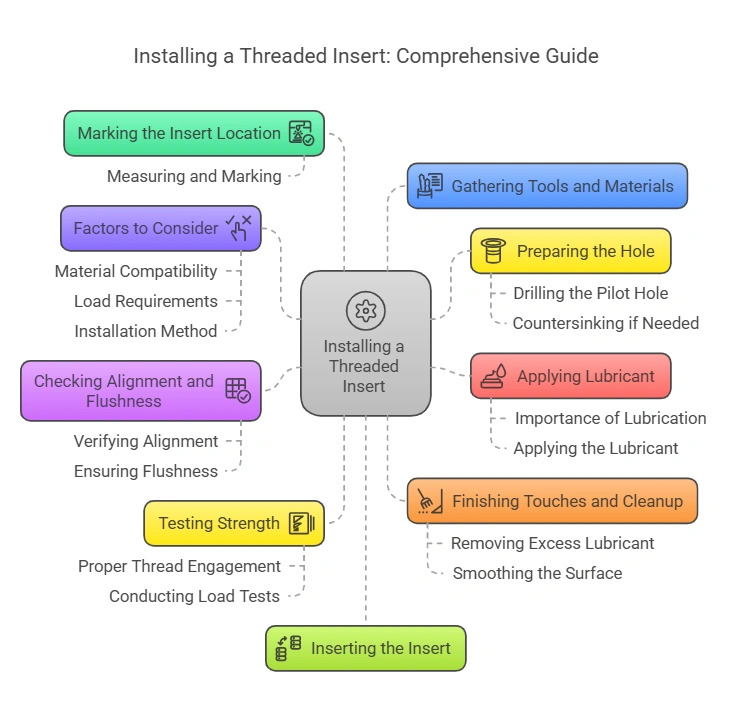
Marking The Insert Location
To install a threaded insert, it’s crucial to accurately mark the insert location. This step ensures precise installation and avoids any potential misalignment or damage during the process. By carefully marking the insertion point, you can achieve a secure and successful threaded insert installation.
Measuring And Marking The Hole Position
Before you can install a threaded insert, you need to measure and mark the location where the insert will be placed. This ensures accurate and secure installation. Follow these steps to get started:
- Start by determining the surface where you want to install the threaded insert.
- Measure the diameter of the insert using a caliper or measuring tape.
- Mark the center point of the hole on your chosen surface using a pencil or marker. Make sure the mark is clear and visible.
- Double-check the accuracy of your mark by measuring the distance from the edge of the surface to the center point. This will ensure proper alignment.
- Use a center punch to create a small indentation on the marked center point. This will help guide the drill bit and prevent it from slipping.
- Secure the surface in place, if possible, to prevent any movement or shifting during the drilling process.
Remember, the accuracy of the marking will greatly impact the quality and stability of the threaded insert installation. Take your time and ensure all measurements and markings are precise before proceeding to the next step.
Preparing The Hole For Insertion
To install a threaded insert, it is crucial to prepare the hole properly. This involves ensuring the hole is clean and clear of debris, choosing the right size bit for drilling, and using a tapping technique to create threads for the insert to be screwed into securely.
Before installing a threaded insert, it is crucial to properly prepare the hole to ensure a secure and long-lasting fit. This involves drilling a pilot hole and potentially countersinking if needed. Let’s dive into the steps required for each of these processes:
Drilling The Pilot Hole
To begin, you’ll need to drill a pilot hole, which will serve as a guide for the threaded insert. Follow these steps:
- Start by selecting the appropriate drill bit size based on the thread size and insert dimensions. Refer to the manufacturer’s guidelines for the recommended drill bit size.
- Secure the workpiece in a vice or clamp to prevent it from moving during drilling.
- Position the drill bit at a 90-degree angle to the surface of the workpiece.
- Apply steady and gentle pressure as you start drilling the pilot hole. Avoid using excessive force, as it may result in a hole that is either too large or not straight.
- Drill the hole to the recommended depth, ensuring it matches the length of the threaded insert. Measure the depth using a depth gauge or marking the drill bit.
- Once the pilot hole is complete, remove any debris or wood chips from the hole using a brush or compressed air.
Countersinking if Needed:
In certain cases, you may need to countersink the hole to allow the threaded insert to sit flush with the surface. Here’s how to proceed:
- Select a countersink drill bit with an appropriate angle and diameter for the job. Ensure the countersink matches the outer diameter of the threaded insert.
- Position the countersink drill bit over the pilot hole, aligning it with the center of the hole.
- Apply gentle pressure and rotate the countersink drill bit in a clockwise motion to create a recessed area around the pilot hole.
- Check the fit by placing the threaded insert into the countersunk area. Ensure it sits flush with the surface of the workpiece. If needed, adjust the countersink using the drill bit until the fit is correct.
- Once the countersinking is complete, remove any debris or wood chips from the hole.
By properly preparing the hole through drilling a pilot hole and, if necessary, countersinking, you’ll be ready to insert your threaded insert securely. These steps ensure a proper fit, minimizing any potential issues down the line. So, let’s move on to the next step of the installation process!
Gather The Necessary Tools And Materials
To install a threaded insert, the first step is to gather all the necessary tools and materials. This includes the threaded inserts themselves, a drill, a drill bit, a tap, a wrench, and a hammer. Ensure that you have everything you need before beginning the installation process.
Before you can begin installing a threaded insert, it’s important to gather all the tools and materials you will need. Ensuring that you have everything prepared beforehand will save you time and frustration during the installation process. Here is a list of the tools and materials you will need:
- Power drill or tap handle: You will need either a power drill or a tap handle to create the initial hole for the threaded insert.
- Drill bit or tap: Depending on the type and size of the threaded insert, you will require an appropriate drill bit or tap.
- Threaded insert: Choose the appropriate threaded insert for your specific application. They come in various sizes and materials, such as metal or plastic.
- Screwdriver or wrench: A screwdriver or wrench will be necessary to tighten the threaded insert securely into place.
- Lubricant: Applying lubricant to the drill bit or tap will help reduce friction during the installation process.
- Safety goggles and gloves: It’s crucial to protect your eyes and hands while drilling and handling the tools.
- Measuring tape or ruler: Accurate measurements are essential to ensure proper placement and alignment of the threaded insert.
- Pencil or marker: Use a pencil or marker to mark the location where you will install the threaded insert.
- Dust mask: Wearing a dust mask is advisable to protect yourself from any dust or debris that may be produced during drilling.
- Cleaning cloth: Keep a cleaning cloth nearby to remove any excess debris or residue.
By gathering all these tools and materials before starting the installation process, you’ll be well-prepared and ready to proceed smoothly with the next steps.
Step 1: Applying Lubricant To The Insert
To begin installing a threaded insert, the first step is to apply lubricant to the insert. This helps to ensure smooth and seamless insertion into the designated area. Follow this crucial step for a successful installation process.
Installing a threaded insert may seem like a daunting task, but with the right guidance, it can be a straightforward process. One crucial step in this process is applying lubricant to the insert. In this section, we will discuss the importance of lubrication and how to apply it correctly.
Importance Of Lubrication
Lubrication plays a vital role when installing threaded inserts. It helps to reduce friction and enables smoother and easier insertion of the insert into the material. Here are some key reasons why lubricating the insert is important:
- Facilitates Easy Installation: Lubrication ensures a smooth transition of the threaded insert into the material, preventing any resistance or binding that may occur due to friction.
- Minimizes Damage: By applying lubricant, you reduce the risk of damaging either the insert or the material during the installation process. This minimizes the chances of any thread stripping or material distortion.
- Reduces Wear and Tear: The lubricant creates a protective barrier between the insert and the material, reducing wear on both surfaces. This helps to extend the lifespan of the insert and promotes longevity of the overall assembly.
Now that we understand the significance of lubrication, let’s dive into the process of applying it correctly.
Applying The Lubricant
To ensure a successful installation, follow these steps to apply lubricant to the threaded insert:
- Step 1: Select an Appropriate Lubricant: Choose a lubricant specifically designed for threaded inserts. It should have good lubricating properties and be compatible with the materials involved.
- Step 2: Clean the Insert: Before applying the lubricant, make sure the insert is clean and free from any debris or contaminants. This ensures optimal adhesion of the lubricant to the insert surface.
- Step 3: Apply the Lubricant: Using a small brush or applicator, apply a thin layer of lubricant to the exterior of the threaded insert. Make sure to cover all the surfaces evenly.
- Step 4: Spread the Lubricant: With a cloth or your fingertip, spread the lubricant evenly across the entire surface of the insert. This ensures that the lubricant is evenly distributed and provides maximum effectiveness during the installation process.
- Step 5: Remove Excess Lubricant: After spreading the lubricant, wipe off any excess using a clean cloth. This prevents any accumulation of excess lubricant that could potentially interfere with the insertion process.
By following these simple steps, you can ensure proper lubrication of the threaded insert, making the installation process smoother and more efficient.
Remember, lubrication is a critical step in the installation of threaded inserts. It not only facilitates the process but also helps to prevent damage and extend the lifespan of the assembly. So, don’t skip this step!
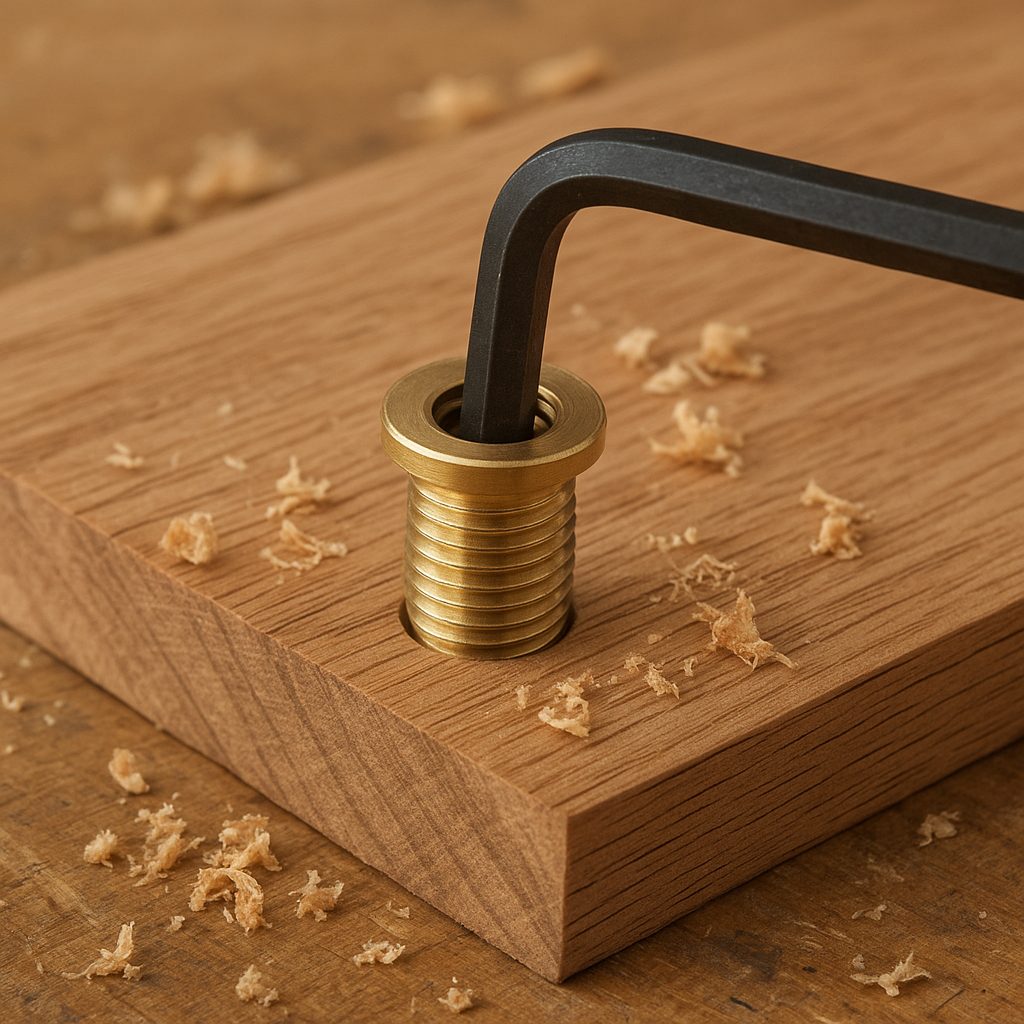
Step 2: Inserting The Insert
To install a threaded insert, the second step is to insert the insert into the desired hole and make sure it is aligned correctly.
Positioning the Insert:
- Start by identifying the location where you want to insert the threaded insert.
- Make sure the area is clean and free from any debris or obstructions.
- It is important to choose a spot that is easily accessible for the insertion tool.
Using the Insertion Tool:
- Attach the insertion tool to the end of the threaded insert.
- Hold the tool perpendicular to the surface where the insert will be installed.
- Align the insert with the hole or threaded opening, ensuring a proper fit.
Applying Pressure and Rotating:
- Once the insert is properly positioned, apply pressure to the top of the insertion tool.
- This will push the insert into the hole.
- While applying pressure, start rotating the insertion tool clockwise.
- The rotation helps to thread the insert into the material and ensure a secure fit.
Remember, it is important to be careful and not apply excessive force during this step. The goal is to insert the threaded insert firmly without damaging the material or the insert itself.
Now that you have successfully inserted the threaded insert, you are ready to move on to the next step in the installation process.
Step 3: Checking The Insert Alignment And Flushness
To ensure a proper and secure installation of a threaded insert, it is essential to check its alignment and flushness. By following step 3 of the installation process, you can ensure that the insert is in the correct position and sits flush with the surface, providing optimal performance.
Verifying Alignment:
Before proceeding with the installation of a threaded insert, it is crucial to ensure that the insert’s alignment is correct. This will help prevent any complications or issues in the later stages of the installation process. The following steps will guide you through the process of verifying alignment:
- Inspect the hole: Begin by examining the hole where you plan to install the threaded insert. Make sure it is clean and free from any debris that could affect the alignment.
- Align the insert: Place the threaded insert into the hole and ensure it fits snugly. Use your fingers to gently rotate it, checking for any misalignment or resistance.
- Use a gauge or alignment tool: To further verify the alignment, utilize a gauge or alignment tool specifically designed for threaded insert installations. This will provide a more accurate assessment.
- Check for proper fit: Double-check that the insert fits perfectly within the hole. It should be flush with the surface or slightly below it, depending on the specific requirements of your project.
Ensuring Flushness:
Once you have verified the alignment of the threaded insert, the next step is to ensure its flushness. This is essential to ensure the stability and functionality of the insert. Follow these steps to achieve the desired flushness:
- Evaluate the position: Examine the position of the threaded insert in relation to the surface. It should be level and aligned properly, neither protruding nor sunk too deep.
- Use a depth gauge: Measure the depth of the insert using a depth gauge. This will help you determine if it is flush with the surface or if you need to make any adjustments.
- Apply gentle pressure: Use your fingers or a suitable tool to apply gentle pressure on the insert, ensuring it is seated securely without any gaps or unevenness.
- Check for protrusion or sinking: Run your hand over the surface, feeling for any protrusion or sinking of the insert. It should be perfectly aligned with the surrounding material.
By following these steps to verify alignment and ensure flushness, you can achieve a successful and secure installation of a threaded insert. Take the time to double-check these aspects to avoid any potential complications down the line.

Step 4: Testing The Insert’S Strength
In step 4 of the threaded insert installation process, it is important to test the strength of the insert. This ensures that the insert is securely in place and can withstand the required load. Proper testing ensures a reliable and durable threaded insert installation.
Ensuring Proper Thread Engagement
To ensure that the threaded insert is securely installed, it is crucial to confirm proper thread engagement. This step will help you avoid any issues or complications down the line. Here are some key points to keep in mind when checking the insert’s thread engagement:
- Start by inspecting the depth of the insert. Measure the distance from the top of the insert to the surface it has been installed into. This will ensure that the insert is properly seated within the material.
- Check the number of threads that are engaged. Ideally, you should have at least one full thread engaged to ensure maximum strength and stability.
- Verify the alignment of the insert. Make sure that it is straight and properly aligned with the surface it is installed into. This will prevent any binding or loosening of the insert.
- Use a gauge or thread checking tool to verify the thread engagement. This will help you determine if the insert is securely in place and properly aligned.
By taking these steps to ensure proper thread engagement, you can guarantee that the threaded insert will provide the strength and durability required for your project.
Conducting Load Tests:
After confirming the proper thread engagement, it is essential to conduct load tests to assess the strength of the inserted thread. These tests will help determine if the insert can withstand the expected load or if any adjustments need to be made.
Here’s how to conduct load tests effectively:
- Determine the load capacity required for your specific application. This will depend on the intended use and the materials involved. Consult the manufacturer’s guidelines or engineering specifications to ensure accurate load calculations.
- Apply the load gradually to the insert. Start with a lighter load and increase it gradually, monitoring any signs of failure or thread stripping.
- Observe the insert for any signs of deformation or loosening as the load is applied. These could be indications of insufficient thread engagement or other issues that need to be addressed.
- Record the load at which the insert reaches its maximum capacity without failure. This will help you determine the insert’s load-bearing capabilities and make any necessary adjustments for your project.
By conducting load tests, you can ensure that the threaded insert is strong enough to withstand the expected forces and provide reliable performance.
Step 5: Finishing Touches And Cleanup
Learn how to finish your threaded insert installation with step five – Finishing Touches and Cleanup. This essential step ensures a clean and professional result for your project. Follow these guidelines for a successful installation process.
Installing a threaded insert is a simple process that can provide added strength and durability to various materials. After completing the installation steps, it’s important to give the threaded insert a final touch to ensure a seamless finish. In this step, we will discuss two crucial aspects of finishing touches and cleanup: Removing Excess Lubricant and Smoothing the Surface.
Removing Excess Lubricant
Removing excess lubricant is essential to prevent any potential build-up that could affect the integrity of the threaded insert. Follow these steps to ensure a clean and polished installation:
- Use a lint-free cloth or paper towel to wipe away any excess lubricant on the surface of the threaded insert. This will help avoid any potential drips or smudges.
- Gently brush the area around the insert using a soft-bristle brush to remove any residual lubricant particles or debris. Be cautious not to apply excessive force that might damage the surrounding material.
- Inspect the threaded insert and surrounding area for any remaining lubricant. If needed, repeat the wiping and brushing process until the surface is free from excess lubricant.
- Take a moment to let the area dry completely before moving on to the next step.
Smoothing The Surface
Smoothing the surface around the threaded insert will provide a polished appearance and ensure a tight fit. Here’s how you can achieve a smooth finish:
- Use a fine-grit sandpaper or emery cloth to gently sand the surface around the installed threaded insert. Make sure to apply light pressure and use smooth, even strokes to avoid damaging the surrounding material.
- Continue sanding until the surface feels smooth and any rough edges or imperfections have been removed.
- Once the surface is smooth, wipe away any residual sanding dust using a clean, dry cloth. This will give you a clearer view of the finished result and help you identify any remaining inconsistencies.
- Take a moment to inspect the area and make any necessary adjustments or additional sanding to achieve the desired smoothness.
By following these steps of removing excess lubricant and smoothing the surface, you can ensure a professional and seamless finish to your threaded insert installation. Taking the time to complete these final touches will not only enhance the overall appearance but also contribute to the long-lasting functionality of the threaded insert.

Frequently Asked Questions For How To Install A Threaded Insert
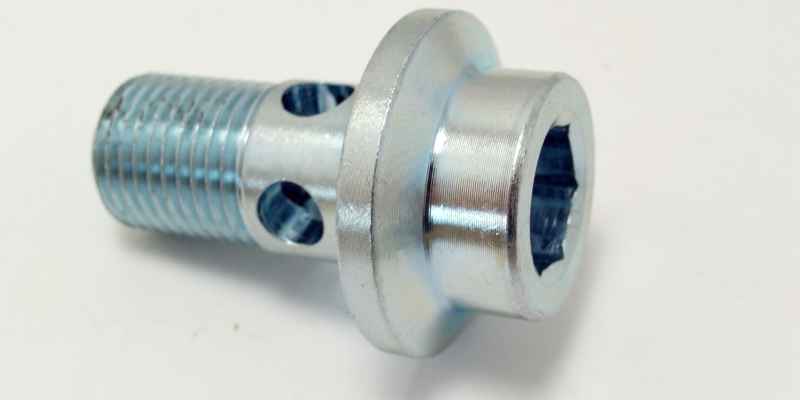
How Do You Install A Threaded Metal Insert?
To install a threaded metal insert, follow these steps:
1. Drill a hole with the same diameter as the insert.
2. Use a tap to create threads inside the hole.
3. Apply adhesive or epoxy to the outside of the insert.
4. Screw the insert into the hole using a wrench.
How Do You Secure Threaded Inserts?
To secure threaded inserts, follow these steps:
1. Choose the appropriate size and type of threaded insert for your application.
2. Use the correct tool, such as an insert driver or threaded insert tool, to install the insert securely.
3. Ensure the insert is aligned properly with the hole before installation.
4. Apply sufficient force while inserting the threaded insert to ensure a tight and secure fit.
Should I Glue Threaded Inserts In Wood?
Yes, it is recommended to glue threaded inserts in wood for secure and lasting attachment.
How Do You Use A Threaded Insert Kit?
To use a threaded insert kit, follow these steps:
1. Choose the appropriate size threaded insert for your project.
2. Drill a hole in the material to the recommended depth.
3. Insert the threaded insert into the hole using the provided installation tool.
4. Turn the tool clockwise to thread the insert securely into place.
Conclusion
To recap, installing a threaded insert may seem like a daunting task, but with the right tools and guidance, it can be a straightforward process. Start by choosing the appropriate insert for your material and application. Then, prepare the hole by drilling or tapping it to the correct size.
Insert the threaded insert into the hole, ensuring it is securely seated. Finally, use a tool such as a screwdriver or wrench to tighten the insert into place. By following these steps and paying attention to detail, you can confidently install a threaded insert and strengthen the durability and functionality of your project.
Remember to always refer to the manufacturer’s instructions for specific guidance and take your time to ensure a proper installation. With the knowledge and skills gained from this guide, you can tackle any threaded insert installation and achieve professional-looking results.