How to Lay Wood Flooring on Concrete: A DIY Guide
To lay wood flooring on concrete, it’s important to properly prepare the concrete subfloor, add a vapor barrier, and install the wood flooring according to manufacturer guidelines. While not recommended, lasting results can be achieved with the help of a qualified professional.
When it comes to installing wood flooring on concrete, preparation is key. The concrete subfloor should be clean and smooth, with heavy troweling or adhesive residue removed using a concrete grinder. A vapor barrier should be added before installing the wood flooring according to manufacturer guidelines.
While not generally recommended, a qualified professional can help achieve lasting results. Read on to learn more about how to lay wood flooring on concrete.
Preparing The Concrete Subfloor
To lay wood flooring on concrete, you must prepare the concrete subfloor beforehand. This involves cleaning the surface thoroughly and removing any adhesive residue or troweling. A vapor barrier is also required to prevent moisture from penetrating the surface.
Before laying wood flooring on concrete, it is important to prepare the concrete subfloor properly. The preparation process involves three key steps which are cleaning the concrete subfloor, removing heavy troweling or adhesive residue, and adding a vapor barrier. Here’s how to go about each step:
Cleaning the Concrete Subfloor:
The concrete subfloor should be clean and free of debris before installing your wood flooring. Use a broom or vacuum to remove any dirt or dust, and then use a damp mop to clean the surface thoroughly. A clean and smooth surface gives a good foundation for your wood flooring.
Removing Heavy Troweling or Adhesive Residue:
If your concrete subfloor has any heavy troweling or adhesive residue, then it must be removed before laying wood flooring. You can use a concrete grinder or a floor scraper to remove the troweling or adhesive residue. After removing the residue, make sure the surface is clean and smooth.
Adding a Vapor Barrier:
A vapor barrier is necessary to prevent moisture from seeping into your wood flooring from the concrete subfloor. You can use a 6-mil polyethylene plastic sheet as a vapor barrier. It should be laid over the concrete subfloor, overlapping the edges by 6-8 inches. Use a duct tape to secure the seams.
In conclusion, preparing the concrete subfloor is essential to the success of laying wood flooring on concrete. Cleaning the concrete surface, removing heavy troweling or adhesive residue, and adding a vapor barrier are the three critical steps in the preparation process. By following these steps, you’ll ensure your wood flooring is installed on a stable and moisture-free base that will last for years to come.
Choosing The Right Glue
Choosing the right glue is essential when laying wood flooring on concrete. Before starting, ensure that the concrete subfloor is clean, smooth, and has a vapor barrier. Installing a wood floor directly on concrete is generally not recommended, so it’s best to follow your manufacturer’s guidelines and talk to a qualified professional.
When it comes to laying wood flooring on concrete, one of the most important factors is choosing the right glue. Not all glues are created equal, and some are better suited for certain applications than others.
Glues that Act as Vapor Barrier
One type of glue to consider is a glue that also acts as a vapor barrier. This type of glue can help prevent moisture from seeping up through the concrete and damaging your wood flooring. It is especially important to consider this type of glue if you live in an area with high humidity levels.
Moisture Level Consideration
Another important factor to consider when choosing a glue is the moisture level of your concrete. If your concrete subfloor is too moist, it can cause the glue to fail, resulting in buckling or warping of your wood flooring. Be sure to test the moisture level of your concrete before proceeding with any installation, and choose a glue that is suitable for the level of moisture you have.
In conclusion, choosing the right glue is crucial when laying wood flooring on concrete. Consider glues that act as a vapor barrier and take into account the moisture level of your concrete subfloor. With the right glue and proper installation techniques, you can enjoy beautiful and durable wood flooring that will last for years to come.
Installing The Wood Flooring
To lay wood flooring on concrete, prepare the subfloor by ensuring it is clean and smooth, removing any adhesive residue with a concrete grinder, and adding a vapor barrier. Follow your flooring manufacturer’s guidelines for installation and consider talking to a professional.
When it comes to laying wood flooring on concrete, the installation process involves a few important steps to ensure the longevity and durability of the flooring. In this section, we will discuss the crucial steps involved in installing wood flooring on concrete.
Spreading the Adhesive
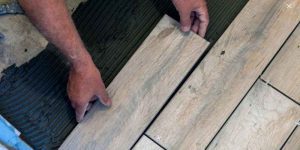
Before laying down the wood flooring planks, it is important to spread the adhesive on the concrete surface. The adhesive helps in creating a strong bond between the wood and the concrete surface. It is recommended to use a notched trowel to spread the adhesive evenly. Make sure to follow the manufacturer’s guidelines and only use the recommended amount of adhesive.
Laying Down the Flooring Planks
Once the adhesive is spread evenly on the concrete surface, it’s time to lay down the wood flooring planks. Begin at one corner of the room and lay one row of planks at a time, ensuring a tight fit between each plank. It’s important to pay close attention to the patterns of the wood for a seamless finish. For a more rustic look, stagger the boards by starting each new row with a shorter plank.
Applying Pressure to the Flooring
After laying down each row of planks, it’s important to apply pressure to ensure the planks are securely attached to the concrete surface. A flooring roller is the best tool for applying pressure. Roll the flooring roller over the planks in both directions to ensure maximum coverage.
Checking for Raised or Drummy Spots
Finally, after all the planks are installed, it’s important to check for raised or drummy spots. Raised or drummy spots can cause the wood flooring planks to lift and become damaged over time. To check for these spots, lightly tap on the surface of the wood using a mallet. If any area sounds hollow or produces an echo, it could indicate a raised or drummy spot and requires immediate attention.
In conclusion, installing wood flooring on concrete requires proper preparation, careful consideration of moisture levels, and a methodical approach. By following these steps, you can ensure a beautiful, long-lasting wood floor in your home or business.
Transitioning Wood To Other Flooring Types
Learn how to successfully lay wood flooring on concrete with our expert guide. From removing old flooring to cutting boards to length and installing corner moulding, this DIY project requires attention to detail and precision to achieve a beautiful final look.
Make sure to follow your manufacturer’s guidelines and talk to a professional before installing wood floors over concrete.
Transitioning To Vinyl
Transitioning wood to vinyl flooring can be a bit of a challenge, but it’s definitely doable. It’s essential to know that vinyl is different from hardwood as it is thinner and more flexible. There are specific vinyl transition strips or moldings for this type of installation. You’ll need to measure the gap between the wood flooring and the vinyl flooring to determine the transition strips’ length accurately. After measuring, cut the transition strip to the required length using a saw.
You can use a construction adhesive to attach the bottom side of the transition strip to the floor and the top side to the vinyl, making sure it sits tightly and the bond is strong. With this simple process, you can seamlessly transition from your wood flooring to vinyl.
Corner Moulding Installation
Corner moldings are an inexpensive, practical, and visually appealing way of finishing off the edges of your wood flooring while transitioning to other types of flooring. They allow for a precise fit, especially in corners and doorways where the wood flooring is most susceptible to damage. To install corner molding, measure the length for the cut then cut the molding along that length using a saw.
Make sure the end of the corner molding is cut at a 45-degree angle to fit perfectly into the corner. Secure the corner molding using a construction adhesive, and you can finish it with paint or stain to match the flooring color. The corner moldings give your floors a clean and polished look while still being functional.
In conclusion, transitioning wood to other flooring types can be tricky, but it’s possible with the right installation techniques. With vinyl transition strips and corner moldings, a seamless installation is achievable, providing a clean finish to your floors.
Final Touches
To lay wood flooring on concrete, it is important to have a clean and smooth concrete subfloor. Use a concrete grinder to remove heavy troweling or adhesive residue, then clean thoroughly. Add a vapor barrier and follow the guidelines provided by the flooring manufacturer.
Finally, install the engineered wood flooring on the concrete subfloor and let it acclimate.
You have made it through the process of laying wood flooring on concrete, congratulations! Now it’s time for the final touches that will bring the project together. Here are some final touches that you may want to consider.
Cutting Boards to Length
One of the most important things to do now is to cut the boards to length. Make sure you measure twice and cut once. You will want to use a circular saw or table saw to get precise cuts. It’s important to leave a 1/2 inch gap between the boards and the wall. This gap will allow for contraction and expansion of the wood due to temperature fluctuations.
Sanding and Finishing
After cutting the boards, sanding and finishing the flooring is the next step. Use an electric sander to sand the boards and make sure all the edges are smooth and even. This will help to ensure that the final finish is smooth and free of bumps or scratches. When applying the finish, consider using a stain to bring out the natural beauty of the wood or a sealant to protect it from moisture.
Final Look
Lastly, The “Final Look” is important after you have applied the finish. You want to ensure that the flooring looks even and beautiful. Take your time to inspect the floor, checking for any missed spots in the finishing, gaps between boards that need filling. Once you are satisfied with how the floor looks, you can enjoy the satisfaction of a job well done.
In conclusion, the final touches are important to consider when laying wood flooring on concrete. By taking the time to cut the boards accurately, sanding and finishing the floor correctly, and ensuring the final look is top-notch, you will have a floor that is not only beautiful but also functional.
Frequently Asked Questions For How To Lay Wood Flooring On Concrete
Can You Put Wood Flooring Directly On Concrete?
While not recommended, there are ways to install wood floors over concrete for lasting results. It’s important to talk to a qualified professional and follow manufacturer’s guidelines. The concrete subfloor should be clean and smooth with a vapor barrier added.
You do not always need a wood floor underlay for solid hardwood flooring on concrete.
How Do You Prepare A Concrete Floor For Wood Flooring?
To prepare a concrete floor for wood flooring, ensure that the concrete subfloor is clean and smooth. Use a concrete grinder to remove any heavy troweling or adhesive residue and then clean the surface thoroughly. You will also need to add a vapor barrier.
Following the manufacturer’s guidelines and seeking qualified professional help is recommended.
What Do You Put Between Concrete And Wood Floors?
To lay wood flooring over concrete, you should prepare the concrete subfloor by making it clean and smooth. You can use a concrete grinder to remove heavy troweling or adhesive residue. After cleaning the concrete surface, you’ll need to add a vapor barrier.
In general, it’s recommended that you talk to a qualified professional before installing wood floors over concrete, and to follow your manufacturer’s guidelines for installing your flooring.
Do You Need Underlay For Solid Wood Flooring On Concrete?
Yes, it’s recommended to install an underlay for solid wood flooring on concrete as it helps with moisture control and sound insulation. It also provides a smooth and even surface for the flooring to be laid on. It’s important to follow the manufacturer’s guidelines and consult with a qualified professional for the installation process.
Conclusion
Installing wood flooring on concrete is a tricky process that requires proper planning and preparation to achieve a good result. Some people may be able to install wooden floors over concrete, but it’s always best to seek help from a qualified professional to ensure the best quality and lasting results.
Make sure to use a concrete grinder to remove heavy troweling or adhesive residue, clean thoroughly, and follow manufacturer guidelines when installing your desired flooring. With the right knowledge, tools and help, you can lay beautiful wood floors on concrete.