How to Make a Walking Stick From a Tree Branch
To make a walking stick from a tree branch, start by selecting a sturdy branch approximately hip height. Remove any side branches and smooth the surface using sandpaper.
Apply a protective coating to prevent rotting and add grip. Attach a rubber or metal end cap for traction and stability. Finally, personalize it with carvings or paint if desired. Making a walking stick from a tree branch is a simple and rewarding DIY project that provides a natural, eco-friendly walking aid.
Choosing The Right Tree Branch
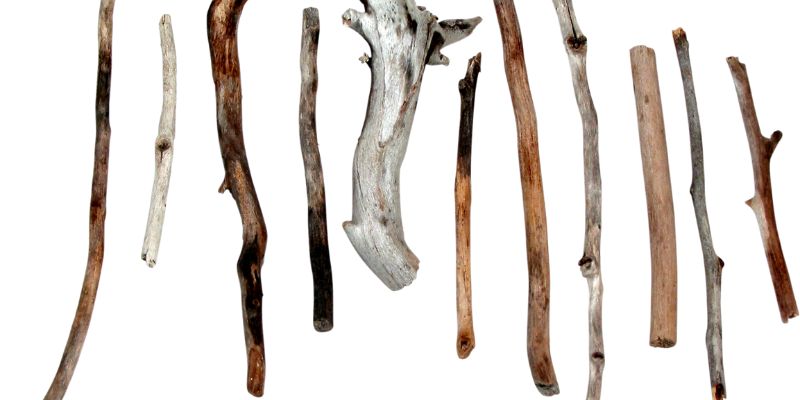
When it comes to creating your very own walking stick, one of the first and most important steps is choosing the right tree branch. Not just any branch will do – you’ll want to find a branch that is sturdy, straight, and suitable for your specific needs. In this article, we will guide you through the process of selecting the perfect branch to ensure that your walking stick is not only functional but also a beautiful, one-of-a-kind piece.
Finding A Suitable Tree Branch
Before you begin your search for the ideal branch, it’s essential to have a clear understanding of what you’re looking for. Consider the following factors when scouting for a suitable tree branch:
- Length and Width
- Wood Type
- Structural Integrity
Considerations For Branch Length And Width
When selecting a branch, it’s crucial to find one that matches your height and comfort level. As a general rule of thumb, your walking stick should reach up to your wrist when your arm hangs naturally at your side. This length ensures that you can maintain a proper posture and achieve optimum support while walking or hiking.
Additionally, take into account the width of the branch. The diameter should be thick enough to provide stability while also fitting comfortably in your grasp. A branch that is too narrow may cause discomfort and slipperiness, while one that is too wide may be too heavy or difficult to handle.
Examining The Branch For Structural Integrity
Once you’ve found a branch that meets the length and width requirements, it’s time to examine its structural integrity. Look for any signs of damage, such as cracks, splits, or mold. These flaws could compromise the strength and durability of your walking stick.
Inspect the bark for any loose or peeling sections. While minor imperfections can be sanded down, a branch with extensive bark damage may indicate underlying issues that make it unsuitable for carving or handling.
| Signs of Structural Damage | Action |
|---|---|
| Cracks or splits | Consider a different branch |
| Mold or rot | Avoid using the branch |
| Extensive bark damage | Look for a healthier branch |
By carefully examining the branch for structural integrity, you can ensure that your walking stick will be not only aesthetically pleasing but also safe and reliable for your adventures.
Preparing And Shaping The Branch
When it comes to making a walking stick from a tree branch, the first step is to prepare and shape the branch to ensure it is sturdy and comfortable to use. This process involves removing the bark and sanding the branch, as well as trimming and cutting it to the desired length. Additionally, shaping the walking stick handle is crucial for a comfortable grip. In this section, we will discuss each of these steps in detail.
Removing Bark And Sanding The Branch
To start, you will need to remove the bark from the branch. This can be done using a sharp knife or a dedicated bark removal tool. Carefully slide the edge of the knife under the bark and lift it away from the branch. Use gentle, controlled movements to avoid damaging the wood beneath.
After removing the bark, it’s time to sand the branch. Use sandpaper with a medium grit to smooth out any rough areas and give the wood a polished finish. Gradually work your way around the branch, using long, even strokes. Remember to sand in the direction of the grain for the best results.
Trimming And Cutting The Branch
Once the branch is bark-free and sanded, it’s time to trim and cut it to the desired length. Consider the ideal height of the walking stick based on your personal preference and comfort.
Using a saw or a sturdy pair of pruning shears, make a clean and straight cut across the branch. Ensure that the cut is perpendicular to the length of the branch for a level base.
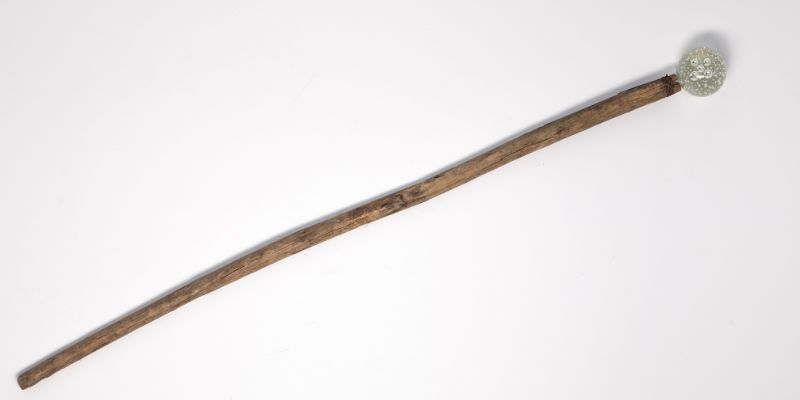
Shaping The Walking Stick Handle
Now that the branch is prepared and trimmed, it’s important to shape the handle for a comfortable grip. The handle can be shaped in various ways, depending on your preference and the natural shape of the branch.
Begin by determining the location of the handle on the branch. This will typically be the upper portion where your hand would naturally rest. Once decided, use a knife or a carving tool to shape the handle. Carve away small sections of the wood, gradually shaping it into a smooth and ergonomic grip.
Be mindful of any knots or irregularities in the wood as they can affect the comfort and functionality of the handle. Sand the handle area to ensure a comfortable grip, and smooth out any rough edges using fine-grit sandpaper.
Remember to take breaks during the process and regularly test the walking stick’s grip and comfort. This will allow you to make any necessary adjustments or refinements.
Finishing And Customizing Your Walking Stick
Learn how to transform a tree branch into a personalized walking stick through finishing and customization techniques.
Smoothing The Branch Surface
To start the finishing process of your walking stick, it is essential to focus on smoothing out any rough surfaces on the branch. This step is crucial to ensure a comfortable grip and a polished appearance. Use sandpaper with a medium grit to gently sand away any bumps, splinters, or rough edges. Make sure to sand in the direction of the grain of the wood for optimal results. Gradually work your way through higher grit sandpapers, such as fine-grit and extra fine-grit, to achieve a smooth and refined surface.
Applying Protective Finish
Once you have achieved a smooth surface on your walking stick, it’s time to apply a protective finish. A finish not only enhances the natural beauty of the wood but also provides protection against moisture, scratches, and other wear and tear. There are various types of finishes available, such as oils, varnishes, and waxes. Choose a finish that suits your preferences and the type of wood you are working with. Apply the finish evenly and follow the manufacturer’s instructions carefully to ensure successful application. Allow plenty of time for the finish to dry and cure before moving on to the next step.
Adding Personalized Touches
Now that you have the foundation of your walking stick finished, it’s time to add your personal touches to make it truly one-of-a-kind. There are countless ways to customize your walking stick according to your style and interests. Here are a few ideas to get you started:
- Carvings or engravings: Consider carving or engraving intricate designs, patterns, or symbols into the wood. This not only adds a unique aesthetic but can also hold personal significance.
- Paint or stain: Use paint or wood stain to add color and character to your walking stick. Experiment with different hues and techniques to achieve the desired look.
- Wrapping: Utilize leather, rope, or colorful cord to wrap sections of your walking stick. Not only does this add grip, but it also adds a touch of style.
- Attachments: Attach small accessories like beads, feathers, or small trinkets to give your walking stick a decorative flair.
- Personalization: Consider adding your initials, a meaningful quote, or small embellishments to make your walking stick uniquely yours.
Remember, the possibilities for customization are endless. Let your creativity and personal preferences guide you in adding those special touches that will make your walking stick a true reflection of your style and personality. Once you have completed the customization process, your handcrafted walking stick will not only serve its practical purpose but also become a cherished item that tells a story.
Using And Taking Care Of Your Walking Stick
A walking stick is not just an accessory; it can be a valuable tool that helps you maintain balance and stability while exploring the great outdoors. However, using and taking care of your walking stick properly is essential to ensure its longevity and your safety. In this section, we will explore a few key aspects of using and maintaining your walking stick.
Proper Grip And Technique
When it comes to using a walking stick, having the proper grip and technique is crucial. This ensures that you get the most out of your walking stick and prevent any unnecessary strain or injury.
Here are a few tips to remember:
- Maintain a relaxed grip on the walking stick, avoiding excessive tightness.
- Hold the stick firmly but not too tightly to allow for natural movement.
- Place your hand on the grip, making sure it is positioned in a way that feels comfortable and secure.
- As you walk, use the walking stick as a support, placing it slightly ahead of you and using it to distribute your weight.
- Remember to match the length of your walking stick to your height for optimal stability.
Maintaining The Walking Stick
Taking proper care of your walking stick is essential to ensure its longevity and performance. Regular maintenance helps prevent any damage or deterioration, ensuring you can rely on your walking stick whenever you need it.
Follow these tips to maintain your walking stick:
- Inspect your walking stick regularly for any signs of wear and tear. Look out for cracks, splinters, or loose components.
- If you notice any damage, repair it promptly. You can use epoxy or wood glue for minor repairs, but for extensive damage, it’s best to consult a professional.
- Keep your walking stick clean by wiping it down with a soft cloth after each use. This helps remove dirt and moisture that can potentially cause damage.
- If your walking stick gets wet, allow it to air dry completely before storing it. Avoid exposure to extreme heat or direct sunlight, as these can cause the wood to warp or crack.
- Consider applying a protective finish to the wood to enhance its durability and resistance to moisture.
Storing And Transporting The Walking Stick
When you’re not using your walking stick, proper storage is essential to keep it in optimal condition. Additionally, knowing how to transport your walking stick safely allows you to take it with you on your outdoor adventures.
Here are some guidelines for storing and transporting your walking stick:
- Find a suitable storage location where your walking stick is protected from moisture, direct sunlight, and extreme temperatures.
- If possible, store your walking stick in an upright position to prevent warping or bending. You can use a walking stick stand or simply lean it against a wall.
- When transporting your walking stick, protect it by using a carrying bag or wrapping it in a soft cloth.
- Avoid placing heavy objects on top of your walking stick, as this can cause it to become misshapen or damaged.
- If you plan to travel by air, check with the airline’s policies regarding carrying and storing walking sticks.
Frequently Asked Questions For How To Make A Walking Stick From A Tree Branch
Can I Make A Walking Stick From A Tree Branch?
Yes, you can make a walking stick from a tree branch. Select a sturdy branch, preferably about shoulder height, and remove any twigs or leaves. Trim it to the desired length and sand it smooth. Add a handle if desired and finish with a protective sealant or stain.
What Tools Do I Need To Make A Walking Stick From A Tree Branch?
To make a walking stick from a tree branch, you will need a few tools. These include a saw or pruners to cut the branch to the desired length, sandpaper to smooth the surface, and possibly a wood carving tool if you want to add a handle or decorative details.
Optional tools include a drill for adding grip or a stain or sealant for a finished look.
How Should I Choose A Tree Branch For A Walking Stick?
When choosing a tree branch for a walking stick, look for one that is sturdy and straight. It should be about shoulder height or slightly taller when held upright. Avoid branches with significant knots or cracks, as these can weaken the stick.
Additionally, consider the type of wood and its hardness to ensure durability.
Conclusion
Making a walking stick from a tree branch is a rewarding and practical DIY project. By following these simple steps, you can create a personalized walking stick that suits your needs and style. Whether for hiking, balance, or simply as a decorative piece, transforming a tree branch into a functional tool is a creative and fulfilling endeavor.
Embrace your creativity and enjoy the process of crafting your very own walking stick.