How to Make Dividers for a Box: A Step-by-Step Guide
To make dividers for a box, measure the interior dimensions of the box and cut strips of cardboard or foam board to fit across the width and length of the box. Slide the dividers into the box to create compartments for organizing items.
Choosing The Right Materials
When it comes to making dividers for your box, choosing the right materials is key. The materials you use will determine the durability and functionality of your dividers. In this blog post, we will explore two popular options: cardboard and foam board.
Cardboard Or Foam Board
Cardboard and foam board are commonly used materials for making dividers due to their versatility and affordability. Let’s take a closer look at each option:
| Cardboard | Foam Board |
|---|---|
| ✓ Lightweight and easy to work with | ✓ Provides better insulation and cushioning |
| ✓ Can be easily customized to fit your box | ✓ Offers a uniform thickness for consistent dividers |
| ✓ Available in various thicknesses | ✓ Resistant to moisture and chemicals |
Both cardboard and foam board have their own advantages, so it’s important to consider your specific needs before making a choice.
Measuring And Cutting Tools
Once you have decided on the material, the next step is to gather the necessary measuring and cutting tools. These tools will help you achieve accurate measurements and precise cuts for your dividers. Here are some essentials:
- Tape measure or ruler to measure the dimensions of your box
- Pencil or marker to mark the measurements on the material
- Box cutter or craft knife to make clean and straight cuts
- Straightedge or T-square to guide your cuts
Having these tools handy will make the process of creating dividers much easier and ensure professional-looking results.
Preparing The Dividers
To prepare the dividers for a box, measure the internal dimensions and cut the cardboard pieces accordingly. Ensure the dividers fit snugly inside the box by marking and scoring folding lines. Finally, fold the cardboard along the scored lines to create the dividers.
When it comes to organizing your belongings, using dividers in a box is an efficient and neat solution. Dividers help separate and categorize items, making it easier to find and access them. In this section, we will go through the steps involved in preparing dividers for a box. This includes measuring the box interior accurately and cutting the dividers to fit perfectly.
Measuring The Box Interior
Before you start cutting the dividers, it is essential to measure the interior of the box accurately. This ensures that the dividers will fit snugly, providing stability and functionality to the arrangement.
Follow these steps to measure the box interior:
- Open the box and remove any existing contents, if applicable.
- Take a measuring tape and measure the length, width, and height of the box interior.
- Write down these measurements, as you will need them while cutting the dividers.
Cutting The Dividers
Once you have the measurements handy, it’s time to cut the dividers to the right size. You can use various materials such as cardboard, foam board, or plywood for the dividers, depending on the sturdiness and look you desire.
Follow these steps to cut the dividers:
- Take a sturdy material of your choice and mark the measurements obtained earlier on it.
- Using a sharp utility knife or a suitable cutting tool, carefully cut along the marked lines.
- Ensure each divider is cut precisely, with straight edges.
To enhance the visual appeal of your dividers and make them even more functional, you can also consider adding labels or color-coding.
Remember to measure and cut the necessary number of dividers needed to create the desired compartments within the box.
In conclusion, by following these simple steps of measuring accurately and cutting the dividers precisely, you can create a well-organized and efficient storage solution for your belongings.
Assembling The Dividers
When it comes to assembling the dividers for a box, it’s crucial to ensure a proper fit and secure placement. This step is essential for organizing and protecting the items inside the box. Let’s dive into the process of fitting and securing the dividers with precision and care.
Fitting The Dividers Into The Box
Before placing the dividers into the box, measure the interior dimensions of the box accurately to ensure a snug fit. Use a ruler or measuring tape to determine the length, width, and height, and then cut the dividers accordingly.
Securing The Dividers
Once the dividers are properly fitted into the box, it’s important to secure them in place to prevent shifting during transport. Here are steps to ensure the dividers are securely in place:
- Apply a thin line of adhesive along the bottom edges of the dividers to keep them in place.
- Insert the dividers gently into the box, making sure they sit firmly against the walls.
- For added stability, use small brackets or clips to anchor the dividers to the sides of the box.
- If necessary, fill any gaps between the dividers and the box walls with padding to prevent movement.
Customizing The Dividers
Once you have created the dividers for your box, it’s time to add a personal touch and make them truly customizable. There are several options to consider when it comes to customizing dividers for your box, including decorative finishes and adding labels or tags. These options allow you to not only organize your items effectively but also make your box visually appealing and easy to navigate.
Decorative Finishes
Decorative finishes are a great way to add style to your dividers and make your box stand out. There are various techniques you can use to achieve different looks. Consider the following options:
- Paint: Use acrylic or spray paint to add color to your dividers. You can choose to paint them in a solid color or create unique patterns and designs that suit your style.
- Decoupage: Decoupage is the art of decorating surfaces with paper cutouts. Use decorative paper, such as scrapbook paper or patterned tissue paper, to cover your dividers and create a personalized look.
- Washi Tape: Washi tape is a decorative adhesive tape that comes in various patterns and colors. Simply apply it to the edges or surfaces of your dividers to instantly transform their appearance.
Adding Labels Or Tags
Labels or tags can be a useful addition to your dividers, especially if you are using the box for storage or organization purposes. They help to identify the contents of each section and make it easier to locate specific items. Here are a few ways to incorporate labels or tags:
- Printed Labels: Create printed labels using a label maker or design them on your computer and print them out. Stick these labels onto your dividers or attach them using clear adhesive sleeves.
- Handwritten Tags: If you prefer a more personal touch, write the labels or tags by hand using markers or pens. This adds a charming homemade feel to your dividers.
- Chalkboard Labels: Chalkboard labels are a versatile option that allows you to easily change the labels whenever you need to. Apply them to your dividers and use chalk or chalk markers to write and erase the labels as needed.
By utilizing decorative finishes and adding labels or tags, you can take your dividers to the next level. These customization options not only enhance the functionality of your box but also make it visually appealing and reflective of your personal style. Get creative and make your dividers stand out!
Using The Dividers
Once you have created dividers for your box, it’s time to put them to use. By utilizing dividers efficiently, you can arrange items in the box in a way that maximizes storage space. Let’s explore how you can achieve this:
Arranging Items In The Box
- Start by identifying the items you intend to store in the box. Group similar items together to make organization easier.
- Place the dividers strategically within the box to create separate compartments for each group of items. This will prevent them from shifting around during transit.
- Consider the size and shape of the items when determining the placement of dividers. Make sure to leave enough space for each item to fit comfortably, while still maximizing storage capacity.
- Use dividers to create sections within sections if needed. This allows for further categorization and organization of smaller items.
Maximizing Storage Space
In order to make the most out of the available storage space, follow these tips:
- Optimize the placement of dividers to create compartments that perfectly fit your items. This will prevent wasted space.
- Consider using multiple layers of dividers to further divide the box’s interior. This technique can significantly increase storage capacity.
- Take advantage of vertical space by stacking items carefully within each compartment. Utilizing the full height of the box can help accommodate more items.
- If necessary, label the dividers or compartments to easily identify the contents of each section. This will save you time when searching for specific items.
By skillfully using the dividers, you can ensure that items are neatly organized, protected, and easily accessible. With a well-arranged box, you can efficiently store a variety of items while saving valuable space. Remember to experiment with different placements and configurations to find what works best for your specific needs.
Frequently Asked Questions For How To Make Dividers For A Box
How Do I Create A Partition In Box?
To create a partition in Box, follow these simple steps:
1. Login to your Box account.
2. Navigate to the folder where you want to create the partition.
3. Click on the “New” button.
4. Select “Folder” from the options.
5. Name the folder accordingly to create the partition. That’s it! You have successfully created a partition in Box.
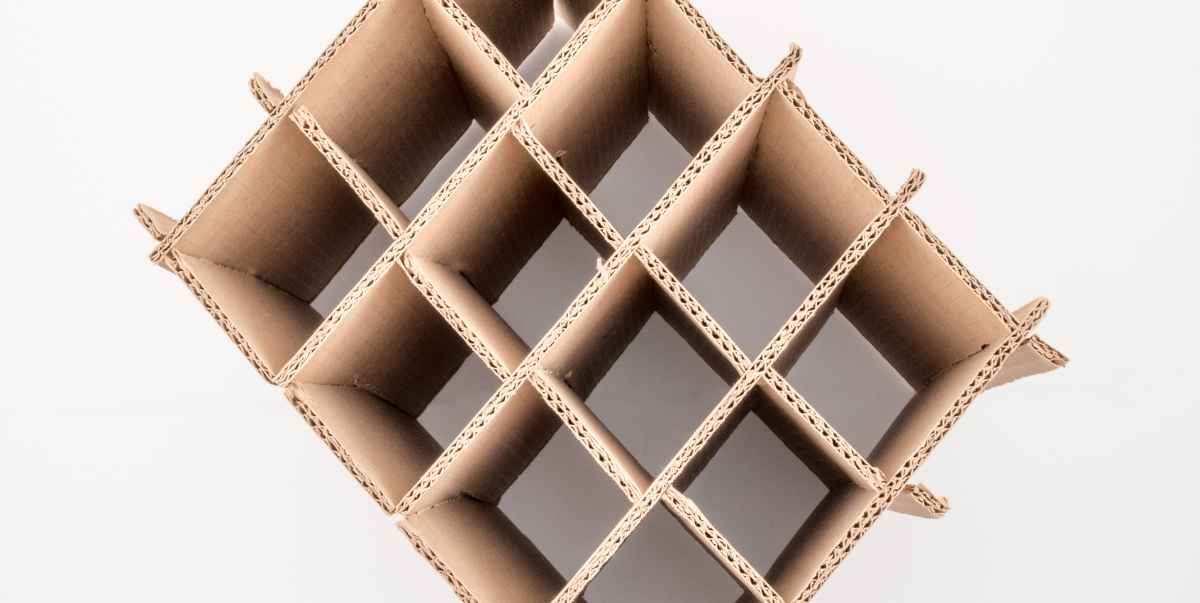
How To Make A Cardboard Divider?
To make a cardboard divider, follow these steps:
1. Measure and cut the cardboard to the desired size.
2. Fold the cardboard along the measured lines.
3. Apply tape or glue to secure the folds.
4. Repeat these steps for additional dividers if needed.
5. Place the cardboard dividers in the desired location to organize and separate items.
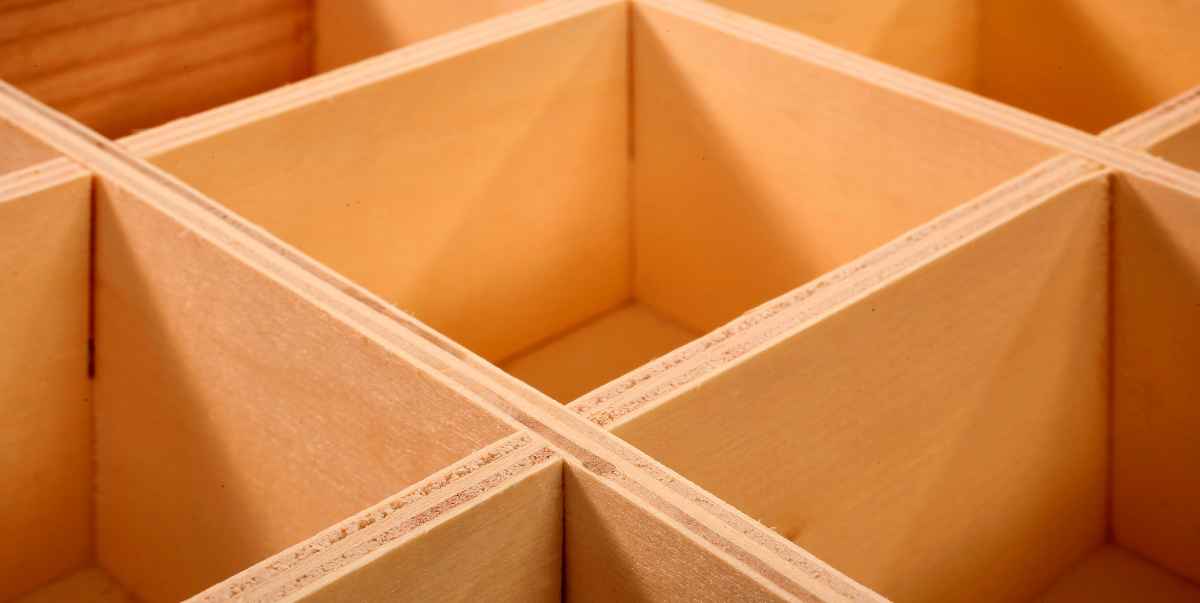
How Do You Make A Wooden Box Divider?
To make a wooden box divider, measure the inside of the box and cut pieces of wood to fit. Glue the pieces together to form a grid, then insert them into the box. Sand the edges for a smooth finish.
How Do You Make A Storage Divider?
To make a storage divider, follow these steps:
1. Measure the length and height of your storage space.
2. Cut a sturdy material, such as cardboard or plywood, to fit these measurements.
3. Use a straight edge and utility knife to accurately cut the material.
4. Attach fabric or adhesive paper to decorate the divider, if desired.
5. Slide the finished divider into your storage space to create separate compartments.
Conclusion
Creating dividers for a box is an easy and practical way to organize and protect your items. By following the step-by-step guide and utilizing simple materials, you can customize your dividers to fit any box. This DIY solution allows you to maximize space and keep your items secure during transportation or storage.
With a little creativity and effort, you can create personalized dividers for all your organizational needs.