How to Master Straight Cuts with a Circular Saw: Foolproof Techniques
To make straight cuts with a circular saw, use a straight edge guide for precise and accurate results. This guide ensures that the saw stays on track, resulting in clean and straight cuts.
Additionally, always double-check the alignment of the guide before starting the cut to ensure accuracy. Now let’s dive into the details of how to make straight cuts with a circular saw.

Choosing The Right Circular Saw
When it comes to making straight cuts with a circular saw, choosing the right tool is crucial. With various options available in the market, it’s important to consider the saw type, power, and blade size before making a decision. This section will guide you through each aspect, helping you make an informed choice that will ultimately lead to precise and straight cuts.
Consider The Saw Type
Before purchasing a circular saw, it’s essential to understand the different types available. The two most common types are worm-drive and sidewinder saws. Worm-drive saws have their motor positioned behind the blade, which provides more torque and greater cutting power. On the other hand, sidewinder saws have their motor located beside the blade, resulting in a lighter and more compact design.
Both types have their advantages and disadvantages. For instance, worm-drive saws are ideal for heavy-duty tasks and can handle thicker materials, while sidewinder saws are more suitable for general-purpose use and are easier to maneuver.
Look At Power And Blade Size
Power and blade size are crucial factors to consider when choosing a circular saw. The power of a saw is usually measured in amperes (A) or volts (V). Higher amperage or voltage generally means more cutting power, making it easier to cut through dense materials.
Moreover, the blade size significantly affects the depth and width of your cuts. Circular saw blades range in size from 6 1/2 inches to 10 1/4 inches. Smaller blades are suitable for lighter tasks and precision cuts, while larger blades are better for heavy-duty work and cutting through thicker materials.
To make sure you select the right saw for your needs, consider the type of projects you will be working on. If you primarily work with larger materials, a worm-drive saw with higher power and a larger blade size might be the best option. However, if you require a more maneuverable and versatile saw for a variety of projects, a sidewinder saw with a smaller blade size might be a better fit.

Setting Up For Success
Before you start making straight cuts with a circular saw, it’s important to set yourself up for success. Proper preparation will not only ensure accurate cuts but also keep you safe during the process. In this section, we will discuss two key steps you need to take before starting your cut: Marking the Cut Line and Securing the Workpiece.
Marking The Cut Line
In order to make a straight cut, you need a clear guide to follow. This is where marking the cut line becomes crucial. Here’s how you can do it:
- Measure and mark the desired length or width of your cut on the workpiece using a pencil or a square.
- Use a straightedge or a straight board as a guide alongside the marked line, ensuring it extends beyond both ends of the cut.
- Secure the straightedge or board firmly in place, making sure it doesn’t move while you’re cutting.
By marking the cut line accurately and using a guide, you’ll have a visual reference to follow, resulting in a precise straight cut.
Securing The Workpiece
Securing your workpiece properly is essential to maintaining stability and preventing accidents. Follow these steps to securely set up your workpiece:
- Place the workpiece on a stable surface, such as a workbench or sawhorses.
- Ensure that the portion of the workpiece to be cut is supported fully and will not sag or fall during the cutting process.
- If necessary, use clamps or other suitable devices to hold the workpiece firmly in place.
It’s important to note that securing the workpiece not only enhances safety but also improves the accuracy of your cuts. A stable workpiece allows you to focus on the cutting process, ensuring a straight and clean result.
Mastering The Technique
Mastering the technique of making straight cuts with a circular saw is essential for any woodworking project. It requires proper body position and maintaining a steady motion to ensure precise and safe cuts. By following these key principles, you can enhance your skills and achieve professional results with your circular saw.
Proper Body Position
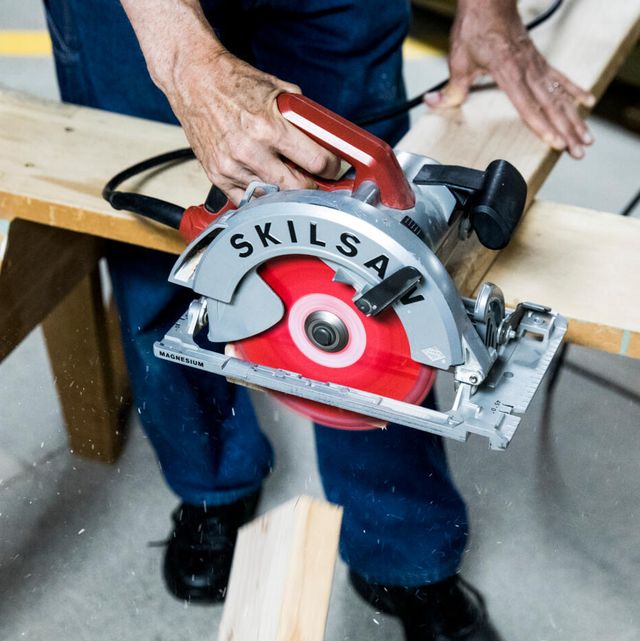
When using a circular saw, proper body position is crucial to maintain control and accuracy. Stand with your feet shoulder-width apart, keeping your body well-balanced and stable. Keep a firm grip on the saw with both hands and position yourself so that you have a clear view of the cutting line. This stance will provide stability and control, allowing you to guide the saw along the desired path with ease.
Maintaining A Steady Motion
Maintaining a steady motion throughout the cut is vital for achieving clean and precise results. Start the saw and allow the blade to reach full speed before making contact with the workpiece. Once you begin cutting, keep a steady and even forward motion, allowing the saw to do the work. Avoid forcing or rushing the saw, as this can lead to uneven cuts and potential safety hazards. By maintaining a steady, controlled motion, you can ensure smooth and accurate cuts every time.
Troubleshooting Common Issues
When using a circular saw for making straight cuts, there are a few common issues that can arise. These issues can potentially affect the quality and accuracy of your cuts. In this section, we will discuss two of the most common problems that you may encounter when using a circular saw: tear-out and misalignment.
Dealing With Tear-out
Tear-out occurs when the circular saw blade splinters or chips the wood as it cuts through it. This can result in rough and uneven edges, which can be unsightly and affect the overall finish of your project. Fortunately, there are a few steps you can take to minimize tear-out and achieve cleaner cuts.
- Use the right blade: Different blades are designed for different types of cuts and materials. Ensure that you are using a blade with fine teeth, specifically designed for clean cuts.
- Secure the workpiece: To reduce vibrations and prevent tear-out, make sure the workpiece is firmly clamped or secured in place.
- Score the surface: Before making your full cut, create a shallow scoring cut along the intended cut line. This will help prevent tear-out by guiding the blade and breaking the wood fibers.
- Use a sacrificial backing: If tear-out is still an issue, place a sacrificial piece of wood behind your workpiece. This can help support the fibers and prevent them from splintering.
Correcting Misalignment
Misalignment is another common problem that can occur when using a circular saw. It happens when the blade deviates from the intended cut line, resulting in crooked cuts. However, there are a few simple techniques that can help you correct misalignment and achieve precise cuts.
| Technique | Description |
|---|---|
| Mark the cut line | Before making your cut, use a pencil or marking tool to clearly indicate the intended cut line. This will help you maintain a visual reference throughout the cutting process. |
| Use a guide | Consider using a straight edge or a saw guide to help ensure a straight and accurate cut. These guides can be clamped or attached to the workpiece, providing a reference point for the saw. |
| Take it slow | Rushing the cutting process can lead to misalignment. Instead, cut slowly and steadily, allowing the saw blade to follow the marked cut line. |
| Practice good technique | Proper technique is crucial for achieving straight cuts. Make sure to align your body and maintain a steady grip on the saw. Keep the blade perpendicular to the workpiece and apply consistent pressure throughout the cut. |
By following these techniques for dealing with tear-out and correcting misalignment, you’ll be able to make cleaner, straighter cuts with your circular saw. Remember to always prioritize safety and use caution when operating power tools.
Expanding Your Skills
If you have been using a circular saw for straight cuts, you are already familiar with one of the most essential woodworking skills. But why stop there? Expanding your skills with a circular saw opens up a world of possibilities for your DIY projects. In this article, we will explore two areas where you can enhance your circular saw abilities: bevel cuts and angles, and working with different materials.
Bevel Cuts And Angles
One way to take your circular saw skills to the next level is by mastering bevel cuts and angles. This technique allows you to create slanted cuts that can add unique dimensions to your projects. Whether you are creating decorative edges or joining pieces at specific angles, understanding how to make accurate bevel cuts is essential.
Here are some key tips to help you excel in making bevel cuts and angles:
- Before you start, ensure your saw is properly calibrated and the blade is secure.
- Take the time to measure and mark the exact angle you want to cut.
- Use clamps or a guide rail system to keep your workpiece in place and ensure a straight and steady cut.
- Start with a shallow cut and gradually deepen it to avoid splintering the wood.
- Practice on scrap pieces first to get a feel for the movement and control necessary to make precise bevel cuts.
With patience and practice, you’ll soon discover the creative possibilities that bevel cuts and angles can offer to your woodworking projects.
Working With Different Materials
The versatility of a circular saw extends beyond wood. It can also be used to cut a range of other materials, such as plastic, metal, and even masonry. By familiarizing yourself with the techniques required for each material, you can expand your skillset and broaden your project possibilities.
Here are some important considerations when working with different materials:
- Research the appropriate blade type and tooth count for the material you are cutting to ensure clean and efficient cuts.
- Adjust the speed of your circular saw to match the material’s requirements. Higher speeds are usually better for cutting through metal and plastic, while slower speeds provide more control when working with delicate materials.
- Take safety precautions when working with materials that produce dust or debris, such as wearing protective goggles, a dust mask, and using a dust collection system if possible.
- Practice on scrap pieces of the material before starting your actual project to get a feel for how the saw handles and how the material reacts to the blade.
By expanding your skill set to include working with different materials, your creativity will know no bounds. Imagine the possibilities of combining wood, plastic, and metal in a single project!

Frequently Asked Questions For How To Make Straight Cuts With Circular Saw
Can You Cut Straight With A Circular Saw?
Yes, a circular saw can cut straight with proper technique and a guide.
How Do You Make Precise Cuts With A Circular Saw?
To make precise cuts with a circular saw, follow these guidelines:
1. Ensure the saw blade is sharp and properly aligned.
2. Use a straight edge guide or mark your cutting line accurately.
3. Maintain a steady grip and control the saw’s speed while cutting.
4. Make shallow initial cuts before going deeper along the line.
5. Always wear protective gear like goggles and gloves for safety.
Why Is My Circular Saw Not Cutting Straight?
Your circular saw may not be cutting straight due to several reasons, such as a dull blade, improper blade alignment, or using excessive force. Check your blade for sharpness, ensure it is properly aligned, and use steady, controlled cuts to achieve straighter results.
How To Build A Simple Circular Saw Guide For Straighter Cuts?
To build a simple circular saw guide for straighter cuts, use a straight piece of wood or metal as a guide. Secure it parallel to your cutting line and keep the saw’s base plate against the guide. This ensures a straight and accurate cut.
Conclusion
Mastering the art of making straight cuts with a circular saw is a valuable skill for any DIY enthusiast. By following the simple steps and techniques outlined in this guide, you’ll be able to achieve precise and accurate cuts in your woodworking projects.
With practice and attention to detail, you can elevate your craftsmanship to the next level and achieve professional-quality results. Keep honing your skills, and soon enough, you’ll be confident in your ability to tackle any cutting task with ease.