
How to Make Wood Filler Look Like Real Wood
To make wood filler look like wood, you can mix it with sanding dust from the wood being renovated or repaired. This produces a filler that looks and acts more like wood.
Here are some tips on how to make wood filler blend seamlessly with your project. When it comes to woodworking, it’s inevitable to have holes, gaps, or cracks that need to be filled. However, a mismatched wood filler can ruin the beauty and continuity of your project.
Fortunately, there are ways to make wood filler look like wood. One of the best ways is to mix the wood filler with sanding dust from the same wood species. This creates a natural-looking filler that can blend seamlessly with your woodwork. You can also use a gel stain or wood glue to hide the wood filler and create a more cohesive finish. We’ll explore some techniques on how to make wood filler look like wood and achieve a professional-looking result.
Types Of Wood Fillers
Fiddes Wood Filler Gel is a versatile option that can make wood filler look like wood by producing a filler that mimics the texture and color of wood. To ensure a closer color match, it is best to use sanding dust from the wood being repaired.
Additional methods to make wood filler look seamless include using gel stain or wood glue.
Wood fillers are an essential ingredient in woodworking projects, helping to fill gaps and holes in wooden surfaces to give a seamless and finished look. But there are different types of wood fillers to choose from, and each has its unique characteristics. Here are the most common types of wood fillers:
Stainable Wood Fillers
Stainable wood fillers are an excellent option if you want the filler to blend seamlessly with the surrounding wood. These fillers can be stained or painted to match the color and grain of your woodwork. The most popular stainable wood filler options include Minwax Stainable Wood Filler and FamoWood Latex Wood Filler.
Epoxy Wood Fillers
Epoxy wood fillers, such as J-B Weld KwikWood Epoxy Putty and PC Woody Wood Epoxy Paste, are a two-part adhesive that cures to a rock-hard finish. They are ideal for projects that require a durable and long-lasting finish, making them an excellent choice for outdoor projects or high-traffic areas.
Latex Wood Fillers
Latex wood fillers are a water-based option that is easy to apply and sand. They dry quickly, making them ideal for projects that require a quick finish. DAP Plastic Wood Wood Filler and Elmer’s Carpenter’s Wood Filler are two great options for latex wood fillers.
Gel Wood Fillers
Gel wood fillers are similar to paste wood fillers but have a thicker consistency. They are ideal for filling larger holes and gaps as they adhere well and are easy to mold. Gorilla Wood Filler and DAP Premium Wood Filler are two excellent options for gel wood fillers.
When it comes to choosing the right wood filler for your project, consider the size and type of the hole or gap you need to fill, the color and grain of the surrounding wood, and the overall finish you want to achieve. With the right wood filler, you can achieve a seamless and professional look on all your woodwork projects.
Matching Wood Fillers With Wood
Fiddes Wood Filler Gel is a versatile wood filler that can be mixed with sanding dust to produce a filler that looks and acts more like wood. It is best to use sanding dust from the wood being renovated or repaired to produce a closer color match.
Other methods for hiding and tinting wood filler may also be employed to make it look seamless.
Choosing the right wood filler is important to ensure that the end product looks seamless and professional. This is why choosing the right sanding dust is important, as it can greatly impact the final product. Using stains and solvents can also help to create a perfect match and tinting the wood fillers can be another effective approach.
Choosing the Right Sanding Dust
When it comes to creating a wood filler that will match the color and texture of your wood, choosing the right sanding dust is crucial. Using sanding dust from the same type of wood that you are filling will produce a much closer color match. Collect the dust during the sanding process and mix it with the filler until you get the desired color.
Using Stains and Solvents
Stains and solvents can help to create an even better match between the wood and the wood filler. By applying a matching stain to the wood after filling, you can create an even more realistic finish. Solvents can be used to soften the wood filler for a smooth finish.
Tinting Wood Fillers
Tinting wood fillers is another great way to create a seamless finish. Water-based dye or stain can be used for water-based fillers while solvent-based dye or stain can be used for solvent-based fillers. However, be careful not to dilute the product too much, as this can impact the quality of the final product.
In conclusion, selecting the right wood filler and proper application is very crucial to achieve excellent results. By carefully choosing the right sanding dust, using stains and solvents, and tinting the wood fillers, you can create a perfect match with wood, and make your wood filler look like real wood.
How To Apply Wood Fillers
Achieving a seamless look when using wood fillers can be a challenge. To make wood filler look like wood, consider using Fiddes Wood Filler Gel mixed with sanding dust that closely matches the color of the original wood being repaired.
Another option is to use a gel stain or wood glue applied with a cloth or brush to fill in spots and hide imperfections.
Preparing the Surface
Before you apply wood filler, make sure the surface is clean and dry. Remove any dust or debris with a soft cloth or brush. If there are any loose or damaged pieces of wood, fix them first. Use a putty knife to fill any larger holes with wood filler, then sand the surface smooth.
Applying the Wood Filler
Apply a small amount of wood filler to the surface with a putty knife. Make sure the filler is smooth and level. If the hole is deep, you may need to apply several layers to fill it completely. Be sure to allow each layer to dry completely before adding another.
Sanding the Filler
Once the filler is dry, sand it with a fine-grit sandpaper until it is smooth and level with the surrounding wood. Be sure to sand with the grain of the wood to avoid damaging the surface. Wipe away any dust with a soft cloth before moving on to the next step.
Applying a Sealant
To give the filler a more natural look, apply a sealant or stain that matches the color of the surrounding wood. Use a small brush to apply the sealant in thin, even coats. Allow each layer to dry completely before applying another. Once the sealant is dry, sand the surface lightly with a fine-grit sandpaper to give it a smooth finish.
In conclusion, when it comes to making wood filler look like wood, it’s important to prepare the surface, apply the filler in thin, even layers, and sand it smooth before applying a sealant or stain. Following these steps will help you achieve a natural-looking finish that blends in seamlessly with the surrounding wood.
Hiding Wood Fillers
Want to make your wood filler look like real wood? Try using a gel stain or wood glue to hide small imperfections. Additionally, mixing sanding dust with Fiddes Wood Filler Gel can result in a filler that looks and acts just like wood, providing a closer colour match.
Hide those holes and fill gaps seamlessly with these tips.
If you’re working on a woodworking project, using wood filler can help fill in gaps, cracks, and holes in the wood. However, one of the biggest challenges when using wood filler is making it look like real wood. If you’re wondering how to hide wood fillers, don’t worry – there are a few ways you can make it look seamless. In this section, we’ll explore two techniques for hiding wood fillers: using gel stains or wood glue and imitating wood grain on filler.
Using Gel Stains Or Wood Glue
One of the easiest ways to hide wood filler is to use gel stains or wood glue. To do this, you’ll need to apply the gel stain or glue to the surface of the wood filler in order to blend it in with the surrounding wood. Gel stains are ideal for small imperfections and will dry quickly, allowing you to move on to the next step in your project. Here are some tips for applying gel stains or wood glue:
- Use a brush or cloth to apply the gel stain or wood glue to the wood filler.
- Let the gel stain or wood glue dry completely before applying any other finishes to the wood.
- If the color is not a perfect match, you can tint the gel stain or wood glue with a dye or stain to get a better color match.
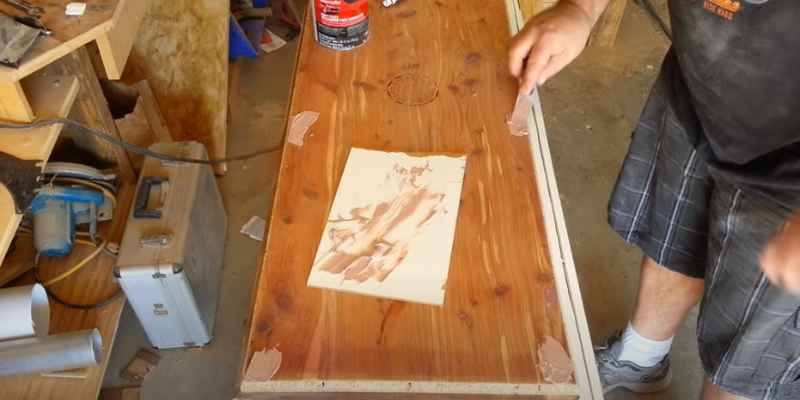
Imitating Wood Grain On Filler
Another way to hide wood fillers is to imitate wood grain on filler. This technique involves using a putty knife to create realistic wood grain patterns on the surface of the wood filler. This can be a time-consuming process, but the end result is well worth it. Here are some tips for imitating wood grain on filler:
- Apply a layer of wood filler to the area you want to fill.
- Let the wood filler dry partially so that it is still pliable.
- Use a putty knife to create wood grain patterns on the surface of the wood filler.
- Let the wood filler dry completely before sanding and finishing.
In conclusion, if you want to hide wood fillers on your woodworking project, there are a few options available to you. You can use gel stains or wood glue to blend the filler in with the surrounding wood, or you can imitate wood grain on the surface of the filler to create a more realistic look. With a little practice and patience, you can make your wood filler look like real wood and achieve a seamless finish on your project.
Best Wood Fillers For Matching Wood
To make wood filler look like wood, you can use wood fillers that can be stained or painted to match the wood. Some of the best wood fillers for matching wood include Minwax Stainable Wood Filler, FamoWood Latex Wood Filler, and DAP Plastic Wood Wood Filler.
It’s also helpful to use sanding dust from the wood being renovated or repaired for a closer color match. Lastly, you can hide wood filler imperfections by using a gel stain or wood glue.
When you are working on a woodworking project, the last thing you want is for the wood filler to stick out like a sore thumb. That’s why it’s important to use a wood filler that matches the color and grain of the wood as closely as possible. In this section, we’ll take a look at some of the best wood fillers for matching wood and how to use them effectively.
Minwax Stainable Wood Filler
Minwax Stainable Wood Filler is a popular choice for woodworkers because it is easy to use and matches the color of the wood very closely. The filler is also stainable, which means you can apply a wood stain over it to get an even better match. To use this filler, simply mix the two parts together and apply it to the hole or gap you need to fill. Once it has dried, sand it down to make it flush with the surrounding wood.
FamoWood Latex Wood Filler
FamoWood Latex Wood Filler is another great option for matching wood. It comes in a range of colors, so you can find one that matches the wood you are working with. This filler is also water-based, which means it is easy to clean up with soap and water. To use this filler, simply apply it to the hole or gap you need to fill and let it dry completely. Once it has dried, sand it down to make it flush with the surrounding wood.
DAP Plastic Wood Wood Filler
DAP Plastic Wood Wood Filler is a high-quality filler that is perfect for repairing and filling holes and gaps in wood. This filler is easy to use and can be sanded, stained, or painted over once it has dried. To use this filler, simply apply it to the hole or gap you need to fill and let it dry completely. Once it has dried, sand it down to make it flush with the surrounding wood.
Gorilla Wood Filler
Gorilla Wood Filler is a strong and durable filler that is perfect for repairing and filling holes and gaps in wood. This filler is easy to use and can be sanded, stained, or painted over once it has dried. To use this filler, simply apply it to the hole or gap you need to fill and let it dry completely. Once it has dried, sand it down to make it flush with the surrounding wood.
In conclusion, using the right wood filler is essential when it comes to matching wood. The best wood fillers for matching wood include Minwax Stainable Wood Filler, FamoWood Latex Wood Filler, DAP Plastic Wood Wood Filler, and Gorilla Wood Filler. These fillers are easy to use, strong, and durable, and can be sanded, stained, or painted over once they have dried. With these fillers, you can fill holes and gaps in wood seamlessly and achieve the perfect match.
Bonus Tip: Homemade Wood Filler Recipe
This bonus tip provides a homemade wood filler recipe to help make your wood filler look more like wood grain. By mixing sanding dust with Fiddes Wood Filler Gel, you can create a filler that closely matches the color of your wood, while also acting and looking like wood.
If you’re in need of wood filler but don’t have any on hand, you can make your own using simple ingredients found around the house. The benefits to making your own wood filler include cost savings and customization options, such as color matching. In this section, we’ll provide step-by-step instructions on how to make your own wood filler and seamlessly blend it in with your wood surface.
Ingredients Needed:
To make your own homemade wood filler, you’ll need the following items:
– Sawdust (from the wood being repaired)
– Wood glue
– Disposable mixing container
– Spatula or putty knife
Step-by-Step Instructions:
1. Start by collecting sawdust from the wood being repaired. This can be done by sanding the wood with sandpaper, creating a sawdust pile, and collecting the sawdust in a disposable container.
2. Add wood glue to the sawdust in a 1:1 ratio. The mixture should have the consistency of peanut butter.
3. Mix the sawdust and wood glue together thoroughly using a spatula or putty knife.
4. Once the mixture is well blended, apply it to the damaged area using the spatula or putty knife. Try to spread the mixture evenly and fill in any gaps or holes.
5. Allow the homemade wood filler to dry according to the wood glue manufacturer’s instructions.
6. Once the filler has dried, sand it down until it’s smooth and level with the surrounding wood surface.
7. To ensure a seamless look, apply the matching wood stain or finish over the repaired area.
By making your own wood filler using these simple ingredients, you can achieve a seamless repair that perfectly matches the color and grain of your wood surface. It’s an easy and cost-effective solution that any DIY enthusiast can try at home.
Frequently Asked Questions On How To Make Wood Filler Look Like Wood
Is There A Wood Filler That Looks Like Wood?
Yes, Fiddes Wood Filler Gel is a wood filler that, when mixed with sanding dust, looks and acts like wood. It is best to use sanding dust from the same wood being repaired for a closer color match. Gel stains can also be used to hide small imperfections.
How Do You Hide Wood Fillers?
To hide wood fillers, you can use gel stain or wood glue to cover small imperfections. Gel stains dry quickly and are easy to apply with a brush or cloth. You can also mix sanding dust with Fiddes Wood Filler Gel for a closer color match.
Avoid diluting water or solvent-based dye or stain too much when tinting wood fillers. Additionally, lacquer thinner and universal tint can be used to make wood fillers look like wood grain.
How Do You Make Wood Filler Look Seamless?
To make wood filler look seamless, try using a wood filler that is stainable and matches the color of the wood. Apply the filler with a putty knife and smooth out any excess. After it has dried, sand it down and stain or paint over it to match the rest of the wood.
You can also mix sanding dust with the filler to create a texture that resembles the wood grain. Avoid using too much water or diluting the filler too much when adding color.
How Do You Tint Wood Fillers?
To tint wood fillers, use a water-based or solvent-based dye or stain. However, be cautious not to dilute the product excessively. Mix the dye or stain carefully, and use sanding dust from the wood being repaired or renovated for a perfect color match.
It is best to avoid using sanding dust from another type of wood.
Conclusion
Making wood filler look like wood grain can be a challenge, but with the right techniques and products, it is possible to achieve a seamless finish. From using gel stains to tinting your wood filler, there are various ways to hide imperfections and make your wood filler match the surrounding wood.
By following some of the tips and products we have highlighted you can create a beautiful, durable finish that looks just like natural wood.