How to Make a Whistle Out of Wood: Easy DIY Guide
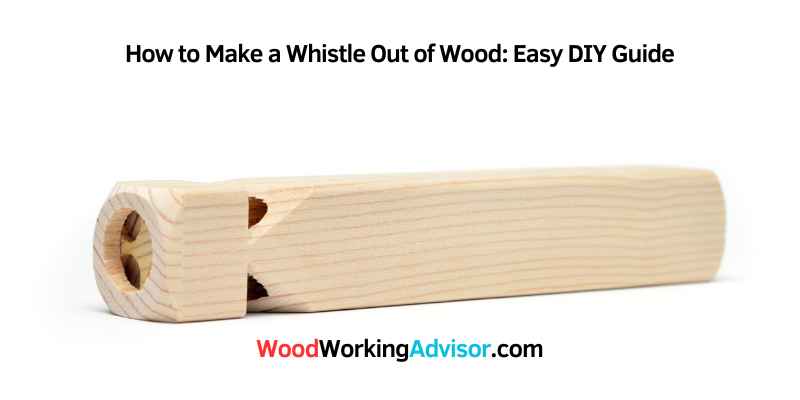
To make a whistle out of wood, choose a 6-8 inch piece of softwood like pine or cedar, whittle it to shape, drill a channel through the center, carve the fipple notch, and insert a dowel plug. Get the notch angle wrong and the whistle won’t produce a clean tone at all. Pitch is controlled by hole size — the project takes only 1-2 hours with a knife, drill, and sandpaper. See our wood crafting ideas for more projects like this.
Quick Answer
How to make a whistle out of wood
Choose a 6–8 inch piece of softwood (pine or cedar). Whittle it to shape, drill a channel through the center, carve the fipple notch, and insert a dowel plug. The pitch is controlled by the size of the hole. The project takes 1–2 hours and requires only a knife, drill, and sandpaper.
Choosing The Right Wood
When it comes to making a whistle out of wood, choosing the right type of wood is crucial for producing a clear and pleasant sound. Different types of wood have varying characteristics that affect the tone and quality of the whistle. Let’s explore the factors to consider when selecting the ideal wood for crafting a wooden whistle.
Types Of Wood Suitable For Whistles
Several types of wood are suitable for making whistles, each offering unique properties that impact the sound produced. Common woods used for crafting whistles include:
- Bamboo
- Cedar
- Maple
- Walnut
- Birch
Wood Characteristics For Best Sound
When selecting wood for a whistle, certain characteristics contribute to creating the best sound. The wood’s density, hardness, and grain pattern play a significant role in the whistle’s tonal quality. Additionally, the wood’s ability to resonate and transmit sound waves impacts the clarity and pitch of the whistle’s sound.
Essential Tools And Materials
When it comes to making a whistle out of wood, having the right tools and materials is essential. In this section, we will discuss the basic carving tools and safety gear you will need to successfully create your wooden whistle.
Basic Carving Tools
Carving wood requires a few basic tools that will help you shape and refine your whistle. Here are the essential carving tools you should have:
- Carving knife: A sharp and sturdy carving knife is a must-have tool for carving the main body of the whistle.
- Gouge: A gouge is useful for hollowing out the inside of the whistle, creating the sound chamber.
- Chisel: A chisel will come in handy for making precise cuts and shaping the whistle.
- Sandpaper: Sandpaper of various grits will help you achieve a smooth finish on your wooden whistle.
Safety Gear
Working with wood can be rewarding, but it is important to prioritize safety. Here are the safety gear items you should have:
- Safety goggles: Protect your eyes from wood chips and flying debris with a pair of safety goggles.
- Dust mask: Wood carving can create a lot of fine dust particles, so wearing a dust mask will help you breathe more comfortably.
- Gloves: Protect your hands from cuts and splinters by wearing a pair of gloves while carving.
By having these basic carving tools and safety gear, you will be well-prepared to start the process of making a whistle out of wood. Keep in mind that safety should always be a priority, so don’t forget to wear your safety gear and take necessary precautions while working with sharp tools.
Best Wood Carving Tools for Making a Whistle
A good carving knife is the most essential tool for whistle-making. Here are the top-rated options for this type of precise carving work.
Our Top Pick
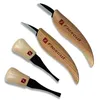
Flexcut Beginner Palm & Knife Set
American-made carving knives with 1095 high carbon steel — the ideal set for whistle carving, fipple cutting, and fine detail work on small wood pieces.
- Best for: Whistle carving, small DIY wood projects
- Why we picked it: Razor-sharp out of the box, ergonomic handles for fine control
- Main drawback: Smaller set — no gouges for large-scale work
Compare more carving options
 Option 1 BeaverCraft Wood Spoon Carving Kit
|
 Option 2 BeaverCraft SC01 Gouges & Chisels Kit
|
Option 3 Flexcut Detail Knife KN13
|
As an Amazon Associate we earn from qualifying purchases.
Designing Your Whistle
Learn how to make a wooden whistle with our step-by-step guide. Discover the art of designing your whistle, creating a unique and functional piece out of wood. Perfect for both beginners and experienced woodworkers.
Designing a whistle out of wood is an enjoyable and rewarding experience. However, it is essential to start with the design process. This stage involves determining the size and shape of your whistle and drawing the design. In this section, we will discuss the critical steps to follow when designing your whistle.
Determining Size And Shape
The size and shape of your whistle will depend on personal preference and the type of wood you are using. When selecting the wood, ensure that it is thick enough to create a functional whistle. Once you have the wood, determine the size of your whistle. You can use a measuring tape to measure the length and width of the wood. After that, you can use a pencil to mark the areas where you want to cut the wood to shape it into a whistle.
Drawing The Design
Drawing the design is a crucial step when making a whistle out of wood. To draw the design, you can use a pencil and a piece of paper. First, draw the outline of the whistle and mark the areas where you want to drill the air hole. The air hole should be drilled in the center of the whistle. After that, mark the areas where you want to cut the wood to create the whistle’s mouthpiece. Ensure that the mouthpiece is comfortable to blow and fits your mouth perfectly.
Summary
In conclusion, designing a whistle out of wood is an exciting process that requires careful planning. Determining the size and shape of your whistle and drawing the design are crucial steps that you should follow. By following these steps, you can create a functional and personalized whistle that you can use for years to come.
Carving The Whistle
Carving the whistle involves three main steps: cutting the wood, hollowing the core, and shaping the sound hole.
Cutting The Wood
- Choose a sturdy piece of wood like cedar or pine.
- Measure and mark the wood to the desired length.
- Use a sharp knife to cut the wood along the markings.
Hollowing The Core
- Drill a hole through the center of the wood piece.
- Use a whittling knife to remove excess wood from inside.
- Ensure the core is hollow to allow air to pass through.
Shaping the sound hole is crucial for creating a clear and loud whistle sound.
Creating The Sound Mechanism
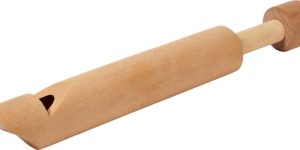
To create a whistle out of wood, you need to make a sound mechanism. Start by carving a block of wood into the desired shape and drilling a hole through the center. Next, create a notch at the top and bottom of the hole.
Finally, shape a thin piece of wood into a whistle mouthpiece and insert it into the notch at the top.
Creating the Sound Mechanism is a crucial step in making a whistle out of wood. It involves shaping the mouthpiece and carving the fipple to create the sound that you desire. Let’s take a closer look at these two processes.
Shaping The Mouthpiece
The mouthpiece is the part of the whistle that you blow into. To shape it, you need to take a small piece of wood and carve it into a flat shape with a slight curve at one end. This curved end should be the end that you blow into. You can use sandpaper to smooth out any rough edges and create a comfortable fit for your lips.
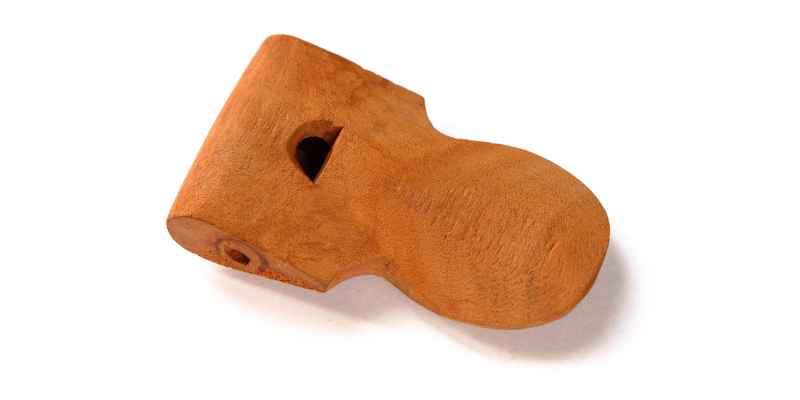
Carving The Fipple
The fipple is the part of the whistle that creates the sound. It is a small, tapered piece of wood that is inserted into the mouthpiece. To carve the fipple, you need to take a small piece of wood and shape it into a wedge shape. This wedge shape should fit snugly into the mouthpiece, with the narrow end facing towards the blowing end.
Once you have carved the fipple, you need to make a small notch in the top of the narrow end. This notch is what creates the sound when air is blown through the whistle. Make sure that the notch is deep enough to create a clear sound, but not too deep that it obstructs the airflow.
In conclusion, creating the sound mechanism of a wooden whistle involves shaping the mouthpiece and carving the fipple. By following these steps, you can create a whistle that produces a clear and pleasant sound.
Assembly And Fine-tuning
Crafting a whistle from wood involves meticulous assembly and fine-tuning to achieve the desired pitch and tone. By carefully shaping and refining the wooden piece, you can create a unique and functional musical instrument. This process requires patience and attention to detail to produce a quality whistle.
Putting Pieces Together
Now that you have prepared all the necessary components, it’s time to assemble your wooden whistle. Follow these step-by-step instructions to put the pieces together:
- Start by taking the mouthpiece and inserting it into the top end of the whistle body. Ensure that it fits securely.
- Next, carefully slide the finger holes onto the body of the whistle. Make sure they are evenly spaced and aligned.
- Once all the finger holes are in place, attach the bottom plate to the whistle body. This will enclose the air chamber and complete the assembly.
Remember to handle the pieces gently to avoid any damage or misalignment during the assembly process.
Adjusting For Sound Quality
After assembling the wooden whistle, it’s important to fine-tune it to achieve the desired sound quality. Follow these tips to adjust your whistle:
- Blow gently into the mouthpiece and listen to the sound produced. If the whistle sounds too high or too low, you may need to make some adjustments.
- To lower the pitch, you can try sanding the finger holes slightly. Be careful not to remove too much material at once, as this can affect the overall sound quality.
- If the whistle sounds too shrill, you can try enlarging the finger holes by using a drill bit. Start with a small increment and test the sound after each adjustment.
- Experiment with different finger hole sizes and positions to find the optimal sound. Keep in mind that small changes can make a significant difference in the whistle’s tone.
By fine-tuning your wooden whistle, you can achieve a clear and melodious sound that will impress your friends and family.
Finishing Touches
After crafting your whistle out of wood, it’s time to add the finishing touches to enhance its look and sound. This final step will ensure your whistle is not only functional but also visually appealing.
Sanding The Whistle
Begin by sanding the surface of the whistle with fine-grit sandpaper to smooth out any rough edges or imperfections.
Applying Finish
Next, apply a wood finish to protect the whistle from moisture and give it a polished appearance. Use a brush to evenly coat the whistle with the finish.
Tips For First-timers
Creating a whistle out of wood can be a rewarding experience for beginners. Follow these tips to ensure a successful project.
Troubleshooting Common Issues
- Check for air leaks in the whistle.
- Ensure the air hole is the correct size.
- Adjust the shape of the whistle’s mouthpiece if needed.
Enhancing The Whistle’s Durability
- Choose a sturdy type of wood for longevity.
- Apply a sealant to protect the wood from moisture.
- Store the whistle in a dry place when not in use.
Frequently Asked Questions
How Can I Choose The Right Type Of Wood For Making A Whistle?
Select a hardwood like maple, cherry, or walnut that is dry and free of knots. Avoid softwoods like pine, as they may not produce a clear sound.
What Tools Do I Need To Make A Whistle Out Of Wood?
You will need a saw, drill with bits, sandpaper, and a knife for shaping and smoothing the whistle. A vise or clamp will also be helpful for stability.
Can I Add Decorative Elements To My Wooden Whistle?
Yes, you can personalize your whistle with carvings, burn designs, or even inlays. Just ensure that any additions do not compromise the functionality of the whistle.
Conclusion
Crafting a wooden whistle is a fulfilling and creative endeavor. By following these steps, you can create a unique whistle from natural materials. Embrace the simplicity and beauty of woodworking while honing your skills. Share your handmade whistle with pride and enjoy the harmonious sounds it produces.
Happy crafting!