How to Remove Dents from Wood: Quick and Easy Fixes
To remove dents from wood, apply heat and moisture to the affected area using an iron and damp cloth, then restore the wood using sandpaper and finishing products. Are you tired of seeing unsightly dents on your beautiful wooden furniture or floors?
Removing these dents can seem like a daunting task, but fear not – we have a simple and effective solution for you. By following a few straightforward steps, you can restore your wood to its original, flawless condition. We will discuss an easy method involving the application of heat and moisture, followed by some sanding and finishing touches.
So, let’s dive right in and discover how to remove those pesky dents from wood, bringing back its natural beauty in no time.
Identifying The Dent
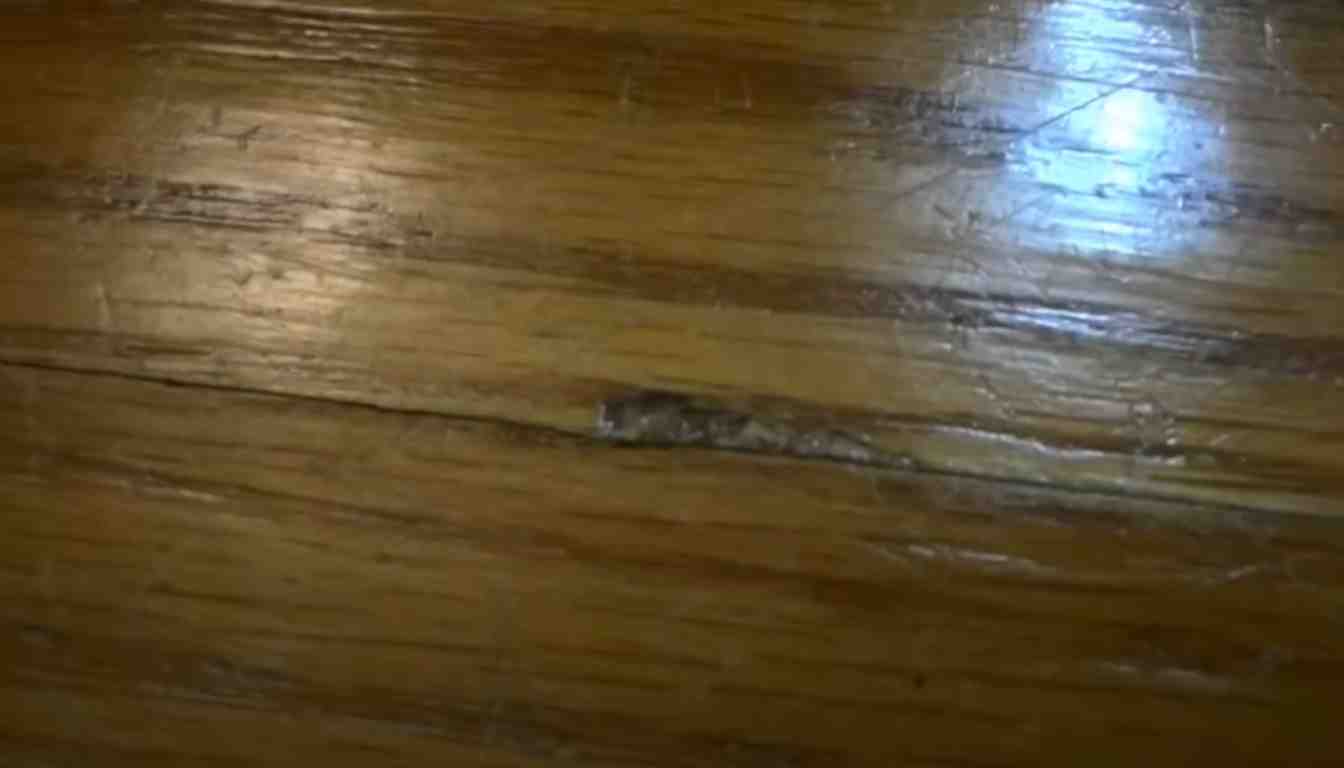
Dents on wooden surfaces can be a frustrating eyesore, but fear not! With the right approach, you can easily restore your wood to its former glory. The first step in this process is identifying the dent. Only by understanding the extent of the damage can you effectively choose the appropriate method to reverse it.
Dent Depth
Surface assessment plays a crucial role in determining the approach for dent removal. It’s important to gauge the depth of the dent to ensure that the correct technique is employed.
There are generally two types of dents: shallow dents and deep dents.
Shallow Dents
Shallow dents are characterized by a minor depression in the wood surface. They may be caused by light impacts or pressure, leaving only a small indentation.
If you run your finger over the dent and can barely feel it, chances are it is a shallow dent. These can typically be remedied using simple DIY techniques.
Deep Dents
In contrast, deep dents are more severe and extend further into the wood. These dents are usually caused by heavy impacts or prolonged pressure on the surface.
If the dent is noticeable even by a visual inspection, or if you can feel a significant depression when you run your finger over it, then it is most likely a deep dent. Removing deep dents may require more advanced techniques and materials.
| Dent Type | Description |
|---|---|
| Shallow Dents | Minor depression, barely felt when running a finger over it |
| Deep Dents | Visible dent, significant depression when running a finger over it |
By accurately determining the dent depth, you can proceed with confidence knowing the appropriate methods to effectively remove the blemish. In the next section, we will explore various techniques for tackling both shallow and deep dents.
Steam Method
To remove dents from wood, the steam method can be effective. Apply a moist cloth on the dented area and use a household iron to apply steam. The heat from the steam will cause the wood fibers to expand, restoring the surface to its original shape.
Using A Damp Cloth
Before we dive into the steam method, it’s important to begin with the first step, which is to use a damp cloth. This method is especially effective for small dents on wood surfaces. Start by dampening a cloth with warm water – making sure it is not soaked – and wring out any excess moisture. The cloth should be slightly damp, not wet.
Once you have the damp cloth ready, place it over the dent on the wood surface. Gently press down and hold it in place for a few minutes. This will allow the moisture from the cloth to penetrate the wood, causing it to expand and push out the dent. For deeper dents, you may need to repeat this process a couple of times.
Applying Heat With An Iron
If the damp cloth method didn’t fully remove the dent, don’t worry! We can now move on to using heat with an iron to further restore the wood surface. This method is effective for both small and deep dents on wooden furniture or flooring.
Here’s how you can do it:
- Start by setting your iron to a low or medium heat setting. It’s essential to not use high heat to prevent any damage to the wood surface.
- Place a clean, dry cloth over the dent to protect the wood from direct heat. Ensure that the cloth covers the dent completely.
- Gently run the heated iron over the cloth in a circular motion for about 10-15 seconds. The heat will help to loosen the wood fibers and make them more pliable.
- Remove the cloth and check if the dent has improved. If needed, repeat the process, adjusting the heat setting as necessary.
You’ll be amazed at how effective the combination of heat and pressure can be in removing dents from wood!
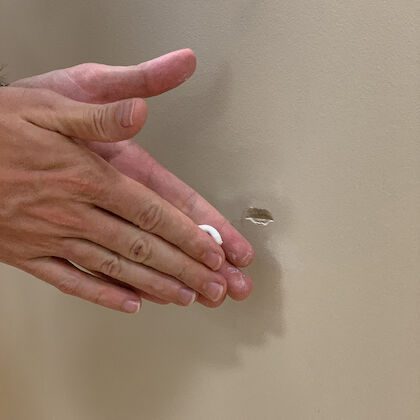
Wood Filler Technique
In the wood repair and restoration process, using a wood filler is an effective technique for removing dents and imperfections. This method involves filling the damaged area with a specialized compound that seamlessly blends with the natural wood. Once applied and sanded, the wood filler technique leaves the surface smooth and ready for refinishing, restoring the wood to its former glory.
Selecting The Right Filler
When choosing a wood filler for dent removal, it’s essential to select a product that matches the type and color of the wood. Opt for a high-quality wood filler that is specifically designed for your wood type, whether hardwood or softwood. Consider the stainability and sandability of the filler to ensure it can be seamlessly integrated into the wood’s natural aesthetics. Take into account the size of the dent and choose a filler that can adequately cover the damaged area.
Filling And Sanding
Before applying the filler, ensure that the damaged area is clean and free of dust and debris. Using a putty knife, smoothly apply the filler into the dent, ensuring it fills the space completely. Remove any excess filler to achieve a level surface. Once the filler is dry, use fine-grit sandpaper to gently sand the area, blending the filler with the surrounding wood. Check the surface from different angles to ensure a seamless integration and a smooth finish before moving onto the refinishing stage.
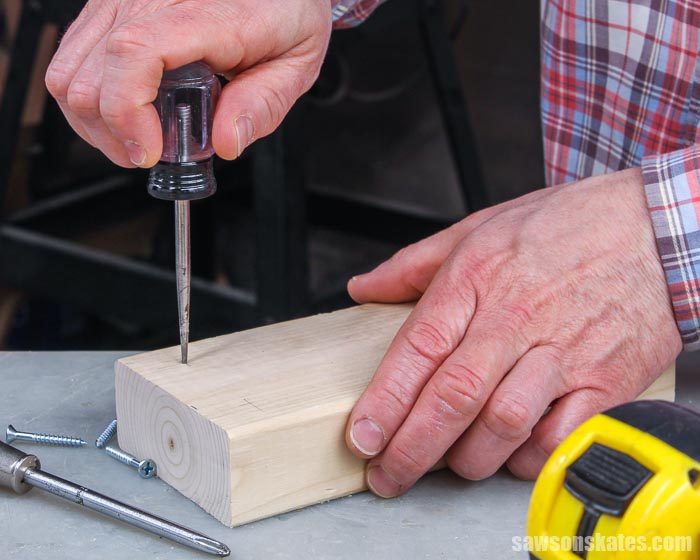
Using A Wet Cloth And Iron
To remove dents from wood furniture, a simple method involves using a wet cloth and an iron. Place the wet cloth over the dent and set the iron to medium heat. Press the iron on top of the cloth for a few seconds, allowing the steam to penetrate the wood and expand it, effectively removing the dent.
Using a Wet Cloth and Iron
If you’ve discovered a dent in your wooden furniture, don’t fret – there’s a simple and effective solution that can help you remove it. Using a wet cloth and iron is a tried and tested method that can restore the appearance of your beloved wooden items. This technique is especially useful for minor dents and can save you the hassle and expense of hiring a professional. In this guide, we’ll walk you through the steps you need to take to successfully remove dents from wood using a wet cloth and iron.
Preparation
Before you begin, it’s important to gather the necessary materials and prepare the surface of the wood. Here’s what you’ll need:
1. Clean, lint-free cloth: Select a soft cloth that won’t scratch or damage the wood surface. It’s important to ensure the cloth is damp, but not dripping wet.
2. Household iron: Make sure the iron is clean, as any dirt or residue can transfer onto the wood. Set the iron to the lowest heat setting, without steam.
Now that you have the required materials, follow these steps to prepare the wood surface:
1. Clean the area: Use a gentle cleaning solution to wipe away any dirt or debris from the dented area. This will help you better assess the depth of the dent.
2. Protect the wood: Place a clean cloth over the dent to shield the surrounding wood from direct contact with the iron.
Application
With the necessary preparations complete, it’s time to start removing the dent. Follow these steps carefully:
1. Wet the cloth: Dip the clean cloth in water and wring it out thoroughly. You want the cloth to be damp, but not soaking wet.
2. Place the cloth over the dent: Lay the damp cloth directly over the dent, ensuring that it completely covers the affected area. Make sure there are no wrinkles or folds in the cloth.
3. Apply heat with the iron: Gently run the iron over the cloth-covered dent, using small circular motions. Apply light pressure and keep the iron in constant motion to avoid burning or scorching the wood.
4. Check progress: Lift the cloth occasionally to assess the progress. The heat from the iron will cause the wood fibers to expand, helping the dent to gradually disappear. If the dent is still visible, continue the process for a few more minutes.
5. Remove the cloth and let the wood cool: Once the dent has been successfully removed, remove the cloth and allow the wood to cool down. This will help the wood fibers contract again, ensuring the dent stays permanently removed.
With these simple steps, you can effectively remove dents from wood using a wet cloth and iron. Remember to take your time and apply gentle heat so as not to damage the wood. And voila! Your wooden furniture will look as good as new without the need for professional assistance.
Final Touches
After successfully removing dents from your wood furniture, it’s time to put on the final touches. These steps, including sanding and applying finish, will ensure a seamless restoration. Follow these simple instructions to bring back the natural beauty of your wooden pieces.
Sanding
Sanding is an essential step to create a smooth surface and blend the repaired area with the rest of the wood. Start by using a 180-grit sandpaper to gently sand the dented area. Make sure to sand in the direction of the wood grain to avoid creating scratches. Gradually move to finer sandpapers, such as 220-grit and 320-grit, until the surface feels even and seamless. Brush off any dust using a clean cloth, ensuring the area is free from debris before moving to the next step.
Applying Finish
The final step in restoring your wood furniture is applying a finish that matches the original aesthetic. Begin by selecting a suitable finish, such as wax, varnish, or polyurethane, depending on the type of wood and the desired outcome. Apply the chosen finish using a brush or a soft cloth, following the manufacturer’s instructions. Ensure an even application, covering both the repaired area and the surrounding wood. Allow the finish to dry completely before using the furniture.
Remember, removing dents from wood requires patience and precision. By following these final touches, you can achieve professional-looking results. Don’t forget to take care of your wood furniture by regularly cleaning and protecting it from scratches and dents. Now you can proudly enjoy your beautifully restored wooden pieces!
Frequently Asked Questions On How To Remove Dents From Wood
How Do You Smooth Dented Wood?
To smooth dented wood, gently sand the area using fine-grit sandpaper. Start with light pressure and gradually increase until the dent is level with the surrounding wood. Finish by applying wood filler, allowing it to dry, and sanding again until smooth.
How Do You Get Dents Out Of Wood Floors And Scratches?
To get dents out of wood floors, use steam and a cloth to swell the wood fibers. For scratches, apply wood filler and sand it smooth.
How Do You Fix A Dent In Plywood?
To fix a dent in plywood, you can use steam and water. First, wet a cloth and place it over the dent. Then, using a hot iron, apply steam to the cloth for a few seconds. The heat and moisture will help the wood fibers swell and reduce the dent.
Repeat if necessary.
How Do You Fix A Dent In Wood Veneer?
To fix a dent in wood veneer, use a damp cloth to soften the area, then cover the dent with a clean cloth. Apply a hot iron to the cloth in a circular motion for a few seconds. Remove the iron and let the area cool.
The dent should be gone.
Conclusion
Incorporating these effective techniques can help you successfully remove dents from wood. By utilizing natural methods, such as steaming and ironing, or employing commercial products, like wood filler or wax sticks, you can restore the appearance of your wood furniture or flooring.
With patience and attention to detail, your wood surfaces can be rejuvenated to their former glory.