How to Use Wood Putty: Expert Tips for Perfect Finishing
To use wood putty, clean the area, apply it with a putty knife, and smooth it out — but only on unfinished wood that won’t be stained, since putty doesn’t absorb stain the way real wood does.
Wood putty stays soft after drying and shouldn’t be used under stain — it doesn’t absorb stain the way surrounding wood does, so patches show up as a visibly different color or sheen. Wood filler, by contrast, hardens and sands like real wood and takes stain more evenly.
Below, we cover when putty is the right choice over filler, how to color-match it to your wood, and the exact application and sanding technique for a smooth, invisible repair.
Choosing The Right Wood Putty
When it comes to using wood putty, it is crucial to choose the right one for your project. The type of wood and the wood grain are the key factors to consider when selecting the appropriate wood putty. Let’s delve into these essential aspects to help you make an informed decision.
Consider The Type Of Wood
Before you start filling the imperfections in your woodwork, it’s important to consider the type of wood you are working with. Different woods have unique characteristics and require compatible wood putties to achieve seamless repairs. Take a look at the table below to find the best wood putty for your specific wood type:
| Wood Type | Recommended Wood Putty |
|---|---|
| Pine | Drying wood putty or water-based wood putty |
| Oak | Oil-based wood putty or stainable wood filler |
| Maple | Water-based wood putty or epoxy wood filler |
Note: It’s always wise to conduct a compatibility test on a small, inconspicuous area before applying putty on the entire surface.
Matching The Wood Grain
For a seamless repair job, it is essential to match the wood grain when choosing a wood putty. The appearance of the wood grain affects the overall aesthetic of the repaired area. Look for wood putties that offer a range of color options to match the specific grain pattern of your wood. This ensures that once the putty is applied and sanded, it blends in seamlessly with the surrounding wood.

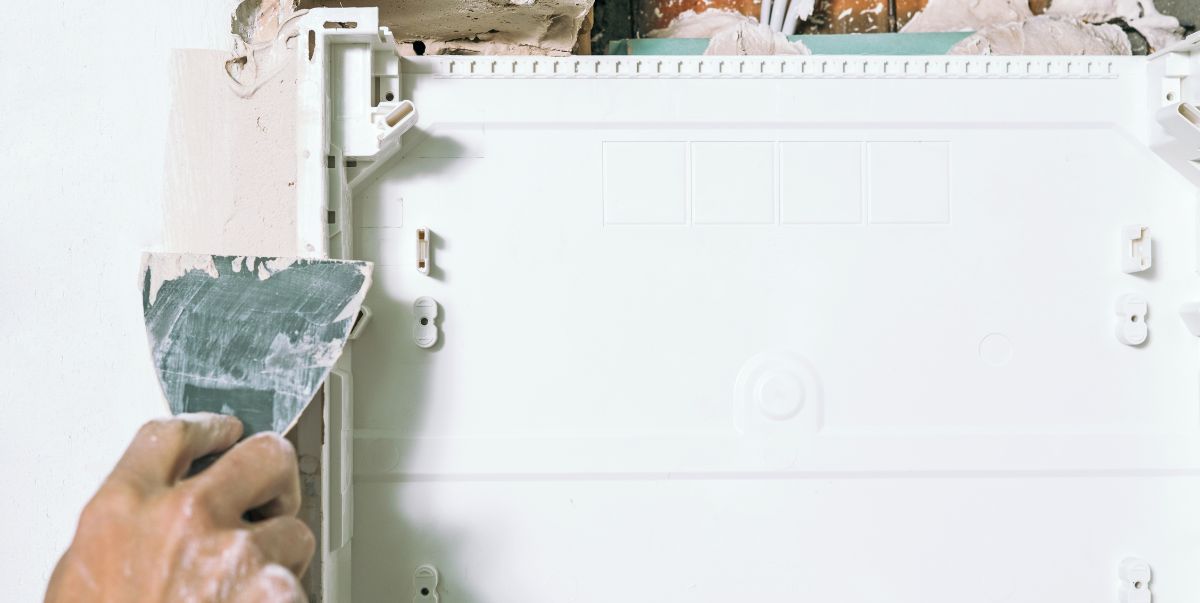
Preparing The Surface
Preparing the surface is an essential step in using wood putty to ensure a smooth and flawless finish. By properly cleaning and sanding the surface, you can create an ideal base for the application of wood putty. In this section, we will discuss two crucial steps: Cleaning the Area and Sanding the Surface.
Cleaning The Area
Before applying wood putty, it is crucial to clean the area thoroughly to remove any dirt, debris, or loose wood particles. This helps in achieving better adhesion and a seamless finish. Here’s how you can clean the surface:
- Begin by removing any loose paint or varnish using a scraper. This will help to create a smooth surface for the wood putty.
- Next, use a brush or a vacuum cleaner to remove any dust, dirt, or debris from the area. Make sure to reach into the corners and crevices.
- If the surface is greasy or has an oil-based stain, clean it with a mild detergent solution and a sponge. Rinse thoroughly to remove any residue.
- Finally, wipe the surface with a clean, damp cloth to ensure it is free from any remaining dirt or cleaning solution.
Sanding The Surface
Sanding the surface is an essential step to create a smooth and level base for the wood putty. Follow these guidelines for effective sanding:
- Begin by selecting the appropriate sandpaper grit based on the condition of the surface. Coarser grits like 80 or 100 are suitable for rough or uneven surfaces, while finer grits like 220 are ideal for smoother surfaces.
- Using a sanding block or sandpaper wrapped around a sanding pad, start sanding the surface in a circular motion. Apply even pressure to ensure consistent sanding.
- Continue sanding until the surface is smooth to the touch and any rough patches or imperfections are leveled out.
- After sanding, remove the sanding dust by wiping the surface with a clean, dry cloth or using compressed air.
Following these steps of cleaning and sanding the surface will ensure that the wood putty adheres properly and creates a seamless finish. Now that you have prepared the surface, you are ready to move on to the next step of applying the wood putty.
TOP PICK FOR WOOD PUTTY
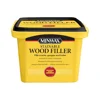 Minwax stainable wood filler for finishing
Minwax Stainable Wood Filler
A wood filler that actually accepts stain, so repairs blend in rather than standing out as a flat patch.
- Best for: nail holes, gouges, and gaps on stained or natural-finish wood
- Why we picked it: takes stain evenly instead of blotching like standard putty
- Main drawback: needs full cure time before sanding and staining
 Gorilla all purpose wood filler water resistant Gorilla all purpose wood filler water resistantGorilla All Purpose Wood Filler Water-resistant, good for indoor or outdoor repairs Check on Amazon |
 Putty knife set for applying wood putty Putty knife set for applying wood puttyPutty Knife Set Multiple sizes for pressing putty into holes and smoothing it flush Check on Amazon |
As an Amazon Associate, we earn from qualifying purchases.
Applying The Wood Putty
When applying wood putty, it’s important to follow the correct steps to ensure a smooth and professional finish. Whether you’re filling small nail holes or covering larger gaps, the process remains the same: apply, smooth, and trim. Let’s take a look at how to use wood putty effectively for filling holes and gaps and then smoothing the putty to create a seamless surface.
Filling Holes And Gaps
Before applying wood putty, ensure the area is clean and free from dust and debris. Use a putty knife to press the putty into the hole or gap, overfilling slightly to allow for shrinkage as the putty dries. For larger gaps, consider layering the putty in multiple applications, allowing each layer to dry before adding the next. Once the hole or gap is filled, use the putty knife to remove any excess putty and achieve a smooth, flat surface.
Smoothing The Putty
After filling holes and gaps with wood putty, it’s essential to smooth the surface for a flawless finish. Use a clean, damp cloth to wipe away any excess putty around the repaired area. For larger surfaces, sand the putty lightly with fine-grit sandpaper, working in the direction of the wood grain. This will help to blend the putty with the surrounding wood and create a seamless appearance. Once the putty is smoothed and dry, the repaired area can be finished with paint, stain, or a clear sealer to match the rest of the wood.
Finishing And Sanding
When it comes to using wood putty, finishing and sanding are crucial steps to achieve a seamless and professional-looking result. After applying the putty to fill in gaps, cracks, or holes in the wood, allowing it to dry completely is essential. Once dried, the next step is sanding the putty to create a smooth and seamless surface that blends seamlessly with the rest of the wood. In this section, we will discuss the techniques of sanding the dried putty and blending it with the wood surface to achieve a flawless finish.
Sanding The Dried Putty
Sanding the dried putty is an important step to ensure a smooth and even surface. Here’s how you can do it effectively:
- Clean the surface: Before you begin sanding, make sure the wood surface is clean and free from any dust or debris. Use a clean cloth or brush to remove any loose particles.
- Select the right sandpaper: Depending on the size and texture of the dried putty, choose the appropriate grit of sandpaper. For rough surfaces, start with a coarse grit, such as 80 or 100, and gradually move to finer grits, such as 120 or 150, for a smoother finish.
- Sand in a circular motion: Using a sanding block or sandpaper wrapped around a block, sand the dried putty in a circular motion. This will help to blend the putty with the surrounding wood and create a seamless surface.
- Keep it even: Ensure that you sand the putty evenly, covering the entire patched area. This will prevent any unevenness or visible lines once the wood is stained or finished.
- Check the smoothness: After sanding, run your fingers over the patched area to feel for any rough spots or inconsistencies. If needed, repeat the sanding process with finer grit sandpaper to achieve a smoother finish.
- Clean and wipe: Once you are satisfied with the smoothness of the surface, use a clean cloth or brush to remove any sanding dust. This will prepare the surface for the next step of blending with the wood surface.
Blending With The Wood Surface
Blending the dried putty with the wood surface is the final step to achieve a seamless and natural look. Here are the steps to follow:
- Choose the right wood stain or finish: Select a stain or finish that matches the color of your wood. This will help the patched area to blend in seamlessly with the rest of the surface.
- Apply the stain or finish: Using a brush or cloth, apply the wood stain or finish to the patched area. Ensure that you cover the putty completely and feather it out slightly onto the surrounding wood to create a gradual transition.
- Blend the edges: To further blend the putty with the wood, gently feather the edges of the stained or finished area using a clean brush or cloth. This will help to create a seamless transition between the patched area and the rest of the wood surface.
- Allow it to dry: Follow the manufacturer’s instructions regarding the drying time for the stain or finish. Ensure that the surface is completely dry before proceeding with any additional coats or finishing touches.
- Inspect the final result: Once the stained or finished area is dry, inspect the patched area closely to ensure that it seamlessly blends with the wood surface. Make any necessary touch-ups or adjustments as needed.
By following these steps of sanding the dried putty and blending it with the wood surface, you can achieve a professional-looking finish that seamlessly integrates the patched area with the rest of the wood. These techniques will help you to effectively use wood putty and achieve flawless results for your woodworking projects.
Final Touches
When it comes to woodworking projects, the final touches can make all the difference in achieving a polished and professional look. In the case of using wood putty, this is your opportunity to ensure a seamless and flawless finish. In this section, we will discuss the two crucial steps of staining and sealing the wood surface, as well as polishing it to create a smooth and elegant end result.
Staining And Sealing
Staining and sealing the wood after applying wood putty is essential to enhance its appearance and protect it from moisture, UV rays, and other potential damages. The staining process involves applying a wood stain of your choice to give the wood a specific color or to match it with existing furniture or decor. Before staining, ensure that the wood putty has fully dried and hardened.
Here’s a step-by-step guide to staining the wood:
- Begin by carefully sanding the area where the wood putty is applied. This will help in removing any excess putty and provide a smooth surface for the stain to adhere to.
- Clean the sanded surface with a cloth to remove any dust particles or debris that may affect the staining process.
- Apply the wood stain evenly using a brush, pad, or cloth. Make sure to follow the manufacturer’s instructions for application and drying time.
- Allow the stain to dry completely, and then assess if you need to apply a second coat for a deeper color.
- Once satisfied with the stain color, it’s time to seal the wood. Choose a suitable sealer, such as polyurethane, varnish, or shellac, depending on the type of wood and its intended use.
- Apply the sealer using a brush or cloth, following the grain of the wood. Make sure to cover all surfaces and edges to provide maximum protection.
- Allow the sealer to dry according to the product’s instructions, and then lightly sand the surface with a fine-grit sandpaper.
Polishing The Surface
After staining and sealing, it’s essential to polish the wood surface to achieve a smooth and attractive finish. Polishing not only enhances the appearance but also adds a protective layer to the wood, making it more resistant to scratches and wear.
Follow these simple steps to polish the wood surface:
- Ensure the stained and sealed wood has dried completely before starting the polishing process.
- Using a soft cloth, apply a small amount of furniture polish or wax to the wood surface.
- Gently rub the polish or wax onto the wood in a circular motion. This helps in distributing the product evenly and bringing out the natural beauty of the wood grain.
- Continue polishing until you achieve the desired level of shine and smoothness.
- Remove any excess polish or wax with a clean cloth, giving the wood surface a final buffing to ensure a flawless and glossy appearance.
With the process of staining, sealing, and polishing, you can elevate your woodworking project to the next level. These final touches bring out the beauty of the wood and provide long-lasting protection. Take your time and pay attention to detail, and you’ll be rewarded with a stunning and professional-looking finish.
Frequently Asked Questions For How To Use Wood Putty
How Do You Use Wood Putty On Wood?
To use wood putty on wood, press it into the damaged area, smooth it with a putty knife, and let it dry. Sand the putty until it’s smooth and matches the wood. Finally, finish with paint or stain as needed.
What Is The Difference Between Wood Filler And Wood Putty?
Wood filler and wood putty are used to fill imperfections in wood surfaces. Wood filler is made from sawdust and a binding agent, while wood putty is a thick, oil-based solution. Filler works best for larger holes and gaps, while putty is ideal for smaller repairs and finishing touches.
Does Wood Putty Dry As Hard As Wood?
Yes, wood putty does dry as hard as wood.
Does Wood Putty Need To Be Sanded?
Yes, wood putty needs to be sanded to achieve a smooth and even finish on the surface. Sanding helps to level the putty with the surrounding wood and ensures a professional-looking result.
Conclusion
Wood putty is a versatile and essential tool for repairing and restoring wood surfaces. By following the proper application techniques and considering the various types of wood putty available, you can achieve seamless and professional-looking results. Keep in mind the importance of sanding and finishing for a polished and durable final outcome.
Utilize these tips to make the most out of wood putty for all your woodworking projects.