How to Easily Remove Excess Stain That Has Dried: Expert Tips
To remove excess dried stain, gently scrape off the surface using a plastic scraper or your fingernail.
Understanding Stain Removal Basics
When it comes to stain removal, understanding the basics is essential. Whether it’s a stubborn coffee spill on your favorite shirt or a dried ink stain on your expensive couch, knowing how to effectively remove these blemishes can save you time, money, and frustration. In this section, we will explore the importance of prompt action, identifying the type of stain and surface, and the general principles for stain removal.
Importance Of Prompt Action
Prompt action is crucial when dealing with stains that have dried. The longer a stain remains on a surface, the harder it becomes to remove. This is because the stain penetrates deeper into the material, making it more challenging to lift. By tackling the stain as soon as possible, you increase your chances of successful removal.
Identifying The Type Of Stain And Surface
Before attempting to remove a stain, it is important to identify both the type of stain and the surface it has adhered to. Different stains require different removal methods, and using the wrong approach can worsen the situation. Additionally, certain surfaces may be more sensitive to certain cleaning agents or techniques, so it is vital to consider these factors before proceeding.
General Principles For Stain Removal
While the specific methods for stain removal will vary depending on the type of stain and surface, there are some general principles that can guide your approach.
- Blot, don’t rub: When removing a stain, it is important to blot the affected area rather than rubbing it. Rubbing can spread the stain and push it deeper into the material.
- Test on an inconspicuous area: Before applying any cleaning agent or solution, it is advisable to test it on a small, inconspicuous area of the surface to ensure it does not cause any damage or discoloration.
- Work from the outside in: When treating a stain, start from the outer edges and gradually work your way towards the center. This helps prevent the stain from spreading further.
- Follow the manufacturer’s instructions: If you are using a specific stain removal product, make sure to carefully read and follow the instructions provided by the manufacturer.
- Repeat if necessary: Stubborn stains may require multiple attempts for complete removal. If the stain persists after the initial treatment, repeat the process or consider seeking professional help.
By keeping these general principles in mind, you can increase your chances of effectively removing excess stain that has dried. Remember to act promptly, identify the stain and surface, and follow appropriate stain removal techniques for the best results.
Getting Ready To Remove Excess Stain
Before you jump into removing excess stain that has dried, it’s essential to prepare yourself and gather the necessary materials and tools. Taking a few safety precautions and wearing personal protective equipment will help ensure that you can tackle the task efficiently and protect yourself from any potential harm.
Safety Precautions And Personal Protective Equipment
When dealing with stain removal, it’s crucial to prioritize safety. Here are some safety precautions to consider:
- 1. Ventilation: Make sure you are in a well-ventilated area to avoid inhaling any harmful fumes.
- 2. Gloves: Wear chemical-resistant gloves to protect your hands from direct contact with the stain and any harsh chemicals you may use.
- 3. Eye Protection: Safeguard your eyes by wearing safety goggles or glasses to prevent any splashes or spills from getting into your eyes.
- 4. Clothing: Wear old or protective clothing that you don’t mind getting stained. Avoid wearing loose-fitting clothes that can easily catch onto objects.
Gathering Required Materials And Tools
Having the right materials and tools on hand will make the stain removal process more efficient. Here’s what you’ll need:
Materials:
- 1. Absorbent Material: Grab some paper towels, old rags, or absorbent pads that you can use to blot and absorb excess stain.
- 2. Stain Remover: Depending on the type of stain, you may need a specific stain remover. Check the product label for compatibility with your stained surface.
- 3. Warm Water: Prepare a bucket or basin of warm water to dilute the stain and aid in the removal process.
Tools:
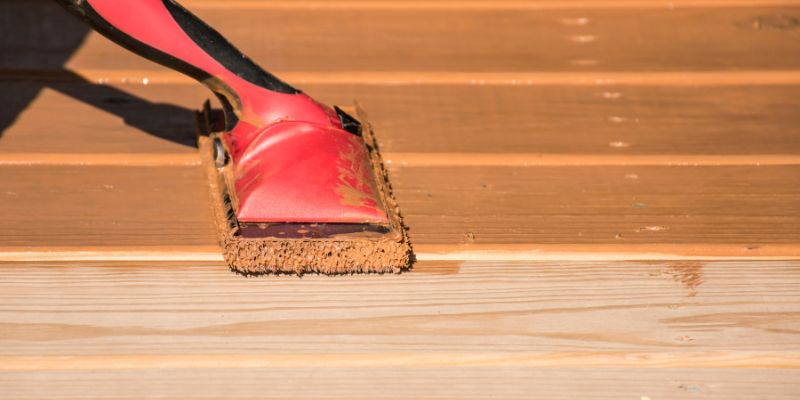
- 1. Scraper: A plastic or wooden scraper can help you gently scrape off any excess dried stain without damaging the surface underneath.
- 2. Soft Brush: A soft-bristled brush can be useful for loosening the dried stain particles, making it easier to remove.
- 3. Clean Cloth: Keep a clean cloth handy for wiping and drying the surface after removing the excess stain.
By taking the time to ensure you have all the necessary materials and tools, and by following safety precautions, you will be well-prepared to tackle the task of removing excess stain that has dried. Follow the subsequent steps diligently to achieve the best results. Remember, patience and care are key when dealing with a stain removal process!
Prep Work Before Tackling Dried Stain
When it comes to removing excess stain that has dried, proper preparation is key to achieving successful results. Before jumping into the stain removal process, it’s important to carefully assess the situation and take a few necessary steps. By following the right prep work, you can ensure that your efforts to remove the dried stain will be effective and efficient.
Cleaning Surrounding Area
Before you begin tackling the dried stain itself, it’s essential to clean the surrounding area. This is particularly important if the stain is located on a porous or delicate material that may be affected by any cleaning solutions you use. By cleaning the surrounding area, you can prevent any additional damage or discoloration.
- Carefully wipe away any dust or debris that may have accumulated on the surface.
- Gently clean the area using a mild soap or detergent solution mixed with warm water.
- Rinse the area thoroughly with clean water and pat it dry using a soft cloth or paper towel.
Assessing The Extent Of Staining
Once the surrounding area is clean, it’s time to assess the extent of the staining caused by the excess dried stain. This step is crucial in determining the appropriate approach for removing the stain, as different types of stains may require different methods.
- Inspect the stained area closely, taking note of the size and severity of the stain.
- Determine the type of stain you are dealing with (e.g., oil-based, water-based, etc.). This information will help you choose the most suitable removal method.
- Consider the material that the stain has adhered to, as certain cleaning solutions or techniques may be more effective on specific materials.
Pre-treatment Considerations For Dried Stains
Before you begin the actual stain removal process, there are a few pre-treatment considerations you should keep in mind. These steps are designed to optimize your chances of successfully removing the dried stain:
- Read the manufacturer’s instructions on any cleaning solutions you plan to use to ensure they are safe to use on the stained material.
- Perform a spot test in an inconspicuous area to make sure the cleaning solution doesn’t cause any adverse reactions or damage to the material.
- If the stain has penetrated deeply into the material, you may need to consider more aggressive techniques or commercial stain removers specifically designed for dried stains.
- Equip yourself with the necessary tools, such as gloves, protective eyewear, and suitable cleaning solutions.
By following these pre-treatment considerations, you can increase the chances of effectively removing the dried stain and minimizing any potential damage to the material.
Removing Dried Stain: Expert Tips Illustrated
Removing dried stain from different surfaces can be a daunting task, especially when you’re unsure of the most effective methods to employ. But fear not, as we have compiled a comprehensive guide that features expert tips for removing dried stain from a wide range of surfaces. Whether it’s a coffee spill on your favorite shirt or an ink blot on your wooden desk, follow our step-by-step instructions to tackle the stain with confidence.
Step-by-step Guide For Common Surfaces
When it comes to removing dried stain, different surfaces require different approaches. Here’s a step-by-step guide to help you deal with stains on common surfaces:
1. Fabrics and Clothing
Removing dried stains from fabrics and clothing can be tricky, but with the right method, you can achieve remarkable results. Follow these steps:
- Gently scrape off any excess stain using a spoon or blunt knife. Be careful not to damage the fabric.
- Apply a small amount of stain remover directly to the affected area. Use a laundry detergent or a specific stain-removing product suitable for that fabric type.
- Gently rub the stain remover into the fabric using a soft cloth or sponge. Be sure to work from the outside of the stain towards the center to prevent spreading.
- Allow the stain remover to penetrate the fabric for the recommended amount of time. Check the label for specific instructions.
- Thoroughly rinse the fabric with cold water to remove both the stain and the stain remover.
- If the stain persists, repeat the process or consider seeking professional help.
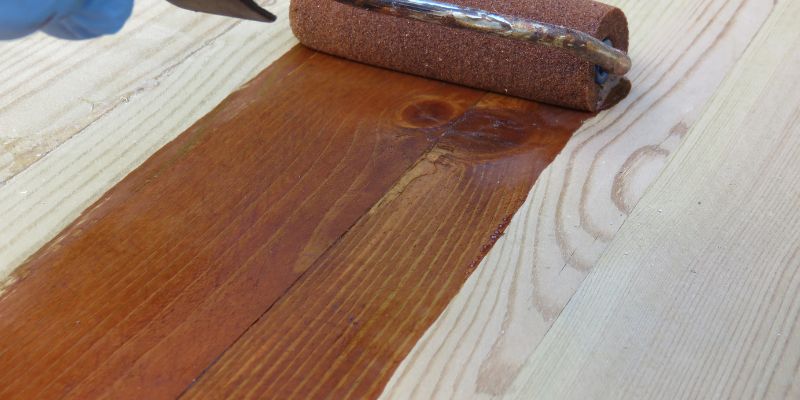
2. Hard Surfaces (Wood, Laminate, Glass, etc.)
Dried stains on hard surfaces can be unsightly, but with the right technique, you can make them disappear. Here’s how:
- Start by wiping the surface clean with a soft cloth or paper towel to remove any loose debris.
- Mix a solution of warm water and mild dish soap in a bucket or spray bottle. Alternatively, you can use a commercial cleaner specifically designed for the type of surface you are working with.
- Dampen a soft cloth or sponge with the cleaning solution and gently rub the stained area, applying slight pressure.
- Rinse the surface with clean water to remove any residue.
- Dry the surface thoroughly with a clean, absorbent cloth.
- If the stain remains, you may need to repeat the process or try using a specialized stain remover for that particular surface.
Homemade Remedies Vs. Commercial Solutions
When it comes to removing dried stains, you may be wondering whether homemade remedies or commercial solutions are more effective. Both options have their pros and cons, so here’s what you need to consider:
Homemade Remedies
Homemade remedies can be cost-effective and eco-friendly alternatives to commercial products. They often utilize common household ingredients such as baking soda, vinegar, or lemon juice. While these remedies can work wonders for certain types of stains, keep in mind that they may not be as potent as specialized commercial solutions. Additionally, homemade remedies can vary in effectiveness depending on the specific stain, material, and surface.
Commercial Solutions
Commercial stain removers are specifically formulated to tackle different types of stains and surfaces. They are generally more powerful and efficient in removing dried stains promptly. Make sure to check the instructions and warnings on the packaging to ensure compatibility with the stained material. However, commercial solutions can be pricier than homemade remedies and might contain harsh chemicals, so be sure to use them according to the manufacturer’s guidelines.
Special Considerations For Delicate Materials
Delicate materials require extra caution when removing dried stains to avoid causing damage. Whether it’s silk, suede, or antique furniture, follow these special considerations:
- Always perform a spot test on an inconspicuous area to ensure the stain remover won’t have adverse effects on the material.
- Use minimal amounts of stain remover and gently dab or blot the stain rather than rubbing aggressively.
- Consider seeking professional advice or hiring a professional cleaner who specializes in delicate materials if you are unsure about the correct method.
By following these expert tips and techniques, you can confidently tackle dried stains on various surfaces and restore their original appearance. Remember to choose the method and product that best suits the stain, surface, and your comfort level. With a bit of patience and care, those pesky stains will be a thing of the past.
Techniques For Stubborn Stain Challenges
Removing excess stain that has dried can be a challenging task. However, with the right techniques, you can tackle even the most stubborn stains and restore the original look of your surfaces. In this section, we will explore three effective methods for removing dried excess stain: heat application, solvent-based removal, and mechanical removal.
Heat Application Methods
Applying heat to the dried stain is a tried and tested method that can help loosen and remove stubborn stains. Here are a few heat application techniques you can try:
- Hairdryer: Use a hairdryer to blow hot air directly onto the stained area. The heat will soften the dried stain, making it easier to wipe away. Keep the hairdryer at a safe distance to avoid any damage to the surface.
- Hot Water: Pour hot water over the stain and let it soak for a few minutes. The heat will penetrate the stain, loosening its grip. Afterward, use a cloth or sponge to wipe away the excess stain gently.
- Heat Gun: A heat gun can be an effective tool for tackling tough, dried stains. Similar to a hairdryer, a heat gun emits hot air but at a higher temperature. Be cautious when using a heat gun and keep it moving to prevent any scorching or damage to the surface.
Solvent-based Removal Strategies
When heat alone doesn’t do the trick, solvent-based removal strategies can come to your rescue. These techniques involve using solvents to dissolve the dried stain. Here are a few solvent-based methods you can consider:
- Mineral Spirits: Apply a small amount of mineral spirits to a clean cloth and gently dab the stain. The solvent will break down the stain, allowing you to wipe it away. Remember to wear protective gloves and work in a well-ventilated area when using solvents.
- Acetone: Acetone is another powerful solvent that can be effective in removing dried stains. Apply a small amount to a cloth and gently rub the stain in a circular motion. Be cautious when using acetone, as it may damage certain surfaces. Test it on a small, hidden area first.
- Denatured Alcohol: Similar to mineral spirits and acetone, denatured alcohol can also be used to dissolve and remove dried stains. Apply a small amount to a cloth and blot the stain until it disappears. Test the alcohol on an inconspicuous area beforehand.
Mechanical Removal Techniques
If the stain still persists after attempting heat application and solvent-based removal, mechanical removal techniques can be your last resort. These methods involve using physical force to scrape or scrub away the dried stain. Here are a few mechanical removal techniques to consider:
- Scraper: Use a scraper with a sharp blade to gently scrape away the dried stain. Be careful not to apply too much pressure, as you may scratch the surface. Start with light strokes and gradually increase the pressure if needed.
- Scrub Brush: A stiff-bristled scrub brush can be effective for removing dried stains, especially on textured surfaces. Apply a mild soap or stain remover to the brush and scrub the stain in a circular motion. Rinse the surface thoroughly afterward.
- Sanding: If the stain is particularly stubborn and has penetrated the surface, sanding may be required. Use fine-grit sandpaper to gently sand away the dried stain, making sure to follow the grain of the wood or the direction of the surface texture.
By following these techniques for stubborn stain challenges, you can effectively remove dried excess stain and restore the original beauty of your surfaces. Whether you opt for heat application, solvent-based removal, or mechanical techniques, always exercise caution and test any method or product on a small, inconspicuous area before applying it to the entire stained surface.
How To Easily Remove Excess Stain That Has Dried
Dealing with excess stain that has dried can be a frustrating task. However, with the right techniques and tools, you can easily remove the stubborn stain from various surfaces. In this section, we will discuss effective methods to remove excess stain that has dried, along with tips for preventing stain setting and advice on maintaining surface integrity.
Tips For Preventing Stain Setting
To prevent excess stain from setting and drying, it’s important to take some precautions during the staining process. Follow these tips:
- Prepare the surface properly before applying the stain, ensuring it is clean and free from dust, dirt, and any previous coatings.
- Apply a thin and even layer of stain to minimize the chance of excess pooling or dripping.
- Use the appropriate tools, such as a brush or sponge, to ensure proper application and control over the amount of stain being used.
- Work in smaller sections, focusing on one area at a time, to prevent the stain from drying too quickly before you have a chance to remove any excess.
- If using a penetrating stain, wipe off any excess within the recommended time frame provided by the manufacturer.
Advice On Maintaining Surface Integrity
While removing excess dried stain, it’s crucial to consider the surface integrity and prevent any damage. Here are some important suggestions:
| Surface Type | Recommended Tools |
|---|---|
| Wood | Gentle scrub brush, fine-grit sandpaper |
| Metal | Soft cloth, metal cleaner |
| Concrete | Stiff nylon brush, concrete cleaner |
| Brick or Stone | Stiff bristle brush, masonry cleaner |
Always test any cleaning solution on a small, inconspicuous area before using it on the entire surface. This ensures that the solution does not cause any damage or discoloration.
Final Touches And Surface Conditioning After Stain Removal
Once you have successfully removed the excess dried stain, it’s essential to complete the process by giving the surface some final touches and conditioning. Follow these steps:
- Thoroughly clean the area with a mild cleaning solution and water to remove any residue from the stain removal process.
- Use fine-grit sandpaper or a soft cloth to smooth out the surface, ensuring it is even and free from any rough spots.
- Apply a sealer or protective coating to enhance the longevity of the surface and prevent future stains from penetrating deeply.
- Regularly maintain and clean the surface according to the manufacturer’s instructions to preserve its appearance and integrity.
By following these steps, you can easily remove excess stain that has dried and restore the beauty of your surfaces without causing any damage or compromising their quality.
Preserving Your Surfaces Post-stain Removal
Removing excess stain that has dried from your surfaces can be a challenging task, but the effort is well worth it to maintain the beauty of your furniture, floors, or any other stained objects. However, removing the stain is just one part of the process. To ensure that your surfaces stay in great condition and are protected from future spills and stains, follow these tips for regular cleaning and maintenance, spot treatment, and applying protective coatings and sealants.
Regular Cleaning And Maintenance Tips
Regular cleaning and maintenance play a crucial role in preserving the condition of your surfaces after removing dried stains. Here are some practical tips to keep in mind:
- Wipe your stained surfaces regularly with a soft, lint-free cloth to remove any dust or dirt that may accumulate.
- Avoid using abrasive cleaners or harsh chemicals as they can damage the surface or strip away protective coatings.
- Use a gentle cleaning solution specifically formulated for the material of your surfaces. Confirm the suitability of the cleaning product by referring to the manufacturer’s recommendations.
- For wooden surfaces, consider applying a furniture polish or wax periodically to keep them moisturized and protected from scratches.
- Prevent direct exposure to sunlight, as prolonged UV exposure can cause discoloration and damage to the stained surfaces.
Spot Treatment For Future Spills
Despite our best efforts, accidents happen. To tackle future spills and stains effectively, try the following spot treatment tips:
- Act quickly and blot any spills with a clean cloth or paper towel to remove excess liquid.
- Avoid rubbing the stain, as it may spread and become more difficult to remove.
- Gently clean the affected area using a mild detergent or stain remover that is appropriate for the type of stain and surface.
- Rinse the area thoroughly with clean water and blot dry.
- If the stain persists, repeat the process or consult a professional cleaner for further assistance.
Protective Coatings And Sealants
Applying protective coatings and sealants can significantly enhance the longevity and durability of your stained surfaces. Consider the following options:
| Surface type | Recommended product |
|---|---|
| Wood | Clear polyurethane varnish or lacquer |
| Stone | Natural stone sealer |
| Concrete | Epoxy concrete sealer |
| Textiles | Fabric protector spray |
Applying these protective coatings or sealants can create an effective barrier against stains and spills, making it easier to clean and maintain your surfaces in the long run.
Frequently Asked Questions For How To Remove Excess Stain That Has Dried
What Happens If You Put Too Much Stain On Wood?
When too much stain is applied to wood, it can result in a variety of problems. Excess stain can create a blotchy and uneven appearance, make the wood splotchy, and may not fully dry or cure. It can also lead to problems with adhesion and long-term durability of the finish.
What Happens If Stain Is Not Wiped Off?
If a stain is not wiped off, it can set into the material and become more difficult to remove. It may also cause permanent damage or discoloration to the surface.
How Do You Fix Tacky Wood Stain?
To fix tacky wood stain, start by lightly sanding the surface. Wipe away any dust and apply a new thin layer of stain. Ensure proper ventilation and allow it to dry completely. If the issue persists, remove the stain with a chemical stripper and reapply as needed.
How Do You Fix A Bad Stain Job?
To fix a bad stain job, start by sanding down the surface to remove the existing stain. Then, clean the area thoroughly and apply a new coat of stain evenly. Allow it to dry completely before assessing the result. If needed, repeat the process until the desired outcome is achieved.
Conclusion
To effectively remove excess stain that has dried, follow these simple yet effective techniques. First, gently scrape off any loose stain with a plastic scraper or putty knife. Next, apply a solvent such as mineral spirits or acetone to dissolve the dried stain.
Finally, use a soft cloth or brush to scrub away any remaining residue. Remember to always test the solvent on a small, inconspicuous area before applying it to the entire stain. By using these methods, you can easily restore your surface to its original beauty.