How to Paint Bare Metal (Without It Rusting or Peeling Later)
To paint bare metal so it doesn’t rust or peel, clean off all dirt/grease/rust, then prime with the type of primer that actually matches your metal – a rust-inhibiting primer (zinc phosphate or epoxy) for ferrous metals like steel and iron, or a self-etching primer for non-ferrous metals like aluminum and galvanized steel. Using the wrong primer type is the single most common reason a bare-metal paint job fails within months.
Ferrous vs. Non-Ferrous Metal: Use the Right Primer
Best Self-Etching Primer Pick
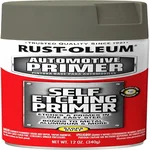 |
Rust-Oleum Automotive Self-Etching Primer – $7.47 Etches and primes non-ferrous metal (aluminum, galvanized steel) in one coat – the step a plain rust-inhibiting primer skips.
|
Most bare-metal paint guides treat “primer” as one product, but the metal underneath actually determines which type will hold. Here’s the distinction that matters:
- Ferrous metal (steel, iron, cast iron): Contains iron, so it rusts. Use a rust-inhibiting primer – zinc phosphate or iron oxide – formulated to block corrosion at the metal surface.
- Non-ferrous metal (aluminum, galvanized steel, brass, copper): Doesn’t rust the same way, but standard primers struggle to bond to its naturally smooth, oxide-coated surface. A self-etching primer uses a mild acid to bite into that surface so the primer – and everything on top of it – actually sticks.
Using a plain rust-inhibiting primer on aluminum or galvanized metal is a common reason paint peels off in sheets within a season – the primer never mechanically bonded to the surface in the first place.
Surface Preparation
Prepare the surface before painting bare metal with proper cleaning, sanding, and priming. This ensures a smooth, durable finish that will last.
Cleaning the Metal Surface Thoroughly
Cleaning the metal surface thoroughly is the first crucial step. Before painting, remove any dirt, oil, rust, or other contaminants that would prevent the paint from adhering properly, using a mild detergent and water. For tougher grease, an automotive solvent or degreaser works better. Make sure every surface is completely clean and dry before moving on.
Sanding and Smoothing Imperfections
Sand the entire metal surface to remove rough spots, bumps, or loose rust – this is what actually gives the primer something to grip. Start with a coarser grit and move to a finer grit for a smooth surface, wearing safety goggles and a dust mask to keep metal particles out of your eyes and lungs.
Priming the Surface
Priming is the step that separates a paint job that lasts years from one that fails in months. The primer acts as a protective layer, blocking corrosion and giving the topcoat a surface it can actually bond to. See the ferrous/non-ferrous section above to pick the right type, then follow these steps:
- Clean the surface again immediately before priming – sanding dust left behind will get trapped under the primer.
- Match the primer to the metal – rust-inhibiting for ferrous, self-etching for non-ferrous.
- Apply thin, even coats, letting each one flash off before the next.
- Let it fully cure per the can’s instructions (typically 24 hours) before applying the topcoat.
Paint Application
Once the primer has cured, the paint application step is what determines the final look. A spray paint finish, a brush, or a roller can all work – the tool matters less than technique.
Choosing the Right Tools
- Spray gun or aerosol spray can – best for even coverage on detailed or curved surfaces
- Paintbrush with synthetic bristles – best for touch-ups and edges
- Microfiber roller – best for large, flat panels
Getting a Smooth Finish
- Hold spray cans 8–12 inches from the surface, moving steadily – stopping over one spot causes drips.
- Apply 2–3 thin coats rather than one heavy coat.
- Use even, overlapping strokes for consistent coverage.
- Let each coat flash off (usually 10–15 minutes) before the next.
Drying and Curing
Proper drying and curing is essential to a durable, rust-resistant finish. Curing and drying aren’t the same thing: paint can feel dry to the touch within an hour, but it may take days to reach full hardness.
Keep the area well-ventilated while drying – poor air circulation causes uneven drying and streaks. Once dry, avoid placing objects on the surface or scrubbing it until it’s fully cured (check the can for the manufacturer’s cure time). To check, press a finger gently on an inconspicuous spot: if it doesn’t leave a mark or feel tacky, it’s cured.
Troubleshooting Common Issues
Even with good prep, a few issues come up often enough to plan for:
Handling Paint Drips and Runs
- Wipe off excess paint immediately with a clean cloth if it’s still wet.
- If it’s already dried, gently sand the drip flat, then feather in a thin fresh coat.
Dealing with Uneven Coverage or Peeling
- Peeling soon after painting almost always traces back to skipping the right primer type – see the ferrous/non-ferrous section above.
- Uneven coverage usually means one heavy coat instead of several thin ones – sand back and reapply in thin layers.
Maintenance and Longevity
Bare metal surfaces stay vulnerable to corrosion at any scratch or chip in the paint, so a little upkeep goes a long way:
- Clean the surface regularly to remove dirt or debris that can trap moisture against the paint.
- A clear protective topcoat adds another layer of defense in high-wear or outdoor spots.
- Inspect for chips or scratches periodically and touch them up promptly – exposed bare metal at a chip will rust and undercut the surrounding paint if left alone.
- For touch-ups, clean the area, prime it with the correct primer type again, and use the same paint to avoid a visible patch.
Frequently Asked Questions About Painting Bare Metal
How do I prepare bare metal for painting?
Clean the surface with a degreaser, sand away rust or loose scale, then prime with a primer matched to the metal type – a rust-inhibiting primer for steel or iron, or a self-etching primer for aluminum or galvanized metal – before applying the topcoat.
What type of paint should I use on bare metal?
A direct-to-metal (DTM) paint or a rust-inhibitive enamel is the safest general choice. Both are formulated to adhere to metal and resist corrosion without needing a separate topcoat.
How can I prevent rust on newly painted metal?
Make sure the surface was thoroughly cleaned and primed with the correct primer type before painting, then apply a quality topcoat. Touching up any chip or scratch promptly, before bare metal is exposed for long, is what actually prevents rust from starting.
Can I paint bare metal without priming first?
Skipping primer is possible with some direct-to-metal paints, but for most projects it isn’t worth the risk – without primer, paint failure and corrosion happen much faster, especially on ferrous metal that’s prone to rust.
Conclusion
A bare-metal paint job that actually lasts comes down to matching the primer to the metal – rust-inhibiting for ferrous, self-etching for non-ferrous – and applying several thin coats instead of rushing one thick one. Skip either of those and even a good topcoat will peel or rust out within a season.
Sponsored / affiliate links. As an Amazon Associate I earn from qualifying purchases. I may earn additional commission from eligible campaigns.