Plans for Bean Bag Toss Board: Build & Play Guide
For the perfect bean bag toss board, consider size, materials, design, and portability. Customizing your board can enhance gameplay and personal style.
Adding scorekeeping features or a unique paint job can make your board stand out. Bean bag toss is a versatile game suitable for all ages, making it a popular choice for social gatherings and events. With the right planning and creativity, you can create a bean bag toss board that is both fun and visually appealing.
Let’s explore some key elements to consider when designing your own bean bag toss board.
Introduction To Bean Bag Toss
Bean bag toss, also known as cornhole or corn toss, is a fun and engaging outdoor game that has been gaining popularity in recent years. Whether you’re planning a backyard barbecue or a tailgate party, bean bag toss is a fantastic addition to any gathering. In this section, we’ll explore the origins of the game and why it has become a beloved pastime for people of all ages.
The Game’s Origin
The game of bean bag toss has a rich history that dates back to ancient civilizations. While its exact origins are debated, it is believed to have originated in Germany in the 14th century, where it was initially played with small bags filled with dried beans. Over time, the game evolved and gained popularity in the United States, especially in the Midwest, where it became a staple at social gatherings and tailgate parties.
Why It’s Popular
Bean bag toss has gained popularity due to its simple rules, accessibility to players of all skill levels, and the ability to be played in various settings. Its straightforward setup and the minimal equipment required make it an ideal game for both casual play and competitive tournaments. Additionally, the game promotes friendly competition and social interaction, making it a favorite choice for families, friends, and event organizers.
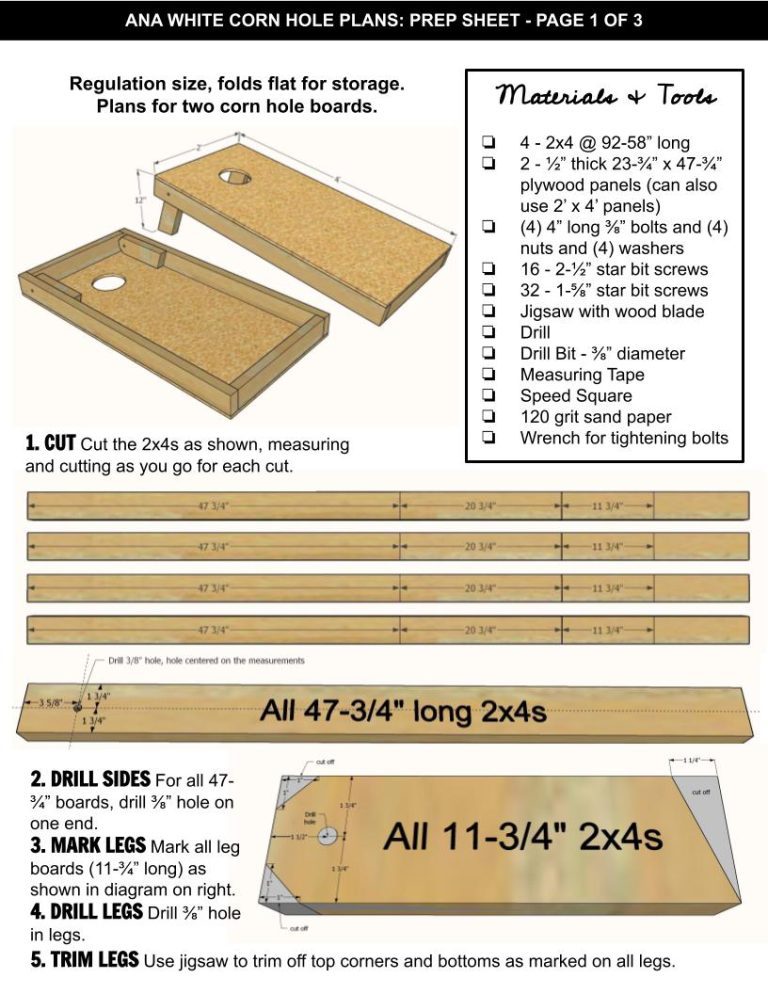
Materials Needed
When building a bean bag toss board, gathering the right materials is essential. Below are the key components required for this fun DIY project.
Choosing The Right Wood
1. Plywood: Sturdy and affordable for the board’s surface.
2. 2×4 boards: Ideal for the frame and legs of the bean bag toss board.
Other Essential Supplies
- Wood glue: Ensures a strong bond between wood pieces.
- Wood screws: Secures the frame and legs in place.
- Sanding paper: Smoothens the surface for a professional finish.
- Paint or stain: Adds color and protection to the board.
- Bean bags: Essential for playing the game.
| Material | Use |
|---|---|
| Plywood | Board surface |
| 2×4 boards | Frame and legs |
| Wood glue | Strong bond |
| Wood screws | Securing |
Designing Your Board
Designing your bean bag toss board is an exciting part of the process. When it comes to creating your board, there are a few key things to consider. From board dimensions to custom designs and themes, every detail matters.
Board Dimensions
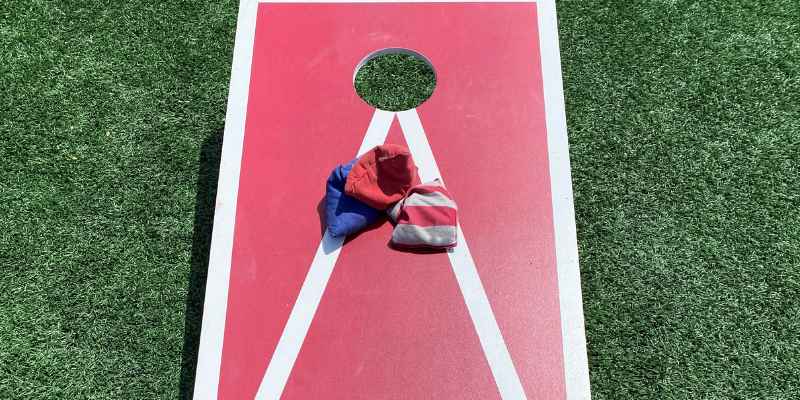
Before you start designing your bean bag toss board, it’s important to determine the dimensions. The standard size for a bean bag toss board is 4 feet by 2 feet, with a hole 6 inches in diameter located 9 inches from the top of the board. However, you can customize the dimensions based on your preferences and available space. Just keep in mind that the boards should be sturdy enough to withstand frequent use and transport.
Custom Designs And Themes
One of the best things about designing your own bean bag toss board is the ability to customize it to your liking. You can choose from a wide range of designs and themes, from classic patterns like stripes and polka dots to sports team logos and movie characters. You can also create your own design using stencils, paint, and other materials. Just be sure to use high-quality materials that will last for many games to come.
When it comes to creating your custom design, there are a few things to keep in mind. First, choose colors that will stand out and be easy to see from a distance. Second, consider the overall aesthetic of your design and how it fits with your personal style. Finally, make sure your design is consistent and well-executed, with clean lines and crisp edges.
Designing your own bean bag toss board is a fun and rewarding experience that allows you to showcase your creativity and personality. By considering the board dimensions and custom designs and themes, you can create a unique and functional board that will provide hours of entertainment for you and your friends.
Cutting And Assembling
When it comes to building a bean bag toss board, the cutting and assembling process is crucial to ensure a sturdy and professional-looking final product. In this section, we will provide a step-by-step cutting guide and walk you through the process of assembling the pieces together to create your bean bag toss board.
Step-by-step Cutting Guide
Before you begin cutting the materials for your bean bag toss board, it’s important to gather all the necessary tools and materials. Here’s a list of what you’ll need:
- Two 2×4 plywood sheets
- Four 2×4 boards
- Tape measure
- Pencil
- Circular saw
- Sandpaper
Once you have all the materials ready, you can start by measuring and marking the plywood sheets according to the dimensions specified in your bean bag toss board plans. Use a circular saw to carefully cut along the marked lines. After cutting the plywood sheets, use sandpaper to smooth out any rough edges.
Assembling Pieces Together
Now that you have the individual pieces cut to size, it’s time to assemble them to create the bean bag toss board. Here’s a simple guide to help you put it all together:
- Begin by laying the plywood sheets on a flat surface, ensuring they are aligned properly.
- Next, attach the 2×4 boards to the edges of the plywood sheets using wood screws, creating a frame around the perimeter of the boards.
- Make sure each corner is securely fastened, and use a level to ensure the boards are flat and even.
- Once the frame is in place, you can add the legs to the back of the board for support, securing them with wood screws.
- Finally, give the entire bean bag toss board a thorough inspection to ensure everything is securely assembled and there are no loose parts.
Painting And Decoration
Learn how to build your own bean bag toss board with these easy-to-follow plans. Add a personal touch to your backyard parties and impress your guests with a custom painted and decorated board. Enjoy hours of fun with family and friends with this DIY project.
When it comes to creating your own bean bag toss board, painting and decoration are key steps to make it visually appealing and personalized. Selecting the right paints and finishes and using decorative techniques can elevate the overall look of your bean bag toss board. In this section, we will explore the different aspects of painting and decoration, including selecting paints and finishes and various decorative techniques you can use to make your board stand out.
Selecting Paints And Finishes
Choosing the right paints and finishes for your bean bag toss board is crucial to ensure its longevity and durability. It’s important to select paints that are suitable for outdoor use, as the board will be exposed to various weather conditions. Acrylic paints are a popular choice for outdoor projects due to their durability and vibrant color options. Make sure to choose finishes that provide protection against UV rays and moisture to prevent the paint from fading or peeling over time.
Decorative Techniques
Decorating your bean bag toss board can be a fun and creative process. There are various techniques you can use to add unique designs and patterns to your board. Here are some decorative techniques you can consider:
- Stencil painting: Use stencils to create intricate designs or patterns on your board. This technique allows for precise and consistent results.
- Freehand painting: Let your creativity flow and paint designs or images directly onto the board without the use of stencils. This technique gives you more freedom to create custom designs.
- Decoupage: Add a touch of personality to your board by decoupaging images or decorative paper onto the surface. This technique allows for endless possibilities and can create a visually striking effect.
- Color blocking: Create a modern and bold look by painting different sections of the board in contrasting colors. This technique adds visual interest and can make your board stand out.
Remember to use masking tape or painter’s tape to create clean lines and prevent any paint bleeding. After applying the decorative techniques, consider adding a clear coat or sealant to protect the design and ensure its longevity.
By carefully selecting paints and finishes and using various decorative techniques, you can transform your bean bag toss board into a visually appealing and personalized piece of outdoor entertainment. Let your imagination run wild and create a board that reflects your unique style and personality.
Note: This response is written in HTML format suitable for WordPress.
Creating The Bean Bags
Bean bag toss is a fun game that can be enjoyed by all ages. The game involves throwing bean bags onto a board with a hole in it. To play the game, you will need to create your own bean bags. Here’s a guide on how to create your own bean bags that will be perfect for your game:
Materials For Bean Bags
Before you start sewing your bean bags, you will need to gather the materials you will need. Here are the materials:
| Materials | Quantity |
|---|---|
| Duck cloth fabric | 2 pieces (6 inches x 6 inches) |
| Thread | 1 spool |
| Rice or beans | 1 pound |
| Scissors | 1 pair |
| Measuring tape or ruler | 1 |
| Sewing machine or needle | 1 |
Sewing Your Bean Bags
Once you have gathered all the materials, you can start sewing your bean bags. Here is how to sew your bean bags:
- Cut two pieces of duck cloth fabric into 6-inch squares.
- Place the two pieces of fabric together, with the right sides facing each other.
- Sew around the edges of the fabric, leaving a small opening.
- Turn the fabric right side out through the small opening.
- Fill the bag with rice or beans, leaving some space at the top.
- Sew the small opening of the bag shut.
- Repeat the process to create more bean bags.
Now that you have created your own bean bags, you can start playing bean bag toss. Have fun!
Setting Up The Game
Bean bag toss board game is a fun activity suitable for all ages. Setting up the game is quick and easy, making it perfect for backyard parties or casual gatherings. Here’s how you can get started:
Rules Of The Game
- Players take turns tossing bean bags at the target.
- Scoring is based on where the bean bag lands on the board.
- The player or team with the most points wins the game.
Adjusting For Different Skill Levels
- For beginners, reduce the throwing distance to make it easier.
- Advanced players can increase the distance for a more challenging game.
- Encourage friendly competition by adapting the game to suit everyone’s skill level.
Maintenance And Care
Proper maintenance and care of your bean bag toss board are essential to ensure its longevity and optimal performance. By following these simple tips, you can keep your board in top condition for years to come.
Cleaning Your Board And Bags
- Use a damp cloth to wipe down the board after each use.
- Regularly inspect the bags for wear and tear.
- For deep cleaning, use mild soap and water on the board.
Storage Tips
- Store the board and bags in a dry place away from direct sunlight.
- Consider covering the board to protect it from dust and debris.
- Store bags in a cool, dry place to prevent mold or mildew.

Frequently Asked Questions
How Do I Build A Bean Bag Toss Board?
Building a bean bag toss board is easy! Start by cutting a plywood sheet to the desired size, then create a hole in the center of each board. Next, paint the boards with your desired design and attach legs for stability.
Finally, grab some bean bags and get ready to play!
What Materials Do I Need To Make A Bean Bag Toss Board?
To make a bean bag toss board, you’ll need a few materials. These include a plywood sheet, a saw, sandpaper, paint or stain, screws or nails, a drill, and bean bags. Make sure to gather all the necessary materials before starting your project.
Can I Customize The Design Of My Bean Bag Toss Board?
Absolutely! Customizing the design of your bean bag toss board is a fun way to add a personal touch. You can paint the boards with your favorite colors, create unique patterns, or even add decals or stickers. Get creative and make your bean bag toss board one-of-a-kind!
What Are The Standard Dimensions For A Bean Bag Toss Board?
The standard dimensions for a bean bag toss board are 2 feet by 4 feet. This size is commonly used in official tournaments and provides a good balance between portability and gameplay. However, you can adjust the dimensions according to your preferences and available space.
Conclusion
Incorporating a bean bag toss board into your outdoor plans can provide hours of entertainment. Whether you’re a DIY enthusiast or looking for a fun project, building your own board allows for customization and creativity. With the right materials and a little effort, you can enjoy this classic game with family and friends.